Classe Audio SSP-60 User manual
- Category
- Audio amplifiers
- Type
- User manual

1
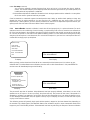
OWNER’S MANUAL
SSP-60
Pre-amplifier/Surround
Sound Processor

2
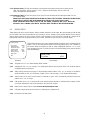
IMPORTANT: SAFETY INFORMATION
CAUTION: PLEASE READ AND OBSERVE ALL WARNINGS AND INSTRUCTIONS IN THIS OWNER’S MANUAL AND
ALL THOSE MARKED ON THE UNIT. RETAIN THIS OWNER’S MANUAL FOR FUTURE REFERENCE.
1) Do not attempt to service the SSP-60 yourself. Do not open the SSP-60 for any reason, there are no user
serviceable parts inside. An open unit, particularly if it is still connected to an AC source, presents a
potentially lethal shock hazard. Refer all questions to authorized service personnel only.
2) To prevent fire or shock hazard, do not expose the SSP-60 to water or moisture. If a liquid does enter your
SSP-60 take it to your Classé dealer for a thorough check-up.
3) Do not place the SSP-60 close to any heat-producing device such as your audio amplifier, radiator, stove,
etc., and keep it away from direct sunlight.
4) Connect the SSP-60 only to an AC source of the proper voltage. The shipping container and the rear panel
serial number tag will stipulate the proper voltage. Use of any other voltage will almost certainly damage the
unit and will void the warranty.
5) AC cords should be routed so that they are not likely to be walked on or pinched by items placed upon or
against them. Do not stress the AC cord by stretching to a plug. If damage does occur to the AC cord, take it
to your Classé dealer for a thorough check-up and proper repair.
6) If the SSP-60 will be out of use for an extended period of time (vacation, etc.), you may wish to unplug the
power cord from the AC source to prevent any chance of problems from a voltage surge or lightning strike.
CE Notice
All of us at Classé take extreme care to insure that your purchase will remain a prized investment. We are proud to
inform you that all Classé Audio components have been officially approved for the European Community (CE) mark
under CE Certificate Number C401CLA1.MGS granted on 18 July, 1996.
This means that your Classé product was subjected to the most rigorous manufacturing and safety tests in the world.
The CE mark certifies that your purchase meets or exceeds all European Community requirements for unit-to-unit
consistency and consumer safety.
Manufactured under license under one or more of the following patents: U.S. number 3,959,950, Canadian numbers
1,004,603 and 1,037,877.
Manufactured under license from Lucasfilm Ltd. U.S. patent numbers 5,043,970; 5,189,703; and 5,222,059.
European patent 0 323 830. Other patents pending.
THX® is a registered trademark of Lucasfilm Ltd.
Manufactured under license from Digital Theater Systems, Inc.
“DTS”, “DTS-ES Extended Surround” and “Neo:6” are trademarks of Digital Theater Systems, Inc.
Manufactured under license from Dolby Laboratories.
“Dolby”, “Pro Logic”, and the double-D symbol are trademarks of Dolby Laboratories.

3
Thank You From Everyone At Classé
Thank you for purchasing the Classé Audio SSP-60 Preamplifier/Surround Sound Processor.
We take great pride in offering components that combine exceptional sonic performance and long-term reliability. To do
that, we have invested in extraordinary design and manufacturing facilities. We trust that you will enjoy your purchase for
many years to come.
Classé Design Philosophy
All of our components benefit from the same rigorous design goal: All Classé products must reproduce music with the
harmonic and spatial integrity typical of fine instruments as heard in a live performance or in the recording studio.
Single Circuit Design
To this end, we make extensive use of carefully optimized versions of the same basic circuit precisely matched to specific
power requirements. This means that all Classé line level components and power amplifiers benefit from years of
refinement. However, our efforts do not stop here.
Listening: The Critical Design Element
Once we determine general circuit values for a particular application, we listen carefully while exchanging and mixing
different parts (transistors, capacitors, wiring, PC boards, etc.) and adjusting specific operating voltages within proper
engineering ranges.
Extended Real-World Lifespan
Every Classé component, even the most affordable, benefits from our painstaking approach to design parameters. The
result is an optimum balance between the often-conflicting demands of exceptional performance and long-term reliability.
Our most expensive components gain from even tighter tolerance parts and highly segmented and exceptionally robust
power supplies with large reserve-current capabilities.
Our Pride in Manufacturing, Your Pride in Ownership
We build all of our components to the highest possible standards. From multi-layer glass-epoxy circuit boards, the full
sized power-supplies, and the massive faceplates, every Classé product is a tribute to both the science and art of sound
reproduction. We hope that you derive as much pleasure and satisfaction from using your Classé unit as we did in
producing it.

4
The Classé SSP-60 Preamplifier/Surround Sound Processor is a beautiful sounding high-end two-
channel Preamplifier which also performs the complex task of decoding and processing multi channel
Surround Sound , while remaining simple and intuitive enough for anyone to use. The SSP-60 is the high
quality center of any audio and home theater installation. It will sound and work best in your system
when used with other high end products, such as those from Classé. Classé has a powerful selection of
single, dual and multi channel power amplifiers, and also builds wonderful CD, DVD and SACD players.
This owner’s manual will make it possible for you to set up the SSP-60 and begin using it only a
short period of time after you take it out of the box. Section 1 quickly details getting it out of the box and
suggests a few precautions. Section 2 explains how to plug in all the wires from all the associated
equipment. Sections 3, 4, 5, and 6 include instructions on setting up and using the SSP-60’s stereo and
surround sound capabilities correctly.
The most difficult part of the set-up will be attaching all the wires. Classé recommends labeling
each and every input or output wire in your system, including the AC cables. When you’ve done this you
will know what equipment is connected at each end. Labeling is a simple task which takes a few extra
minutes, but which can save hours of effort if you ever want to change anything, even a single cable or
wire.
It is also a good idea to make a chart of all the associated equipment and how you want to attach
everything together. Even a simple penciled flow chart will make your tasks go faster with fewer hookup
errors. You can keep the chart for later reference when you want to add to or subtract equipment from
the system.

5
Contents
IMPORTANT: SAFETY INFORMATION ...................................................................................................................2
CE NOTICE ...................................................................................................................................................2
THANK YOU FROM EVERYONE AT CLASSÉ............................................................................................................3
CLASSÉ DESIGN PHILOSOPHY...............................................................................................................................3
SECTION 1.0 - GETTING STARTED.........................................................................................................................6
1.1 UNPACKING THE SSP-60..............................................................................................................6
1.2 OPTIMAL PLACEMENT AND INSTALLATION NOTES........................................................................6
1.3 VENTILATION...............................................................................................................................6
A FEW NOTES ABOUT THE SSP-60 AND THE SET-UP...............................................................................................7
SECTION 2.0 - CONNECTING THE SSP-60.............................................................................................................9
SECTION 3.0 - FRONT PANEL CONTROLS ...........................................................................................................11
SECTION 4.0 - THE SSP-60 REMOTE CONTROL ...................................................................................................12
SSP-60 MENU FLOW CHART................................................................................................................................15
SECTION 5.0 - SETTING UP THE SSP-60...............................................................................................................16
5.1 AUDIO SETUP:...........................................................................................................................17
5.2 SPEAKER SETUP:.........................................................................................................................18
5.3 SOURCE SETUP:.........................................................................................................................22
5.4 DISPLAY SETUP:..........................................................................................................................23
5.5 TRIGGER SETUP:........................................................................................................................24
5.6 THX AUDIO SETUP .....................................................................................................................25
SECTION 6.0 – USING THE TAPE INPUTS AND OUTPUTS......................................................................................26
6.1 RECORDING AUDIO/VIDEO, ANALOG.......................................................................................26
6.2 RECORDING ANALOG AUDIO ONLY..........................................................................................27
6.3 RECORDING DIGITAL AUDIO/VIDEO..........................................................................................27
6.4 RECORDING DIGITAL AUDIO ONLY ...........................................................................................27
SECTION 7.0 - REMOTE ZONE USE.....................................................................................................................28
APPENDIX A RC5 CODES FOR CLASSÉ SSP-60...............................................................................................29
APPENDIX B SSP-60 MODE CHART................................................................................................................30
APPENDIX C SSP-60 MODE DESCRIPTIONS....................................................................................................32
APPENDIX D SSP-60 THX MODE CHART.........................................................................................................33
SSP-60 SPECIFICATIONS......................................................................................................................................34

6
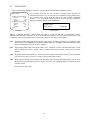
Section 1.0 - Getting Started
1.1 Unpacking the SSP-60
Your Classé SSP-60 is packed in high-density foam inside a special cardboard container. Take the unit out
of the heavy plastic bag and place the SSP-60 on a sturdy surface. Carefully inspect it and report any
concealed damage to your dealer immediately.
In addition, look for the following accessories:
1) The Owner’s Manual (This one)
2) One detachable AC power cord.
3) One remote control handset (with two AAA batteries).
4) One calibration microphone with battery and cable.
We strongly recommend that you save the shipping carton and foam inserts. The REQUIRED Replacements
are expensive to purchase. The packaging was designed to protect the SSP-60 under almost all circumstances
and will be very useful in protecting the valuable electronic instrument if you move or need to ship the unit for
any reason.
1.2 Optimal Placement and installation notes
Please pay careful attention to the safety information at the beginning of this manual (Page 2).
Take care when choosing the location for the SSP-60. Stable, high-strength shelving or equipment racks
specifically designed for audio/video components are best.
Place the SSP-60 close enough to other components to allow convenient connection. This is especially true
for source components where shorter cable runs are best. However, we do not recommend stacking the SSP-
60 with other components, especially tuners, as they may be affected by radio-frequency emissions from the
SSP-60’s microprocessor.
Allow at least four inches of free space behind the SSP-60 to accommodate interconnect cables, power cords,
etc. Four inches of unobstructed free space above the SSP-60’s chassis cover will allow sufficient air
circulation to dissipate the small amount of heat.
Isolate power amplifiers as much as possible from the SSP-60 to avoid stray magnetic fields, often generated
by their large power supply transformers, as well as the heat normally produced by these units. The SSP-60’s
high current output stage is virtually immune to problems sometimes encountered when the power amplifiers
are far away at the end of long cable runs.
Do not place the SSP-60 on a rug or other soft surface into which it could sink. Do not place another unit on
top of the SSP-60. Do not place the SSP-60 on top of a unit that generates heat.
1.3 Ventilation
CAUTION: Ventilation is very important. We do not recommend attempting to operate the SSP-60 if the
ambient temperature exceeds 40°C (100°F). There are components inside which produce heat. If there is
insufficient ventilation around the chassis the processors will overheat and may act erratically until allowed to
cool. Any cabinet should have adequate airflow to allow warm air to leave and cooler room air to enter.
Positive ventilation is required in some installations due to the heat generated by the associated electronics.

7
A few notes about the SSP-60 and the Set-up
The SSP-60 offers Dolby Digital EX
©
, DTS-ES Matrix
©
Dolby Pro Logic II
©
and THX ULTRA2
©
decoding and has several
modes that may be used to enhance a normal stereo signal. It also functions as a high quality stereo preamplifier. The 7.1
channel input is equipped with comprehensive volume control facilities and ensures that the SSP-60 may remain
compatible with new multi-channel formats as they appear.
The SSP-60 accepts up to seven digital input sources, ten line-level input sources, one balanced analog input plus a tape
loop and two additional record outputs. It has six composite and S-Video inputs, three component video inputs,
composite, S-Video and component monitor outputs, composite and S-video record outputs and an S-Video monitor
output without On Screen Display (OSD) for highest quality video performance.
The SSP-60 has two main modes of operation. In the normal operation mode the SSP-60 automatically senses the type of
the incoming signal and selects the best mode for that signal. The user can over-ride the automatic selection and select
different post-processing modes for the incoming signals. These modes include a mono down-mix, stereo, Stereo96,
Dolby Pro Logic, Dolby Pro Logic II (Movie), Neo6 Cinema and four Music modes: Natural, Party, PLII Music, Neo6:
Music. The user can bypass the digital section of the SSP-60, if desired, and connect, for example, a high quality stereo
source to the Left and Right channels of the 7.1 channel input.
The SSP-60 is supplied with a comprehensive infrared (IR) remote control.
Options for system integration are provided by RC5 jacks to interface with other Classé products, by the three 12VDC
trigger outputs to control external equipment and by communication with a PC or home automation system via the RS 232
interface.
The SSP-60 has a complete and well-thought-out panel of connections that can accommodate a complex audio and
theater system.

8
SSP-60 REAR PANEL

9
Section 2.0 - Connecting the SSP-60
Use the diagram on the previous page to follow the discussion regarding input and output connections.
SAFETY NOTE: Before you begin work we very strongly advise that all electronic equipment be unplugged from the AC
outlets or be switched off with the AC switch (NOT in Standby). Failure to follow the above advice can result in damage to
speakers and to electronics and perhaps to you.
RCA-style cables should be rotated (twisted) slightly as you insert them into (or remove them from) the SSP-60’s jacks.
2.1 VIDEO INPUTS: There are fifteen Video Inputs (3 Component, 6 S-Video and 6 Composite). The S-Video and
Composite video inputs are assigned to the like numbered analog (AV) audio inputs: VID1 is associated with AV1,
VID2 with AV2, etc.
2.1.1 DIGITAL INPUTS: The seven Digital Audio inputs may be assigned to any Audio source, (AV1 – AV6 and AUD1 –
AUD4). Any Digital input may be assigned to more than one source.
2.1.2 AUDIO INPUTS: When an audio source is selected for listening, the analog (if any) signal assigned to that input
will also appear at the record, record1, record2, and (if selected) at the remote zone outputs. Any Digital input
assigned to the same source will be heard at the Main 7.1 outputs only. When you have both a digital and an
analog input assigned to an audio source the analog signal will appear only at the three record outputs and (if
selected) at the remote zone output. The Digital signal will be processed and routed to the main outputs and also
appear unprocessed at the digital output. The analog signal going to the record-outs does not go through the A
to D and D to A converters. The two signals are handled separately. There is no way to send the processed digital
information to any of the record or remote zone outputs.
2.1.3 PLAY INPUTS: The PLAY input functions as part of a tape loop. It is designed to accept the output from a two-
channel tape machine. Pressing the TAPE button on the front panel routes the analog audio signal on the PLAY
input through the digital processor. Refer to Section 6 for more information on Taping.
2.1.4 7.1 INPUTS: These are analog audio inputs, designed to make it possible to listen to new multi-channel formats,
such as SACD and DVD-Audio. These inputs are analog only. The input signal goes only through the volume
control (still affected by your “speaker level” settings) and directly to the 7.1 Outputs.
2.1.5 VIDEO INPUTS: The three styles of video inputs are also separate from each other. A Composite video input
signal will not be converted to S-Video nor to Component video. An S-Video input signal will be present on the
Composite video outputs but not the Component video outputs. A Component video input signal will not be
converted to Composite nor to S-Video. If you want to send video to the remote zone output you have to feed the
SSP-60 a Composite video signal. Thus an S-Video signal can be sent to your television and to a recording VCR,
while only Composite video can be sent to the remote Zone. (S-Video should be sent only over a short length of
cable).
2.1.6 IR IN: There is one IR input which allows you to make a connection from the remote Zone area as well as from
the Main listening/viewing area. The Zone can be controlled from either the Main area or Zone and the Main
area can be controlled from either Main or the Zone area.
2.1.7 IR OUT: This output will permit you to control another piece of Classé equipment by repeating signals received
through the front panel IR receiver of the SSP-60. For this purpose, you will need to install a 2 conductor shielded
cable with 1/8” mini mono plugs at both ends from the SSP-60’s IR OUT to the IR in of the other unit.
2.1.8 MIC: This input will permit you to connect the supplied calibration microphone. See section 5.2.5 for details on
the auto calibration procedure.

10
2.2 OUTPUTS: Video outputs for Component, Composite and S-Video formats are provided. Both the Composite
and S-Video formats have outputs with On Screen Display (OSD) and without On Screen Display (NO OSD). The
OSD can be turned off and on. There is a Composite video output for the remote Zone and both S-Video and
Composite video outputs for recording. The S-Video inputs also deliver Composite video output signals. (S-Video
In to S-Video Out will deliver higher quality video). Both analog audio outputs and a digital audio output are
provided from the SSP-60.
2.2.1 7.1 AUDIO OUTPUTS: The SSP-60 has both balanced and single ended 7.1 channel outputs. They deliver both
stereo and multi-channel signals, depending on the source signal and the mode of playback you select. If you
only have one rear speaker use the left SURR REAR 7.1 output.
2.2.2 DIGITAL AUDIO OUTPUT: The Optical digital output (TOSlink) delivers the same digital audio information that
is present at the digital input of the selected source. Analog information will not be converted to digital for output
here. This digital signal can be routed to another surround processor, digital recorder or to a high-quality digital-
to-analog converter (DAC).
2.2.3 REC AUDIO OUTPUTS: There are three record audio outputs. They all carry the analog audio of the currently
selected main Source (NOT the zone source or the PLAY input). Digital Inputs are not decoded through these
outputs.
2.2.3.1 When deciding what input and output cable combinations you will need, you have to first decide how you will be
using the processor. If you use the Remote Zone you can have two sources, each playing in a separate area.
However, you cannot record one source while watching another, unless you use the Remote Zone output as a
tape out. Be aware that to record a Satellite feed when you are listening to a decoded digital signal in the main
area, you must have the analog audio and composite video signals from the Satellite receiver connected to the
corresponding AV and composite video inputs.
FOR EXAMPLE:
• Digital audio from the Satellite Receiver is plugged into COAX1
• COAX1 is assigned to AV1
• Analog two-channel audio output from satellite receiver is plugged into AV1 analog inputs
• S-Video from the Satellite receiver is fed to VID1 S-Video input
• Composite video from Satellite Receiver is plugged into VID1 Composite video input
• Select AV1 as source for Main area
• 7.1 Main outputs will contain decoded digital audio from COAX1
• Record outputs will contain signal only from analog inputs on AV1. The Zone output could also carry the AV1
analog signal, but only if AV1 is selected as the source signal for Zone.
• S-Video output from AV1 appears on S-Video OSD and NO OSD and on S-Video REC out.
• Composite Video from AV1 appears on Composite OSD and NO OSD, plus the REC and Zone Composite
outputs (if Zone has AV1selected as its source).
With only a little thought and planning you can turn the SSP-60 into a versatile control center. To record a source,
or to play music throughout your house you will need to connect both the digital and the analog inputs from
several audio or audio video pieces, such as a CD player, a Satellite receiver or a DVD player. Refer to Section
6.0 for more information on using the tape inputs and outputs.
2.3 TRIGGER OUTPUTS: The three Triggers give you a great deal of control over your total system. Trigger 1 may be
set up separately from Triggers 2 and 3. The triggers may be individually set up to enable and disable various
other system components. The Triggers only deliver a control voltage, but the delivery can be configured in
several ways to allow you to properly signal equipment to turn off and on. See Section 5.5: TRIGGER SETUP for a
full explanation.

11
Section 3.0 - Front Panel Controls
SSP-60 FRONT VIEW
The SSP-60 operates intuitively. The seven controls on the face of the processor give you all the options you need
to turn it on and use it successfully day after day.
3.1 The “STANDBY” button toggles the SSP-60 from standby to operate and vice versa. There is an on/off switch
on the rear of the unit, which turns the AC on and off. When in “Standby” the LED above the button glows
green, when in “Operate” mode the LED is out and the display is lit. Please note that if the remote zone is
enabled, the display will read “Zone B On” when the unit is in Standby. See section 7.0 for details on the
remote zone. The “Standby” button will also activate or de-activate the triggers depending on their settings.
See section 5.5 for details on the trigger settings.
3.2 The “MODE” buttons are used to scroll through all the available Modes of operation. The available Modes
depend on the type of the audio input signal. Appendix B shows all the available Modes (subject to change)
and indicates which speakers are active.
3.3 The “INPUT” buttons are used to scroll through the available Sources: AV1 – AV6, AUD1 – AUD4, and the
External 7.1 input. Please note that you have to go into the SOURCE SETUP menu to activate the balanced
input. See section 5.3.4 for further details. Once the Sources are set up, you can select a source and the SSP-
60 will begin to automatically process the audio or audio/video information correctly. If you wish to change
the processing style you can use the MODE buttons to scroll to the preferred playback method. Please note
that the availability of certain modes depends on the type of incoming signal. See APPENDIX B for details.
3.4 The “TAPE” button selects the “PLAY” input and sends this signal to the main output for monitoring. The
previously selected Main Source remains as the source and continues to play through the record outputs. (See
the notes in section 6.0 for more information on Taping).
3.5 The “MUTE” button mutes the audio output. Press the button again to return to the previous listening level.
Turning the volume up releases the Mute condition, while turning volume down maintains Mute until the Mute
button is pressed again.
3.6 The unlabeled “VOLUME” knob changes the volume in all of the connected speakers. Turn this knob
counterclockwise to reduce the volume and clockwise to increase it. When the SSP-60 is Muted the volume
can be “reduced” using the Volume control without coming out of Mute, but if the knob is turned clockwise to
increase the volume the SSP-60 will begin playing again immediately.
3.7 The front panel display shows the current operation of the SSP-60, including the selected input, the format of
the signal being played, the selected playback Mode, and the current Volume level (or Mute condition).

12
Section 4.0 - The SSP-60 Remote Control
The keys on the SSP-60 remote control are laid out in an easy to use pattern. The keys have been grouped according to
their use. The first three rows, DIM through TRIM /\, are a set of ten buttons with a variety of relatively unrelated tasks. The
second section is made up of three rows beginning with EXIT and ending with the single key \/. These seven keys are used
during the Setup of the surround processor. The five bottom rows, beginning with AV1 and ending with the VOLUME /\
key are the keys you will use most often. They include the keys used to directly access a Source, the MUTE and the
VOLUME up and down keys, as well as ZONE. The following is a list of the Remote Control Keys and their functions.
DIM Press
this key once to dim the display. A second press returns the display to its
normal brightness. NOTE: The dim setting does not reset when the unit i
s put in
STANDBY, though it will reset to bright if the rear on/off switch is cycled, or if the AC
supply is interrupted.
STATUS Pressing the STATUS key causes the SSP-
60 to display on the TV screen the
setup for the currently selected Source. The displa
yed information includes the name of
the input, the decode mode, the location and type of audio and video input selected.
NOTE: Similar information is always shown in the display window of the SSP-60.
Status will not be displayed if OSD is set to “OFF”.
STANDBY toggles the SSP-60 from “standby” to “operate”
and vice versa. There is an
on/off switch on the rear of the unit, which turns the AC on and off. When in “Standby”
the LED above the button glows green, when in “Operate” mode the LED is out and th
e
display is lit. Please note that if the remote zone is enabled, the display will read “Zone
B On” when the unit is in Standby. See section 7.0 for details on the remote
zone. The
“Standby” button will also activate or de-activate the trigger
s depending on their
settings. See section 5.5 for details on trigger settings.
MODE Press the
Mode key to scroll through all the available Modes of operation. The
available Modes depend on the audio input signal type. Appendix B shows all th
e
available Modes (subject to change) and indicates which speakers are active.
CAL Press the CAL key once you are in the “level setup”
menu to initiate the pink noise
test signal. This function is for manual calibration only. For auto calibration, see s
ection
5.2.5 for details.
COMP Press
this key to reduce the dynamic range of the audio. (The unit’s display will
show LateN ON when enabled and LateN OFF when disabled. The Screen will show
LateNight ON or LateNight OFF). Utilizing a process called dynami
c compression, the
processor can prevent loud passages from getting too much louder than the normal
passages. Turning on this feature allows you to enjoy your movie or other program
when you don’t want to disturb neighbors or family. Please note that this
function is
only available in Dolby Digital.
THX Press this key to enable the THX function (THX Music or THX AdvCine). To
disable THX press the Mode key. For more advanced THX settings, see section 5.6 THX
Audio Setup

13
TRIM
Press this key to cycle through a list of options which will allow you to adjust the
loudnes
s of the Subwoofer, Center, or Surround speakers, or to temporarily alter the
spectral balance of the sound in all speakers by adjusting the treble or the bass content.
Use the TRIM /\ or \
/ keys to adjust the selected parameter. This is a temporary
adjustment - when the SSP-
60 is put into Standby or is powered off the speaker levels
will revert to the settings in the Level Setup (under the Speaker Setup menu) and the
Treble/Bass settings will revert to the settings in the Audio Setup.
TRIM \/ Press this key to decrease
the loudness of the speaker previously selected with
the TRIM key, or to reduce the treble or bass content of the sound in all speakers.
TRIM /\ Press this key to increase the loudness of the speaker previ
ously selected with
the TRIM key, or to increase the treble or bass content of the sound in all speakers.
EXIT (CANCEL) Press
this key to leave the Setup Menus without saving any of the
changes you might have made.
/\ This key has two functions: Press this key to navigate through the di
fferent selections
available in the Setup Menus, while in a menu select or change a value.
ALSO: After
pressing the ZONE key
(followed by the Standby key if the Zone had not been
previously enabled), the /\ key will increase the volume at the Zone outputs.
MENU Pressing the MENU
key brings up the page of the Setup Menu you were last
using. This makes it easy to return to a setup parameter you were trying to get just right.
No mat
ter where you start in the Setup Menu, you can quickly and easily navigate to
any other section.
< This key has two functions: Press
this key to navigate through the different selections
available in the Setup Menus, while in a menu select or change a value.
ALSO: After
pressing the ZONE key
(followed by the Standby key if the Zone had not been
previously enabled), the < key will
scroll through the Audio and Audio/Video Sources to
play at the Zone outputs
ENTER The ENTER
key is used in the Setup Mode to memorize a change, or to access
a sub menu.
When you are not in a menu, pressing the ENTER key once will scan
through all of the active inputs.
> This key has two functions
: Press this key to navigate through the different selections
available in the Setup Menus, while in a menu select or change a value. ALSO: After
pressing the ZONE key
(followed by the Standby key if the Zone had not been
previously enabled), the >
key will scroll through the Audio and Audio/Video Sources to
play at the Zone outputs.
\/ This key has two functions: Press this key to na
vigate through the different selections
available in the Setup Menus, and while in a menu to select or change a value. ALSO:
After pressing the ZONE key (followed by the Standby key if the Zone had not been
previously enabled), the \/ key will decrease the volume at the Zone outputs.

14
AV1
- AV6 These six keys ea
ch directly access one of the AV Sources consisting of a
Video Input and a hard
-
wired Analog Audio input plus any associated Digital Audio
input selected during setup. These keys can also be used to select Zone Sources.
AUD1
- AUD4 These
four keys each directly access one of the Audio Sources
consisting of a hard-
wired Analog Audio input plus any associated Digital Audio input
selected during setup. These keys can also be used to select Zone Sources.
EX 7.1 Press
this key to listen to the Special 7.1 Analog inputs. (The 7.1 inputs cannot
be accessed in the remote Zone.)
TAPE Press this key to listen to the PLAY in
put through the Main output. In a typical
application you will use this key to monitor the quality of a tape you are making. The
Main Source continues to be the Source selected, so you can continue to record.
Toggle this Key to switch between Tape and main
Source. Refer to section 6.3 for more
information on the Tape Loop.
ZONE Press
this key to enter Zone Access Mode. To enable the Zone output, press
Standby. Press Standby again to shut down the Zone output. Press either the \/ or /
\
keys to decrease or increase the volume of the Zone output or the < or >
key to scroll
back and forth through the ten sources.
You can also select Zone sources directly with
the AV1-AV6 and AUD1-AUD4 keys.
For more details, see section 7.0 on the Remote
Zone use.
MUTE This key has two functions: Press this key to Mute the Main outputs.
ALSO: After
pressing the ZONE key (followed by the St
andby key if the Zone had not been
previously enabled), use this key to Mute the Zone outputs.
\/ VOLUME Press
this key to decrease the volume of the Main outputs. This key affects
the Main outputs OR the Zone outputs (if you are in the Zone control menu).
VOLUME /
\ Press this key to increase the volume of the Main outputs.
This key affects
the Main outputs OR the Zone outputs (if you are in the Zone control menu).

15
Level setup
Left 0dB
Center 0dB
Right 0dB
Right surround 0dB
Right back 0dB
Left back 0dB
Left surround 0dB
Subwoofer 0dB
Exit
Speaker setup
Level setup
Distance setup
Size setup
Level autocalibrate ?
Dist. autocalibrate ?
Exit
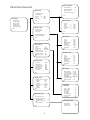
SSP-60 Menu flow chart
Main Menu
Audio setup
Speaker setup
Source setup
Display setup
Trigger setup
THX Audio setup
Exit
Audio setup
Dolby/DTS setup
Preset setup
Treble ---ll--- 0dB
Bass ---ll--- 0dB
LFE level 0dB
Exit
Source setup
Source 1
Title AV1
Digital input AES/EBU
Preset No change
Analog monitor
Component video Off
Balanced source Off
Balanced routing DSP
Exit
Display setup
TV system NTSC
Superimpose Off
Temporary disp. Full
Video format Auto
OSD output Both
Distance units Feet
OSD style Default
Exit
Trigger setup
Trigger 1 sense Power On
- polarity Posit.
- delay No
- duration Infin.
Trigger 2 sense Power On
- polarity Posit.
- delay No
- duration Infin.
Exit
Input level
monitoring 0
-1
Gain: 0dB -2
Peak:-85dB -3
Press <or> -4
to change -5
sensitivity -6
Press Enter to -8
accept or Exit -10
to cancel
dBr
Dolby/DTS setup
PLll Panorama Off
PLll Center Width 3
PLll Dimension 0
Neo:6 Center Image 2
Exit
Preset Setup
Preset 1
Treble ----+---- 0dB
Bass ----+---- 0dB
Center ----+---- 0dB
Surround ----+---- 0dB
Subw ----+---- 0dB
Exit
Distance setup
Left 0 ft
Center 0 ft
Right 0 ft
Right surround 0 ft
Right back 0 ft
Left back 0 ft
Left surround 0 ft
Subwoofer 0 ft
Exit
Size setup
Main speakers Large
Center speaker Small
Surround speakers Small
Back speakers 2 Small
Subwoofer Yes
Subwoofer freq. 80Hz-THX
Subwoofer filter On
Enhanced bass Off
Exit
THX Audio setup
Bass limiter setup
Boundary gain comp.
THX Ultra2 Sub No
Boundary gain comp. -
ASA
Back speakers Apart
Exit
Bass limiter setup
Bass limiter On
Limiter level -50dB
Limiter noise Off

16
Main menu
Audio setup
Main Menu
>Audio setup
Speaker setup
Source setup
Display setup
Trigger setup
THX Audio setup
Exit
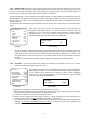
Section 5.0 - Setting Up the SSP-60
The SSP-60 has a complete and well-thought-out configuration system, flexible enough for even a complex audio and
home theater system. You will find setup to be quite intuitive, and that once set up, operation of the SSP-60 will prove to
be simple and straightforward.
Setup requires use of the supplied Classé remote control. You may use either the On-Screen (TV) menu or the illuminated
front panel display. The two methods are equally easy to use and understand. The same highlighted selection on the TV
on-screen display is visible on the unit’s display panel (except the Analog Monitor sub-menu).
To begin: be sure the SSP-60 is on. If the SSP-60 display is not on, and the green LED above the standby button is not lit,
then you must turn the power “ON” with the rocker switch above the AC cord on the rear panel. (The SSP-60 may be left
in “Standby” mode indefinitely when not in use. You may wish to unplug it or turn it off completely when you will be away
for a long period of time, or when a thunderstorm threatens). The backup Flash Memory does not require any
maintenance since no battery is used in this system.
Pressing the MENU key on the remote accesses the main menu. The /\ and \/ keys (above and below the ENTER
key)
scroll through the main menus and the sub-menus, positioning the cursor beside the choices. Press the ENTER
key to
access the menu item you have highlighted.
These displays show that you have accessed the Main menu and highlighted the Audio
setup feature. You can scroll through the available choices by pressing the \/ and /\
buttons on the remote. When the cursor points to the feature you wish to adjust, press the
ENTER
key. To leave the menu and save the settings scroll down to Exit and press the
ENTER key.
TV Display Panel Display
Pressing the MENU key to begin setup brings up screens similar to the ones above. Six sub menus and Exit are displayed:
1. Audio Setup In this submenu you can configure the Dolby/DTS setup, the five custom audio presets,
as well as the overall Bass and Treble controls and LFE level.
2. Speaker Setup In this submenu you can configure the speaker levels, distances and sizes. This submenu
also includes the level and distance auto-calibrate options.
3. Source Setup In this submenu you can define your input Sources, name them, assign the associated
digital inputs (if any) and presets, and also the sensitivity of the analog inputs (under
“Analog Monitor”). This sub-menu also permits you to enable any of the three
Component video inputs, select the balanced audio input as source and enable or
bypass the DSP processing for this balanced signal.
4. Display Setup In this submenu you can select various Video options, including NTSC or PAL and On-
Screen-Display (OSD). This sub-menu also permits you to set the distance units in feet
or meters.
5. Trigger Setup Defines the use of the three Voltage Triggers available on the back panel.
6. THX Audio Setup In this submenu you can select the various parameters of THX operation.
7. Exit Memorizes current settings and returns to full operation.

17
Audio setup
Dolby/DTS setup
Audio setup
> Dolby/DTS setup
Preset setup
Treble ---ll--- 0dB
Bass ---ll--- 0dB
LFE level 0dB
Exit
5.1 AUDIO SETUP:
These displays show that you have accessed the Audio setup sub-menu and chosen the
Dolby/DTS setup. You can scan through the available choices by pressing the \/ and /\
buttons on the remote. When the feature you wish to adjust is highlighted press the < or
> key to decrease or increase the level. To leave the menu and save the settings scroll
down to Exit and press the ENTER key.
TV Display Panel Display
5.1.1 Audio setup: The Audio setup includes Dolby/DTS setup, Preset setup, Bass and Treble controls, and LFE (Low
Frequency Effects) level adjustment.
• Treble and Bass settings can be adjusted plus or minus 12dB in 1dB steps.
• The LFE (Low Frequency Effects) channel contains only low frequency signals. It is the “0.1” of the 5.1 or 7.1
channel digital surround signal. The LFE channel is present only with Dolby Digital, Dolby Digital EX, DTS and
DTS-ES sources. The LFE level can be set from –10dB to 0dB.
5.1.2 Dolby/DTS setup
:
This sub menu permits the following adjustments for the Dolby Pro Logic II Music mode and
DTS Music mode.
Dolby Pro Logic II Music mode setup:
• “PLII Panorama” setting (ON/OFF) affects the surround sound field. With PLII panorama “On”, the sounds from
the front channels are spread to the surround channels.
• “PLII Center Width” (Min to Max) allows the adjustment of the Center image from all front speakers to varying
degrees.
• “PLII Dimension” (-3 to 3) controls the front-to-surround balance of the sound field.
DTS Music mode setup:
• NEO:6 Center Image (0 to 6) controls the balance between the center and the left and right front channels.
5.1.3 Preset setup:
The Presets are used to temporarily change the bass and treble controls and the levels of the
center, surround and subwoofer speakers. The Preset setup allows one to program five different presets, which
can be assigned to any source in the “Source setup menu”. This will be useful in the event that you require a
different tonal balance depending on the source you are using in your system. For example, you might decide to
have a different bass and treble setting for playback from your VCR.
For as long as the specific source is selected:
• The preset Treble and Bass settings replace the settings in the Audio setup
• The preset Center, Surround, and Subwoofer levels are added to values in the Level setup.

18
Speaker setup
Level setup
Level setup
Left: 0.0dB
Speaker setup
>Level setup
Distance setup
Size setup
Level autocalibrate?
Dist. autocalibrate?
Exit
Level setup
>Left 0dB
Center 0dB
Right 0dB
Right surround 0dB
Right back 0dB
Left back 0dB
Left surround 0dB
Subwoofer 0dB
Exit
5.2 SPEAKER SETUP:
Although this manual is following the setup sub-menus in the order they appear on the Main menu screen, you will need to
set up the speakers first in the “Size setup” - Section 5.2.4. It will make it easier to properly set the speaker output levels if
you have configured the SSP-60 so it “knows” what speakers you have in the system as well as the speaker sizes. You
should also consult the manual for the speakers and for the subwoofer and decide what crossover frequency you should
set for the subwoofer. Usually the crossover frequency will be around 80 Hz, but if your speakers are small and have no
real bass capability you may wish to get more information from the woofer by setting the crossover at 100 or 120Hz. You
may also wish to check with your dealer about this section of the setup sequence.
Once the speaker sizes are set, use the “Distance setup” (Section 5.2.3), or ‘Dist. autocalibrate’ (Section 5.2.5) to set the
correct distances before moving on to the “Level setup” or “Level autocalibrate” sub-menus.
These displays show that you have accessed the Speaker setup sub-menu and
highlighted the Level setup. You can scan through the available choices by pressing the
\/ and /\ buttons on the remote. When the sub-menu you wish to adjust is highlighted
press the ENTER key to make a selection. To leave this menu scroll down to Exit and press
the ENTER key.
TV Display Panel Display
5.2.1
Level setup:
There are two ways to calibrate the speakers with the SSP-60. You can do it by hand with the aid of
a Sound Pressure Level (SPL) meter. An inexpensive but relatively accurate meter is available at most Radio Shack stores, or
through their catalog. You can also do it automatically using the supplied microphone and the auto-calibrate procedure
(refer to section 5.2.4 for more details).
Classé recommends all speakers be set at equal levels, at a sound pressure level of 75dB. This level will usually enable
you to watch movies with the Volume control set at 0dB, depending of course upon the show, how loud you like to listen
and, of course, your neighbors.
These displays show that you have accessed the Level setup sub-menu and highlighted the
Left Front speaker level control. You can scan through the available choices by pressing
the \/ and /\ buttons on the remote. When the speaker you wish to adjust is highlighted
press the < or > key to decrease or increase the level. To leave the menu and save the
settings scroll down to Exit and press the ENTER key.
TV Display Panel Display
Highlighting a speaker selection does not cause that speaker to play pink noise. To play pink noise at the relative level
displayed on the right side of the screen or panel, you must press the CAL key on the remote control to start the test signal.
The SSP-60 will immediately begin playing pink noise through one speaker after another. Next, use the /\ or \/ keys to
scroll to each speaker you wish to test/adjust. Press either the < or > key to begin playing pink noise through the selected
speaker. Continue to press the < and > key to adjust the volume of that speaker until the SPL meter reads 75 dB. The >
key increases speaker SPL and the < key decreases SPL. Use either the /\ or \/ to scroll to the next speaker you wish to
adjust, use < or > to start it playing and correct the adjustment.
When you are satisfied with the levels of the speakers let the pink noise cycle through all the speakers a few times to be
sure all the audio output levels are the same, then press CAL to exit the test signal. Scroll down to “Exit” and press ENTER
to exit the Level Menu. The settings will be memorized.

19
Distance setup
Left 0ft
Size setup
Main speakers Large
Distance setup
>Left 0 ft
Center 0 ft
Right 0 ft
Right surround 0 ft
Right back 0 ft
Left back 0 ft
Left surround 0 ft
Subwoofer 0 ft
Exit
Size setup
>Main speakers Large
Center speaker Small
Surround speakers
Small
Back speakers 2 Large
Subwoofer Yes
Subwoofer freq. 80Hz-THX
Subwoofer filter On
Enhanced bass Off
Exit
5.2.2 Distance setup: This menu is used to synchronize the sound coming from several speakers so it arrives to the
listeners’ ears at the same time. Proper synchronization makes it possible for the listener to localize the apparent source of
a sound in the surround environment. Setup of the delay time to be applied to the Center and Surround speakers is a
simple matter of measuring the relative distances from the listener to the speakers.
Measure the distances of all your speakers from the listening position. The Left and Right Front speakers should each be
approximately the same distance from the listening position. If the difference between the left and the right front channels
exceeds 2 feet or 0.7 meters, an error message will appear showing that the delay exceeds 2 ms between the left and the
right main channels.
To change the unit of measurement used in the distance setup, you must go to the “display setup” menu and select feet or
meters.
These displays show that you have accessed the Distance setup sub-menu and
highlighted the Left speaker distance. You can scan through the available choices by
pressing the \/ and /\ buttons on the remote. When the speaker you wish to adjust is
highlighted press the < or > key to decrease or increase the level. To leave the menu
and save the settings scroll down to Exit and press the ENTER key.
TV Display Panel display
• You can set the speaker distances by pressing the left and right arrow keys. The range of adjustment is from 0 ft to
63 ft (21m). However, the maximum recommended difference between the nearest and most distant speaker is 15
ft (5m). Distance values outside of the above stated limits will be displayed in a different color, usually red. The
most distant speaker should be moved closer or the nearest speaker should be moved further to avoid this
situation.
• If a speaker is not defined in the Size setup, “None” is displayed and the distance cannot be changed.
5.2.3
Size setup:
The size setup defines which speakers can handle full range signals as in the case of “Large”
speakers. The subwoofer settings are also in this menu.
These displays show that you have accessed the Size setup sub-menu and highlighted the
Main speaker size control. You can scan through the available choices by pressing the
\/ and /\ buttons on the remote. When the speaker you wish to adjust is highlighted
press the < or > key to set the speaker size. To leave the menu and save the settings
scroll down to Exit and press the ENTER key.
TV Display Panel Display
• Speakers that can handle a full range frequency signal should be set to “Large.”
• Speakers that cannot handle a full range frequency signal should be set to “Small.” The bass portion of their signal
will be redirected to the front large speakers or the subwoofer if present.
• If a speaker is not present (e.g. Center) you should set it to “None.”
• If there is only one rear speaker connected, select “1 Small” or “1 Large” depending on the size of the speaker and
connect this rear speaker to the LEFT SURR REAR output of the 7.1 output section.
• If the subwoofer filter is set to off, the signal from the small speakers is fed to the subwoofer without the digital low
pass filter. The crossover frequency setting will have no effect. You may wish to do this if your subwoofer has its
own built-in filter.

20
Speaker setup
Dist. autocalibrate?
Speaker setup
Level setup
Distance setup
Size setup
Level autocalibrate?
>Dist. autocalibrate?
Exit
5.2.3
Size setup
(Continued):
You can set the subwoofer crossover frequency from 40 Hz to 140 Hz in 10 Hz steps (the slope is 24dB per
octave). The crossover frequency is the frequency below which the bass signal does not go to small speakers, but
is redirected to the large speakers or subwoofer.
• Enhanced Bass duplicates the subwoofer information to both the large speakers and the subwoofer. You may desire
this in some cases to get more bass from your system.
Classé recommends a conservative approach towards speaker setup. Setting up medium sized speakers as Large may
degrade the sound by asking speakers to do more than they can. Subwoofers are very good at filling in the low
frequencies for a whole system. If you don’t let them provide the full amount of low frequencies required to balance your
system you will often miss some of the sound effects in music and AV program.
5.2.4
Auto-calibration
: Automatic calibration is easier but will work properly only in a quiet environment. Too much
ambient noise such as air conditioning, forced air heating, or people talking in the room can cause the auto-calibration to
fail. First, insert the battery in the calibration microphone. Plug the microphone into the MIC input at the back of the SSP-
60. Turn the microphone on and install it at the preferred listening position (or in the middle of the seating area) pointing
straight up (this microphone is omni-directional). Do not hold the microphone in your hand. Use a microphone stand or a
camera stand or simply prop it up with pillows.
TV Display Panel display
Before you begin, set the volume level of the SSP-60 to a reasonably loud level (start around -10) and turn up your
subwoofer level. To activate distance auto-calibration place the cursor at “Dist. Autocalibrate ?” and press ENTER. The
monitor screen will immediately change to the following:
TV Display Panel display
The process will stop when all speakers’ delays (distances) have been properly calibrated, unless there is an error. If the
speakers are too far apart or not set up correctly, the process will stop. The process will also cease if the speaker it is
attempting to calibrate is not attached or of the initial noise level from the speaker is too low. When this situation occurs,
an error message (autocalibration error) will appear at the top of your TV display (or screen). You will then have to press
any key on the remote to continue.
The calibrating process will generally begin again with the speaker it stopped at. We have observed that, depending on
the acoustics of your listening space, the subwoofer distance auto-calibration may fail or return unreasonable results. If this
happens try one of the following solutions: If the subwoofer level was very soft during the first pass of the auto-calibration
Speaker setup
Dist. autocalibrate?
Autocalibrating
Please wait
Acoustic speaker dist.
Calibrating: Left
Speaker dist.: 00.00 ms
Complete: 0/3
Press Exit key to
abort autocalibration
Page is loading ...
Page is loading ...
Page is loading ...
Page is loading ...
Page is loading ...
Page is loading ...
Page is loading ...
Page is loading ...
Page is loading ...
Page is loading ...
Page is loading ...
Page is loading ...
Page is loading ...
Page is loading ...
Page is loading ...
Page is loading ...
-
 1
1
-
 2
2
-
 3
3
-
 4
4
-
 5
5
-
 6
6
-
 7
7
-
 8
8
-
 9
9
-
 10
10
-
 11
11
-
 12
12
-
 13
13
-
 14
14
-
 15
15
-
 16
16
-
 17
17
-
 18
18
-
 19
19
-
 20
20
-
 21
21
-
 22
22
-
 23
23
-
 24
24
-
 25
25
-
 26
26
-
 27
27
-
 28
28
-
 29
29
-
 30
30
-
 31
31
-
 32
32
-
 33
33
-
 34
34
-
 35
35
-
 36
36


Classe Audio SSP-60 User manual
- Category
- Audio amplifiers
- Type
- User manual
Ask a question and I''ll find the answer in the document
Finding information in a document is now easier with AI
Related papers
-
Classe Audio SSP-300 User manual
-
-
-
Classe Audio SSP-800 User manual
-
Classe Audio SSP-600 Owner's manual
-
-
-
-
-
Other documents
-
B&K AVR505 User manual
-
-
Classé SSP-300 Owner's manual
-
 Halcro SSP100 Quick Setup Manual
-
-
Legrand 28731 Owner's manual
-
C2G 40324 Owner's manual
-
ONKYO TX-DS989 Ver2 Owner's manual
-
-
 California AUDIO LABS CL-2500 SSP User manual

