6
GB
Briefly: starting a programme
1. Switch the washing machine on by pressing button .
All the LEDs will light up for a few seconds and the
ONOFF / DOOR LOCK LED will begin to flash.
2. Load your laundry into the washing machine and
shut the appliance door.
3. Set the PROGRAMME knob to the programme
required.
4. Set the wash temperature (see page 7).
Starting and Programmes
5. Set the spin speed (see page 7).
6. Add the detergent and any fabric softener (see page 8).
7. Start the programme by pressing the START/RESET
button for at least 2 seconds.
8. When the programme is finished, the ON-OFF /
DOOR LOCK LED will flash to indicate that the
appliance door can be opened. Take out your
laundry and leave the appliance door ajar to allow
the drum to dry thoroughly. Turn the washing
machine off by pressing the button
.
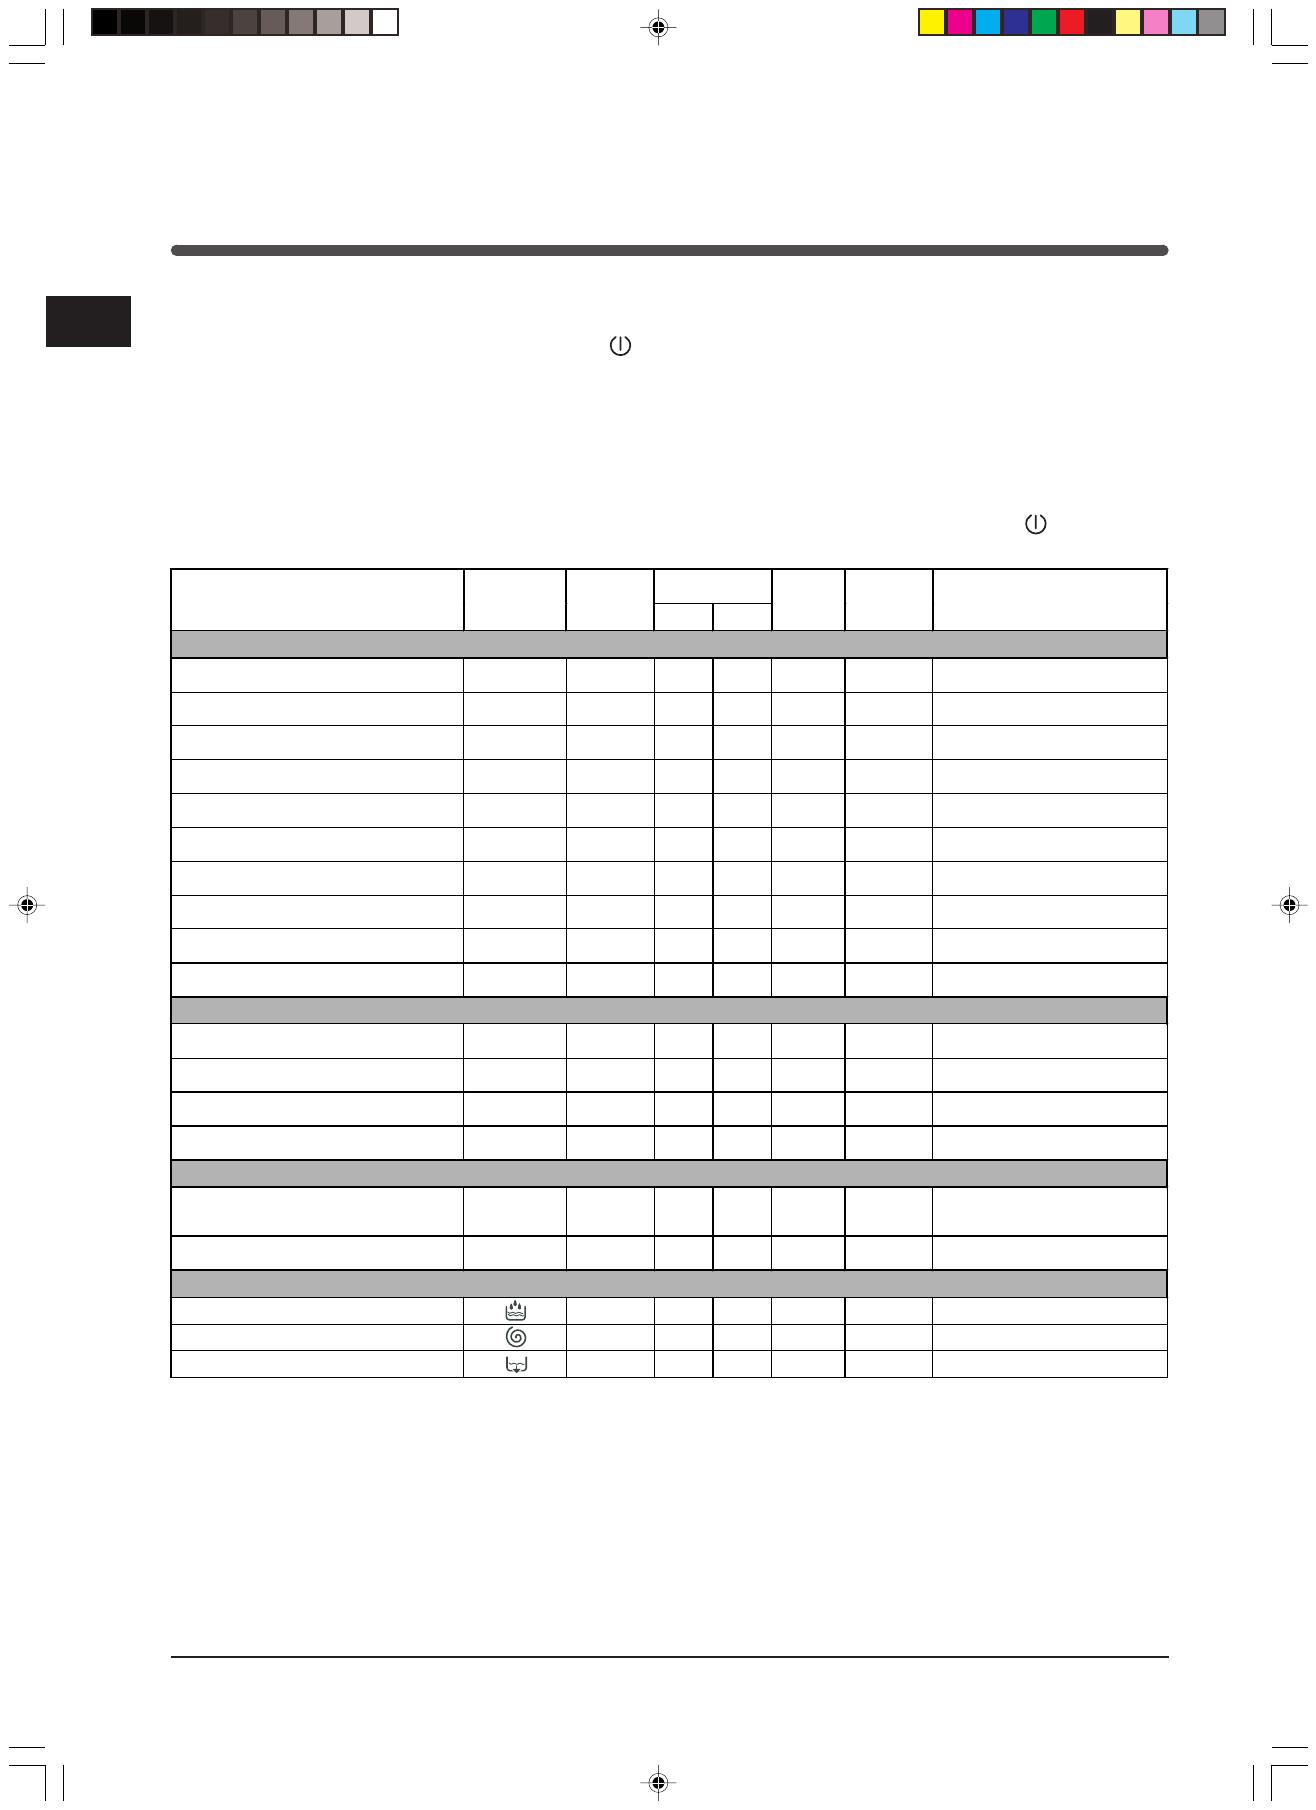
Programme table
Notes
- For Programmes 8 and 10, we advise against exceeding a wash load of 3.5 kg.
- For Programmes 13 and 9, we advise against exceeding a wash load of 2 kg.
- For the anti-crease option: see Easy Iron (opposite page). The information contained in the table is purely indicative.
Special programme
Daily (programme 11 for Synthetics) is designed to wash lightly soiled garments in a short amount of time: it only
lasts 30 minutes and allows you to save on both time and energy. By setting this programme (11 at 30°C), you can
wash different fabrics together (except for woollen and silk items), with a maximum load of 3 kg.
We recommend the use of liquid detergent.
* To select a lower temperature (60° or 40°), the temperature reduction rotary is to be used.
Tr9231gb_WIXXL86-Indesit.p65 20/01/05, 14.396
Detergent
Type of fabric and degree of soil Programmes
Tempe-
rature
Pre-
wash
wash
Fabric
softener
Cycle
length
(minutes)
Description of wash cycle
Standard
Extremely soiled whites
(sheets, tablecloths, etc.)
1
90°
135
Pre-wash, wash cycle, rinse cycles,
intermediate and final spin cycles
Extremely soiled whites
(sheets, tablecloths, etc.)
2
90°
150
Wash cycle, rinse cycles,
intermediate and final spin cycles
Heavily soiled whites and fast colours
2
60°
*
140
Wash cycle, rinse cycles,
intermediate and final spin cycles
Heavily soiled whites and delicate colours
2
40°
*
105
Wash cycle, rinse cycles,
intermediate and final spin cycles
Slightly soiled whites and delicate colours
(shirts, jumpers, etc.)
3
40°
70
Wash cycle, rinse cycles,
intermediate and final spin cycles
Heavily soiled fast colours (baby linen, etc.)
4
60°
75
Wash cycle, rinse cycles, anti-crease
or delicate spin cycle
Heavily soiled fast colours (baby linen, etc.)
4
40°
60
Wash cycle, rinse cycles, anti-crease
or delicate spin cycle
Delicate colours (all types of slightly soiled
garm ents)
5
40°
60
Wash cycle, rinse cycles, anti-crease
or delicate spin cycle
Wool
6
40°
50
Wash cycle, rinse cycles, anti-crease
and delicate spin cycle
Very delicate fabrics (curtains, silk, viscose,
etc.)
7
30°
45
Wash cycle, rinse cycles, anti-crease
or draining cycle
Time for You
Heavily soiled whites and fast colours
8
60°
60
Wash cycle, rinse cycles,
intermediate and final spin cycles
Slightly soiled whites and delicate colours
(shirts, jumpers, etc.)
9
40°
50
Wash cycle, rinse cycles,
intermediate and final spin cycles
Delicate colours (all types of slightly soiled
garm ents)
10
40°
40
Wash cycle, rinse cycles, delicate
spin cycle
Delicate colours (all types of slightly soiled
garm ents)
11
30°
30
Wash cycle, rinse cycles and delicate
spin cycle
Sport
Sports shoes (MAX 2 pairs)
12
30°
50
Cold wash (without detergents),
wash cycle, rinse cycles and delicate
spin cycle
Fabrics for sportswear (Tracksuits, shorts, etc.)
13
30°
60
Wash cycle, rinse cycles,
intermediate and final spin cycles
PARTIAL PROGRAMMES
Rinse
Rinse cycles and spin cycle.
Spin cycle Draining and spin cycle
Drain Draining


