
WARNING: NO PORTION OF THIS MANUAL MAY BE REPRODUCED IN ANY SHAPE
OR FORM WITHOUT THE WRITTEN APPROVAL OF GRIZZLY INDUSTRIAL, INC.
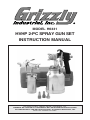
MODEL H6331
HVHP 2-PC SPRAY GUN SET
INSTRUCTION MANUAL


Table of Contents
SECTION 1: SAFETY .......................................................................................................4
SECTION 2: INTRODUCTION .........................................................................................7
SECTION 3: SET UP ........................................................................................................8
SECTION 4: OPERATIONS ...........................................................................................10
SECTION 5: ACCESSORIES .........................................................................................13
SECTION 6: MAINTENANCE ........................................................................................14
WARRANTY AND RETURNS ........................................................................................20

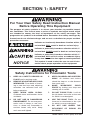
SECTION 1: SAFETY
Indicates a potentially hazardous situation which, if
not avoided, MAY result in minor or moderate injury.
It may also be used to alert against unsafe practices.
Indicates a potentially hazardous situation which, if
not avoided, COULD result in death or serious injury.
This symbol is used to alert the user to useful infor-
mation about proper operation of the equipment.
For Your Own Safety Read Instruction Manual
Before Operating This Equipment
The purpose of safety symbols is to attract your attention to possible hazard-
ous conditions. This manual uses a series of symbols and signal words which
are intended to convey the level of importance of the safety messages. The
progression of symbols is described below. Remember that safety messages by
themselves do not eliminate danger and are not a substitute for proper accident
prevention measures.
NOTICE
Indicates an imminently hazardous situation which, if
not avoided, WILL result in death or serious injury.
Safety Instructions for Pneumatic Tools
1. KEEP ALL SAFETY DEVICES IN
PLACE
2. REMOVE ADJUSTING KEYS AND
WRENCHES
3. KEEP WORK AREA CLEAN
4. DO NOT USE IN DANGEROUS
ENVIRONMENT
5. KEEP CHILDREN AND VISITORS
AWAY.
6. MAKE WORKSHOP CHILD
PROOF
7. DO NOT FORCE TOOL.
8. USE THE RIGHT TOOL.
9. DO NOT USE UNDER THE
INFLUENCE OF DRUGS OR
ALCOHOL.

10. USE PROPER AIR HOSE
11. WEAR PROPER APPAREL.
12. ALWAYS USE SAFETY GLASSES.
13. WEAR APPROVED HEARING
PROTECTION.
14. SECURE WORK.
15. MAINTAIN TOOLS WITH CARE.
16. REDUCE THE RISK OF
UNINTENTIONAL STARTING.
17. DISCONNECT TOOLS
18. DO NOT OVERREACH.
19. USE THE RECOMMENDED
ACCESSORIES.
20. CHECK FOR DAMAGED PARTS
BEFORE USING.
21. NEVER LEAVE UNATTENDED
TOOL CONNECTED TO AIR.
22. NEVER ALLOW UNTRAINED
USERS TO USE THIS TOOL
WHILE UNSUPERVISED.
23. IF YOU ARE UNSURE OF THE
INTENDED OPERATION, STOP
USING TOOL.
24. BE AWARE OF HOSE LOCATION
WHEN USING PNEUMATIC
TOOLS.
Safety Instructions for Pneumatic Tools

1. READ THIS MANUAL.
2. READ MATERIAL LABELS
AND MATERIAL SAFETY DATA
SHEETS (MSDS).
3. RESPIRATORY PROTECTION.
4. FIRE EXTINGUISHERS.
5. FLAMMABLE MATERIAL.
6. FRESH AIR.
7. AIR PRESSURE INJURY PRO-
TECTION.
Additional Safety Instructions for HVHP Spray
Guns
8. PROTECTIVE CLOTHING.
9. INAPPROPRIATE USE.
10. STORAGE.
11. EYE PROTECTION.
12 OPERATING PRESSURE.
13. LOCAL LAWS.

Model H6331 HVHP Spray Gun Set -7-
SECTION 2: INTRODUCTION
We are proud to offer the Grizzly Model
Model H6331 HVHP 2-Pc Spray Gun Set.
This model is part of a growing Grizzly fami-
ly of fine power tools. When used according
to the guidelines set forth in this manual,
you can expect years of trouble-free, enjoy-
able operation and proof of Grizzly’s com-
mitment to customer satisfaction.
It is our pleasure to provide this manual
with the Model H6331. It was written to
encourage safety considerations and guide
you through general operating procedures
and maintenance.
The specifications, details, and photographs
in this manual represent the Model H6331
as supplied when the manual was pre-
pared. However, owing to Grizzly’s policy
of continuous improvement, changes may
be made at any time with no obligation on
the part of Grizzly.
Foreword
Machine Data
If you have any comments regarding this
manual, please contact us:
Grizzly Industrial, Inc.
C/O Technical Documentation Manager
P.O. Box 2069
Bellingham, WA 98227-2069
Email: [email protected]
Most importantly, we stand behind our
tools. If you have any service questions or
parts requests, please call or write us at
the location listed below.
Grizzly Industrial, Inc.
1203 Lycoming Mall Circle
Muncy, PA 17756
Phone: (570) 546-9663
Fax: (800) 438-5901
E-Mail: [email protected]
Web Site: http://www.grizzly.com
Contact Info
Read the manual before operation.
Become familiar with this tool, its
safety instructions, and its operation
before beginning any work. Serious
personal injury may result if safety or
operational information is not under-
stood or followed.
Large HVHP Spray Gun
Type .................................. HP Siphon Feed
Fluid Tip .......................................... 1.8 mm
Air Consumption .....................6.0–8.8 CFM
Inlet Air Pressure ..........3–4 Bar/43–58 PSI
Material Capacity ...................1L / 33.8 oz
Maximum Pattern Width ........ 180–230 mm
Small HVHP Spray Gun
Type .................................. HP Siphon Feed
Fluid Tip .......................................... 1.4 mm
Air Consumption .....................4.2–6.5 CFM
Inlet Air Pressure ..........3–4 Bar/43–58 PSI
Material Capacity ...............200ml / 6.8 oz
Pattern Width .......................... 130–180mm

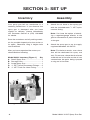
SECTION 3: SET UP
Figure 1.
please immediately
call Customer Service at (570) 546-9663
for advice.
Otherwise, filing a freight claim
can be difficult.
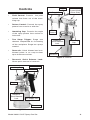
Model H6331 Inventory (Figure 1) Qty
A.
B.
C.
D.
E.
Inventory
Assembly
1.
.
Note: You have the option of attach-
ing a regulator/gauge directly to the
gun for convenient air pressure control
at the gun.
2.
Note: For the best results, use a hose
that will be dedicated for spray use
only. Do not use a hose that has been
used with an in-line oiler as the oil can
contaminate the paint being sprayed
or clog an in-line filter.

Controls
Fluid Control:•
Pattern Control:•
Atomizing Cap :•
Two Stage Trigger :•
Reservoir:•
Reservoir Quick Release Lock:•
Figure 2.
Figure 3.

SECTION 4: OPERATIONS
To use your spray gun:
1.
2.
3.
Machine
Data Page 7
4.
Atomizing
Cap and Fan Adjustments Page
Page 12
5.
Note: Trial and error are necessary
to achieve the results you want along
with a fair amount of practice. Test
your material flow and spray pattern
on a piece of cardboard or some scrap
of material similar to your project.
EXPLOSION HAZARD! DO NOT
smoke or have any source of flame
or spark near spraying. Vapors will
explode if ignited.
RESPIRATORY HAZARD! A l ways us e
a NIOSH approved respirator when
using spray equipment. Failure to
protect your lungs can lead to respi-
ratory illness and nervous system
damage.
TOXIC FUMES! Always use an
approved spray booth or well ven-
tilated area when spraying. NEVER
spray in an confined space where
toxic fumes and flammable vapors
can accumulate to deadly levels.
Spraying

6.
7.
8.
Figure 4
9.
10.
11.
Figure 5
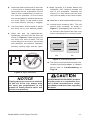
NOTICE
Tipping spray gun may cause material
to spill out of the cup. Always hold
the spray gun perpendicular to the
ground to avoid potential spills and
gravity feed problems.
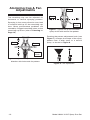
6"
8"
Figure 4.
6"
8"
Figure 5.
12.
Troubleshooting
Page 16.
CONTAMINATION HAZARD! Dispose
of paint waste in a responsible man-
ner! Follow manufacturer's recom-
mendations and local laws regarding
disposal.

Figure 8.
Figure 7
Figure 8
Cleaning
Page 14
Atomizing Cap & Fan
Adjustments
Figure 6.
Figure 7.

Figure 9.
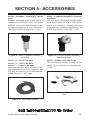
G6261—Campbell Hausfeld™ Water
Filter
Figure 11.
H7274—Campbell Hausfeld™ Pressure
Regulator
Figure 10.
G8114 —
3
⁄8" x 25 Ft. Air Hose
G8115 —
3
⁄8" x 50 Ft. Air Hose
G8116—
3
⁄8" x 100 Ft. Air Hose
Figure 12.
H3174—Air Blow Gun with 2 Tips
SECTION 5: ACCESSORIES

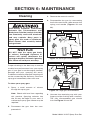
SECTION 6: MAINTENANCE
Cleaning
To clean your spray gun:
1.
Note: Check with local laws regarding
this practice. Spraying solvents into
the air may be illegal in your area. A
cabinet style spray gun cleaner may be
required.
2.
NOTICE
DO NOT soak the spray gun body
in solvent. Prolonged exposure to
solvent will rapidly deteriorate the
spray gun washers and seals. Ignoring
this notice will void your warranty.
EXPLOSION HAZARD! Chlorinated
Solvents like Tricloroethane and
Methylene Chloride (methyl chloride)
can chemically react with aluminum
and may explode. Many parts in
spray guns are made of aluminum.
Read solvent label carefully before
using solvent.
3.
4.
Figures 13
14
5.
Figure 13 14
Figure 14.
Figure 13.

Lubrication
6.
Note:If the small holes in the atomizing
cap become blocked, soak in clean
solvent. If the blockage still exists, clear
the blockage with a small needle, tak-
ing great care to not enlarge or damage
the hole. Damage to the hole will create
a disrupted spray pattern.
7.
8.
Lubricate the following areas with
spray gun lube after cleaning:
A.
B.
C.
D.
E.
F.
Figure 15.
Figure 16.

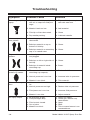
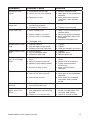
Troubleshooting
Symptom Possible Cause Solution

Symptom Possible Cause Solution

Parts Breakdown H6331
Large Gun Parts List H6331
REF PART # DESCRIPTION REF PART # DESCRIPTION
101A PH6331101A NOZZLE ASSEMBLY 129 PH6331129 CONTROL SCREW
104 PH6331104 FLUID NOZZLE 132A PH6331132A NEEDLE ASSEMBLY
105 PH6331105 HEAD 136 PH6331136 PIVOT PIN
106 PH6331106 CONTROL SCREW 137 PEC13M E-CLIP 5MM
107 PH6331107 GUN BODY 138 PH6331138 TRIGGER
111A PH6331111A NEEDLE ASSEMBLY 139 PH6331139 PLUG
112 PORS005 O-RING 4.5 X 1.5 S5 140 PH6331140 SPECIAL CONNECTOR
113 PH6331113 CONTROL SCREW 141 PH6331141 TUBE
114 PH6331114 GASKET 142 PH6331142 SEAL
116A PH6331116A CONTROL ASSEMBLY 143 PH6331143 CANISTER 1LITER
121 PH6331121 GASKET 143A PH6331143A CANISTER ASSEMBLY
122 PH6331122 HOUSING 145 PH6331145 O-RING KIT
123A PH6331123A LOCKNUT 146 PH6331146 UNIVERSAL WRENCH
128 PH6331128 COMPRESSION SPRING
140
139
138
137
136
129
128
122
121
114
113
112
107
106
105
104
145
116A
111A
123A
132A
141
143
142
144A
101A
146
Rebuild O-Ring
Kit Not Included
Large Gun
Note: Breakdown
shown for service
purposes only. Not all
parts are available
for purchase.

202
201
204
205
206
203
216
215
214
213
212
211
210
209
208
207
218
219
217
220
221
201-1
Rebuild O-Ring
Kit Not Included
Small Gun
Small Gun Parts List H6331
REF PART # DESCRIPTION REF PART # DESCRIPTION
201 PH6331201 CONTAINER COVER SET 211 PH6331211 SEAT SEAL
201-1 PH6331201-1 GASKET 212 PH6331212 TRIGGER
202 PH6331202 GUN BODY 213 PH6331213 TRIGGER PIN
203 PH6331203 CANISTER 20ML 214 PH6331214 PATTERN SCREW
204 PH6331204 FLUID NEEDLE SET 215 PH6331215 FLUID NOZZLE
205 PH6331205 COMPRESSION SPRING 216 PH6331216 AIR CAP SET
206 PH6331206 FLUID KNOB 217 PH6331217 SEALING RING
207 PH6331207 AIR INLET PLUG 218 PH6331218 DIRECTIONAL SCREW
208 PORP008 O-RING 7.8 X 1.9 P8 219 PH6331219 PAINT INLET JOINT
209 PH6331209 COMPRESSION SPRING 220 PH6331220 O-RING KIT
210 PH6331210 AIR VALVE SEAT 221 PH6331221 SLOTTED PLUG
Note: Breakdown
shown for service
purposes only. Not all
parts are available
for purchase.

-
 1
1
-
 2
2
-
 3
3
-
 4
4
-
 5
5
-
 6
6
-
 7
7
-
 8
8
-
 9
9
-
 10
10
-
 11
11
-
 12
12
-
 13
13
-
 14
14
-
 15
15
-
 16
16
-
 17
17
-
 18
18
-
 19
19
-
 20
20


Ask a question and I''ll find the answer in the document
Finding information in a document is now easier with AI
Related papers
-
Grizzly H8115 Owner's manual
-
Grizzly G5352 User manual
-
Grizzly Paint Sprayer H8116 User manual
-
-
-
-
-
-
-
Other documents
-
Husky H4860HSG Installation guide
-
Husky H4930SSG Operating instructions
-
Husky H4850GHVSG Operating instructions
-
-
-
-
 ATD Tools ATD-6810 User manual
-
Kobalt SGY-AIR176NB User manual
-
-
