
www.lg.com
OWNER’S MANUAL
LED LCD MONITOR
E1642C
E1942C
E2042C
E2242C
E2342C
Please read this manual carefully before operating
your set and retain it for future reference.
LED LCD MONITOR MODEL
ENGLISH

2
ENG
ENGLISH
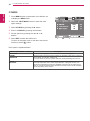
TABLE OF CONTENTS
3 Unpacking
4 Partsandbuttons
5 SettinguptheMonitorset
5 - AttachingtheStandBase
5 - DetachingtheStandBase
6 - Mountingonatable
6 - Usingthecableholder
8 - Mountingonawall
9 ConnectingtoaPC
9 - D-SUBconnection
12 CustomizingSettings
12 - MenuSettings
13 -PICTURE
14 -COLOR
15 -DISPLAY
16 -OTHERS
17 SUPERENERGYSAVINGSetting
18 PICTUREMODESetting
21 E1642C
22 E1942C
23 E2042C
24 E2242C
25 E2342C
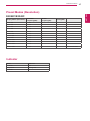
26 PresetModes(Resolution)
27 Indicator
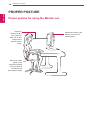
28 ProperpostureforusingtheMonitorset.

3
ENG
ENGLISH
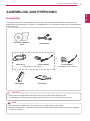
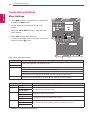
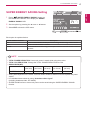
ASSEMBLING AND PREPARING
Checkyourproductboxforthefollowingitems.Ifthereareanymissingaccessories,contactthelocal
dealerwhereyoupurchasedyourproduct.Theillustrationsinthismanualmaydifferfromtheactualproduct
andaccessories.
Donotuseanyunapprovedaccessoriestoensurethesafetyandproductlifespan.
Anydamagesorinjuriesbyusingunapprovedaccessoriesarenotcoveredbythewarranty.
Theaccessoriessuppliedwithyourproductmayvarydependingonthemodel.
Productspecificationsorcontentsinthismanualmaybechangedwithoutpriornoticeduetoupgrade
ofproductfunctions.
(Dependingonthecountry) (Dependingonthecountry)


5
ENG
ENGLISH
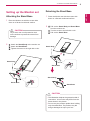
ASSEMBLING AND PREPARING
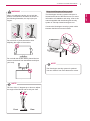
Attachthetothemonitorset.
Attachthe.
Tightenthescrewtotherightwithacoin.
1
PlacetheMonitorsetwiththescreenside
downonaflatandcushionedsurface.
Layafoammatorsoftprotectivecloth
onthesurfacetoprotectthescreenfrom
damage.
2
Thisillustrationdepictsthegeneralmodelof
connection.Yourmonitormaydifferfromthe
itemsshowninthepicture.
Donotcarrytheproductupsidedownholding
onlythestandbase.Theproductmayfall
andgetdamagedorinjureyourfoot.
1
PlacetheMonitorsetwiththescreenside
downonaflatandcushionedsurface.
2
Pullouttheand
fromthemonitorset.
Turnthescrewtotheleftwithacoin.
Pulloutthe.

6
ENG
ENGLISH
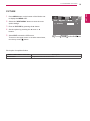
ASSEMBLING AND PREPARING
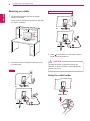
1
LiftandtilttheMonitorsetintoitsupright
positiononatable.
Leavea10cm(minimum)spacefromthewall
forproperventilation.
2
ConnecttheAC-DCAdapterandPowerCord
toawalloutlet.
3
Press (Power)buttononthebottomswitch
paneltoturnthepoweron.
10 cm
10 cm
10 cm
10 cm
Unplugthepowercordbeforemovingthe
Monitortoanotherlocation.Otherwiseelectric
shockmayoccur.
E1942C/E2042C/E2242C/E2342C
E1642C

7
ENG
ENGLISH
ASSEMBLING AND PREPARING
UsingtheKensingtonsecuritysystem
TheKensingtonsecuritysystemconnectoris
locatedatthebackoftheMonitorset.Formore
informationofinstallationandusing,refertothe
manualsuppliedwiththeKensingtonsecurity
systemorvisit
http://www.kensington.com
.
ConnecttheKensingtonsecuritysystemcable
betweentheMonitorsetandatable.
TheKensingtonsecuritysystemisoptional.
Youcanobtainitfrommostelectronicsstores.
Whenyouadjusttheangle,donotholdthe
bottomoftheMonitorsetframeasshownon
thefollowingillustration,asmayinjureyour
fingers.
Donottouchorpressthescreenwhen
adjustingtheangleofthemonitor.
Donotholdthissetlikebelowpicture.Monitor
screencandetachfromstandbaseandinjure
yourbody.
Tiltfrom+20to-5degreesupordowntoadjust
theangleoftheMonitorsettosuityourview.

8
ENG
ENGLISH
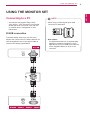
ASSEMBLING AND PREPARING
Forproperventilation,allowaclearanceof10cm
oneachsideandfromthewall.Detailed
instructionsareavailablefromyourdealer,seethe
optionalTiltWallMountingBracketInstallationand
SetupGuide.
IfyouintendtomounttheMonitorsettoawall,
attachWallmountinginterface(optionalparts)to
thebackoftheset.
WhenyouinstalltheMonitorsetusingawall
mountinginterface(optionalparts),attachit
carefullysoitwillnotdrop.
1
Please,Usethescrewandwallmountinterface
inaccordancewithVESAStandards.
2
Ifyouusescrewlongerthanstandard,the
monitormightbedamagedinternally.
3
Ifyouuseimproperscrew,theproductmightbe
damagedanddropfrommountedposition.In
thiscase,LGElectronicsisnotresponsiblefor
it.
4
VESAcompatible.
5
PleaseuseVESAstandardasbelow.
784.8mm(30.9inch)andunder
*WallMountPadThickness:2.6mm
*Screw:Φ4.0mmxPitch0.7mmx
Length10mm
787.4mm(31.0inch)andabove
*PleaseuseVESAstandardwallmountpad
andscrews.
10 cm
10 cm
10 cm
10 cm
Disconnectthepowercordfirst,andthen
moveorinstalltheMonitorset.Otherwise
electricshockmayoccur.
IfyouinstalltheMonitorsetonaceilingor
slantedwall,itmayfallandresultinsevere
injury.
UseonlyanauthorizedLGwallmount
andcontactthelocaldealerorqualified
personnel.
Donotovertightenthescrewsasthismay
causedamagetotheMonitorsetandvoid
yourwarranty.
Useonlyscrewsandwallmountsthat
meettheVESAstandard.Anydamages
orinjuriesbymisuseorusinganimproper
accessoryarenotcoveredbythewarranty.
UsethescrewsthatarelistedontheVESA
standardscrewspecifications.
Thewallmountkitwillincludeaninstallation
manualandnecessaryparts.
Thewallmountbracketisoptional.Youcan
obtainadditionalaccessoriesfromyourlocal
dealer.
Thelengthofscrewsmaydifferdepending
onthewallmount.Besuretousetheproper
length.
Formoreinformation,refertothe
instructionssuppliedwiththewallmount.
E1642C
E1942C
E2042C
E2242C
E2342C
75x75
M4
4

9
ENG
ENGLISH
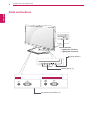
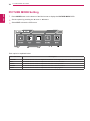
USING THE MONITOR SET
YourMonitorsetsupportsPlug&Play*.
*Plug&Play:APCrecognizesaconnected
devicethatusersconnecttoaPCandturn
on,withoutdeviceconfigurationoruser
intervention.
TransmitsanalogvideofromyourPCtothe
Monitorset.ConnectthePCandtheMonitorset
withthesuppliedD-sub15pinsignalcableas
showninthefollowingillustrations.
ForAppleMacintoshuse,aseparateplug
adapterisneededtochangethe15pin
highdensity(3row)D-SUBVGAconnector
onthesuppliedcabletoa15pin2row
connector.
WhenusingaD-Subsignalinputcable
connectorforMacintosh

10
ENG
ENGLISH
USING THE MONITOR SET
WhenyouwanttousetwoPCinourMonitor,
pleaseconnectthesignalcable(D-SUB)
respectivelyinMonitorset.
IfyouturntheMonitorsetonwhileitiscold,
thescreenmayflicker.Thisisnormal.
Somered,green,orbluespotsmayappear
onthescreen.Thisisnormal.
Thisfunctionprovidestheuserwithoptimal
displaysettings.Whentheuserconnects
themonitorforthefirsttime,thisfunction
automaticallyadjuststhedisplaytooptimal
settingsforindividualinputsignals.(Only
supportedinAnalogMode)
Whenyouencounterproblemssuchas
blurryscreen,blurredletters,screenflicker
ortiltedscreenwhileusingthedeviceor
afterchangingscreenresolution,pressthe
AUTOfunctionbuttontoimproveresolution.
(OnlysupportedinAnalogMode)
Connectthesignal
inputcableandtighten
itbyturningthescrews
clockwise.
Donotpressthescreenwithyourfingerfor
alongtimeasthismayresultintemporary
distortiononthescreen.
Avoiddisplayingafixedimageonthe
screenforalongperiodoftimetoprevent
imageburn.Useascreensaverifpossible.
SelfImageSettingFunction
Pressthepowerbuttononthebottompanelto
turnthepoweron.Whenmonitorpoweristurned
on,the""Functionisexecuted
automatically.(OnlysupportedinAnalogMode)

11
ENG
ENGLISH
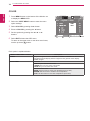
CUSTOMIZING SETTINGS
1
PressthedesiredbuttononthebottomoftheMonitorset.
2
ChangethevalueofthemenuitembypressingthebuttonsonthebottomoftheMonitorset.
Toreturntotheuppermenuorsetothermenuitems,usetheuparrow(
)button.
3
SelecttoleavetheOSDmenu.
Accessesthemainmenus.(Seep.12)
Thisfunctionallowsyoutolockthecurrentcontrolsettings,so
thattheycannotbeinadvertentlychanged.
PressandholdtheMENUbuttonforseveralseconds.
Themessage"OSDLOCKED"shouldappear.
YoucanunlocktheOSDcontrolsatanytimebypushing
theMENUbuttonforseveralseconds.Themessage"OSD
UNLOCKED"shouldappear.
(SUPERENERGYSAVING)
UsethisbuttontoenterSUPERENERGYSAVINGmenu.Formoreinformation.(Seep.17)
UsethisbuttontoenterCUSTOM,TEXT,PHOTO,CINEMA,GAMEmenus.(Seep.18)
Whenadjustingyourdisplaysettings,alwayspresstheAUTObuttonontheMONITOR
SETUPOSD.(OnlysupportedinAnalogMode)
E1642C/E1942C:1366x768
E2042C:1600x900
E2242C/E2342C:1920x1080
ExittheOSD(OnScreenDisplay).
(PowerButton)
Turnsthepoweronoroff.
Thepowerindicatorstaysredifthedisplayisrunningproperly
(OnMode).IfthedisplayisinSleepMode,thepowerindicator
blinksred.

12
ENG
ENGLISH
CUSTOMIZING SETTINGS
1
PressbuttononthebottomoftheMonitorset
todisplaytheOSD.
2
Settheoptionsbypressingthe◄or►or▼
buttons.
3
Selectthe""buttontoenterthemore
optionsettings.
4
SelecttoleavetheOSDmenu.
Toreturntotheuppermenuorsetothermenuitems,
usetheuparrow(
)button.
Eachoptionisexplainedbelow.
Toadjusttheclearnessofthescreen.
Tocustomizethecolorofthescreen
Toadjustthepositionofthescreen
Toimprovetheclarityandstabilityofthescreen
Tocustomizethescreenstatusforauser'soperatingenvironment
D-SUB(Analogsignal)input.
Toadjustthebrightness,contrastofthescreen
Switchtofullscreenmodeaccordingtoinputimagesignal.
Changetheinputimagesignalratiotooriginal.
*ThisfunctionworksonlyifinputresolutionislowerthanMonitorsetratio(16:9).
Restoreallfactorydefaultsettings.Pressthe
◄
,
buttonstoresetimmediately.

13
ENG
ENGLISH
CUSTOMIZING SETTINGS
1
PressbuttononthebottomoftheMonitorset
todisplaytheOSD.
2
Selectthe""buttontoenterthemore
optionsettings.
3
Entertobypressingthe▼button.
4
Settheoptionsbypressingthe◄or►or▼
buttons.
5
SelecttoleavetheOSDmenu.
Toreturntotheuppermenuorsetothermenuitems,
usetheuparrow(
)button.
Eachoptionisexplainedbelow.
Toadjusttheclearnessofthescreen.

14
ENG
ENGLISH
CUSTOMIZING SETTINGS
1
PressbuttononthebottomoftheMonitorset
todisplaytheOSD.
2
Selectthe""buttontoenterthemore
optionsettings.
3
Selectbypressingthe►button.
4
Entertobypressingthe▼button.
5
Settheoptionsbypressingthe◄or►or▼
buttons.
6
SelecttoleavetheOSDmenu.
Toreturntotheuppermenuorsetothermenuitems,
usetheuparrow(
)button.
Eachoptionisexplainedbelow.
Setyourowngammavalue.:GAMMA0,GAMMA1,GAMMA2onthemonitor,
highgammavaluesdisplaywhitishimagesandlowgammavaluesdisplay
blackishimages.
Setyourownredcolorlevels.
Setyourowngreencolorlevels.
Setyourownbluecolorlevels.
Selectthescreencolor.
Setthescreentowarmcolortemperature(morered).
Setthescreentomediumcolortemperature.
Setthescreentocoolcolortemperature(moreblue).

15
ENG
ENGLISH
CUSTOMIZING SETTINGS
1
PressbuttononthebottomoftheMonitorset
todisplaytheOSD.
2
Selectthe""buttontoenterthemore
optionsettings.
3
Selectbypressingthe►button.
4
Entertobypressingthe▼button.
5
Settheoptionsbypressingthe◄or►or▼
buttons.
6
SelecttoleavetheOSDmenu.
Toreturntotheuppermenuorsetothermenuitems,
usetheuparrow(
)button.
Eachoptionisexplainedbelow.
Tomoveimageleftandright.
Tomoveimageupanddown.
Tominimizeanyverticalbarsorstripesvisibleonthescreenbackground.The
horizontalscreensizewillalsochange.
Toadjustthefocusofthedisplay.Thisitemallowsyoutoremoveanyhorizontal
noiseandclearorsharpentheimageofcharacters.

16
ENG
ENGLISH
CUSTOMIZING SETTINGS
1
PressbuttononthebottomoftheMonitorset
todisplaytheOSD.
2
Selectthe""buttontoenterthemore
optionsettings.
3
Selectbypressingthe►button.
4
Entertobypressingthe▼button.
5
Settheoptionsbypressingthe◄or►or▼
buttons.
6
SelecttoleavetheOSDmenu.
Toreturntotheuppermenuorsetothermenuitems,
usetheuparrow(
)button.
Eachoptionisexplainedbelow.
Tochoosethelanguageinwhichthecontrolnamesaredisplayed.
Usethisfunctiontosetthepowerindicatoronthebottomsideofthemonitorto
ONorOFF.IfyousetOFF,itwillgooff.
IfyousetONatanytime,thepowerindicatorwillautomaticallybeturnedon.
Iftheoutputofthevideocardisdifferenttherequiredspecifications,thecolor
levelmaydeteriorateduetovideosignaldistortion.Usingthisfunction,the
signallevelisadjustedtofitintothestandardoutputlevelofthevideocardin
ordertoprovidetheoptimalimage.Activatethisfunctionwhenwhiteandblack
colorsarepresentinthescreen.

17
ENG
ENGLISH
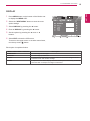
CUSTOMIZING SETTINGS
1
Press buttonon
thebottomoftheMonitorsettodisplaythe
OSD.
2
Settheoptionsbypressingthe◄or►or▼buttons.
3
SelecttoleavetheOSDmenu.
Eachoptionisexplainedbelow.
EnablesSUPERENERGYSAVINGyoucansaveenergywiththisenergy-efficientfunction
DisablesSUPERENERGYSAVING.
ResetsthevaluesoftotalenergyconsumptionreductionandCO2emissionreduction
estimates.
:Howmuchpowerissavedwhileusingthemonitor.
:ChangetheTOTALPOWERREDUCTIONtoCO2.
396mm
(15.6inch)
470mm
(18.5inch)
508mm
(20inch)
546mm
(21.5inch)
584mm
(23inch)
SUPERSAVING 4W/h 4W/h 5W/h 6W/h 7W/h
SavingDatadependsonthePanel.So,thosevaluesshouldbedifferentfromeachpanelandpanel
vendor.
LGcalculatedthesevaluesbyusing
(includingbroadcastvideo:IEC62087)
SUPERSAVINGreferstohowmuchpowercanbesavedusingtheSUPERENERGYSAVING
function.

18
ENG
ENGLISH
CUSTOMIZING SETTINGS
Eachoptionisexplainedbelow.
1
PressbuttononthebottomoftheMonitorsettodisplaytheOSD.
2
Settheoptionsbypressingthe◄or►or▼buttons.
3
SelecttoleavetheOSDmenu.
Itisamodethattheusercanadjusteachelement.ItcanadjustthecolormodeoftheMainMenu.
Itisamodethatthescreenisadjustedtothebestforthetextworks.
Itisamodethatthescreenisadjustedtothebesttoviewpictures.
Itisamodethatthescreenisadjustedtothebesttoviewthevideos.
Itisamodethatthescreenisadjustedtothebesttoplayagame.

19
ENG
ENGLISH
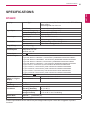
TROUBLESHOOTING
Isthepowercordofthedisplay
connected?
Checkandseeifthepowercordisconnectedproperlytothepower
outlet.
Isthepowerindicatorlighton?
PressthePowerbutton.
Isthepoweronandthepower
indicatorRed?
Adjustthebrightnessandthecontrast.
Isthepowerindicatorflickering?
Ifthedisplayisinpowersavingmode,trymovingthemouseor
pressinganykeyonthekeyboardtobringupthescreen.
TrytoturnonthePC.
Doyouseean"OUTOFRANGE"
messageonthescreen?
ThismessageappearswhenthesignalfromthePC(videocard)is
outofhorizontalorverticalfrequencyrangeofthedisplay.Seethe
'Specifications'sectionofthismanualandconfigureyourdisplay
again.
Doyouseea"NOSIGNAL"
messageonthescreen?
Whenthemonitorison"No-Signal"in5minutes,themonitorgoesto
DPMmode.
Doyousee“OSDLOCKED”when
youpushMENUbutton?
Youcansecurethecurrentcontrolsettings,sothattheycannotbe
inadvertentlychanged.YoucanunlocktheOSDcontrolsatanytime
bypushingtheMENUbuttonforseveralseconds:themessage“OSD
UNLOCKED”willappear.
DisplayPositionisincorrect.
Pressthebuttontoautomaticallyadjustyourdisplayimageto
theidealsetting.
Onthescreenbackground,vertical
barsorstripesarevisible.
Pressthebuttontoautomaticallyadjustyourdisplayimageto
theidealsetting.
Anyhorizontalnoiseappearingin
anyimageorcharactersarenot
clearlyportrayed.
Pressthebuttontoautomaticallyadjustyourdisplayimageto
theidealsetting.
Checkandadjustthedisplay
totherecommendedresolutionoradjustthedisplayimagetotheideal
setting.Setthecolorsettinghigherthan24bits(truecolor).

20
ENG
ENGLISH
TROUBLESHOOTING
Thescreencolorismonoor
abnormal.
Checkifthesignalcableisproperlyconnectedanduseascrewdriver
tofastenifnecessary.
Makesurethevideocardisproperlyinsertedintheslot.
Setthecolorsettinghigherthan24bits(truecolor)at
.
Thescreenblinks.
Checkifthescreenissettointerlacemodeandifyes,changeittothe
recommendresolution.
Haveyouinstalledthedisplay
driver?
BesuretoinstallthedisplaydriverfromthedisplaydriverCD(or
diskette)thatcomeswithyourdisplay.Or,youcanalsodownloadthe
driverfromourwebsite:http://www.lg.com.
MakesuretocheckifthevideocardsupportsPlug&Playfunction.
Checkandseeifthefrequencyortheresolutionwere
changed.Ifyes,readjustthevideocardtotherecommendresolution.
Iftherecommendedresolution(optimalresolution)isnotselected,lettersmaybeblurredandthe
screenmaybedimmed,truncatedorbiased.Makesuretoselecttherecommendresolution.
ThesettingmethodcandifferbycomputerandO/S(OperationSystem),andresolutionmentioned
abovemaynotbesupportedbythevideocardperformance.Inthiscase,pleaseasktothecomputer
orthevideocardmanufacturer.
Page is loading ...
Page is loading ...
Page is loading ...
Page is loading ...
Page is loading ...
Page is loading ...
Page is loading ...
Page is loading ...
Page is loading ...
-
 1
1
-
 2
2
-
 3
3
-
 4
4
-
 5
5
-
 6
6
-
 7
7
-
 8
8
-
 9
9
-
 10
10
-
 11
11
-
 12
12
-
 13
13
-
 14
14
-
 15
15
-
 16
16
-
 17
17
-
 18
18
-
 19
19
-
 20
20
-
 21
21
-
 22
22
-
 23
23
-
 24
24
-
 25
25
-
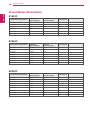 26
26
-
 27
27
-
 28
28
-
 29
29


LG BEJE2342SA User manual
- Category
- LED displays
- Type
- User manual
Ask a question and I''ll find the answer in the document
Finding information in a document is now easier with AI