
DOC ID - 1784 • Rev 01 1 / 20
ClareVision Plus App Guide
Content
Introduction...1
Installing and signing in/creating an account with CVP...1
Using the CVP app...3
Contact information...20
Last modified: 10/04/18
Introduction
The ClareVision Plus Application (app) has updated features and a stylish new
layout. The new app makes using ClareVision Plus (CVP) cameras and NVRs
easier than ever.
For device specific “how to” information (installation options and included items),
see the Clare Controls Knowledge Base Quick Start Guides Space.
https://knowledgebaseclarecontrols.atlassian.net/wiki/spaces/QSG/overview
Installing and signing in/creating an account with CVP
Install and sign in/create an account to access your CVP devices.
To install the ClareVision Plus app:
1. Access your device’s app store.
ClareVision Plus for Android – Google Play
ClareVision Plus for iOS - iTunes
2. Search for ClareVision Plus, and then download the app.

DOC ID - 1784 • Rev 01 2 / 20
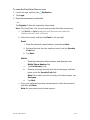
To setup the ClareVision Plus account:
1. Launch the app, and then tap My Devices.
2. Tap Login.
3. Enter the homeowner’s credentials.
– or –
Tap Register. Follow the registration steps below.
Note: The ClareVision Plus account used must be that of the homeowner.
a. Tap Mobile or Email (preferred), and then read and select the
checkbox for the Terms of Service.
b. Select the country, and then tap Finish in the top-right.
Email
i. Enter the customer’s email address, and then tap Next.
ii. Retrieve the code from the email and enter it into the Security
Code field.
iii. Tap Next.
Mobile
i. Enter the customer’s mobile number, and then tap in the
Mobile Phone Number field.
ii. Tap Get Security Code.
iii. Retrieve and copy the code from the text message, and then
paste in into the Security Code field.
Note: If the code is not sent correctly or the timer expires, tap
Get Again.
iv. Tap Next.
c. Enter your preferred username and password, confirm the password,
and then tap Finish.
Note: the username cannot contain spaces.

DOC ID - 1784 • Rev 01 3 / 20
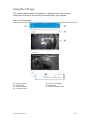
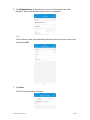
Using the CVP app
This sections below contains information on getting to know and using the
ClareVision Plus app to successfully view and monitor your cameras.
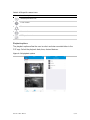
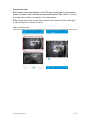
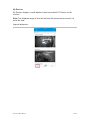
Figure 1: CVP home page
(1) Playback options
(2) Add a device
(3) Camera settings
(4) Camera live view
(5) CVP account settings
(6) Notifications
(7) Camera and NVR feeds

DOC ID - 1784 • Rev 01 4 / 20
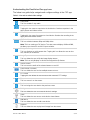
Understanding the ClareVision Plus app icons
The below icon guide helps navigate and configure settings in the CVP app.
Table 1: Live and recorded video settings
Icon
Icon description
2-way audio
This icon enables 2-way audio.
Take photo
Tapping this icon saves a snapshot to the local device. Retrieve snapshots in the
app’s pictures and videos section.
Record video
Tapping this icon saves live stream to a local device. Retrieve the recording in the
app’s picture and videos section.
HD/Basic video
This icon switches between 480p and 1080p video.
Note: This icon varies per CVP device. The cube camera displays 1MB and 2MB,
the Nanny cam shows SD and HD. Expect variation.
Start/pause footage
This icon displays on multi-camera view. Tapping this icon allows the user to view
one, selected, or all streams.
Image flip
This icon allows the user to flip the image display stream.
Note: This icon only displays on devices that support the flip feature.
Volume control
This icon turns the audio of the selected stream on and off.
Camera view (1 monitor)
This icon allows the user to view multiple streams at once.
PTZ control
Tapping this icon allows the user access to their camera’s PTZ settings.
Zoom
This icon zooms in on the stream.
Back
This icon brings the user back to the previous screen.
Settings
This icon allows the user to access the device’s settings.
Share
This icon allows the user access to the device share feature.
Add device
This icon allows the user to add a new device.
Playback
This icon allows the user to play back footage from the stream.

DOC ID - 1784 • Rev 01 5 / 20
Table 2: PTZ specific camera icons
Icon
Icon description
Start/stop and auto scan
Focus control
Zoom
Iris control
PTZ speed control
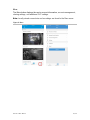
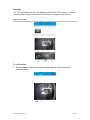
Playback options
The playback options allow the user to select and view recorded video in the
CVP app. Select the playback date, time, desired devices.
Figure 2: CVP playback options

DOC ID - 1784 • Rev 01 6 / 20
To view recorded video from the ClareVision Plus app:
Notes
• You must have an NVR or a micro SD card to record footage.
• CVP micro SD cards come pre-formatted for CVP cameras. Other micro
SD cards require formatting before use.
1. Tap .
2. Tap .
3. Select a date range.
4. Select the camera(s) to search for recorded footage.
5. Tap Start Playback.
Recorded video is displayed.
6. Use the Icons to navigate the recorded footage.
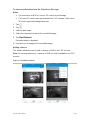
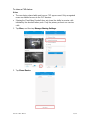
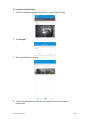
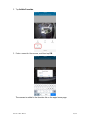
Adding a device
This feature allows the user to add a camera or NVR to the CVP account.
Note: For security measures, a camera or NVR can only be added to one CVP
account.
Figure 3: CVP addition options

DOC ID - 1784 • Rev 01 7 / 20
To add a ClareVision Plus camera:
1. Launch the CVP app.
2. Tap My Devices, and then tap .
3. Tap Scan QR Code.
4. Scan the QR code on the camera housing or the packaging label.
5. Follow the instructions in the CVP app to complete the process.
6. Once completed, tap the CVP logo under the camera part number, the live
stream displays
To add a legacy Clare Camera/NVR:
1. Launch the ClareVision Plus app.
2. Tap My Devices, and then tap .
3. Tap Manual Adding.
4. Enter the device information, and then tap the Save icon in the top-right
corner.
Note: To remotely view manually added cameras, the user must configure
port forwarding on their router/firewall. See the router/firewall’s documentation
for instructions.
To remove a camera from the CVP account:
1. Launch the CVP app.
2. Tap My Devices, and then tap the 3 dots on the top-right corner of the
desired camera.

DOC ID - 1784 • Rev 01 8 / 20
3. Tap Delete Device, and then tap Confirm.
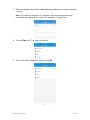
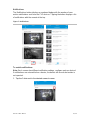
Camera settings
The advanced camera settings display the selected camera’s information. Name,
time zone, date format, alarm notifications, and device information are available
options for each camera.
Note: The advanced settings vary per device.
Figure 4: CVP additional options

DOC ID - 1784 • Rev 01 9 / 20
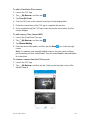
Camera live view
Each camera’s live view displays on the CVP app’s home page. Tap the desired
device’s stream to view it and access the stream features. See, Table 1: Live and
recorded video settings, on page 4 for icon descriptions.
Note: Swipe the camera stream left to view the next camera in the list and right
to view the previous camera in the list.
Figure 5: CVP live view

DOC ID - 1784 • Rev 01 10 / 20
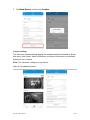
More
The More button displays the user’s account information, account management,
sharing settings, and additional CVP settings.
Note: Locally stored screenshots and recordings are found in the More menu.
Figure 6: More

DOC ID - 1784 • Rev 01 11 / 20
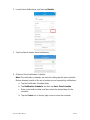
To share a CVP device:
Notes
• The user being shared with must have a CVP app account. Only recognized
users are allowed access to the CVP devices.
• Sharing the ClareVideo Doorbell does not share the ability to receive calls
initiated by the doorbell button push. Only the primary account can receive
calls.
1. Tap More, and then tap Manage Sharing Settings.
2. Tap Share Device.

DOC ID - 1784 • Rev 01 12 / 20
3. Enter the desired user’s email address/phone number and a remark about the
camera.
Note: The remark is limited to 20 characters. We recommend adding the
name/brief description of the camera, for example – Garage Cam.
4. Tap the Plus icon to select the device.
5. Tap on the desired device(s), and then tap OK.

DOC ID - 1784 • Rev 01 13 / 20
6. Tap All permissions to give the user access to the cameras live view,
playback, alarm, and two-way audio features if applicable.
– or –
Tap the device name and individually select the features the user can access,
and then tap OK.
7. Tap Save.
The list of shared devices displays.

DOC ID - 1784 • Rev 01 14 / 20
To accept a shared device:
1. Tap the notification displayed at the top of ClareVision Plus app.
2. Tap Accept.
3. The shared device(s) display.
4. Tap the desired device to view the live stream or access the shared
permissions.

DOC ID - 1784 • Rev 01 15 / 20
Notifications
The Notifications button displays a numbered badge with the number of new
motion notifications sent from the CVP devices. Tapping the button displays a list
of notifications with the newest at the top.
Figure 7: Notifications
To enable notifications:
Note: Each camera has different notification settings, configure each as desired.
If notifications are not enabled on a device, the device still records but motion is
not reported.
1. Tap the 3 dots next to the desired camera’s name.

DOC ID - 1784 • Rev 01 16 / 20
2. Locate Alarm Notifications, and then tap Disable.
3. Tap the slider to enable alarm notifications.
4. (Optional) Set a Notification Schedule.
Note: The notification schedules are used for setting specific time schedules.
Motion detected outside of the set schedules are not reported by notifications.
a. Tap the Notification Schedule slider.
b. Tap Notification Schedule, and then tap Set a Time Schedule.
c. Enter a start and end time, and then select the desired days for the
schedule.
d. Tap the Check icon in the top-right corner to save the schedule.

DOC ID - 1784 • Rev 01 17 / 20
My Devices
My Devices displays a small window of each associated CVP device on the
account.
Note: The displayed image is from the last time the stream was accessed, it is
not a live view.
Figure 8: My Devices

DOC ID - 1784 • Rev 01 18 / 20
Favorites
The CVP app allows the user the ability to favorite their CVP cameras. Cameras
set as favorites display at the top of the My Devices page for easy access.
Figure 9: Favorites
To set favorites:
1. Tap the desired camera’s preview, and then tap the 3 dots next to the
camera’s name.

DOC ID - 1784 • Rev 01 19 / 20
2. Tap Add to Favorites.
3. Enter a name for the camera, and then tap OK.
The camera is added to the favorites list on the app’s home page.

DOC ID - 1784 • Rev 01 20 / 20
Contact information
Clare Controls, LLC.
7519 Pennsylvania Ave, Suite 104
Sarasota, FL 34243
General: 941.328.3991
Fax: 941.870.9646
www.clarecontrols.com
Integrator/Dealer Support: 941.404.1072
Homeowner Support (ClareCare): 941.315.2273 (CARE)
-
 1
1
-
 2
2
-
 3
3
-
 4
4
-
 5
5
-
 6
6
-
 7
7
-
 8
8
-
 9
9
-
 10
10
-
 11
11
-
 12
12
-
 13
13
-
 14
14
-
 15
15
-
 16
16
-
 17
17
-
 18
18
-
 19
19
-
 20
20


Ask a question and I''ll find the answer in the document
Finding information in a document is now easier with AI
Related papers
-
clare CLR-CVP-B2B50-ODI Quick start guide
-
clare CLR-VACC-WBKT1B Installation guide
-
clare CLR-V200-4B28W Installation guide
-
clare CVP-64050-10 User manual
-
clare CLR-V200-4PNVR1 Quick start guide
-
clare CLR-V100-2T36B Installation guide
-
-
clare CLR-V200-4BVFB Installation guide
-
clare CLR-V200-4DVFW Installation guide
-
Other documents
-
Clare Controls ClareVision Plus Series Quick start guide
-
-
-
-
-
-
-
-
OvrC LUM-300-CUB-IPW-WH User guide
-