Page is loading ...

CO_EIN]Y$
SAFETY
......................... --. ...................... 1=3
1_STAL[LA'_'_OH
USE AHD CARE
Features of Your Counter Unit .......... 6
To Start Things Cooking ......... 7
Cleaning Tips ............................. 8
Removable Parts ...................... 9
SERVBCF-
Before Calttng For Service
WARRANTY
.... !0
MODEL 42420
42421
42425
Kenrnore
lViNiV1191(347726
SR10113
b-3

T
Y@@
appalances, basic safety precautions shouUd be followed, inclluding _he following:
Teach children notto play
with control knobs or any
other part of the counter
unit,
_ever leave children
alone or unattended where
a counter unit is in use.
Caution:
Hever store things chil-
dren might want above a
counter unit.
Hever let anyone climb,
sit or stand on the counter
unit. They might be in-
jured on a hot surface.
_ever leave an oven door
open when you are not
watching.
1 NESAF15-1

ABways keepthe counter unit
area clear and free from thin gs
that will burn.
CAUTDON:
Never store things in an
oven or near cooktop ele-
mentslburners. Thesethings
may catch fire and plastic
items could melt.
Never use your counter unit
for warming or heating a
room. You could be burned or
seriously injured. Such mis-
use could also cause damage
to the unit.
Never wear loose clothing
when using your counter
unit. Such clothing could
catch fire.
Never use atowel orother bulky
cloth as a potholder. Such
cloths could catch fire on a hot
element/burner.
Never let pot handles stick
out over the front of the
counter unit. Turn handles in
so that they cannot be
bumped into. Keep the
handles away from other hot
surface elements/burners.
2
Never leave cooktop elements!
burners unwatched at high heat
settings. Boilovers cause
smoking and greasy spillovers
could catch fire.
NESAF16

Keep this book for later use.
Be sure your counter unit is installed and grounded
properly by a qualified technician.
Choose pots and pans with flat bottoms, large enough
to cover the entire cooktop element. This will cut down
the risk of setting potholders or clothing on fire with an
uncovered element and waste less energy.
AIways use care when touching the cooktop. The glass
surface of the counter unit will retain heat after controls
have been turned off. Be careful not to get burned.
Onily some kinds of glass or ceramic pans can be used
for cooktop cooking. Be sure that the pan you use will
not break when heated on the cooktop elements.
Always use dry potholders when removing pans from
the oven. Moist or damp potholders can cause steam
burns.
Always follow cleaning Instructions in this book.
Always keep the cooktop area clear and free from
things that will burn, gasoline and other flammable
vapors and liquids.
Always keep the counter unit cteano Food and grease
are easy to Ignite. Clean counter unit and vent hoods
regularly.
Always keep combustible wall coverings, curtains or
drapes a safe distance away from your counter unit.
Always keep dish towels, dish cloths, potholders and
other linens a safe distance away from your counter
unit. Never store such items in your counter unit°
Always keep wooden, plastic utensils or canned food
a safe distance away from your counter unit.
Never put removable heating elements In water. Don't
put them in a dishwasher.
Never try to repair or replace any part of the oven
unless instructions are given In this book. All other
work should be done by a skilled technician.
Never heat unopened food containers. Pressure
buildup may make container burst and cause injury.
Never leave jars or cans of fat or drippings on or near
the oven. Never let grease build up on your oven° You
can keep grease fires from starttng If you clean up
grease and spills after each oven use.
Never try to move a pan of hot fat, especially a deep fat
fryer. Walt until the fat has cooled.
Never clean cooktop surface when it is hot. Some
cleaners produce noxious fumes and wet cloths could
cause steam burns if used on a hot surface.
Never touch surface units or heating elements. They
may be hot even though they appear dark In color.
Never use the open coil elements without reflector
pans or drip bowls in place, if these pans or bowls are
not there during cooking, wiring or other range parts
may be damaged.
Never use aluminum foil to line drip bowls. Improper
use of foil could start a fire or cause electrical shock.
Read and understand this information
NOW. g Should you ever need it, you will
not have time for reading.
Never use water on a grease fire. it will
onSy spread the f_ames.
COOKTOP GREASE FIR_:
Never pick up a faaming pan,, oRnstead
11, Turn off the element,
2= Smother the fire with a tighUy fitting
pan lid, baking soda oran extinguisher,
OV":N FIRE
Do not try to move the pan.
t. C|ose oven door and turn controas off.
2. If fire continues, throw baking soda on
the fire.
3 NESAF31

N$$ALLATI
TO THE nNSTALLER: Leave This Guide With
The Range.
TO THE OWNER OF THE RANGE: Retain This
Guide For Future Reference.
TOOL UST
The following tools are needed to install your new
counter unit.
o 1/8" drill bit
• Electric or hand drill
• Flat bladed screwdriver
. Pencil
. Ruler or tape measure and straightedge
. Hand or saber saw
LOCATIOH
Counter space must be provided for installation of the
counter unit. When choosing a location, consider the
following:
o The cooktop should be easy to reach and lighted with
natural light during the day_
• To eliminate the risk of burns or fire by reaching over
heated surface units, cabinet storage space located
above the surface units should be avoided. If cabinet
storage space is to be provided, the risk can be
reduced by installing a range hood that projects
horizontally a minimum of 5" beyond the bottom of
the cabinets. Cabinets installed above the counter
unit may be no deeper than t3".
To insure accuracy, it is best to make a template
when cutting the opening in the counter. See Figure
1 and Table 1 for all necessary dimensions.
The following minimum clearances must be
maintained:
2 1/2" minimum clearance between the front edge of the
counter unit and the front edge of the counter.
30" minimum vertical clearance from the cooktop to the
counter unit and the front edge of the counter.
30" minimum vertical clearance from the cooktop to the
nearest overhead surface.
5 1/2" minimum clearance on the left side and 2" mini-
mum clearance on the right side of the counter unit to a
height of at least 18".
5 1/2" MIN.
CLEARANCE
TO SIDE WALL
CLEARANCE
TO SIDE WALL
L
TABLE t
DiMENSiONS
A 30 1t4"
B 21 1/2"
......... ,,, ,,,.....................
C 28 318"
D 19 3/8"
E 19 1/2"
F 28 1/2"
G 14 1/4"
H 3"
J 33 1/4"
K 2 1t4"
L 3 1/2"
UNIT AND CUTOUT DIMENSIONS
Fig. 1
4 NEINS44

ELECTRmCAL REQUIR MEHTS
We recommend that you have the electrical hookup of
your counter unit done by a qualified electrician. After
installation, have the electrician show you where your
disconnect ts located.
Check with you r local utilities for electrical codes which
apply in your area. Failure to wire your unit according to
governing codes could result in a hazardous condition.
If there are no local codes, your counter unit must be
wired and fused to meet the requirements of the
NATIONAL ELECTRICAL CODE, ANSt/NFPA NO. 70-
1990. You can get a copy by writing:
National Fire Protection Association
Batterymarch Park
Quincy, MA 02269
You must use a three-wire, single-phase A. C. 208Y/120
Volt or 120f240 Volt, 60 Hertz electrical system. If you
connect to aluminum wiring, properly installed
connections listed for use with aluminum and
copper wiring must be used.
Use aminimum wire size of No. 10 copper wire protected
with a 30 Amp. fuse or circuit breaker for' both 208Y/120
Volt and 120/240 Volt electrical systems.
INSTALLATION
Before installing the counter unit or moving itto another
location, have the electrician verify:
. That your home is provided with adequate electrical
service.
• That the addition of the counter unit witl not overload
the household circuit on which it is used.
Cut the opening in the countertop. Be sure to maintain
cutout dimensions and minimum clearances as shown
on previous page. To minimizechipping ofthe countertop
you can apply masking tape before you make the cut.
Install an approved junction box where it will be easily
reached through the front of the cabinet where the
counter unit will be located. The counter unit has 3 feet
of conduit_
IMPORTANT: The junction box must be located
where it will allow considerable slack in the
conduit for serviceability, See Fig. 3.
Install the counter unit in the cutout opening. Note: If
the unit is being installed in a blind counter (one with no
cabinet opening below), wire connections must be made
before putting the unit into the cutout.
Secure the tub of the counter unit to the counter with the
wood screws shipped with the unit.
ELECTRICAL CONNECTIONS
The electrical power to the supply line
must be shut off while line connections
are being made.. Failure to do so could
result in serious injury or death.
When making the wire con nections, use the entire length
conduit provided (3 feet)_ The conduit must not be cut.
Connect the red and black leads from the counter unit
conduit to the corresponding leads in the junction in the
junction box.
The bare ground wire in the conduit is connected to the
counter unlt frame. Connect the other end of this wire to
a properly grounded cold water pipe or use another
approved grounding method.
A white (neutral) wire is not needed for this unit. The
white lead from the household electrical supply can be
taped and terminated in the junction box.
BE SURE THIS CUT DOES NOT
INTERFERE WITH CABINET
STRUCTURE AT FRONT
16" MIN.
CM)
Fig.3
NEINS45-1

The model and serial number of your counter unit can be found on a tag
underneath the unit. Copy these numbers into the space provided in your
installation instructions on page 4.
REMOVABLE
COOKTOP UNITS
(See page 9 )
/
MODEL AND SERIAL NUMBERS
(Located under the cooktop)
COOKTOP
SURFACE
(See CIeaningTips
onpage 8)
KNOBS
(Seepage 7)
COOKTOPINDICATOR
LIGHT
6 NECUF04

Cooktop Cooking
The sign near each cooktop control knob shows which
element Is turned on by that knob,
CORRECT
@0 O0 O® O0
O0 @0 O0 O@
Left Left Right Right
Rear Front Rear Front
To operate cooktop controls:
1. Push to turn.
2. Set on or between marks for desired heat,
OFF
3 II 5
4
For best cooktop results and energy efficient operation,
you should use pans that:
A, Have flat bottoms and straight sides.
B. Have light handles that do not tilt pans°
C_ Are about the same size as_the element.
PanBottomRat/PanSitsLevel
PanCoversEntireElement
INCORRECT
1 _ •....
Pan Too Small
Warped Pan
Warped Pan Warped Pan
Heavy Handle
Tilts Pan
Never line the bowls below cooktop
elements with aluminum foil Foil can
prevent normal heat flow and damage
the unit,
7 NEMTC16

C,-EANmNG CHART
Warm water, a mild detergent, and a soft cloth are safe to use on all cleanable parts of your counter unit. Do not use
metal scouring pads except where recommended.
PART CLEANING MATERIALS REMARKS
Control knobs Detergent, warm water, Do not use abrasive cleaners. Knobs pull off for
soft cloth easier cleaning.
Porcelain enameled Detergent, warm water, Ifacids (such as fruit juices, marinades) should spill
cooktop paper towel, dry cloth on the unit while it is hot, use a dry paper towel or
cloth to wipe them up right away° When the surface
has cooled, wash and rinse. Polish with dry cloth. No
matter how stubborn the stain, never use harsh
abrasive cleaners. They could permanently damage
the enamel surface. We recommend a cleanser such
as Soft Scrub® brand or a similar cleaning product to
keep porcelain surfaces looking clean and new. After
cleaning, rinse well with a vinegar and water mixture.
This will help prevent a brown residue from forming
when the oven is heated. Buff these areas dry with a
dry cloth.
Chrome reflector Detergent, water, Clean after each spillover. Rub gently with scouring
bowls ammonia, scouring pad pad. Wash the reflector bowls with water and soap
after each use. Stubborn stains may require an
ammonia soaked paper towel.
Brushed chrome Detergent, warm water, soft Do not scour chrome tops. Stubborn stains may be
cooktop (some cloth or a chrome cleaner, removed by using Espree Mag Wheel Cleaner® or
models) or Sears Cooktop Cleaning Turtle Wax Polishing Compound®. To remove finger
Creme prints on brushed chrome, apply a little baby oll with
a paper towel. Rub in the direction of the brush
marks. Armor All Protectant® can also be used (after
cleaning). Be sure to clean spills of acidic food
............ quickly. Vinegar spills can permanently stain chrome.
if cleaning methods described above prove ineffective, baked-on food residue or stains on chrome cooktops
can be removed by using pad type oven cleaners. Use extreme caution. Oven cleaners are caustic and will
damage painted or aluminum surfaces, such as range sides, backguard or control panel. Do not use spray type
oven cleaners. Overspray will damage nearby painted surfaces and heating elements. Use several layers of
newspaper and masking tape to cover surfaces such as the backguard, control panel, range sides, countertops,
etc. Remove cooktop elements (except solid disk elements), burner bowls, grates, etc. Apply the pad type oven
cleaner evenly to the entire top surface. The entire top must be cleaned to keep the finish consistent in color.
Use extreme caution to prevent the oven cleaner from coming in contact with any other surface. Let the cleaner
remain on the top for 20-30 minutes. Rinse the top well to remove every' trace of oven cleaner. Dry the top and
apply Armor All Protectant® to protect the finish.
Glass
Glass cleaner and paper
towels
if you need additional
cleaning for spotting, wash
with equal parts white
vinegar and warm water;
rinse well and dry.
Remove stubborn soil with paste of baking soda and
water. Do not use abrasive cleaners. Rinse
thoroughly.
8 NECCH 17

REMOVABLE KHOBS
All control knobs may be removed for easy cleaning by
pulling the knob straight off the stem, Be sure that the
knob is in the OFF position before removal.
Hint: Slip a thin cloth (such as a handkerchief) or a piece
of string under and around the knob edge and pull up,
Caution: Read these instructions carefully
before replacing the knobs. Replacing
the knobs improperly will damage the
knobs and the spring clip on the stems.
Bf this happens_ the knobs will fit
loosely.
.............. _,.............. ,,, ii ll,, ii ,/,±UL
To replace the knob:
1. Match the flat side of the "D" Shaft on the knob to the
flat side of the stem and replace knob.
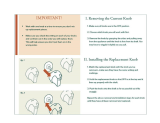
REMOVABLE COOKTOP UNITS
The cooktop elements can be unplugged and the bowls
removed for cleaning.
Be sure all cooktop unit contro! knobs are turned
off and elements are cool before you remove or
replace a cooktop unit,
To remove:
1. Grasp element, tilt it upward slightly to clear the
bowl, then pull away from the receptacle. The element
will not sit level when replaced if it is forced too far
upward when removed=
2o For modeiswith porcelain enameled reflector bowls,
remove the chrome trim ring.
3. Lift out the bowl.
Do not put the element into water, it cleans itself when
heated during normal use°
To replace:
1. Replace the bowl. Be sure the receptacle Is showing
in the bowl opening,
2. For models with porcelain enameled reflector bowls,
replace chrome trim ring.
3_ Slide the plug ofthe element firmly into the receptacle
and lower the element into place°
iMPORTANT: Never operate a cooktop element without
the bowl in place. This can cause scorching of the
cooktop, burning ofwiring insulation and loss of energy.
ELEMEN'I'S
REFLECTOR RECEPTACLE
CAUTION: Do not pul! element up more than t/2"
or damage to the receptacle wi!!
OCCUr=
LmFT=UP COOKTOP
The cooktop lifts up so the cooktop and the area
underneath (burner box bottom) can be cleaned.
Remove four surface units as described above.
To raise the cooktop:
1. Remove knobs.
2, Grasp at the front and lift upo
3, Raise the support rod into place to hold the cooktop
while cleaning,
To lower the cooktop:
1. Carefully replace the support rod and lower the
cooktop. Press into place, Make sure the strikes fit
in the catches to fasten the cooktop,
2, Replace four surface units.
3. Replace knobs.
MAINTOP
BRACKET
Be sure to secure cooktop support rod in the
maintop strike bracket,
MAINTOP
SUPPORT
ROD
9 NEMNT26-2

BEFORE C LHNG FOR SERVBCE
Save time and money = Check this list before you call for service,
To eliminate unnecessary service calls, first, read all the instructions in this manual carefully. Then, if you have a
problem, always check this list of common problems and possible solutions before you call for service.
If you do have a problem you cannot fix yourself, call your nearest Sears Store or Service Center for help. When
calling, have this manual and your Repair Parts List handy with the model, serial number and purchase date.
PROBLEM POSS0BLE CAUSE DOH'T CALL FOR SERVtCE
UHTBL YOU CHECK
elements do ° No power to unit , Check household fuse or circuit breaker,
• Cooktop
not work
Heavily soiled or stained
chrome cooktop cannot
besatisfactorily cleaned
improper operation ofcon-
troi
Surface unit not replaced
correctly
, Surface element needs
replacing
• Spills were not wiped up
promptly
, Be sure knob Is pushed in while turning.
o When surface unit is cool, check to see if
drip pans are set securely in countertop
and unit is plugged in correctly.
o Unplug the element which will not heat. Plug
in another element of the same size in its
place, if the second element heats, replace
the first element, tfthe second element does
not heat, call for service.
o See the Cleaning Tips for cleaning instruc-
tions.
10 NESER32-1

e_r OoU:ttar_ raftor}s are
FULL OHE YEAR WARRAHTY OH THE FUNCT_OHlilRG OF ALL
PARTS EXCEPT GLASS PARTS
If, within one year from the date of Installation, any part, other than a glass
part, falls to function properly due to a defect In material or workmanship,
Sears will repair or replace It, free of charge.
FULL 3e-DAY WARRAH_ ON GLASS PARTS AND FINISH OF POR-
CELAnN EHAMEL, PAnHTED OR BRmGHT METAL FIHISHED PARTS
If, within 30 days from the date of Installation, any glass part or the finish on
any porcelain enamel, painted or bright metal part Is defective In material or
workmanship, Sears will replace the part, free of charge.
FULL 90_IDAY WARRAN_ ON MECHANliCAL ADJUSTMENTS
For 90 days from the date of Installation, Sears will provide, free of charge,
any mechanical adjustments necessary for proper operation of the range,
except for normal maintenance.
If the unit is subjected to other than private family use, the above warranty
coverage Is effective for only g0 days.
WARRANTY SERVQCE lie AVAI]LABLE BY CONTACTliNG THE
NEAR_ST SEARS SERVliCE CENTeR/DEPARTMENT _N THE
UNQTED STATES
This warranty applies only while this product is in use In the United States.
This warranty gives you spectflc legal rights, and you may also have other
rights which vary from state to state.
SEARS,ROEBUCKandCOo
Dept.731 CR-W
SearsTower
Chicago, IL 60684
WE WHAT SELIL
"We Service What We Sell" ts our assurance to you ttrat you can depend on Sears for service because Sears
service ts natlonwlde.
Your Kenmore Counter Unit has added value when you conslder that Sears has a service unit near you staffed
by Sears trained technicians.., professional tech nlclans specifically trained on Sears appliances, having the
parts, tools and equipment to ensure that we meet our pledge to you -- "We Service What We SelW'
TO FURTHER ADD TO THE VALUE OF YOUR RANGE, BUY A SEARS PJIAmNTENANCE AGREEMENT,
Kenmore Counter Units are designed, manufac-
tured and tested for' years of dependable opera-
tlon. Yet, any modern appliance may require
service from tlme to ttmeo The Sears Warranty
plus the Sears Maintenance Agreement provides
protection from unexpected repair bills and as_
sures you of enjoying maximum range efficiency.
Here's a comparative warranty and Maintenance
Agreement chart showing you the benefits of a
Sears Range Maintenance Agreement°
Years o! Owners} 1pCoverage
Replacement of Defective
Parts other than Porcelain
or Glass
2 Mechanlca| Adjustment
3 Porcelain and Glees Parts
Annual Preventive Malrtten-
ence Check at your request
1st Year
W
g0 DAYS
W
3O DAYS
W
2nd Year
MA
MA
MA
3rd Year
MA
MA
lVlA
W - Werranty MA ÷Malnton_ncQ Agreement
CONTACT YOUR SEARS SALESPERSON OR LOCAL SEARS SERVICE
CENTER TODAY AND PURCHASE A SEARS MARNTEHANCE AGREEMENT.
Solid by SEARS_ ROEBUCK AND CO,, Chicago, I_L 60684
Prinled in LaFayette, Georgia --
/