ACE 7306707 Owner's manual
- Category
- Air blowers/dryers
- Type
- Owner's manual
This manual is also suitable for

i 'munmmmBw,_,
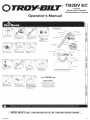
Operator'
®
T
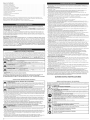
2-Cycle
Electric Start Capable
Handheld Blower / Vacuum
RemovingUnit FromCarton
Remove all contents from
carton.
AssembleThe Unit
) t
Place the unit on a level
surface. Fill the fuel tank.
AssembleThe Unit
Insert the upper blower
tube into the blower outlet
and turn it clockwise until
it locks into place.
]
j
Install the lower blower tube
onto the upper blower tube
and turn it clockwise until it
locks into place.
Starting The Unit
Primer L
) J
Press the primer bulb 10
times, or until fuel is visible.
]
fChoke_er E
Move the choke lever to
Position 1.
]
E
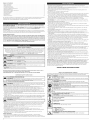
I Gallon 3.2 oz
Mix thoroughly in a separate
fuel can:
- 3.2 fl. oz. of 2-cycle
engine oil
- 1 gallon of unleaded
gasoline
NOTE: Do not mix directly in
the fuel tank.
Tools Required:
• Flathead Screwdriver
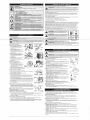
Handle
"°°°'
Cruise Control _ ,__ _
Starter Rope
Upper Blower Tub
_._ cover__
_Z/ P.merBu,b_
_ Fuel Cap
Lower Vacuum Tube
Upper Vacuum Tube
Choke Lever
Starting The Unit
f
)
Crouch in the starting
position.
E]
DO NOT squeeze the
trigger.
]
f
Do not squeeze the
trigger. Pull the rope 5
times.
Do not squeeze the
trigger. Move the choke
lever to Position 2.
E]
Elbow
Bag Strap
•Vacuum Bag
__ Zipper
Starting The Unit
f
Do not squeeze the
trigger. Pull the rope 3-5
times to start the engine.
E] E
,j
Squeeze the trigger, or
press down the cruise
control, and allow the unit to
warm up for 30-60 seconds.
L]
Continue to squeeze the
trigger, Move the choke
lever to Position 3. Warm
the unit for an additional 60
seconds. The unit may be
used during this time.
Need Help?
Call 1-800-828-5500
DIDN'T START?
Repeat the starting instructions.
IF engine fails to start after2 attempts,
move choke lever to position 3 and pull
the starter rope until engine starts
IF unit still fails to start, refer to the
operator's manual for additional starting
and troubleshooting information
n
I
_m
C
uJ
it)
n
I
C
I,L
n
I
m
O
_C
o_
¢0
uJ
NEED HELP? CALL 1-800-828-5500 iN U.S. OR 1-800-668-1238 iN CANADA
769-07209 P00 06/11

TABLE OF CONTENTS
Service Information ................................................................ 2
Safety Information ................................................................ 2
Assembly Instructions ............................................................. 3
Oii and Fuel Information ............................................................ 3
Starting and Stopping Instructions .................................................... 3
Operahng Instructions ............................................................. 3
Maintenance and Repair Instructions .................................................. 4
Cleaning and Storage .............................................................. 4
Optional Accessory ............................................................... 4
Troubleshooting .................................................................. 4
Specifications .................................................................... 4
Warranty Information ............................................................. 16
All mformahon, illustrations, and specifications ,q this manual are based on the latest product information
available at the time of pnnhng. We reserve the right to make changes at any time without notice.
Copyright© 2011 MTD SOUTHWEST INC, All Rights Reserved.
DO NOT RETURN THiS UNIT TO THE RETAILER. PROOF OF PURCHASE WILL BE REQUIRED
FOR WARRANTY SERVICE.
For ass=stance regarding the assembly, controls, operation or maintenance of the un=t, please call the
Customer Support Department at 1=800=828=5500 in the United States or 1=800-668=1238 m Canada.
Addlhonal mformahon about the umt can be found on our webslte at www.troybilt.com or
www.troybilt.ca.
For serwce, please call the Customer Support Department to obtaHqa list of authorized service dealers
near you. Service on this umt, both within and after the warranty period, should only be performed by an
authonzed and approved service dealer. When servicing, use only idenhcal replacement parts.
SPARK ARRESTOR NOTE
NOTE: For users on U.S. Forest Land and in the states of California, Maine, Oregon and Washington.
All U.S. Forest Land and the state of Cahfornla (Pubhc Resources Codes 4442 and 4443), Oregon and
Washington require, by law that certain ,_ternal combustion engines operated on forest brush and/or grass-
covered areas be equipped with a spark arrestor, ma,qta,qed ,q effective work,qg order, or the engine be
constructed, equipped and maintained for the prevention of fire. Check with your state or local authonhes for
regulations perta,qlng to these requirements. Failure to follow these requirements could subject you to hablhty
or a fine. This unit is factory equipped with a spark arrestor. If it requires replacement, ask your LOCAL
SERVICE DEALER to install the Accessory Part #753=06027 Muffler Assembly.
• SAFETY ALERT SYMBOLS •
Safety alert symbols are used to draw your attention to possible dangers. These symbols, and their
explanahons, deserve your careful attenhon and understanding. The safety warnings do not by
themselves eliminate any danger. The instructions or warnings they give are not substitutes for
proper accident prevent=on measures. These safety mstruchons are not meant to cover every
possible condition that may occur. If queshons arise, please call the Customer Support
Department at 1=800=828=5500 (U.S.) or 1=800=668=1238 (Canada).
SYMBOL MEANING
DANGER: S@qals an EXTREME hazard.
Failure to obey a safety DANGER signal WiLL result in serious injury or death to yourself or
to others.
__ I WARNING: Signals a SERIOUS hazard.
Failure to obey a safety WARNING s@qal CAN result in senous injury to yourself or to others.
[_.l CAUTION: Signals a MODERATE hazard.
Failure to obey a safety CAUTION signal MAY result in property damage or injury to
yourself or to others.
IMPORTANT! Signals special mechanical informahon.
NOTE: S@qals addlhonal important general mformahon.
,, To reduce the risk of hearing loss associated with sound level(s), always wear ear/heanng
protection when operating this unit.
,, Wear heavy long pants, boots, gloves, and a long sleeve shirt. Do not wear loose clothing, jewelery,
short pants, sandals or go barefoot. Secure hair above shoulder level.
,, Wear a face or dust mask if the operahon is dusty.
,, To avoid static electricity shock, do not wear rubber gloves or any other insulated gloves while
operating th_s umt.
,, Use the unit only m dayhght or good artificial hght.
,, Keep all surfaces free from oll and fuel.
,, Avoid accidental starting. Be m the starting position whenever pulhng the starter rope. The operator
and unit must be in a stable poslhon while starting. Refer to Starting and Stopping Instructions.
,, Do not set unit on any surface except a clean, hard area while engine is running. Debris such as
gravel, sand, dust, grass, etc. could be picked up by the air retake and thrown out by the discharge
opening, damaging unit, property, or causing serious injury to bystanders or operator.
,, Only use the unit for its intended purpose. Only use the unit as described in this manual.
,, Do not force the umt. It will do the job better and with less hkehhood of injury at a rate for which it
was designed.
,, Do not overreach or use from unstable surfaces such as ladders, trees, steep slopes, rooftops, etc.
Always keep proper footing and balance.
,, Always hold the umt with a firm grip when operating.
,, Keep hands, face, and feet away from all moving parts. Do not touch or try to stop the impeller
when it is rotating. Do not operate without guards m place.
,, Do not put any object into openings. Do not use with any opening blocked; keep free of dirt, debris,
and anything that may reduce the air flow.
,, Do not touch the engine or muffler. These parts get extremely hot from operahon, even after the
unit Is turned off.
,, Do not operate the engine faster than the speed needed to do the job. Do not run the engine at
high speed when not m use.
,, Always stop the engine when operahon is delayed or when walk,_g from one Iocahon to another.
,, Stop the engine for maintenance, repair, to install or remove the blower tubes or vacuum
attachments. The Emitmust be stopped and the impeller no longer turning to avoid contact with the
rotating blades.
,, Ifyou strike or come into contact with a foreign object, stop the engine immediately and check for
damage. Do not operate before repalnng damage. Do not operate the unit with loose or damaged parts.
,, Use only original equipment manufacturer replacement parts and accessories for this unit. These
are available from an authorized serwce dealer. The use of any unauthorized parts or accessories
could lead to serious injury to the user, or damage to the unit, and void the warranty.
,, Never use this unit for spreading chemicals, ferhhzers or other substances which may contain toxic
materials.
,, To reduce fire hazard, replace faulty muffler and spark arrestor. Keep the engine and muffler free
from grass, leaves, excesswe grease or carbon build up.
,, Never point the blower in the dlrechon of bystanders, animals, windows or automobiles.
,, Avoid situations that could catch the vacuum bag on fire. Do not operate near an open flame. Do
not vacuum warm ash from fire-places, barbecue p_ts, brush plies, etc. Do not vacuum d_scarded
cigars or cigarettes unless the cinders are completely cool.
,, The unit is designed to pickup dry material such as leaves, grass, small twigs, and bits of paper. Do
not attempt to vacuum wet debris and/or standing water as th_s may result m damage to the
blower/vacuum. To avoid severe damage to the impeller, do not vacuum metal, broken glass, etc.
OTHER SAFETY WARNINGS
,, Always disconnect the spark plug before performing maintenance or accessing movable parts.
,, Never store the unit. with fuel in the tank, inside a building where fumes may reach an open flame
(pilot hghts, etc.) or sparks (switches. electrical motors, etc.).
', Allow the engine to cool before storing or transporting. Be sure to secure the unit while transporting.
,, Store the unit m a dry place, either locked up or up high to prevent Lmauthonzed use or damage.
Keep out of the reach of children.
,, Never douse or squirt the unit with water or any other hquld. Keep handles dry, clean, and free from
debris. Clean after each use, see Cleaning and Storage instruchons.
,, Keep these mstruchons. Refer to them often and use them to instruct other users. If you loan this
umt to others, also loan these mstruchons to them.
SPECIAL NOTE: Exposure to vibrations through prolonged use of gasohne powered hand tools could
cause blood vessel or nerve damage m the fingers, hands, and joints of people prone to circulation
disorders or abnormal swelhng. Prolonged use in cold weather has been hnked to blood vessel
damage m otherwise healthy people. If symptoms occur such as numbness, pare, loss of strength,
change m skin color or texture, or loss of feehng m the fingers, hands or joints, dlsconhnue use of this
too! and seek medical attention. An anh-wbrahon system does not guarantee avoidance of these
problems. Users who operate power tools on a regular basis must closely monitor their physical
cond_hon and the cond_hon of th_s tool.
SAVE THESE iNSTRUCTiONS
Read the Operator's Manual and follow all warnings and safety instructions. Failure to do so
can result in serious injury to the operator and/or bystanders.
FOR QUESTIONS, CALL 1=800=828=5500 IN THE U.S. OR 1=800=668=1238 IN CANADA
,, IMPORTANT SAFETY INSTRUCTIONS ,,
_ CALIFORNIA PROPOSITION 65
WARNING: Engine exhaust, some of its constituents and certain finished components
contain or emit chemicals known to the State of California to cause cancer and b_rth
defects or other reproductive harm. Wash hands after handhng.
READ ALL INSTRUCTIONS BEFORE OPERATING
I _ I WARNING: When us,qg the unit. you must follow the safety rules. Please read these
_nstruct_ons before operating the unit in order to ensure the safety of the operator and any
bystanders. Please keep these mstruchons for later use.
,, Read the instruchons carefully. Be familiar w_ththe controls and proper use of the unit.
,, Do not operate this unit when bred, iii, or under the influence of alcohol, drugs, or medlcahon.
,, Children and teens under the age of 15 must not use the unit, except for teens guided by an adult.
,, All guards and safety attachments must be installed properly before operahng the unit.
,, Inspect the unit before use. Replace damaged parts. Check for fuel leaks. Make sure all fasteners
are m place and secure. Replace parts that are cracked, ch_pped, or damaged _nany way. Do not
operate the umt w_th loose or damaged parts.
,, Carefully respect the area before starting the unit. Remove all debris and hard or sharp objects such
as glass, w_re. etc.
,, Clear the area of children, bystanders, and pets. At a minimum, keep all children, bystanders, and pets
outside a 50 feet (15 m) radius; there still may be a risk to bystanders from thrown objects. Bystanders
should be encouraged to wear eye protection. Ifyou are approached, stop the unit immediately.
SAFETY WARNINGS FOR GAS UNITS
-- i
L_ ARNING: Gasohne is highly flammable, and its vapors can explode if @qlted. Take the
following precautions:
,, Store fuel only m containers specifically des@_ed and approved for the storage of such materials.
,, Always stop the engine and allow it to cool before fllhng the fuel tank. Never remove the fuel tank
cap or add fuel when the engine _shot. Always loosen the fuel tank cap slowly to reheve any
pressure _nthe tank before fuehng. Do not smoke.
,, Always mix and add fuel in a clean, well-ventilated outdoor area where there are no sparks or
flames. Do not smoke.
,, Never operate the unit without the fuel cap securely in place.
,, Avoid creating a source of @_lhon for spilled fuel. Wipe up any spilled fuel from the unit
_mmed_ately before starting the Emit. Move the unit at least 30 feet (9.1 m) from the fuehng source
and s_te before start,qg the eng,qe. Do not smoke.
,, Never start or run the unit inside a closed room or building. Breathing exhaust fumes can kill.
Operate th_s umt only _na well-ventilated outdoor area.
WHILE OPERATING
,, Wear safety glasses or goggles that are marked as meehng ANSI Z87.1-1989 standards.
,, Never run the unit w_thout the proper equipment attached. Do not operate the umt w_thout the
blower tubes or vacuum tubes and vacuum bag attached. Make sure the vacuum bag _scompletely
z_pped closed.
SAFETY AND INTERNATIONAL SYMBOLS "
Th_soperator's manual descnbes safetyand ,_ternat_onalsymbols and p_ctographsthat may appear onthB product
Readthe operator's manual for complete safety assembly, operat,_g, ma=ntenance and repa=r=nformat=on
SYMBOL
Ax
©
|
O
H IqH )
MEANING
SAFETY ALERT SYMBOL
Ind_cates danger, warning or caution. May be used m conjunction w_th other symbols
or p_ctographs.
READ OPERATOR'S MANUAL
WARNING: Read the operator's manual(s) and foHHowairwarnings and safety
,nstruct,ons. Failure to do so can resuHtm senous injury to the operator and/or bystanders.
• WEAR EYE AND HEARING PROTECTION
WARNING: Thrown objects and Houdno_secan cause severe eye injury and heanng
Ross.Wear eye protection meeting ANSI Z87.1-1989 standards and ear protechon when
operating thB un,t. Use a fuHHface sh,eld when needed.
UNLEADED FUEL
Always use clean, fresh unleaded fueH
OIL
Refer to operator's manual for the proper type of oil.
DO NOT USE E85 FUEL iN THiS UNHT
WARNING: It has been proven that fuel containing greater than 10% ethanol w_ll
I_keiydamage th_s engine and void the warranty.
= ON/OFF STOP CONTROL
ON / START / RUN
• ON/OFF STOP CONTROL
OFF or STOP
PRIMER BULB
Push pnmer bulb, fully and slowly, I0 times.
CHOKE CONTROL
1. _ FULL choke posit,on
2. • PARTIAL choke pos,t,on
3. * RUN choke poslhon
THROWN OBJECTS CAN CAUSE SEVERE INJURY
WARNING: Small objects can be propelled at h,gh speed, causing injury.

SYMBOL MEANING
*WARNING: DO NOT USE E85 FUEL iN THIS UNIT.
It has been proven that fuel containing greater than 10% ethanol will likely
damage this engine and void the warranty.
WARNING: Gasoline is extremely flammable. Ignited vapors may
explode. Always stop the engine and allow it to cool before filling the
fuel tank. Do not smoke while filling the tank. Keep sparks and open
flames at a distance from the area.
WARNING: Remove fuel cap slowly to avoid injury from fuel spray.
Never operate the unit without the fuel cap securely in place.
-- I
UNLEADED GAS* 2-CYCLE OIL
1 GALLON US 3.2 FL. OZ.
(3.8 LITERS) (95 ml)
1 LITER 25 ml
MIXING RATIO - 40:1
I _ I WARNING: Add fuel in a clean, well ventilated outdoor area. Wipe up any spilled fuel immediately. |
/
Avoid creating a source of ignition for spilled fuel. Do not start the engine until fuel vapors dissipate.
J
ASSEMBLING THE UNIT
_[_ ARNING: To prevent serious personal injury, stop the engine and allow the impeller to stop before
attaching or removing tubes.
_ ARNING: To prevent serious personal injury or damage to the unit, make sure the blower tubes, or
vacuum tubes and the vacuum bag, are in place before you operate the unit.
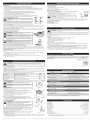
BLOWER ASSEMBLY
Installing the Upper Blower Tube
1. Align the bump on the end of the upper
blower tube with the bump slot on the bottom
end of the blower outlet (Fig. 1).
2. Insert the upper blower tube into the blower
outlet (Fig. 1).
3. Twist the upper blower tube clockwise until it
locks into place (Fig. 1).
installing the Lower Blower Tube
1. Align the bump slot on the top end of the lower
blower tube with the bump on the end of the
upper blower tube (Fig. 2).
2. Place the lower blower tube onto the upper
blower tube (Fig. 2).
3. Twist the lower blower tube clockwise until
tight (Fig. 2).
VACUUM ASSEMBLY
Removing the Upper Blower Tube
1. Hold the unit firmly.
2. Insert a flathead screwdriver into the tube
lock. Twist the screwdriver counterclockwise
1/4 turn and hold (Fig. 3).
3. Grasp the upper blower tube and twist it
counterclockwise (Fig. 3).
4. Pull the upper blower tube from the blower
outlet.
Removing the Lower Blower Tube
1. Hold the upper blower tube firmly.
Blower Outlet _ Bump
\ /'_ It_("_ Slot
Upper_ /_A _-¢_ _
Tube_7__
7/// Bump
Fig. 1
TubeLock
Fig. :3
Fig. 5
2. Grasp the lower blower tube and twist it counterclockwise until the lower blower
tube unlocks from the upper blower tube.
3. Remove the lower blower tube from the upper blower tube.
Installing the Vacuum Tubes
1. Locate the hole in the impeller door. The door lock tab is recessed in the hole
toward the front of the blower (Fig. 4). Insert a flat head screwdriver, into the hole
and press the door lock tab in and lift the door to release the lock.
2.
Lower ,_ "_"
Blower 'k_-_ _'_:
T
p
Fig. 2
Impeller Door Lock Tab
Door
Fig. 4
Vacuum Tube
Fig. 6
While holding the impeller door open, align the upper vacuum tube's three (3)
slots with the impeller intake's three (3) lock tabs (Fig. 5). Insert the upper vacuum VacuumTube VacuumTube
tube into the impeller intake and twist the upper vacuum tube clockwise with both Fig.7
hands until the lock tabs snap into place (Fig. 6).
Align the arrow on the lower vacuum tube with the arrow on the upper vacuum
tube (Fig. 7).
Vacuum
4 in. Bag
(10.2cm)
\
Fig. 9
Vacuum
Elbow
Pull the end of the cinch strap to secure the small opening of the bag around the vacuum elbow. Tighten the cinch
strap so that the bag has limited movement along the elbow, but will not slip off the flared end.
NOTE: The arrows must align properly to install the vacuum tubes correctly.
4. Grasp the lower vacuum tube firmly with both hands and push the lower vacuum
tube into the upper vacuum tube. Turn the lower vacuum tube clockwise until it
snaps into place and locks. The dot on the lower tube aligns with the dot on the
upper tube when properly assembled.
NOTE: Use both hands during this assembly to fit the parts together tightly.
NOTE: The flat area on the upper vacuum tube should face the handle when installed
correctly.
VACUUM BAG ASSEMBLY
Installing the Vacuum Elbow onto the Blower
1. While facing the front of the unit, hold the keyed end of the vacuum elbow in the
left hand and the flared end in the right hand. Align the lock tabs on the keyed end
with the lock tabs on the blower outlet. (Fig. 8)
2. Insert the vacuum elbow into the blower and turn clockwise until it locks into
place. (Fig. 8)
Inserting the Vacuum Elbow into the Bag
1. Locate the small opening in the vacuum bag. Insert the flared end of the vacuum
elbow approximately 4 in. inside the small opening. (Fig. 9)
2.
OIL AND FUEL MIXING INSTRUCTIONS
I _ _CAUTION: For proper engine operation and maximum reliability, pay strict attention to the oil and fuel i
mixing instructions on the 2-cycle oil container. Using improperly mixed fuel can severely damage the engine.
l
Old and/or improperly mixed fuel are the main reasons for the unit not running properly. Be sure to use fresh, clean
unleaded fuel. Follow the instructions carefully for the proper fuel/oil mixture.
Definition of Blended Fuels
Today's fuels are often a blend of gasoline and oxygenates such as ethanol, methanol, or MTBE (ether). Alcohol-
blended fuel absorbs water. As little as 1% water in the fuel can make fuel and oil separate. It forms acids when
stored. When using alcohol-blended fuel, use fresh fuel (less than 30 days old).
Using Blended Fuels
If you choose to use a blended fuel, or its use is unavoidable, follow recommended precautions:
Always use the fresh fuel mix explained in your operator's manual
Use the fuel additive STA-BIL® or an equivalent
Always agitate the fuel mix before fueling the unit
Drain the tank and run the engine dry before storing the unit
Using Fuel Additives
The bottle of 2-cycle oil that came with your unit contains a fuel additive which will help inhibit corrosion and minimize
the formation of gum deposits. It is recommended that you use our 2-cycle oil with this unit. If unavailable, use a good
2-cycle oil designed for air-cooled engines along with a fuel additive, such as STA-BIL@ Gas Stabilizer or an
equivalent. Add 0.8 oz. (23 ml) of fuel additive per gallon of fuel according to the instructions on the container. NEVER
add fuel additives directly to the unit's fuel tank.
Thoroughly mix the proper ratio of 2-cycle engine oil with unleaded gasoline in a separate fuel can. Use a 40:1 fuel/oil
ratio. Do not mix them directly in the engine fuel tank. See the table below for specific gas and oil mixing ratios.
NOTE: One gallon (3.8 liters) of unleaded gasoline mixed with one 3.2 oz. (95 ml) bottle of 2-cycle oil makes a 40:1
fuel/oil ratio.
NOTE: Dispose of the old fuel/oil mix in accordance with federal, state and local regulations.
l I A, I WARNING: Operate this unit only in a well-ventilated outdoor area. Carbon monoxide exhaust fumescan be lethal in a confined area.
i I _, I WARNING: Avoid accidental starting. Make sure you are in the starting position when pulling the starter
rope (Fig. 12). To avoid serious injury, the operator and unit must be in a stable position while starting.
To avoid serious personal injury, make sure that the blower tube is locked in place.
STARTING INSTRUCTIONS
NOTE: When starting the unit, make sure it is not directed at bystanders or loose debris.
1. Mix gas with oil. Fill the fuel tank with fresh fuel/oil mixture. See Oil and Fuel
Mixing Instructions.
NOTE: There is no need to turn the unit on. The On/Off switch is in the ON ( I)
position at all times (Fig. 10).
2. Fully press and release the primer bulb 10 times, slowly. Some amount of fuel
should be visible inthe primer bulb (Fig. 11). If fuel cannot be seen in the bulb,
press and release the bulb until fuel is visible.
3. Move the choke lever to Position 1 (Fig. 11).
NOTE: The unit should be started in idle. Do not squeeze the trigger until step 8 (Fig. 10).
4. Do not squeeze the trigger. Place the unit on a firm, flat surface. Crouch in the
starting position and hold the unit firmly (Fig. 12).
5. Do not squeeze the trigger. Pull the starter rope out until some resistance is felt.
This is usually around 2-4 inches. Pull the starter rope 5 times in a controlled and
steady motion.
6. Do not squeeze the trigger. Move the choke lever to Position 2 (Fig. 11).
7. Do not squeeze the trigger. Pull the starter rope 3-5 times in a controlled and
steady motion to start the engine.
8. Squeeze and hold the trigger, or press down the cruise control (Fig. 10), and allow
the engine to warm up for 30 to 60 seconds.
9. Continue to squeeze the trigger. Move the choke lever to Position 3 (Fig. 11).
10. Continue to squeeze the trigger. Continue warming the engine for an additional
60 seconds. The unit is now ready for use.
mE..The engine does not start, go back to step 2.
mE..The engine fails to start after 2 attempts, move the choke lever to Position 3,
squeeze the trigger, and pull the starter rope 3-8 times in a controlled and steady
motion. The engine should start. If not, repeat. Fig.12
iF WARM... If the engine is already warm, go back to step 6.
STOPPING INSTRUCTIONS
1. Release the trigger or raise the cruise control to idle the engine.
2. Press and hold the On/Off switch in the OFF (O} position until the engine comes to a complete stop (Fig. 10).
Cruise / On/Off Switch
Control J Trigger
Fig. 10
Fig.11
NOTE: This Unit Can Use an Electric Start or Power Start Bit TMOptional Accessory!
Please refer to the Electric Starter or Power Start BitTMoperator's manual for proper use of this feature. (items Sold
Separately! Please refer to page 4 of this manual about purchasing these accessories.)
STARTING iNSTRUCTiONS
NOTE: When starting the unit, make sure it is not directed at bystanders or loose debris.
1. Mix gas with oil. Fill the fuel tank with fresh fuel/oil mixture. See Oil and Fuel Mixing Instructions.
NOTE: There is no need to turn the unit on. The On/Off switch is in the ON (I ) position at all times (Fig. 10).
2. Fully press and release the primer bulb 10 times, slowly. Some amount of fuel should be visible in the primer bulb
(Fig. 11). If fuel cannot be seen in the bulb, press and release the bulb until fuel is visible.
3. Move the choke lever to Position 1 (Fig. 11).
NOTE: The unit should be started in idle. Do not squeeze the trigger until step 10 (Fig. 10).
4. Do not squeeze the trigger. Place the unit on a firm, flat surface. Crouch in the starting position and hold the unit
firmly (Fig. 12).
5. Do not squeeze the trigger. Insert the electric starter or Power Start BitTMinto the side of the unit (Fig. 22). Refer to the
Operation section of the electric starter or Power Start BitTMoperator's manual.
6. Do not squeeze the trigger. Press and hold the electric starter or drill's ON (I) button for 2 seconds.
7. Do not squeeze the trigger. Move the choke lever to Position 2 (Fig. 11).
8. Do not squeeze the trigger. Press and hold the electric starter or drill's ON (I) button for 2-second intervals until
the unit starts.
9. Do not squeeze the trigger. Remove the electric starter or drill from the unit.
10. Squeeze and hold the trigger, or press down the cruise control (Fig. 10), and allow the engine to warm up for 30 to
60 seconds.
11. Continue to squeeze the trigger. Move the choke lever to Position 3 (Fig. 11).
12. Continue to squeeze the trigger. Continue warming the engine for an additional 60 seconds. The unit is now
ready for use.
mE..The engine does not start, go back to step 2.
mE..The engine fails to start after 2 attempts, move the choke lever to Position 3 and squeeze the trigger. Press and
hold the electric starter or drill ON (I) button for 2-second intervals until the unit starts.
iF WARM... If the engine is already warm, go back to step 7.
STOPPING INSTRUCTIONS
1. Release the trigger or raise the cruise control to idle the engine.
2. Press and hold the On/Off switch in the OFF (O) position until the engine comes to a complete stop (Fig. 10).
_ ARNING: To avoid serious personal injury, wear goggles or safety glasses at all times when
operating this unit. Wear a face mask or dust mask in dusty locations.
L_ I WARNING: To prevent serious personal injury or damage to the unit, make sure the blower tubes, or
vacuum tubes and the vacuum bag, are in place before you operate the unit.
HOLDING THE BLOWER / VACUUM
Before operating the unit, stand in the operating position. Check for the following:
Operator is wearing proper clothing, such as boots, safety glasses or goggles, ear/hearing protection, gloves, long
pants and long sleeve shirt
The unit is in good working condition
The tubes and guards are in place and secure
USING THE CRUISE CONTROL
1. Once the engine has started and warmed up, squeeze the trigger to accelerate
the unit as needed (Fig. 13).
2. For longer periods of operation and to eliminate possible finger fatigue, move the
cruise control toward the FAST position to incrementally increase or maintain the
unit's engine speed (Fig. 13). When the cruise control is pressed, the trigger will
recede into the handle.
3. To decrease engine speed, move the cruise control to the SLOW position and the Fig.13
trigger will return to idle (Fig. 13).
Cruise
Control
Trigger

OPERATING TIPS
Assure the unit is not directed at anybody or any loose debris before starting the unit.
Always hold the unit securely when operating. Keep a firm grip on the handle.
To reduce the risk of hearing loss associated with sound level(s), hearing protection is required.
Operate power equipment only at reasonable hours-- not early in the morning or late at night when people might be
disturbed. Comply with times listed in local ordinances. Usual recommendations are 9:00 am to 5:00 pm, Monday
through Saturday.
To reduce noise levels, limit the number of pieces of equipment used at any one time.
To reduce noise levels, operate power blowers at the lowest possible speed to do the job.
Check your equipment before operation, especially the muffler, air intakes and air filters.
Use rakes and brooms to loosen debris before blowing.
In dusty conditions, slightly dampen surfaces when water is available.
Watch out for children, pets, open windows or freshly washed cars, and blow debris safely away.
Clean up after using blowers and other equipment. Dispose of debris appropriately.
OPERATING THE UNIT AS A BLOWER
INCORRECT CORRECT
POSITION POSITION
Fig.14
_ILL_ I WARNING: After starting the unit, always stand on the left side of |
i
the unit to operate it as shown in figure 14 to keep from blocking the
]
air intake.
Use the blower for trees, shrubs, flower beds and hard-to-clean areas. Also use the
unit around buildings, walls, overhangs, fences and screens, and for other normal
cleaning procedures. Conserve water by using power blowers instead of hoses for
many lawn and garden applications, including areas such as gutters, screens, patios,
grills, porches and gardens.
Hold the blower with the right hand. Do not stand on the right side of the blower when operating the unit (Fig. 14). If
you do, you will be blocking the air intake and this will affect the unit's performance. Instead, be sure to stand on the
left side of the unit to maximize the unit's efficiency (Fig. 14).
Sweep from side to side with the nozzle several inches above the ground or floor. Slowly advance the unit, keeping
the accumulated pile of debris in front of you.
Most dry blowing operations are better suited to low speeds, rather than high. High speed blowing is a better way to
move heavier items like large debris or gravel.
OPERATING THE UNIT AS A VACUUM
_IILL_ ARNING: To avoid serious personal injury, never unzip the
vacuum bag without stopping the unit first.
WARNING: As a vacuum, the unit is designed to pick up dry
material such as leaves, grass, small twigs and bits of paper. To avoid
serious personal injury, do not attempt to vacuum wet debris and/or
standing water as this may result in damage to the blower/vacuum. Fig.15
To avoid severe damage to the impeller, do not vacuum metal, broken
glass or similar items.
m
WARNING: Avoid situations that could catch the vacuum bag on
fire. Do not operate near an open flame. Do not vacuum warm ash
from fireplaces, barbecue pits, brush piles, etc. Do not vacuum
discarded cigars or cigarettes unless the cinders are completely cool.
Use the unit for vacuuming up light debris like leaves and paper.
Be sure the vacuum bag is zipped closed before operating the unit. Fig.16
Place the shoulder harness over your head and onto your shoulder. Hold the vacuum with both on hands on the
handle (Fig. 15), tilting the suction tube slightly, and use a sweeping action to collect light debris (Fig. 16). The debris
will flow into the vacuum bag. Things such as small leaves and small twigs will be mulched as they pass through the
fan housing, allowing the vacuum bag to hold more debris.
Emptying the Vacuum Bag
When the bag is full, suction will noticeably decrease. Turn off the unit and allow the impeller to stop before you unzip
the bag.
1. While wearing eye protection and a dust mask, unzip the vacuum bag and empty the contents into a garbage bag
or container.
2. Turn the bag inside out after initial emptying and vigorously shake out dust and debris.
3. Zip close and reinstall the vacuum bag.
NOTE: Empty the bag after each use to avoid deterioration and obstructing air flow, which will reduce the
performance of the vacuum.
m
_L_ ARNING: To prevent serious injury, never perform maintenance or repairs with unit running. Always
service and repair a cool unit. Disconnect the spark plug wire to ensure that the unit cannot start.
MAINTENANCE SCHEDULE
Perform these required maintenance procedures at the frequency stated in the table. These procedures should also be
a part of any seasonal tune-up.
NOTE: Some maintenance procedures may require special tools or skills. If you are unsure about these procedures,
take your unit to a Troy-Bilt or other qualified service dealer.
NOTE: Maintenance, replacement, or repair of the emission control devices and system may be performed by a Troy-
Bilt or other qualified service dealer.
NOTE: Please read the California/EPA statement that came with the unit for a complete listing of terms and coverage
for the emissions control devices, such as the spark arrestor, muffler, carburetor, etc.
FREQUENCY MAmNTENANCE REQUIRED SEE
Before starting the engine Fill the fuel tank with fresh fuel mixture 3. 3
Every 10 hours (every 5 hours
Clean and re-oil the air filter 3.4
in vacuum mode)
Every 25 hours Check the spark plug condition and gap 3.4
AIR FILTER MAINTENANCE
_I_L_ ARNING: To avoid serious personal injury, always turn your
trimmer off and allow it to cool before you clean or service it.
_ WARNING: Wear gloves to prevent injury when handling unit.
Cleaning the Air Filter
Failure to maintain your air filter properly can result in poor performance or can cause
permanent damage to your engine.
1. To open the air filter cover, push the locking tab on the right side of the cover
inward and pull the air filter cover slightly out and to the left (Fig. 17).
2. Remove the air filter (Fig. 18).
3. Wash the filter in detergent and water. Rinse the filter thoroughly and allow it to dry.
4. Apply enough clean SAE 30 motor oil to lightly coat the filter.
5. Squeeze the filter to spread and remove excess oil.
6. Replace the filter (Fig. 18).
NOTE: If the unit is operated without the air filter, you will VOID the warranty.
7. To reinstall the air filter cover, position the hooks on the left side of the air filter
cover into the slots at the left side of the back plate (Fig. 18).
8. Swing the cover to the right and press closed so the air filter cover tab snaps into
the slot on the back plate (Fig. 19).
IDLE SPEED ADJUSTMENT
L_ ARNING: This unit will need to be running during idle speed
adjustment. Wear protective clothing and observe all safety
instructions to prevent serious personal injury.
Also, DO NOT set unit on any surface except a clean, hard area while
starting or performing any adjustments. Debris, such as gravel, sand,
dust, grass, etc., could be thrown by the blower tube and damage
property or cause serious injury to bystanders or operator.
The idle speed of the engine is adjustable. An idle adjustment screw is between the
air filter cover and the engine starter housing (Fig. 20).
NOTE: Careless adjustments can seriously damage your unit. An authorized service
dealer should make carburetor adjustments.
If, after checking the fuel and cleaning the air filter, the engine still will not idle, adjust
the idle speed screw as follows:
1. Start the engine and let it run at a high idle for a minute to warm up. Refer to
Starting/Stopping Instructions.
2.
Air FHter Cover Locking Tab
Fig.17
Smots Smot
Back PJate Air FJJter
Fig. 18
Air FiJter Cover Locking Tab
Fig. 19
Fig. 20
Release the throttle trigger and let the engine idle. If the engine stops, insert a small Phillips in between the air filter
cover and the engine cover (Fig. 20). Turn the idle speed screw in, clockwise, 1/8 of a turn at a time (as needed)
until the engine idles smoothly.
Checking the fuel, cleaning the air filter, and adjusting the idle speed should solve most engine problems. If not and all
of the following are true:
the engine will not idle
the engine hesitates or stalls on acceleration
there is a loss of engine power
Have the carburetor adjusted by an authorized service dealer.
REPLACING THE SPARK PLUG
Use a replacement part number 753-06193. The correct spark gap is 0.025 in. (0,635 ram}.
1. Stop the engine and allow it to cool.
2. Grasp the plug boot firmly and pull the cap from the spark plug.
3. Clean dirt from around the spark plug. Remove the spark plug from the cylinder 0.025in.
head by turning a 5/8 in. socket counterclockwise. Io.6
_L_ CAUTION: Do not sand blast, scrape, or clean electrodes. Grit in
the engine could damage the cylinder. ._
Fig.21
4. Replace cracked, fouled or dirty spark plug. Set the spark gap at 0.025 in. (0.635 mm) using a feeler gauge (Fig. 21).
5. Install a correctly-gapped spark plug in the cylinder head. Turn the 5/8 in. socket clockwise until snug.
If using a torque wrench, torque to:
110-120 in.olb. {12.3-13.5 N,_m)
Do not over tighten.
6. Reinstall the spark plug boot.
m j_lhbL_ ARNING: To avoid serious personal injury, always turn your unit off and allow it to cool before you
clean or do any maintenance on it.
CLEANING
Use a small brush to clean off the outside of the unit. Do not use strong detergents. Household cleaners that contain
aromatic oils such as pine and lemon, and solvents such as kerosene, can damage the plastic housing or handle. Wipe
off any moisture with a soft cloth.
STORAGE
Never store a fueled unit where fumes may reach an open flame or spark.
Allow the engine to cool before storing.
Store the unit locked up to prevent unauthorized use or damage.
Store the unit in a dry, well-ventilated area.
Store the unit out of the reach of children.
Long Term Storage
1. Remove the fuel cap, tip the unit and drain the fuel into an approved container.
NOTE: Do not use fuel that has been stored for more than 30 days. Dispose of the old fuel/oil mix in accordance with
federal, state and local regulations.
2. Start the engine and allow it to run until it stalls. This ensures that all fuel has been drained from the carburetor.
3. Allow the engine to cool. Remove the spark plug and put 5 drops of any high quality motor oil or 2-cycle oil into the
cylinder. Pull the starter rope slowly to distribute the oil. Reinstall the spark plug.
NOTE: Remove the spark plug and drain all of the oil from the cylinder before attempting to start the unit after storage.
4. Thoroughly clean the unit and inspect it for any loose or damaged parts. Repair or replace damaged parts and
tighten loose screws, nuts or bolts. The unit is ready for storage.
ELECTRIC STARTER AND POWER START BIT TM FEATURES
This unit is designed to be started with an optional electric starter or Power Start BitTM that are sold separately. If choosing
to start the unit using one of these features or have questions, please contact your local retailer or call 1-800-828-5500 in
the U.S (1-800-668-1238 in Canada) for more information and purchasing. You may also go to www.troybimt.com or
www, troybimt.ca.
Fig. 22
CAUSE
The primer bulb was not pressed enough
The fuel is old (over 30 days) and!or improperly mixed
SOLUTmON
Press the primer bulb fully and slowly 10 times
Drain the fuel tank and add fresh, properly mixed fuel
f
The fuel is old (over 30 days) and!or improperly mixed Drain the fuel tank and add fresh, properly mixed fuel
:to ,
The air filter is plugged Clean or replace the air filter
The air filter is plugged Clean or replace the air filter
NOTE: For repairs beyond the minor adjustments listed above, locate your nearest authorized service center by calling
the Customer Support Department at 1-800-828-5500 (U.S.) or 1-800-668-1238 (Canada).
Engine Type ..................................................................... Air-Cooled, 2-Cycle
Displacement ............................................................................... 27 cc
Idle Speed RPM ................................................................... 3,200-4,400 rpm
Operating RPM ................................................................... 7,000 - 8,000 rpm
Blower Velocity .............................................................. up to 150 mph (240 kmh)
Blower Air Output ........................................................... up to 450 cfm (12.7 cmm)
Mulching Ratio .......................................................................... up to 10:1
Spark Plug Gap ................................................................. 0.025 in. (0.635 mm)
Lubrication ......................................................................... Fuel/Oil Mixture
Fuel/Oil Ratio ................................................................................ 40:1
Fuel Tank Capacity ................................................................... 14 oz. (414 ml)
Vacuum Bag Capacity ................................................................. 1 bushel (35 I)
Approximate Weight (no fuel) .......................................................... 12 Ibs. (5.44 kg)
All specifications are based on the latest product information available at the time of printing. We reserve the right
to make changes at any time without notice.
Page is loading ...
Page is loading ...
Page is loading ...
Page is loading ...
Page is loading ...
Page is loading ...
Page is loading ...
Page is loading ...
Page is loading ...
Page is loading ...
Page is loading ...

MANUFACTURER'S LiMiTED WARRANTY FOR:
GARANTIE LiMiTEE DU FABRICANT POUR:
GARANTJA MMITADA DEL FABRICANTE PARA:
®
The limited warranty set forth below is given by Troy-Bilt LLC (Troy-Bilt) with respect to new merchandise purchased and used in the United States, its possessions and territories.
Troy-Bilt warrants this product against defects in material and workmanship for a period of two (2) years commencing on the date of original purchase and will, at its option, repair or replace, free of charge, any part found to be defective in
material or workmanship. This limited warranty shall only apply if this product has been operated and maintained in accordance with the Operator's Manual furnished with the product, and has not been subject to misuse, abuse, commercial
use, neglect, accident, improper maintenance, alteration, vandalism, theft, fire, water or damage because of other peril or natural disaster. Damage resulting from the installation or use of any accessory or attachment not approved by Troy-Bilt
for use with the product(s) covered by this manual will void your warranty as to any resulting damage. This warranty is limited to ninety (90) days from the date of original retail purchase for any Troy-Bilt product that is used for rental or
commercial purposes, or any other income-producing purpose.
HOW TO OBTAIN SERVICE: Warranty service is available, WITH PROOF OF PURCHASE THROUGH YOUR LOCAL AUTHORIZED SERVICE DEALER. To locate the dealer in your area, visit our website at www.troybilt.com or www.troybilt.ca,
check for a listing in the Yellow Pages, call 1-800-828-5500 or 1-800-668-1238 in Canada, or write to RO. Box 361131, Cleveland, OH 44136-0019. No product returned directly to the factory will be accepted unless prior written permission has
been extended by the Customer Service Department of Troy-Brit.
This limited warranty does not provide coverage in the following cases:
A. Tune-ups - Spark Plugs, Carburetor Adjustments, Filters
B. Wear items - Bump Knobs, Outer Spools, Cutting Line, Inner Reels, Starter Pulley, Starter Ropes, Drive Belts, Saw Chains, Guide Bars, Cultivator Tines.
C. Troy-Bilt does not extend any warranty for products sold or exported outside of the United States of America, its possessions and territories, except those sold through Troy-Bilt's authorized channels of export distribution.
Troy-Bilt reserves the right to change or improve the design of any Troy-Bilt Product without assuming any obligation to modify any product previously manufactured.
No implied warranty, including any implied warranty of merchantability or fitness for a particular purpose, applies after the applicable period of express written warranty above as to the parts as identified. No other express
warranty or guaranty, whether written or oral, except as mentioned above, given by any person or entity, including a dealer or retailer, with respect to any product shall bind Troy-Bilt During the period of the Warranty, the
exclusive remedy is repair or replacement of the product as set forth above. (Some states do not allow limitations on how long an implied warranty lasts, so the above limitation may not apply to you.)
The provisions as set forth in this Warranty provide the sole and exclusive remedy arising from the sales. Troy-Bilt shall not be liable for incidental or consequential loss or damages including, without limitation, expenses incurred
for substitute or replacement lawn care services, for transportation or for related expenses, or for rental expenses to temporarily replace a warranted product. (Some states do not allow limitations on how long an implied warranty
lasts, so the above limitation may not apply to you.)
In no event shall recovery of any kind be greater than the amount of the purchase price of the product sold. Alteration of the safety features of the product shall void this Warranty. You assume the risk and liability for loss, damage, or injury to
you and your property and/or to others and their property arising out of the use or misuse or inability to use the product.
This limited warranty shall not extend to anyone other than the original purchaser, original lessee or the person for whom it was purchased as a gift.
How State Law Relates to this Warranty: This warranty gives you specific legal rights, and you may also have other rights which vary from state to state.
To locate your nearest service dealer, dial 1-800-828-5500 in the United States or 1-800-668-1238 in Canada.
La garantie limit6e 6noncee ci-apres est accordee par Troy-Bilt LLC et concerne les marchandises neuves achetees et utilisees aux Etats-Unis, ses possessions et territoires.
Troy-Bilt LLC garantit ce produit contre tout vice de mati@e ou de facon pendant une p@iode de deux (2) ans a compter de la date d'achat initiale et elle se r6serve le choix de reparer ou de remplacer, a.titre gratuit, toute piece pr6sentant un vice de
mati@e ou de fa£on. Cette garantie limit6e ne s'appliquera que dans la mesure ou le produit aura 6te utilis6 et entretenu conform6ment au Manuel de I'utilisateur fourni avec le produit et n'aura pas fait I'objet d'un usage inadequat, abusif, commercial
ou negligent, d'un accident, d'un entretien inadequat, d'une modification, de vandalisme, d'un vol, d'un incendie, de d6g_ts d'eau ou d'un endommagement resultant d'un autre p@il ou d'un desastre naturel. Les dommages resultats de I'installation
ou de I'utilisation de tout accessoire ou 6quipement non approuve par Troy-Bilt pour une utilisation avec le(s) produit(s) couvert(s) par le present manuel annuleront la garantie en ce qui concerne les dommages qui en resulteraient eventuellement. La
presente garantie est limitee & quatre-vingt-dix (90) jours a compter de ladate d'achat au d6tail initiale pour tout produit Troy-Bilt utilise &des fins locatives ou commerciales, ou toute utilisation produisant des revenus.
POUR L'OBTENTION DU SERVICE DE GARANTIE : le service au titre de la garantie est disponible, SUR PRESENTATION D'UNE PREUVE D'ACHAT, AUPRES DU DISTRIBUTEUR AGREE LOCAL. Pour trouver un distributeur dans votre region,
visitez notre site Web www.troybilt,com or www.troybilt.ca, consultez les Pages Jaunes, appelez le 1-800-828-5500 aux Etats-Unis ou le 1-800-668-1238 au Canada, ou ecrivez a.I'adresse Troy-Bilt LLC, PO Box 361131, Cleveland, OH
44136-0019. Aucun produit retourne & I'usine sans permission ecrite prealable du service apres-vente de Troy-Bilt ne sera accept&
La garantie limit_e n'offre aucune couverture darts les cas suivants :
A. Mises au point : bougies, r6glages de carburateur, filtres
B. EI6ments pouvant s'user : boutons de but6e, bobines ext@ieures, fil de coupe, moulinets int@ieurs, poulie du demarreur, cordons de d6marrage, courroies d'entralnement, chafnes de scie, guide barres, couteaux de motobineuse.
C. Troy-Bilt LLC n'accorde aucune garantie pour les produits vendus ou exportes des Etats-Unis d'Am@ique, de leurs possessions et territoires, exception faite en ce qui concerne les produits vendus par I'interm6diaire de ses canaux agr6es
de distribution a I'exportation.
Troy-Bilt LLC se reserve le droit de modifier ou d'ameliorer la conception de ses produits sans pour autant assumer I'obligation de modifier tout produit d'une fabrication plus ancienne.
Aucune garantie implicite, y compris toute garantie de valeur marchande ou d'adaptation _ une fin particuli_re, ne s'applique apr_s la p_riode applicable de garantie expresse _crite ci-dessus concernant les pi&ces qui sont
identifi_es. Aucune autre garantie ou caution expresse, _crite ou orale, _ I'exception de celle mentionn_e ci-dessus, accord_e par toute personne ou entitY, y compris tout distributeur ou d_taillant, concernant tout produit
n'engagera la responsabilit6 de Troy-Bilt LLC. Pendant la p_riode de garantie, le recours exclusif est la r_paration ou le remplacement du produit darts les conditions _nonc_es ci-dessus. (Certains 6tats ne permettent pas la limitation
de la garantie implicite, il est donc possible que la limitation ci-dessus ne s'applique pas &vous.)
Les clauses _nonc_es darts la pr_sente Garantie constituent le recours unique et exclusif inherent aux ventes. Troy-Bilt LLC ne sera en aucun cas tenue pour responsable de tout dommage indirect ou cons_cutif ou de dommages
comprenant, entre autres, les d_penses encourues du fait du recours _ des services de remplacement ou de substitution pour I'entretien des pelouses, le transport ou des frais connexes, ou les frais entra'in_s par une location
destin_e & remplacer provisoirement un produit sous garantie. (Certains 6tats ne permettent pas la limitation de la garantie implicite, il est donc possible que la limitation ci-dessus ne s'applique pas & vous.)
Aucun recouvrement, quel qu'il soit, ne sera d'un montant sup@ieur au prix du produit vendu. Toute modification des dispositifs de securit6 du produit annulera la pr6sente Garantie. Vous assumez tout risque et toute responsabilit6 r6sultant de
la perte, de I'endommagement ou du pr6judice que vous et votre propriete et/ou d'autres et leur propri6t6 pourront encourir d'un fait de I'utilisation normale, de la mauvaise utilisation ou de I'incapacite d'utiliser le produit.
La pr6sente garantie limitee n'est accord6e qu'& I'acheteur initial, au preneur initial ou &la personne & laquelle le produit a ete offert.
Le Droit des Etats vis _ vis de la pr_sente garantie : la presente garantie vous conf@e certains droits juridiques et vous pouvez b_neficier d'autres droits lesquels varient d'un etat a.I'autre.
Pour obtenir I'adresse du distributeur r¶teur le plus proche, composez le : 1-800-828-5500 aux Etats-Unis ou le 1-800-668-1238 au Canada.
Troy-Bilt LLC concede la garantia limitada establecida debajo para mercancias nuevas que sean compradas y usadas en los Estados Unidos, sus posesiones territorios.
Troy-Bilt LLC garantiza este producto contra defectos en el material y la mano de obra durante un periodo de dos (2) a5os, a partir de la fecha de compra original y a su entera discreci6n, arreglar_t o substituir& sin costo alguno cualquier pieza
cuyo material o mano de obra se considere defectuoso. Esta garantia limitada se deber& aplicar Onicamente si este producto ha sido manejado y mantenido de acuerdo al Manual del Operario incluido con el producto y, si no ha sido sometido a
mal uso, abuso, uso comercial, negligencia, accidente, mantenimiento inapropiado, alteraci6n, vandalismo, hurto, fuego, agua o da6os debidos a otros riesgos o desastre natural. Los da6os ocasionados por la instalaci6n o el uso de cualquier
accesorio o aditamento que no est& aprobado pot Troy-Bilt y que sea usado con el (los) producto(s) contemplados en este manual, anular&n la garantia con respecto a cualquier da6o resultante. Esta garantia est,. limitada a noventa (90) dias a
partir de la fecha de compra original al detalle de cualquier producto Troy-Bilt que se use para alquiler, para prop6sitos comerciales o cualquier otro prop6sito que genere ingresos.
C6MO OBTENER SERVlOIO: El servicio de garantia est& disponible A TRAVES DE SU DISTRIBUIDOR DE SERVICIO LOCAL AUTORIZADO, AL PRESENTAR EL COMPROBANTE DE COMPRA. Para Iocalizar al distribuidor en su &rea, visite
nuestro sitio en Internet en www.troybilt.com or www.troybilt.ca, busque el aviso clasificado en las Paginas Amarillas, Ilame al 1-800-828-5500 en EE.UU. o al 1-800-668-1238 en Canada, o escriba a Troy-Bilt LLC, PO Box 361131, Cleveland,
OH 44136-0019. No se aceptar_, ningt_n producto que sea enviado directamente a la f_.brica, a menos que haya recibido autorizaci6n previa por escrito por parte del Departamento de Servicio al Consumidor de Troy-Brit.
Esta garantia limitada no ofrece cobertura en los siguientes casos:
A. Sincronizaciones - bujias, ajustes de carburadores, filtros.
B. Artfculos de desgaste, perillas percusivas, carretes externos, linea de corte, carretes internos, polea de arranque, cuerdas de arranque, correas motoras, vio cadenas, guia bares, dientes de cultivadora.
C. Troy-Bilt no le ofrece ninguna garantia a los productos que sean vendidos o exportados fuera de los Estados Unidos de Am@ica, sus posesiones y territorios, excepto aquellos que se vendan a tray,s de los canales de distribuci6n para
exportaci6n autorizados pot Troy-Bilt.
Troy-Bilt se reserva el derecho a cambiar o mejorar el dise_o de cualquier producto Troy-Bilt, sin adoptar ninguna obligaci6n para modificar cualquier producto fabricado con anterioridad.
Ninguna garantJa implicita es aplicable despu_s del periodo de aplicabilidad de la garantia expresa escrita con anterioridad, incluyendo cualquier garantia implicita de comerciabilidad o idoneidad para un prop6sito particular con
respecto alas piezas identificadas. Exceptuando Io mencionado anteriormente, ninguna otra garantJa expresa bien sea escrita o verbal con respecto a cualquier producto que sea concedida per cualquier persona o entidad,
incluyendo al distribuidor o minorista, deber& comprometer a Troy-Bilt LLC durante el periodo de la Garantia, el remedio exclusive es el arreglo o la sustituci6n del producto seg_n Io establecido anteriormente. (Algunos estados no
permiten limitaciones en cuanto al periodo de duraci6n de una garantia implicita, de manera que puede que la limitaci6n anterior no sea aplicable en su caso.)
Las estipulaciones establecidas en esta Garantia ofrecen la soluci6n _nica y exclusiva que resulte de las ventas. Troy-Bilt no deber_ ser responsable de p_rdidas o daSos incidentales o consecuentes que incluyan, sin limitaci6n,
gastos incurridos debido a la sustituci6n de servicios de mantenimiento de prados, transporte o gastos relacionados, o gastos de alquiler para reemplazar temporalmente un producto bajo garantia. (Algunos estados no permiten
limitaciones en cuanto al periodo de duraci6n de una garantia implicita, de manera que puede que la limitaci6n anterior no sea aplicable en su caso.)
Ningun tipo de recuperaci6n deberA ser superior al precio de compra del producto vendido, en ningOn caso. La alteraci6n de las caracteristicas de seguridad del producto deber& anular esta Garantia. Usted adopta el riesgo y la obligaci6n de la
p@dida, daSo o lesi6n en su persona o a su propiedad y/o la de otras personas y sus propiedades, que se origine a raiz del uso o mal uso, o la incompetencia para usar el producto.
Esta garantia limitada no deberA cubrir a ninguna otra persona distinta al comprador original, arrendatario original, o la persona para la cual se compr6 en calidad de regalo.
Relaci6n de las leyes estatales con esta Garantia: Esta garantia le confiere derechos legales especificos, y puede que usted tambi&n tenga otros derechos, los cuales varian en cada estado.
Para Iocalizar al distribuidor de servicio local m&s cercano, marque el nOmero 1-800-828-5500 en EE.UU. o al 1-800-668-1238 en Canada.
Troy-Bilt LLC
P.O. Box 361131
Cleveland, OH 44136-0019
-
 1
1
-
 2
2
-
 3
3
-
 4
4
-
 5
5
-
 6
6
-
 7
7
-
 8
8
-
 9
9
-
 10
10
-
 11
11
-
 12
12
-
 13
13
-
 14
14
-
 15
15
-
 16
16


ACE 7306707 Owner's manual
- Category
- Air blowers/dryers
- Type
- Owner's manual
- This manual is also suitable for
Ask a question and I''ll find the answer in the document
Finding information in a document is now easier with AI
in other languages
- français: ACE 7306707 Le manuel du propriétaire
- español: ACE 7306707 El manual del propietario
Other documents
-
MTD YM320BV User manual
-
-
Troy-Bilt Vacuum Cleaner TB320BV User manual
-
-
-
Yard Machines YM290 User manual
-
Craftsman 41BSGBPG901 User manual
-
Yard-Man YMGBV3100 User manual
-
-