GE ZIF240NPKII Owner's manual
- Category
- Side-by-side fridge-freezers
- Type
- Owner's manual

OWNER’S
MANUAL
18" and 24" Built-In Column
Freezers
24" and 30" Built-In Column
Refrigerators
monogram.com
49-60767-1
10-17 GEA

2 49-60767-1
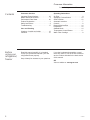
Contents
Before
using your
refrigerator/
freezer
Read this manual carefully. It is intended
to help you operate and maintain your new
refrigerator/freezer properly.
Keep it handy for answers to your questions.
If you don’t understand something or need
more help, there is a list of toll-free consumer
service numbers included in the back section
of this manual.
OR
Visit our website at: monogram.com
Consumer Information
Column Refrigerator and Freezer Units
Consumer Services
Important Phone Numbers ............22
Model and Serial Numbers .............3
Performance Data Sheet ..............20
Product Registration ..................3
Safety Instructions .................... 4
Troubleshooting .....................17
Care and Cleaning
Cleaning—Outside and Inside. . . . . . . . . . 15
Vacation. . . . . . . . . . . . . . . . . . . . . . . . . . . 15
Operating Instructions
Air Filter ............................9
Appliance Communication .............10
AutoFill Pitcher .....................12
Automatic Icemaker ...................7
Controls ............................6
Drawers/Shelves/Bins ................14
Preparation ........................16
Sabbath Mode ......................14
Temperature Control Drawer. . . . . . . . . . . 11
Water Filter Cartridge .................8

49-60767-1 3
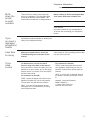
If you
received a
damaged
refrigerator/
freezer
Immediately contact the dealer (or builder) that
sold you the refrigerator/freezer.
Save time
& money
Before you request service, check the
Troubleshooting Tips in the back of this
manual.
It lists causes of minor operating problems that
you can correct yourself.
If you
need
service
To obtain service, see the Consumer
Services page in the back of this manual.
We’re proud of our service and want you to be
pleased. If for some reason you are not happy
with the service you receive, here are steps to
follow for further help.
For customers in the USA:
FIRST, contact the people who serviced your
appliance. Explain why you are not pleased.
In most cases, this will solve the problem.
NEXT, if you are still not pleased, contact
Monogram.com or call 888.444.1875 during
normal business hours
For customers in Canada:
FIRST, contact the people who serviced
your appliance. Explain why you are not
pleased. In most cases, this will solve the
problem.
NEXT, if you are still not pleased, write all
the details—including your phone number
to:
Manager, Consumer Relations
Mabe Canada Inc.
1 Factory Lane, Suite 310
Moncton, N.B. E1C 9M3
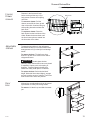
Write
down the
model
& serial
numbers
These will be on a label on the hinge side
wall of your appliance. The refrigerator label
is beside the humidity control drawer. The
freezer label is beside the ice storage drawer.
Before sending in the Product Registration
card, please write these numbers here:
Model Number
Serial Number
Use these numbers in any correspondence
or service calls concerning your refrigerator/
freezer.
Consumer Information
Column Refrigerator and Freezer Units

4 49-60767-1
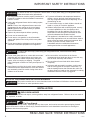
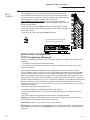
IMPORTANT SAFETY INSTRUCTIONS
READ AND SAVE THESE INSTRUCTIONS
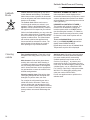
STATE OF CALIFORNIA PROPOSITION 65 WARNINGS
WARNING
This product contains one or more chemicals known to the State of California to cause cancer and
birth defects or other reproductive harm.
CAUTION
To reduce the risk of injury when using your refrigerator/freezer, follow these basic safety
precautions.
Ŷ 'RQRWFOHDQJODVVVKHOYHVRUFRYHUVZLWKZDUPZDWHU
when they are cold. Glass shelves and covers may
break if exposed to sudden temperature changes or
impact, such as bumping or dropping. Tempered
glass is designed to shatter into many small pieces if it
breaks.
Ŷ .HHSILQJHUVRXWRIWKH³SLQFKSRLQW´DUHDVFOHDUDQFHV
between the doors and between the doors and cabinet
are necessarily small. Be careful closing doors when
children are in the area.
Ŷ 'RQRWWRXFKWKHFROGVXUIDFHVLQWKHIUHH]HU
compartment when hands are damp or wet, skin may
stick to these extremely cold surfaces.
Ŷ 'RQRWUHIUHH]HIUR]HQIRRGVZKLFKKDYHWKDZHG
completely.
Ŷ ,QIUHH]HUVZLWKDXWRPDWLFLFHPDNHUVDYRLGFRQWDFW
with the moving parts of the ejector mechanism, or
with the heating element that releases the cubes. Do
not place fingers or hands on the automatic ice making
mechanism while the freezer is plugged in.
WARNING
To reduce the risk of fire, explosion, electric shock, or injury when using your refrigerator/freezer,
follow these basic safety precautions:
Ŷ 7KLVUHIULJHUDWRUIUHH]HUPXVWEHSURSHUO\LQVWDOOHGDQG
located in accordance with the Installation Instructions
before it is used.
Ŷ 8QSOXJWKHUHIULJHUDWRUIUHH]HUEHIRUHPDNLQJUHSDLUV
or cleaning.
NOTE: Power to the refrigerator/freezer cannot be
disconnected by any setting on the control panel.
NOTE: Repairs must be performed by a qualified
Service Professional.
Ŷ 5HSODFHDOOSDUWVDQGSDQHOVEHIRUHRSHUDWLQJ
Ŷ 'RQRWXVHDQH[WHQVLRQFRUG
Ŷ 'RQRWVWRUHRUXVHJDVROLQHRURWKHUIODPPDEOH
vapors and liquids in the vicinity of this or any other
appliance.
Ŷ 'RQRWVWRUHH[SORVLYHVXEVWDQFHVVXFKDVDHURVRO
cans with a flammable propellant in this appliance.
Ŷ 7RSUHYHQWVXIIRFDWLRQDQGHQWUDSPHQWKD]DUGVWR
children, remove the fresh food and freezer doors
from any refrigerator/freezer before disposing of it or
discontinuing its use.
Ŷ 7RDYRLGVHULRXVLQMXU\RUGHDWKFKLOGUHQVKRXOGQRW
stand on, or play in or with the appliance.
Ŷ &KLOGUHQDQGSHUVRQVZLWKUHGXFHGSK\VLFDOVHQVRU\
or mental capabilities or lack of experience and
knowledge can use this appliance only if they are
supervised or have been given instructions on safe
use and understand the hazards involved.
Ŷ 7KLVDSSOLDQFHLVLQWHQGHGWREHXVHGLQKRXVHKROG
and similar applications such as: staff kitchen areas in
VKRSVRIILFHVDQGRWKHUZRUNLQJHQYLURQPHQWVIDUP
KRXVHVE\FOLHQWVLQKRWHOVPRWHOVEHG
EUHDNIDVWDQGRWKHUUHVLGHQWLDOHQYLURQPHQWV
catering and similar non-retail applications.
INSTALLATION
WARNING
EXPLOSION HAZARD
Keep flammable materials and vapors, such as gasoline, away from refrigerator/freezer. Failure to do so can result in
fire, explosion, or death.
WARNING
Tip Over Hazard.
These appliances are top heavy, especially with any doors open, and must be secured to prevent tipping forward
which could result in death or serious injury. Read and follow the entire installation instructions for securing the
appliance with the anti-tip system.

49-60767-1 5
IMPORTANT SAFETY INSTRUCTIONS
READ AND SAVE THESE INSTRUCTIONS
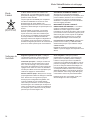
PROPER DISPOSAL OF YOUR OLD REFRIGERATOR/FREEZER
Do not, under any circumstances, cut or remove the third (ground) prong from the power cord. For personal
safety, this appliance must be properly grounded.
The power cord of this appliance is equipped with a
3-prong (grounding) plug which mates with a standard
3-prong (grounding) wall outlet to minimize the possibility
of electric shock hazard from this appliance.
Have the wall outlet and circuit checked by a qualified
electrician to make sure the outlet is properly grounded.
Where a standard 2-prong wall outlet is encountered, it
is your personal responsibility and obligation to have it
replaced with a properly grounded 3-prong wall outlet.
Do not use an adapter.
The refrigerator/freezer should always be plugged into its
own individual electrical outlet which has a voltage rating
that matches the rating plate.
A 115 Volt AC, 60 Hz, 15- or 20-amp fused, grounded
electrical supply is required. This provides the best
performance and also prevents overloading house wiring
circuits which could cause a fire hazard from overheated
wires.
Never unplug your refrigerator/freezer by pulling on the
power cord. Always grip plug firmly and pull straight out
from the outlet.
Immediately discontinue use of a damaged supply cord.
If the supply cord is damaged, it must be replaced by a
qualified service professional with an authorized service
part from the manufacturer.
When moving the refrigerator/freezer away from the wall,
be careful not to roll over or damage the power cord.
CONNECTING ELECTRICITY
WARNING
ELECTRICAL SHOCK HAZARD
Plug into a grounded 3-prong outlet
Do not remove the ground prong
Do not use an adapter
Do not use an extension cord.
Failure to follow these instructions can result in death, fire, or electrical shock.
WARNING
SUFFOCATION AND ENTRAPMENT HAZARD
Failure to follow these disposal instructions can result in death or serious injury
IMPORTANT: Child entrapment and suffocation are not
problems of the past. Junked or abandoned refrigerator/
IUHH]HUVDUHVWLOOGDQJHURXVHYHQLIWKH\ZLOOVLWIRU³MXVWD
IHZGD\V´,I\RXDUHJHWWLQJULGRI\RXUROGUHIULJHUDWRU
freezer, please follow the instructions below to help
prevent accidents.
Before You Throw Away Your Old Appliance
Ŷ7DNHRIIWKHIUHVKIRRGDQGIUHH]HUGRRUV
Ŷ Leave the shelves in place so that children may not
easily climb inside.
Refrigerant and Foam Disposal:
Dispose of appliance in accordance with Federal and Local Regulations. Contact your local authorities for the
environmentally safe disposal of your appliance.

6 49-60767-1
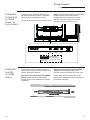
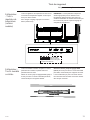
Controls
Column Refrigerator and Freezer Units
Temperature
controls
Changing
display
temperatures
from °F to °C
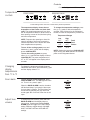
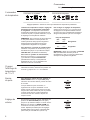
To change the temperature display between
Fahrenheit and Celsius, press and hold (-) pad
until the display shows in °C.
The temperature display shows the set
temperature of the freezer and fresh food
units. The actual temperature will vary from
the set temperature based on factors such as
door opening, amount of food, defrost cycling
and room temperature.
NOTE: Frequent door openings or door left
open for periods of time may increase the
internal temperature of the freezer and fresh
food compartments temporarily.
To turn off the cooling system press and
hold both (+) and (-) pads until the display
shows COOLING OFF.
To turn the cooling system on, press
either (+) or (-) pad and the display will show
COOLING ON. The preset temperatures of
0°F or 37°F will appear in the display after 3
seconds.
To change the temperature settings, press
the (+) or (-) pads to desired temperature
set point. Allow 24 hours for the refrigerator/
freezer to reach the temperature you have set.
NOTE: Setting the controls to COOLING OFF
stops cooling, but does not shut off electrical
power to the refrigerator/freezer.
Door alarm
Adjust tone
volume
To turn the Door Alarm feature off, press
DOOR ALARM once. The OFF light will come
on. To turn it on, press it again.
When the DOOR ALARM is active, the alarm
will flash and beep if you keep the door open
for more than 2 minutes. The Door Alarm can
be silenced by pressing any key. Alarm will
sound again after 5 minutes if the door is still
open.
Preset Settings: Allow 24 hours to reach these preset temperatures.
Temperature Ranges
Low High
34°F 42°F Fresh
Food
1°C 5°C
-6°F +4°F Freezer
-21°C -15°C
Refrigerator ControlsFreezer Controls
To change the tone volume, press and hold
DOOR ALARM until the display shows a
volume level. Pressing and holding DOOR
ALARM again will toggle to the next volume
setting. Repeat to toggle through VOLUME
HIGH, VOLUME LOW and VOLUME OFF
settings.

49-60767-1 7
Automatic Icemaker (freezer models)
Column Refrigerator and Freezer Units
Automatic
icemaker
(freezer
models)
Accessing
the icemaker
and ice
storage bin
(freezer
models)
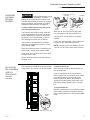
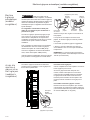
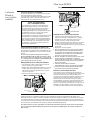
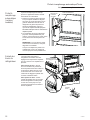
The icemaker is located above the first drawer
of the freezer. The ice bin is in the first drawer.
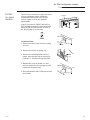
To remove the ice bin:
Open and fully extend top drawer and lift out
the ice storage bin.
If the ice storage bin will be removed more
than 2 minutes, set the icemaker power switch
to the OFF position to prevent cubes from
falling into the wire drawer. Remember to
switch the icemaker power switch back to the
ON position before replacing the ice storage
bin.
To turn icemaker off :
Remove top wire drawer to access the icmaker
power switch (see Drawer Removal section).
Set the power switch to the OFF position (OFF
or O)
CAUTION
Avoid contact with the moving
parts of the ejector mechanism, or with the
heating element (located on the bottom of the
icemaker) that releases the cubes. Do not place
fingers or hands on the automatic ice making
mechanism while the freezer is plugged in.
A newly-installed freezer may take 12–24
hours to begin making ice.
The icemaker will produce seven cubes per
cycle—approximately 15 cycles in a 24-hour
period, depending on freezer compartment
temperature, room temperature, number of
door openings and other use conditions.
If the freezer is operated before the water
connection is made to the icemaker, set the
power switch to OFF.
When the freezer has been connected to the
water supply, set the power switch to
ON
.
Throw away the first full bucket of ice to allow
the water line to clear.
Be sure nothing interferes with the sweep of
the feeler arm.
When the bin fills to the level of the feeler
arm, the icemaker will stop producing ice.
It is normal for several cubes to be joined
together.
If ice is not used frequently, old ice cubes will
become cloudy, taste stale and shrink.
NOTE: Icemaker works best between 40 and
120 PSI (275-827 kPa) home water pressure.
Icemaker
ON/OFF
switch
Feeler Arm
Feeler Arm
Icemaker
Icemaker
Power
Switch
Power
Switch
(Appearance may vary)
(Appearance may vary)

8 49-60767-1
Water filter
cartridge
(on some
models)
RPWFE Water Filter
Column Refrigerator and Freezer Units
RPWFE Water filter cartridge
The water filter cartridge is located in the front
access panel at the bottom of the unit.
This product uses radio frequency identification
(RFID) to detect leaks and monitor filter status. The
RFID technology is certified by the FCC.
When to replace the filter cartridge
The filter cartridge should be replaced every six
months or earlier if 170 gallons of water has been
dispensed or the flow of water to the dispenser or
icemaker decreases.
The main refrigerator/freezer control will display
ORDER WATER FILTER when the water filter has
reached 90% of life. The display will change to
WATER FILTER EXPIRED after 100% of life.
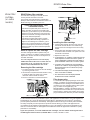
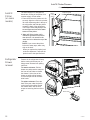
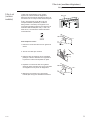
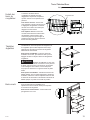
Removing the filter cartridge
1. To replace the filter, first remove the old cartridge
by removing the filter cover.
2. Use the filter tool (attached inside the filter cover)
to rotate the filter one-quarter turn counter-
clockwise until the handle is vertical.
3. Pull out on the filter to unseat and remove.
Installing the filter cartridge
1. Insert the filter through the front of the unit with
WKHKDQGOHYHUWLFDODQGWKH³IURQW´ODEHOIDFLQJ
upward. Push the cartridge inward until it is fully
seated.
2. Use the filter tool (attached inside the filter cover)
to rotate the filter clockwise one-quarter turn until
the handle is horizontal.
3. Replace the filter cover.
4. In refrigerators, run 2 gallons of water through the
AutoFill pitcher to remove air from the system. A
newly installed filter cartridge will cause water to
spurt and dribble until the air is out of the system.
5. In freezers, the icemaker may not immediately
produce ice. Initial ice may be irregularly shaped.
Discard the first bin of ice to allow air to purge
from the system.
6. The water filter display will automatically reset
when a new filter is installed.
7. The water filter screen will display WATER
FILTER LEAK if a leak is detected.
Filter bypass plug
To reduce the risk of property damage due to water
leakage, you MUST use the filter bypass plug when
a replacement filter cartridge is not available. Some
models do not come equipped with the filter bypass
plug. To obtain a free bypass plug, call
800-GECARES. In Canada, call 800.561.3344. The
autofill pitcher and icemaker will not operate without
either the filter or bypass plug installed. The bypass
plug is installed in the same way as a filter cartridge.
FCCID: ZKJ-EBX1532P001 ICID:
10229A-EBX1532P001
³7KLVGHYLFHFRPSOLHVZLWKSDUWRIWKH)&&
Rules. Operation is subject to the following two
conditions: (1) This device may not cause harmful
interference, and (2) this device must accept any
interference received, including interference that
PD\FDXVHXQGHVLUHGRSHUDWLRQ´
³7KLVGHYLFHFRPSOLHVZLWK,QGXVWU\&DQDGD
licence-exempt RSS standard(s). Operation is
subject to the following two conditions: (1) this
device may not cause interference, and (2) this
device must accept any interference, including
interference that may cause undesired operation
RIWKHGHYLFH´
For the maximum benefit of your filtration system, GE Appliances recommends the use of GE Appliances-
branded filters only. Using GE Appliances-branded filters in GE Appliances and Hotpoint
®
refrigerators
provides optimal performance and reliability. GE Appliances filters meet rigorous industry NSF standards
for safety and quality that are important for products that are filtering your water. GE Appliances has
not qualified non-GE Appliances-branded filters for use in GE Appliances and Hotpoint refrigerators and
there is no assurance that non-GE Appliances-branded filters meet GE Appliances standards for quality,
performance and reliability.
If you have questions, or to order additional filter cartridges, visit our website at monogram.com or
call Monogram Preferred Service, 800.444.1845. In Canada, call 866.777.7627.
Filter Tool
Filter Cover
Filter

49-60767-1 9
The Air Filter is located in the upper left corner
of some refrigerator models. Monogram
recommends replacement of the air filter
every 6 months or when odor becomes
objectionable.
At 90% of air filter life, RESET and HOLD 3
SEC will flash on the main control above and
below the AIR FILTER indicator. at 100% of
life, they will stay on continuously.
To Replace Filter:
1. Remove the cover of the air filter by sliding
the front.
2. Remove the old filter by pulling out.
3. Remove the replacement filter from the
plastic. Insert the filter into the housing by
pushing it in. The filter will snap into place.
4. Replace filter cover by sliding it on from
the front. Make sure the front edge is flush
against the refrigerator wall.
5. Press and hold the AIR FILTER pad to reset
the indicator.
Air filter
(on some
models)
Air Filter (refrigerator models)
Column Refrigerator and Freezer Units
Air Filter

10 49-60767-1
WI-FI
Connect
Appliance Communication
Column Refrigerator and Freezer Units
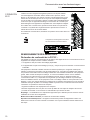
Your refrigerator/freezer has a Connected Appliance information label
located behind the lowest door bin, as shown, and can be connected to
your WI-FI network, allowing it to communicate with your smart phone for
remote monitoring, control and notifications. Please visit
www.GEAppliances.com/connect to learn more about connected
appliance features, and to learn what connected appliance apps will work
with your Smart Phone.
To use your WI-FI, press the WI-FI pad on the control panel. The WI-FI
symbol will flash during the connection process. It will remain solid when a
connection is made.
To turn off WI-FI, press and hold the WI-FI pad again.
REGULATORY INFORMATION
FCC/IC Compliance Statement:
This device complies with Part 15 of the FCC Rules. Operation is subject to the following two
conditions:
1. This device may not cause harmful interference.
2. This device must accept any interference received, including interference that may cause
undesired operation.
This equipment has been tested and found to comply with the limits for a Class B digital
device, pursuant to Part 15 of the FCC Rules. These limits are designed to provide reasonable
protection against harmful interference in a residential installation. This equipment generates
uses and can radiate radio frequency energy and, if not installed and used in accordance with
the instructions, may cause harmful interference to radio communications. However, there is no
guarantee that interference will not occur in a particular installation. If this equipment does cause
harmful interference to radio or television reception, which can be determined by turning the
equipment off and on, the user is encouraged to try to correct the interference by one or more of
the following measures:
• Reorient or relocate the receiving antenna.
• Increase the separation between the equipment and receiver.
• Connect the equipment into an outlet on a circuit different from that to which the receiver is
connected.
• Consult the dealer or an experienced radio/television technician for help.
Labelling: Changes or modifications to this unit not expressly approved by the manufacturer
could void the user’s authority to operate the equipment.
ConnectPlus module only (or similar communication module)
RF Exposure - This device is only authorized for use in a mobile application. At least 20 cm of
separation distance between the ConnectPlus device and the user’s body must be maintained
at all times.
Connected Appliance information label
located behind the lowest door bin

49-60767-1 11
Refrigerator -
Temperature
controlled
drawer (on
some models)
Refrigerator -
Humidity
controlled
drawer
The temperature controlled drawer has an
adjustable temperature control. This drawer
can be used for miscellaneous items.
To change the setting, press the Select button.
NOTE: Temperatures indicate the appropriate
temperatures for the food and actual
temperatures may vary based on normal
operation and other factors such as door
openings and fresh food set point.
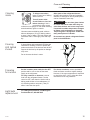
The humidity controlled drawer contains a
sliding control to let you control the amount of
cold air entering the drawers.
Slide the control all the way to the MORE
setting and the drawer provides higher
humidity levels recommended for most leafy
vegetables.
Slide the control all the way to the LESS
setting and the drawer provides lower
humidity levels recommended for most fruits.
Excess water that may accumulate in the
bottom of the drawers should be emptied and
the drawers wiped dry.
Storage Drawers
Column Refrigerator and Freezer Units
32° 34° 38°
CAUTION
Do not store glass bottles at this setting. If
they are frozen, they can break and result in
personal injury.
Laceration Hazard

12 49-60767-1
AutoFill Pitcher/Drawers
Column Refrigerator and Freezer Units
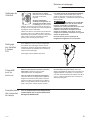
AutoFill
Pitcher
(on some
models)
Refrigerator
Drawer
removal
The AutoFill pitcher is designed for
hands-free, refilling of the pitcher for a
constant supply of fresh water.
1. Place the lid onto the pitcher so it fits
securely. Align the notch in the pitcher
lid to the dispenser guide in the top of
the refrigerator and slide the pitcher
toward the back of the refrigerator
until it stops.
There may be up to a 5
second response time before water
starts to fill the pitcher.
2. Water will fill the pitcher until it
reaches a specified level and will
then shut off. It is normal for the
water level to be below the top of the
pitcher.
NOTE: If you remove the pitcher
before the water stops, water may
drip on the shelf.
When you replace the pitcher back
under the dispenser, it will refill the
pitcher back to the specified level.
Drawers in the refrigerator will stop
before coming all the way out, to
help prevent contents from spilling
onto floor.
To remove a drawer: Pull the
drawer out and press the snaps at
the front of both sides to release
the drawer. Lift the front of the
drawer up while pulling forward
to move the pan free of the back
slide hooks.
To replace a drawer: Place the
back of the pan under the hooks
on the back of the slides. Rotate
the drawer down until the front
snaps are securing the front of the
pan.
Snaps to
release drawer
Back hooks
Notch
in top of
pitcher
Dispenser guide

49-60767-1 13
Drawers/Shelves/Bins
Column Refrigerator and Freezer Units
Freezer
Drawer
removal
Door
bins
All door bins are adjustable and can be moved
up and down to meet your storage needs.
To remove: Lift the bin up and slide it towards
you.
Adjustable
shelves
Tempered glass shelves in the refrigerator
and freezer enable you to make efficient shelf
arrangements to fit your family’s food storage
needs.
To remove shelves: Tilt shelf up at front,
then lift it up and out of tracks on rear wall of
refrigerator/freezer.
CAUTION
Handle glass shelves
carefully. Glass shelves and covers may break
if exposed to impact, such as bumping or
dropping. Tempered glass is designed to
shatter into many small pieces if it breaks.
To replace shelves: Select desired shelf
height. With shelf front raised slightly, engage
top lugs in tracks at rear of cabinet. Then lower
front of shelf until it locks into position.
Drawers in the freezer will stop
before coming all the way out, to
help prevent contents from spilling
onto floor.
To remove a drawer: Pull the
drawer out and lift the front up and
clear of the slide. Continue lifting up
while pulling forward to release the
back hook.
To replace a drawer: Place the
back hooks into the back slots of the
slides. Rotate the drawer down until
the front locater pins are seated into
the front slots of the slides.
Back hooks

14 49-60767-1
Cleaning
outside
Door handles and trim—Clean with a cloth
dampened with soapy water. Dry with a soft
cloth.
Main Control—Clean with a glass cleaner
and dry with a soft cloth. While cleaning, it
is possible to activate key pads and change
the unit settings and modes. If this happens,
wait 2 minutes and then use the appropriate
key pad touches to return the controls to the
desired settings/modes.
Keep the outside clean. Wipe with a clean
cloth lightly dampened with mild liquid dish
detergent. Dry with a clean, soft cloth.
Do not wipe the refrigerator/freezer with a
soiled dish cloth or wet towel. These may
leave a residue that can damage the finish.
Do not use scouring pads, powdered cleaners,
bleach or cleaners containing bleach because
these products can scratch and damage the
finish.
Stainless steel—Regularly clean and polish
the stainless steel door panels and handles
(on some models) with a commercially
available stainless steel cleaner such as
Stainless Steel Magic™ to preserve and
protect the fine finish. To purchase Stainless
Steel Magic and the Monogram polishing cloth,
visit Monogram .com or call 800.444.1845.
For Stainless Steel Magic, order part number
WX10X15. For Monogram polishing cloth,
order part number WX72X10001.
Do not use appliance wax or polish on the
stainless steel.
Sabbath Mode/Care and Cleaning
Column Refrigerator and Freezer Units
Sabbath
Mode
Sabbath Mode was designed for use on the
Jewish Sabbath and Holidays. The Sabbath
Mode feature makes it possible for observant
Jews to refrigerate and freeze food during the
duration of the holiday.
The Sabbath Mode feature can be set to
override typical reactions to actions in your
appliance. While in the Sabbath Mode, your
appliance will still operate normally. However,
the appliance will not respond to your actions.
While in the Sabbath Mode, you may notice the
IDQUXQQLQJZKHQWKHGRRULVRSHQHGKRZHYHU
this is not a result of your actions. The fan will
operate at random times. The defrost heater
will continue to defrost the appliance and
freezer and will be activated on a timer. The
defrost heater will not defrost as a result of
door openings or any consumer actions.
DISPLAYS, ALARMS and LIGHTS —The
main temperature control displays will be
GHDFWLYDWHGWKHUHIRUHWKH\ZLOOQRWEHOLWVRXQG
a tone or operate when touched. Door alarms
will be disabled. Lights will always be on but at
a dim light setting.
ICEMAKER and AUTOFILL PITCHER —
The icemaker will continue to operate. The
icemaker can be disabled by setting the
icemaker power switch to the OFF position
(see Accessing the Icemaker). To obtain ice,
open the freezer door and remove the cubed
ice from the ice bin. AutoFill pitcher will not
operate.
To turn on Sabbath Mode, press and hold
both (+) and DOOR ALARM pads until the
display shows SABBATH MODE.
Repeat the process to turn off Sabbath Mode.
Temperature set point will be displayed.
(with icemaker
OFF)

49-60767-1 15
Cleaning
inside
To help prevent odors,
leave an open box of baking
soda in the unit.
Turn off power at the
circuit breaker or fuse box
before cleaning. If this is
not practical, wring excess
moisture out of sponge or cloth when cleaning
around switches, lights or controls.
Use warm water and baking soda solution—
about a tablespoon (15 ml) of baking soda to
a quart (1 liter) of water. This both cleans and
neutralizes odors. Thoroughly rinse and wipe
dry.
Other parts of the refrigerator/freezer—
including door gaskets, meat and vegetable
drawers, ice storage bin and all plastic parts—
can be cleaned the same way.
CAUTION
Do not clean glass shelves
or covers with warm water when they are
cold. Glass shelves and covers may break
if exposed to sudden temperature changes
or impact, such as bumping or dropping.
Tempered glass is designed to shatter into
many small pieces if it breaks.
Do not wash any plastic refrigerator/freezer
parts in the dishwasher.
Care and Cleaning
Column Refrigerator and Freezer Units
Preparing
for vacation
Cleaning
LED lighted
shelves
Set the icemaker power switch to the OFF
position and be sure to shut off the water
supply to the refrigerator.
For long vacations or absences, remove
food from the refrigerator/freezer. Set the
control to OFF, and clean the interior with a
baking soda solution of one tablespoon (15
ml) of baking soda to one quart (1 liter) of
water. Leave the door open.
For shorter vacations, remove perishable
foods and leave controls at regular settings.
However, if the room temperature is expected
to drop below 60°F (16°C), follow the same
instructions as for long vacations.
If glass shelves with integrated LED lights are
removed for cleaning, be sure to protect the
probes at the back of the shelves and do NOT
support the shelves by the probes or damage
may occur.
Do not immerse shelves in water.
Light bulb
replacement
For LED light replacement, call Monogram
Preferred Service, 800.444.1845
Probes

16 49-60767-1
Preparation
Column Refrigerator and Freezer Units
Refrigerator/
freezer
location
Ŷ Do not install the refrigerator/freezer where
the temperature will go below 55°F (13°C).
It will not run often enough to maintain prop-
er temperatures.
Ŷ Do not install the refrigerator/freezer where
temperatures will go above 100°F (37°C). It
will not perform properly.
Ŷ Do not install the refrigerator/freezer in a
location exposed to water (rain, etc.) or
direct sunlight.
Ŷ Install it on a floor strong enough to
support it fully loaded.
For proper installation, the refrigerator/
freezer must be placed on a level surface
of hard material the same height as the
rest of the flooring. This surface should be
strong enough to support a fully loaded
refrigerator/freezer, or approximately 1,200
lbs. each. See the Installation Instructions
for complete directions.

49-60767-1 17
Before you
call Service
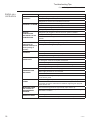
Troubleshooting Tips
Column Refrigerator and Freezer Units
PROBLEM POSSIBLE CAUSE
REFRIGERATOR/
FREEZER DOES NOT
OPERATE
May be in defrost cycle when motor does not operate for about 45 minutes.
Temperature control in the OFF position.
If interior light is not on, refrigerator/freezer may not be plugged in at wall
outlet.
The house fuse is blown/house circuit breaker is tripped. Replace fuse or
reset the breaker.
Unit master switch may not be turned on.
The Sabbath Mode Kit may be activated. Turn off the Sabbath Mode.
MOTOR OPERATES
FOR LONG PERIODS
OR CYCLES ON AND
OFF FREQUENTLY
(Modern refrigerators
and freezers with
more storage
space and a larger
freezer require more
operating time. They
start and stop often
to maintain even
temperatures.)
Normal when refrigerator/freezer is first plugged in. Wait 24 hours for the
refrigerator/freezer to completely cool down.
Often occurs when large amounts of food are placed in refrigerator/ freezer.
This is normal.
Door left open or package holding door open.
Hot weather or frequent door openings. This is normal.
Temperature controls set at the coldest setting. See Temperature Controls.
VIBRATION OR
RATTLING (Slight
vibration is normal.)
Refrigerator may not be properly installed.
THUMPING SOUND
WHEN DOOR IS
CLOSED
This is a normal operating sound.
The mechanism that closes the door makes a slight thumping sound as it
passes over its lever point, at approximately 80 degrees.
Closing the door slowly will minimize the sound.
OPERATING SOUNDS Normal fan air flow. Fan cools the compressor motor.
The fans change speeds in order to provide optimal cooling and energy
savings.
These NORMAL sounds will also be heard from time to time:
– You may hear a whooshing or gurgling sound when the doors close. This
is due to pressure equalizing within the refrigerator/freezer.
– A water dripping noise may occur during the defrost cycle as ice melts
from the evaporator and flows into the drain pan.
– The flow of refrigerant through the refrigerator/freezer cooling coils may
make a gurgling noise like boiling water.
– Water dropping on the defrost heater can cause a sizzling, popping or
buzzing sound during the defrost cycle.
– You may hear cracking or popping sounds when the refrigerator/freezer
is first plugged in or during/after the defrost cycle. This happens as the
refrigerator/freezer cools to the correct temperature.
– The compressor may cause a clicking or chirping sound when attempting
to restart (this could take up to 5 minutes).
– The electronic control board may cause a clicking sound when relays
activate to control refrigerator/freezer components.
– Ice cubes dropping into the bin.
– The icemaker water valve will buzz and water will run in tubes when the
icemaker and AutoFill pitcher fills with water.

18 49-60767-1
Before you
call Service
Troubleshooting Tips
Column Refrigerator and Freezer Units
PROBLEM POSSIBLE CAUSE
DOOR NOT CLOSING
PROPERLY
Package may be holding door open.
&KHFNWKHGRRUJDVNHWLWPD\EHRXWRISRVLWLRQ
Refrigerator is not level. See Installation Instructions.
REFRIGERATOR/
FREEZER TOO WARM
Temperature control not set cold enough. See Temperature Control.
Warm weather or frequent door openings.
Door left open for long time.
Package may be holding door open.
ACTUAL
TEMPERATURE
NOT EQUAL TO SET
TEMPERATURE
Refrigerator just plugged in. Allow 24 hours for system to stabilize.
Door open for too long. Allow 24 hours for system to stabilize.
Warm food added to refrigerator/freezer. Allow 24 hours for system to
stabilize.
Defrost cycle is in process. Allow 24 hours for system to stabilize.
FROST OR ICE
CRYSTALS ON
FROZEN FOOD (Frost
within package is
normal.)
Door left open or package holding door open.
Too frequent or too long door openings.
SLOW ICE CUBE
FREEZING
Door may have been left open.
Turn temperature control to a colder temperature.
Packages may be holding door open.
ICE CUBES HAVE
ODOR/TASTE
Old cubes need to be discarded.
Ice storage bin needs to be emptied and washed.
Unsealed packages in freezer may be transmitting odor/taste to ice.
Interior of freezer needs cleaning. See Care and Cleaning.
Poor-tasting incoming water. Replace water filter.
AUTOMATIC
ICEMAKER DOES
NOT WORK
Icemaker power switch is in the O (off) position.
Water supply turned off or not connected.
Freezer too warm.
Piled up cubes in storage bin may cause icemaker to shut off too soon.
Level cubes by hand.
SMALL OR HOLLOW
CUBES
Water filter clogged. Replace the filter or use the filter bypass plug.
Check for a connection to a Reverse Osmosis water system. If an RO is
connected, remove the water filter and install the orginal bypass plug that
came with the unit.
MOISTURE FORMS
ON OUTSIDE OF
REFRIGERATOR/
FREEZER
Not unusual during periods of high humidity. Wipe surface dry.
Controlling humidity and temperature in the kitchen with air conditioning will
eliminate this condition.
AUTOFILL PITCHER
DOES NOT WORK
Water supply turned off or not connected.
Pitcher is not detected. Remove pitcher and re-seat into dispenser.

49-60767-1 19
Before you
call Service
PROBLEM POSSIBLE CAUSE
MOISTURE COLLECTS INSIDE Too frequent or long door openings.
In humid weather, air carries moisture into refrigerator/freezer
when doors are opened.
Control humidity and temperature in the kitchen with air
conditioning.
REFRIGERATOR/FREEZER HAS
ODOR
Foods with strong odors should be tightly covered.
Check for spoiled food.
Interior needs cleaning. See Care and Cleaning.
Defrost water system beneath unit needs cleaning.
Air filter life has expired. Replace air filter.
Keep open box of baking soda in refrigerator/freezerUHSODFH
every 3 months.
INTERIOR LIGHT DOES NOT
WORK
No power at outlet.
LED light needs replacing. See Schedule Service.
The Sabbath Mode may be activated and operating. Turn off
Sabbath Mode.
DOOR DIFFICULT TO REOPEN
IMMEDIATELY AFTER CLOSING
Tight door seal is due to pressure equalizing within the
refrigerator.
After closing the door, wait 5–30 seconds to reopen.
Troubleshooting Tips
Column Refrigerator and Freezer Units

20 49-60767-1
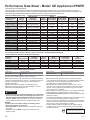
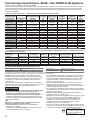
Performance Data Sheet - Model: GE Appliances RPWFE
Use Replacement Cartridge RPWFE.
The concentration of the indicated substances in water entering the system was reduced to a concentration less than or equal to the
permissible limit for water leaving the system as specified in NSF/ANSI Standard 42 and Standard 53. System tested and certified by NSF
International against NSF/ANSI Standard 42 and Standard 53 for the reduction of substances listed below.
The following pharmaceutical reduction claims have not been certified by NSF International.
Claims tested and verified by independent laboratory:
Substance
Reduction Average Influent
NSF specified
Challenge
Concentration
Avg %
Reduction
Average Product
Water
Concentration
Max Permissible
Product Water
Concentration
NSF
Test Report
Atenolol 1088 ng/L N/A 99.5% 5.0 ng/L N/A J-00103221
Fluoxetine 845 ng/l N/A 99.4% 5.0 ng/L N/A J-00103221
Ibuprofen 898 ng/L N/A 98.8% 9.9 ng/L N/A J-00103726
Progesterone 945 ng/L N/A 99.4% 5.5 ng/L N/A J-00103727
Trimethoprim 403 ng/L N/A 99.5% 2.0 ng/L N/A J-00103221
It is essential that the manufacturer’s recommended installation, maintenance and filter replacement requirements be carried out for the product to perform as
advertised. See Installation Manual for Warranty information.
Application Guidelines/Water Supply Parameters
Service Flow 0.5 gpm (1.89 lpm)
Water Supply Potable Water
Water Pressure 25-120 psi (172-827 kPa)
Water Temperature 33°F-100°F (0.6°C-38°C)
Note: While the testing was performed under standard laboratory
conditions, actual performance may vary. Contaminant reduction
testing is conducted every five years by certifying agency to
maintain certification.
Replacement Cartridge: RPWFE. For estimated costs of
replacement elements please call 1.877.959.8688 or visit our
website at www.geapplianceparts.com.
WARNING
To reduce the risk associated with ingestion of contaminants:
• Do not use with water that is microbiologically unsafe or of
unknown quality without adequate disinfection before and
after the system. Systems certified for cyst reduction may be
used on disinfected water that may contain filterable cysts.
NOTICE
To reduce the risk of water leakage or flooding, and to
ensure optimal filter performance:
• Read and follow use instructions before installation and use of
this system.
• Installation and use MUST comply with all state and local
plumbing codes.
• Do not install if water pressure exceeds 120 psi (827 kPa). If
your water pressure exceeds 80 psi, you must install a pressure-
limiting valve. Contact a plumbing professional if you are
uncertain how to check your water pressure.
• Do not install where water hammer conditions may occur. If
water hammer conditions exist you must install a water hammer
arrester. Contact a plumbing professional if you are uncertain
how to check for this condition.
• Do not install on hot water supply lines. The maximum operating
water temperature of this filter system is 100º F (38º C).
• Protect filter from freezing. Drain filter when temperatures drop
below 33ºF (0.6ºC).
• Change the disposable filter cartridge every six months or sooner
if you observe a noticeable reduction in water flow rate.
• Failure to replace the disposable filter cartridge at recommended
intervals may lead to reduced filter performance and cracks inthe
filter housing, causing water leakage or flooding.
• Product certified by NSF International, which requires resting
of Product every 5 years for material safety, structural integrity,
performance claims.
Capacity 170 Gallons (643.5 Liters). Contaminant Reduction Determined by NSF testing.
Substance Tested
for Reduction
Average
Influent
NSF specified
Challenge
Concentration
Avg %
Reduction
Average
Product Water
Concentration
Max Permissible
Product Water
Concentration
NSF Reduction
Requirements
NSF
Test Report
Chlorine Taste and Odor 2.0 mg/L 2.0 mg/L ± 10% 97.4% 0.05 mg/L N/A J-00102044
Nominal Particulate Class
,WRP 7,633,333 pts/mL At least 10,000 particles/mL 99.0% 71,850 pts/mL N/A J-00106249
Asbestos 109 MF/L
10
7
to 10
8
fibers/L; fibers
JUHDWHUWKDQPLQOHQJWK 99.99% 0)/ N/A J-00102069
Atrazine 0.009 mg/L 0.009 mg/L ± 10% 94.4% 0.0005 mg/L 0.003 mg/L N/A J-00102058
Benzene 0.016 mg/L 0.015 mg/L ± 10%± 96.4% 0.0001 mg/L 0.005 mg/L N/A J-00102065
Carbofuran 0.08 mg/L 0.08 mg/L ± 10% 98.8% 0.001 mg/L 0.04 mg/L N/A J-00102059
Cyst* 104,750 cysts/L Minimum 50,000 cysts/L 99.99% 3 cyst//L N/A J-00102057
Lead @ pH 6.5 0.140 mg/L 0.15 mg/L ± 10% 99.3% 0.001 mg/L 0.010 mg/L N/A J-00102052
Lead @ pH 8.5 0.158 mg/L 0.15 mg/L ± 10% 98.3% 0.002 mg/L 0.010 mg/L N/A J-00102053
Mercury @ pH 6.5 0.006 mg/L 0.006 mg/L ± 10% 91% 0.0004 mg/L 0.002 mg/L N/A J-00102054
Mercury @ pH 8.5 0.006 mg/L 0.006 mg/L ± 10% 88.3% 0.0003 mg/L 0.002 mg/L N/A J-00104087
Lindane 0.002 mg/L 0.002 mg/L ± 10% 99% 0.00002 mg/L 0.0002 mg/L N/A J-00102063
P-Dichlorobenzene 0.222 mg/L 0.225 mg/L ± 10% 99.8% 0.0005 mg/L 0.075 mg/L N/A J-00102067
Toxaphene 0.015 mg/L 0.015 mg/L ± 10% 93.5% 0.001 mg/L 0.003 mg/L N/A J-00102061
2, 4-D Reduction 0.218 mg/L 0.210 mg/L ± 10% 99.9% 0.0001 mg/L 0.07 mg/L N/A J-00102064
VOC 0.278 mg/L 0.300 mg/L ± 10% 97.7% 0.0015 mg/L N/A J-00102070
*Based on the use of Cryptosporidium parvum oocysts.
REPLACEMENT
ELEMENT
Tested and certified by NSF International against
NSF/ANSI Standard 42 and Standard 53 in model
GE Appliances RPWFE for the reduction of the
claims specified on the performance data sheet.
Page is loading ...
Page is loading ...
Page is loading ...
Page is loading ...
Page is loading ...
Page is loading ...
Page is loading ...
Page is loading ...
Page is loading ...
Page is loading ...
Page is loading ...
Page is loading ...
Page is loading ...
Page is loading ...
Page is loading ...
Page is loading ...
Page is loading ...
Page is loading ...
Page is loading ...
Page is loading ...
Page is loading ...
Page is loading ...
Page is loading ...
Page is loading ...
-
 1
1
-
 2
2
-
 3
3
-
 4
4
-
 5
5
-
 6
6
-
 7
7
-
 8
8
-
 9
9
-
 10
10
-
 11
11
-
 12
12
-
 13
13
-
 14
14
-
 15
15
-
 16
16
-
 17
17
-
 18
18
-
 19
19
-
 20
20
-
 21
21
-
 22
22
-
 23
23
-
 24
24
-
 25
25
-
 26
26
-
 27
27
-
 28
28
-
 29
29
-
 30
30
-
 31
31
-
 32
32
-
 33
33
-
 34
34
-
 35
35
-
 36
36
-
 37
37
-
 38
38
-
 39
39
-
 40
40
-
 41
41
-
 42
42
-
 43
43
-
 44
44


GE ZIF240NPKII Owner's manual
- Category
- Side-by-side fridge-freezers
- Type
- Owner's manual
Ask a question and I''ll find the answer in the document
Finding information in a document is now easier with AI
in other languages
- français: GE ZIF240NPKII Le manuel du propriétaire
Related papers
-
GE ZIF301NPNII Owner's manual
-
GE 49-60562-2 User manual
-
GE ZIBI240PII Owner's manual
-
GE Bottom-Freezer Built-In Refrigerator User manual
-
GE ZICS360NRRH User manual
-
-
GE ZIK30GNHAII Owner's manual
-
GE ZIS420NR Owner's manual
-
-
GE ZIRP360NXLH User manual
Other documents
-
GE Monogram ZIFP360NHLH User manual
-
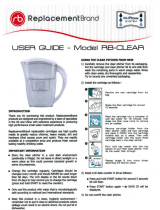 ReplacementBrand RB-CLEAR Operating instructions
-
 GE Monogram Refrigerator All-Refrigerators and All-Freezers User manual
-
Monogram ZIBS240 Owner's manual
-
 GE Monogram BUILT-IN Refrigerators User manual
-
GE Monogram ZIC30GNHII Owner's manual
-
Igloo FR9211-B User manual
-
-
-
Monogram ZIF301NPNII Owner's manual


