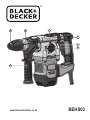
BLACK+DECKER BEHS03 User manual
- Category
- Power tools
- Type
- User manual
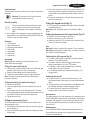
BLACK+DECKER BEHS03 is a versatile tool suitable for drilling, chiseling, and hammer drilling applications. It boasts a powerful motor that delivers efficient performance, making it ideal for both DIY enthusiasts and professionals. With its user-friendly design, the BEHS03 ensures precise and controlled operation for a wide range of tasks.
BLACK+DECKER BEHS03 is a versatile tool suitable for drilling, chiseling, and hammer drilling applications. It boasts a powerful motor that delivers efficient performance, making it ideal for both DIY enthusiasts and professionals. With its user-friendly design, the BEHS03 ensures precise and controlled operation for a wide range of tasks.


-
 1
1
-
 2
2
-
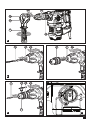 3
3
-
 4
4
-
 5
5
-
 6
6
-
 7
7
-
 8
8
-
 9
9
-
 10
10
-
 11
11
-
 12
12


BLACK+DECKER BEHS03 User manual
- Category
- Power tools
- Type
- User manual
BLACK+DECKER BEHS03 is a versatile tool suitable for drilling, chiseling, and hammer drilling applications. It boasts a powerful motor that delivers efficient performance, making it ideal for both DIY enthusiasts and professionals. With its user-friendly design, the BEHS03 ensures precise and controlled operation for a wide range of tasks.
Ask a question and I''ll find the answer in the document
Finding information in a document is now easier with AI
Related papers
-
BLACK+DECKER BL188 User manual
-
-
Black & Decker BEHS03 User manual
-
Black & Decker BEHS01 User manual
-
Black & Decker BCD900 User manual
-
Black & Decker BEH710 User manual
-
Black & Decker KD885 User manual
-
-
Black & Decker BCD003 User manual
-
Other documents
-
Hikoki W18DA Cordless Screw Driver User manual
-
Ryobi RDD18C User manual
-
-
DeWalt DCD706D2 T User manual
-
DeWalt DCD796 User manual
-
DeWalt DCD996 User manual
-
-
DeWalt D25733 User manual
-
DeWalt DCH273 User manual
-