
HOTPLATES
COUNTERTOPMODELS: H-33, H63, H-65, H-70, H-115
BUILT-IN MODELS: H-336, H-636, H-706, H-006
• OPERATION • INSTALLATION•
MAINTENANCE MANUAL
WELLS MANUFACTURING COMPANY
2 Erik Circle, P.O. Box 280, Verdi, NV 89439
(702) 345-0444 • FAX: 702-345-0569
TOLL-FREE FAX: (800) 356-5142, for orders only
ITEM NO. 49050
REV. A 10/96

TABLE OF CONTENTS
DESCRIPTION PAGE
Warranty Statement 3
Shipping Claim Procedure 4
Warnings! 5
Installation Instructions 6-7
Operating Instructions 7
Cleaning Instructions 7
Warranty Exclusions 8
2

WARRANTY STATEMENT
All commercial cooking equipment manufactured by WELLS is warranted against defects in materials and
workmanship for a period of one year from the date of original installation or 18 months from the date of
shipment from our factory, whichever comes first and is for the benefit of the original purchaser only, except
that;
a. with respect to the stainless steel fry pots for gas fryers, model number WFG-40-2, the
stainless steel fry pot is warranted to be free from defects that could cause shortening leaks for five
years from date of purchase, except that after one year replacement of fry pot only is covered at 75%
of list price of kettle assembly. Fry kettle includes new shrouds, insulation, flue vent, burners,
thermostats and attaching hardware; travel and labor not included. Fry pots which fail due to abuse
are not covered by standard or five year warranty - items include, but are not limited to, the firing of
burners without shortening or other cleaning solution in the fly kettle at proper level.
b. with respect to Lite Line Products, warranty is one year parts and labor on carry-in
portable models.
c. with respect to cold/refrigerated products, warranty labor is limited to 90 days after
installation. Extended warranty for labor and compressor are available at time of sale. Contact factory
sales department for details.
THIS WARRANTY IS THE COMPLETE AND ONLY WARRANTY, EXPRESSED OR IMPLIED IN
LAW OR FACT, INCLUDING BUT NOT LIMITED TO, WARRANTIES OF MERCHANTABILITY OR
FITNESS FOR ANY PARTICULAR PURPOSE, AND/OR FOR DIRECT, INDIRECT OR
CONSEQUENTIAL DAMAGES IN CONNECTION WITH WELLS' PRODUCTS. This warranty is void if
it is determined that upon inspection by an authorized service agency that the equipment has been modified,
misused, misapplied, improperly installed, or damaged in transit or by fire, flood or act of God. It also does
not apply if the serial nameplate has been removed or service is performed by unauthorized personnel. The
prices charged by Wells for its products are based upon the limitations in this warranty. Seller's obligation
under this warranty is limited to the repair of defects without charge by a WELLS' factory authorized service
agency or one of its sub-service agencies and is limited to a 60 mile radius to the nearest authorized service
agency or one of its sub-service agencies. This service will be provided on customer's premises for non-
portable models. Portable models (a device with a cord and plug) must be taken or shipped to the closest
authorized service agency, transportation charges prepaid for service. In addition to restrictions contained in
this warranty, specific limitations are shown in the Service Policy and Procedure Guide. WELLS' authorized
service agencies are located in principal cities. This warranty is valid in the United States and Canada and
void elsewhere. Please consult your classified telephone directory, your foodservice equipment dealer or
write the Factory Service Department, Wells Manufacturing Company, P.O. Box 280, Verdi, Nevada 89439,
phone (702) 345-0444, for information and other details concerning warranty.
3

SHIPPING CLAIM PROCEDURE:
For your protection, please note that equipment in this shipment was carefully inspected and packed by
skilled personnel before leaving the factory. The transportation company assumes full responsibility for
safe delivery upon acceptance of this shipment.
IF SHIPMENT ARRIVES DAMAGED:
VISIBLE LOSS OR DAMAGE: Be certain this is noted on freight bill or express receipt and signed by
person delivering.
FILE CLAIM FOR DAMAGES IMMEDIATELY: Regardless of extent of damage.
CONCEALED LOSS OR DAMAGE: If damage is unnoticed until merchandise is unpacked, notify
transportation company or carrier immediately, and file "concealed damage" claim with them. This
should be done within (15) days of date of delivery is made to you. Be sure to retain container for
inspection.
Wells cannot assume responsibility for damage or loss incurred in transit; however, we will furnish the
necessary documents to support your claim.
4

WARNINGS!
For Countertop Hotplates:
FOR YOUR SAFETY
Wells Countertop Hotplate is equipped with a three-prong electrical plug. This three-prong plug is
part of a system that will protect you if something goes wrong with the electrical wiring in the hotplate.
Be sure the three-prong plug is plugged into. a matching three-prong socket. DO NOT cut or break
off the large third prong in this plug, or the protective system will not work.
For All Hotplate Models:
IMPORTANT!
Make sure that incoming voltage is the same as unit is rated for. An electrical specification
plate specifying rated voltage, wattage, HZ and phase of unit is attached to the hotplate.
Plugging or wiring hotplate into greater voltage than unit is rated for may cause severe damage
to the infinite control, elements and other components. Plugging or wiring hotplate into
less voltage than unit is rated for may cause significant decrease in performance.
CAUTION
DO NOT SUBMERGE COUNTERTOP HOTPLATES IN WATER. DO NOT
SPLASH OR POUR WATER ONTO CONTROL PANELS OR WIRING.
PLEASE RETAIN THIS MANUAL FOR FUTURE REFERENCE
5

INSTALLATION INSTRUCTIONS:
1. Remove Hotplate carefully from carton. Remove all loose packaging and accessories.
2. IMPORTANT: Read all installation instructions carefully BEFORE starting installation.
3. It is the responsibility of the installer to comply with local codes.
4. Any installation not matching the specifications discussed in this manual will void the warmers
warranty.
Installing Countertop Hotplates:
1. Carefully place hotplate on a suitable countertop or table.
2. Hotplates are equipped with 4-inch adjustable legs (1-inch legs for Model H-115). Screw legs (4 each
packed with unit) into holes on bottom corners of hotplate. Set unit upright on countertop or table.
CAUTION: HOTPLATES SHOULD NOT BE OPERATED WITHOUT HAVING
LEGS INSTALLED.
3. H-63 Hotplates are provided with power cord. All Hotplates are equipped with a spacer to keep unit
spaced properly from the wall. SPACER SHOULD NOT BE REMOVED FOR ANY REASON!
WARNING: HOTPLATES SHOULD MAINTAIN A MINIMUM CLEARANCE OF
1-INCH FROM COMBUSTIBLE WALLS FROM THE SIDES AND
REAR OF THE UNIT.
4. Plug unit into a grounded 120V or 208/240V (depending on the model purchased), single phase
receptacle. Check metal rating plate on the unit to verify correct voltage. Hotplate models without
cordsets should be hardwired by a licensed electrician to the correct voltage. MAKE SURE THAT
INCOMING VOLTAGE IS THE SAME AS UNIT IS RATED FOR..
Electrical Grounding Instructions: Hotplates with power cords are equipped a three-prong (grounding)
plug for your protection against shock hazard and should be plugged directly into a properly grounded three-
prong receptacle. DO NOT CUT or remove the grounding prong from this plug.
Installation Requirements/or Built-in Hotplates:
1. Built-in hotplates must be installed into an all metal countertop.
2. The specification sheet covers Underwriters Laboratories conditions of acceptability, installation,
fabrication, and cut-out dimensions.
3. The installation of Built-in Hotplates varies depending on the model chosen. Each hotplate has
features and capabilities that affect the installation.
4. There must be a minimum 1-inch clearance between the unit and rear wall of the counter;
minimum '/4-inch clearance between the unit and adjacent cooking appliances; minimum 2-inch
clearance between the unit and side wall of counter; minimum 9-inch clearance between the
countertop and bottom metal shield.
5. The metal shield must be a minimum No. 22 MSG, and installed at least 9-inches below the
countertop (may have openings which will not permit entrance of a %-inch diameter rod). Please
review specification sheet carefully before beginning installation of Built-in Hotplates. Final
installation must meet all local codes.
6

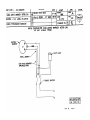
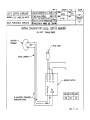
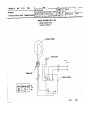
Installing Built-in Hotplates:
1. Please refer to the backside of the specification sheet (General Layout Data) provided with this
manual for specific "cutout" dimensions and installation of the hotplate you have purchased.
2. Install electrical conduit (if required by local code) between hotplate and electrical box.
3. Cut and/or drill holes as required in countertop apron.
4. Mount unit and control panel.
OPERATING INSTRUCTIONS:
1. Heat controls are equipped with an infinite switch for each cooking/heating element, allowing
adjustable temperature setting (OFF, LOW and HI) per element.
2. Control light glows when the heat is turned ON, warning the operator to turn off the unit when not in
use.
3. "High Speed" elements are super-sized, providing instant heat for extra-fast warming — cold to full
heat in 26 seconds.
Cooking Hints:
1. Save energy costs by turning the unit off when not in use. Due to instant warm-up, it's not
necessary to leave the unit on low heat during intermittent usage.
2. Hotplates will hold up to 16 quart pots or pans.
3. Hotplates with solid element, maximize heat efficiency by using flat bottom pots or pans.
CLEANING INSTRUCTIONS:
Before using your new hotplate, wipe entire unit clean using a clean, damp cloth/sponge with mild detergent
and towel dry.
1. Turn temperature control knob to the OFF position.
2. Allow unit to completely cool.
3. Unplug hotplate (if countertop model).
4. Wipe entire unit down using a clean cloth/sponge and a mild detergent.
WARNING: DO NOT SUBMERGE HOTPLATE IN WATER (COUNTERTOP
UNITS). DO NOT SPLASH/POUR WATER ONTO THE CONTROL PANEL
OR WIRING. POSSIBLE SHOCK HAZARD MAY RESULT AND UNIT
MAY BE DAMAGED (COUNTERTOP AND BUILT-IN UNITS).
5. Wipe the stainless steel cabinet down with a damp cloth, this allows "lifetime" stainless steel to keep
its luster permanently.
IMPORTANT: DO NOT USE STEEL WOOL FOR CLEANING.
6. To clean hotplates with swing-up elements, remove the heat reflector pans and clean with a damp
cloth and mild detergent, or place pans in a dishwasher.
7

WELLS MANUFACTURING COMPANY SERVICE
POLICY AND PROCEDURE GUIDE ADDITIONAL
WARRANTY EXCLUSIONS
1. Resetting the safety thermostats, circuit breakers, overload protectors, or fuse replacements unless
warranted conditions are the cause.
2. All problems due to operation at voltages other than specified on equipment nameplates -conversion to
correct voltage must be the customer's responsibility.
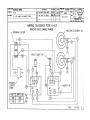
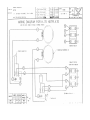
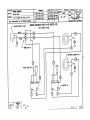
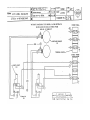
3. All problems due to electrical connections not made in accordance with electrical code requirements and
wiring diagrams supplied with the equipment.
4. Calibration of heat controls after the first sixty (60) days on original components. Replacement of item&
subject to normal wear to include such items as knobs, light bulbs, baskets, grids, mechanical timers and
thermocouples. Normal maintenance functions including lubrication, adjustments of airflow, thermostats,
door mechanisms, microswitches, burners and pilot burners and replacement of fuses and indicating lights
are not covered by warranty.
5. All fry pots welded in the field.
6. Deterioration of aluminum vessels due to insertion of food product or use of abrasive cleaners is not
covered by warranty.
7. Full use, care, and maintenance instructions are supplied with each machine. Those miscellaneous
adjustments noted are customer responsibility. Proper attention will prolong the life of the machine.
8. Travel mileage is limited to sixty (60) miles from an Authorized Service Agency or one of its sub-service
agencies.
9. All labor shall be performed during regular working hours. Overtime premium will be charged to the
buyer.
10. All genuine Wells replacement parts are warranted for ninety (90) days from date of purchase on non-
warranty equipment. This parts warranty is limited only to replacements of the defective part. Any use of
non-genuine Wells parts completely voids any warranty.
11. Installation, labor, and job check-outs are not considered warranty.
12. Charges incurred by delay's, waiting time or operating restriction's that hinder the service technicians
ability to perform service are not covered by warranty. This includes institutional and correctional
facilities.
8

WARRANTY POLICY & INSTRUCTIONS GENERAL
This policy and procedures is the controlling document for submitting warranty claims. The information
provided must be reviewed and understood by all service, parts, and warranty administration personnel,
including branch and sub-agents involved in the servicing of Wells Manufacturing Equipment.
1. The warranty statement and service agency listing provides our
customers with our warranty statement, authorized service agencies and additional warranty
exclusions, and is provided to customers with all Wells Manufacturing equipment.
2. Warranty claims that have charges which are excluded or limited in the
warranty statement and service agency listing without prior factory
approval will be rejected. Included, but not limited to, are items such
as:
A. Travel charges for portable equipment, items with power cords such as F-49 fryers,
hotplates, waffle bakers, pop-up toasters, etc. These items must be taken to the closest
authorized service agency or their sub-agent by the end-user.
B. Any mileage/travel labor charges in excess of 60 miles one way on any equipment.
C. Calibration of heat controls after the first sixty (60) days on original components.
Replacement of items subject to normal wear to include such items as knobs, light bulbs,
baskets, grids and thermocouples. Normal maintenance functions including lubrication,
adjustments of airflow, thermostats, door mechanisms, microswitches, burners and pilot
burners and replacement of fuses and indicating lights are not covered by warranty.
3. Care must be taken not to exceed the value of the equipment. Wells Manufacturing Co. will not
be responsible for costs which exceed replacement cost of the equipment. If repair costs are
estimated to be near or above the replacement cost of the unit, contact the factory for repair or
replacement directions.
4. We are using the CFESA/NAFEM Warranty Service Report. It is
available through Wells Manufacturing Co., p/n 58831, in packages of 100, or through CFESA
headquarters. All other warranty forms will be rejected.
5. All warranty claims must be submitted in a timely manner. All
warranty claims must be submitted within six months of the completion date.

PROCEDURES GENERAL
1. All information must be typed or printed clearly.
2. All required information must be provided in accordance with the warranty form instructions
(see pages 3 and 4).
3. Distribution:
A. Mail the original copy of the warranty form to Wells
Manufacturing, attention Service/Warranty.
B. Attach one copy of the warranty form to the parts that are being returned to the
Factory.
4. We use your agency invoice number as our control number and your invoice number can
only be used once during a two year period. The invoice number can be 10 digits in any
alphanumeric combination.
5. Only one serial number may be used per warranty report. If more than one unit is serviced
at a location, submit a warranty report for each unit. You may use a "-1" on your agency
invoice, i.e., Invoice #10701, 10701-1, 10701-2, etc. Travel and mileage may be charged to
only one serial number.
NOTE
Failure to comply with these requirements and the warranty form
instructions will result in rejection of your claim or delay in
processing of the warranty claim.


-
 1
1
-
 2
2
-
 3
3
-
 4
4
-
 5
5
-
 6
6
-
 7
7
-
 8
8
-
 9
9
-
 10
10
-
 11
11
-
 12
12
-
 13
13
-
 14
14
-
 15
15
-
 16
16
-
 17
17
-
 18
18
-
 19
19
-
 20
20


Ask a question and I''ll find the answer in the document
Finding information in a document is now easier with AI
Related papers
-
Wells OC-4T Operating instructions
-
-
Wells Manufacturing HC100 Operating instructions
-
-
Wells HC100 Specification
-
-
-
-
Bloomfield H-636 Specification
-
Wells HC1006 Specification