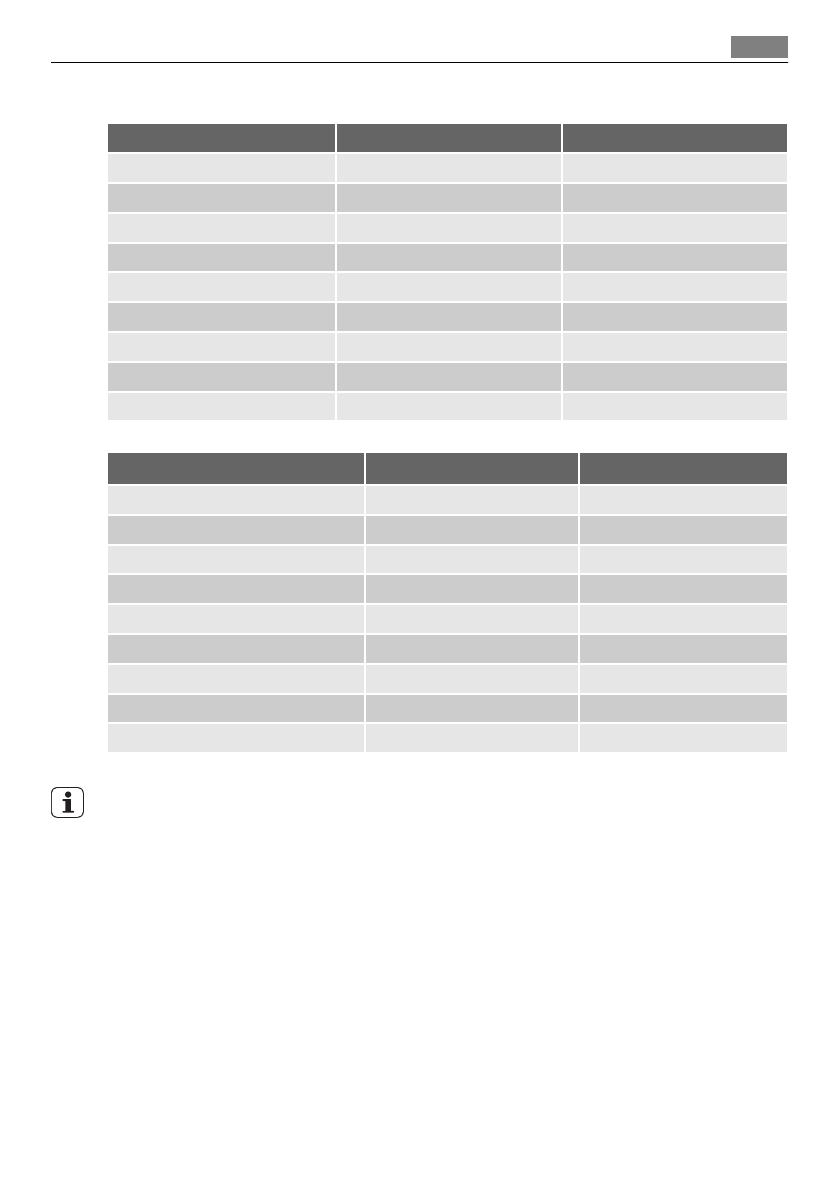
Aeg-Electrolux F99009W0P User manual

Category
Dishwashers
Type
User manual

Aeg-Electrolux F99009W0P is a dishwasher designed to provide efficient and convenient dish cleaning. Equipped with various features, it offers customizable washing cycles, automatic detergent and rinse aid dispensing, and a spacious interior to accommodate a significant number of dishes. Additionally, it boasts a user-friendly control panel with a display for easy program selection and monitoring.

Aeg-Electrolux F99009W0P is a dishwasher designed to provide efficient and convenient dish cleaning. Equipped with various features, it offers customizable washing cycles, automatic detergent and rinse aid dispensing, and a spacious interior to accommodate a significant number of dishes. Additionally, it boasts a user-friendly control panel with a display for easy program selection and monitoring.

FAVORIT 99009
EN
DISHWASHER USER MANUAL
FOR PERFECT RESULTS
Thank you for choosing this AEG product. We have
created it to give you impeccable performance for many
years, with innovative technologies that help make life
simpler – features you might not find on ordinary
appliances. Please spend a few minutes reading to get the
very best from it.
ACCESSORIES AND CONSUMABLES
In the AEG webshop, you’ll find everything you need to
keep all your AEG appliances looking spotless and
working perfectly. Along with a wide range of accessories
designed and built to the high quality standards you
would expect, from specialist cookware to cutlery baskets,
from bottle holders to delicate laundry bags…
Visit the webshop at:
www.aeg-electrolux.com/shop
2
CONTENTS
4 Safety information
8 Product description
8 Control panel
12 Use of the appliance
12 Setting the water softener
14 Use of dishwasher salt
14 Use of detergent and rinse aid
15 Multitab function
16 Loading cutlery and dishes
18 Washing programmes
19 Select and start a washing
programme
21 Care and cleaning
22 What to do if…
24 Technical data
25 Environment concerns
25 Installation
The following symbols are used in this user
manual:
Important information concerning your
personal safety and information on how to
avoid damaging the appliance.
General information and tips
Environmental information
Subject to change without notice
Contents
3
SAFETY INFORMATION
Before the installation and use, read this manual carefully:
For your safety and the safety of your property.
To help the environment.
For the correct operation of the appliance.
Always keep these instructions with the appliance also if you move or give it to a different
person.
The manufacturer is not responsible if an incorrect installation and use causes damage.
Children and vulnerable persons safety
Do not let persons, children included, with reduced physical sensory, reduced mental
functions or lack of experience and knowledge to use the appliance. They must have su-
pervision or instruction for the operation of the appliance by a person who is responsible
for their safety.
Keep all packaging away from children. There is the risk of suffocation or injury.
Keep all detergents in a safe area. Do not let the children touch the detergents.
Keep children and pets away from the appliance when the door is open.
General safety
Do not change the specifications of this appliance. There is the risk of injury and damage
to the appliance.
Obey the safety instructions from the detergent manufacturer to prevent burns to eyes,
mouth and throat.
Do not drink the water from the appliance. Particles of detergent can stay in your appli-
ance.
Do not keep the appliance door open without supervision. This to prevent injury and to
fall on an open door.
Do not sit or stand on the open door.
Use
The appliance is only for domestic use. Do not use the appliance for other uses to pre-
vent injury to persons and damage to property.
Only use the appliance to clean accessories that are applicable for dishwashers.
Do not put flammable products or items that are wet with flammable products in, near
or on the appliance. Risk of explosion or fire.
Put the knives and all items with sharp points in the cutlery basket with their points
down. If not, put in a horizontal position in the upper basket or in the knife basket. (Not
all models have the knife basket).
Use only specified products for dishwashers (detergent, salt, rinse aid).
Types of salt that are not specified for dishwashers can cause damage to the water soft-
ener.
Fill the appliance with salt before you start a washing programme. Remaining salt in the
appliance can cause corrosion or make a hole in the bottom of the appliance.
4 Safety information
Do not fill the rinse aid dispenser with other products than the rinse aid, (dishwasher
cleaning agent, liquid detergent). This can cause damage to the appliance.
Make sure that the spray arms can move freely before you start a washing programme.
The appliance can release hot steam if you open the door while a washing programme
operates. There is a risk of skin burns.
Do not remove the dishes from the appliance until the washing programme is comple-
ted.
Care and cleaning
Before you clean the appliance, deactivate it and disconnect the mains plug from the
mains socket.
Do not use flammable products or products that can cause corrosion.
Do not use the appliance without the filters. Make sure that the installation of the filters
is correct. An incorrect installation causes unsatisfactory washing results and damage to
the appliance.
Do not use spray water or steam to clean the appliance. Risk of electrical shock and
damage to the appliance.
Installation
Make sure that the appliance is not damaged. Do not install or connect a damaged appli-
ance, contact the supplier.
Remove all packaging before you install and use the appliance.
Only a qualified person must do the electrical connection, the plumbing and the installa-
tion of the appliance. This to prevent the risks of structural damage or injury.
Make sure that the mains plug is disconnected from the mains socket during installation.
Do not drill into the sides of the appliance to prevent damage to hydraulic components
and electrical components.
Frost precautions
Do not install the appliance where the temperature is less than 0 °C.
The manufacturer is not responsible for frost damage.
Water connection
Use new hoses to connect the appliance to the water supply. Do not use used hoses.
Do not connect the appliance to new pipes or pipes not used for a long time. Let the
water flow for some minutes, then connect the inlet hose.
Make sure not to squash or cause damage to the water hoses when you install the appli-
ance.
Make sure that the water couplings are tight to prevent a water leakage.
The first time you use the appliance, make sure that the hoses do not have water leaks.
The water inlet hose has a safety valve and a double sheath with an inner mains cable.
There is pressure in the water inlet hose only when the water flows. If there is a leak in
the water inlet hose, the safety valve interrupts the flow of water.
Be careful when you connect the water inlet hose:
Safety information
5
Do not put the water inlet hose or the safety valve in water.
If the water inlet hose or the safety valve are damaged, immediately disconnect the
mains plug from the mains socket.
Contact the service centre to replace the water inlet hose with safety valve.
WARNING!
Dangerous voltage.
Electrical connection
The appliance must be earthed.
Make sure that the electrical information on the rating plate agrees with the power sup-
ply.
Always use a correctly installed shockproof socket.
Do not use multiple plugs and extension cables. There is a risk of fire.
Do not replace or change the mains cable. Contact the service centre.
Make sure not to squash or cause damage to the mains plug and cable behind the appli-
ance.
Make sure that there is access to the mains plug after the installation.
Do not pull the mains cable to disconnect the appliance. Always pull the mains plug.
Only for UK and Ireland. The appliance has a 13 amp mains plug. If it is necessary to
change the fuse in the mains plug, use a 13 amp ASTA (BS 1362) fuse .
Internal lamp
This appliance has an internal lamp that comes on when you open the door and goes off
when the door is closed.
WARNING!
Visible led radiation, do not look directly into the beam.
The LED of the lamp is CLASS 2 and agrees with IEC 60825-1: 1993 + A1:1997 + A2:2001.
Emission wave length: 450 nm
Maximum emitted power: 548 μW
6 Safety information
To replace the internal lamp, contact the service centre.
Disconnect the mains plug from the mains socket before the replacement of the internal
lamp.
Service centre
Only a qualified person can repair or work on the appliance. Contact the service centre.
Use only original spare parts.
To discard the appliance
To prevent the risk of injury or damage:
Disconnect the mains plug from the mains socket.
Cut off the mains cable and discard it.
Remove the door catch. This prevents children or pets to be closed in the appliance.
There is a risk of suffocation.
Discard the appliance at the local waste disposal centre.
WARNING!
The dishwasher detergents are dangerous and can cause corrosion !
If an accident occurs with these detergents, contact immediately a physician.
If the detergent gets into the mouth, contact immediately a physician.
If the detergent gets into the eyes, contact immediately a physician and clean the eyes
with water.
Keep dishwasher detergents in a safe area and out of children touch.
Do not keep the appliance door open when there is detergent in the detergent dispenser.
Fill the detergent dispenser only before you start a washing programme.
Safety information
7
PRODUCT DESCRIPTION
2
3
4
5
6
7
1
8
9
10
11
1 Upper basket
2 Water hardness dial
3 Salt container
4 Detergent dispenser
5 Rinse aid dispenser
6 Rating plate
7 Filters
8 Lower spray arm
9 Upper spray arm
10 Top spray arm
11 Worktop
CONTROL PANEL
Messages in the display and acoustic signals help you to operate with the appliance.
8 Product description
1
3
4
5
6
7
8
2
1 On/off button
2 Menu touchpad (up)
3 Display
4 Return touchpad
5 Start touchpad
6 OK touchpad
7 Menu touchpad (down)
8 Display touchpad
On/off button
Press this button to activate or deactivate the appliance.
After ten minutes from the end of the washing programme, the Auto Off function auto-
matically deactivates the appliance. This helps to decrease energy consumption.
Display
A
B
C
The display has three areas. To operate in an area, press the display touchpad until the edge
of the area comes on.
Programs area (A)
This area shows the menu with the washing programmes and the time of each programme.
To set the washing programme, refer to 'Washing programmes'.
1. Press the display touchpad to go to this area.
2. Press one of the menu touchpads. The display shows:
The menu with the washing programmes
The time of each programme
3. Press one of the menu touchpads to set a washing programme.
4. Press the OK touchpad. The display shows the three areas:
Control panel
9
Area (A) shows the washing programme and the time of the programme.
Area (B) shows the end time of the washing programme.
End Time area (B)
You can delay the start of the washing programme from 1 to 24 hours.
1. Press the display touchpad to go to this area.
2. Press one of the menu touchpads to set the number of hours for the delay start.
The upper part of the area shows the delay start.
The lower part of the area shows the end time of the washing programme.
3. Press the OK touchpad.
4. Press the return touchpad to close the menu option and go back to area (A).
Options area (C)
1. Press the display touchpad to go to this area.
2. Press one of the menu touchpads to go through the menu option.
3. Press the OK touchpad to set a function or to open the submenu.
4. Press the return touchpad to close the menu option and go back to area (A).
Menu option
Menu Submenu Description of the function
Multitab
On
Off
If you use the combi detergent
tablets ('3 in 1', '4 in 1', '5 in 1'),
use the multitab function. Re-
fer to 'Multitab function'.
Extra hygiene
On
Off
This function gives better re-
sults for the hygiene. During
the rinsing phase, the tempera-
ture stays at 70 °C for 10 to 14
minutes.
ProBoost
On
Off
This function increases the wa-
ter pressure by 40%. This func-
tion gives better washing re-
sults when the dishes are very
dirty.
Settings Language english
(Different languages are availa-
ble).
You can set the language of
the messages in the display.
Sound volume
On
Off
(5 levels are available).
You can adjust the volume of
all the acoustic signals.
Level 0 = volume off.
Factory setting: 5.
Time You can set the time.
10 Control panel
Menu Submenu Description of the function
Brightness
(10 levels are available).
You can change the intensity
of the display.
Factory setting: 10.
Contrast
(10 levels are available).
You can change the contrast of
the display.
Factory setting: 6.
Reset settings You can go back to the factory
setting of the appliance.
Water hardness
(10 levels are available).
You can adjust the level of the
water softener. Refer to 'Set-
ting the water softener'.
Factory setting: 5.
Rinse aid
On
Off
You can activate the rinse aid
dispenser. This function is
available only when the multi-
tab function is on.
Back To go back to the menu option.
Wash guide Program guide The display shows information
about the washing pro-
grammes.
Option guide The display shows information
about the functions.
Demo mode
On
Off
You can simulate a washing
programme. Refer to Demo
mode .
Factory setting: Off .
Back To go back to the menu option.
Demo mode
1. Go to the menu option.
2. Go to Wash Guide .
3. Press the OK touchpad to open the submenu.
4. Go to Demo mode and activate the function.
5. Press the display touchpad.
The display shows the three areas (A), (B) and (C).
The top left corner of the display shows DEMO. The function is activated.
Deactivate the function to operate the appliance.
Control panel
11
USE OF THE APPLIANCE
Activating the appliance for the first time
1. Activate the appliance.
2. The display shows the default language: Language English.
Press the OK touchpad to confirm the default language
Press one of the menu touchpads to set a different language and then press the OK
touchpad to confirm.
3. The display shows the time message.
4. Press one of the menu touchpads to set the time.
5. Press the OK touchpad.
6. The display goes to 'Programs' area.
Using the appliance
1. Be sure that the set level of the water softener agrees with the water hardness in your
area. If not, adjust the water softener.
2. Fill the salt container with dishwasher salt.
3. Fill the rinse aid dispenser with rinse aid.
4. Load cutlery and dishes into the appliance.
5. Set the correct washing programme for the type of load and soil.
6. Fill the detergent dispenser with the correct quantity of detergent.
7. Start the washing programme.
If you use the combi detergent tablets ('3 in 1', '4 in 1', '5 in 1'), use the multitab function.
Refer to 'Multitab function'.
SETTING THE WATER SOFTENER
The water softener removes minerals and salts from the water supply. These minerals and
salts can cause damage to the appliance.
Adjust the level of the water softener if this does not agree with the water hardness in your
area.
Contact your local water authority to know the water hardness in your area.
Water hardness
Water hardness ad-
justment
German degrees
(°dH)
French degrees
(TH°)
mmol/l Clarke de-
grees
manually elec-
tronical-
ly
51 - 70 91 - 125 9,1 - 12,5 64 - 88
2
1)
10
43 - 50 76 - 90 7,6 - 9,0 53 - 63
2
1)
9
37 - 42 65 - 75 6,5 - 7,5 46 - 52
2
1)
8
12 Use of the appliance
Water hardness
Water hardness ad-
justment
German degrees
(°dH)
French degrees
(TH°)
mmol/l Clarke de-
grees
manually elec-
tronical-
ly
29 - 36 51 - 64 5,1 - 6,4 36 - 45
2
1)
7
23 - 28 40 - 50 4,0 - 5,0 28 - 35
2
1)
6
19 - 22 33 - 39 3,3 - 3,9 23 - 27
2
1)
5
1)
15 - 18 26 - 32 2,6 - 3,2 18 - 22 1 4
11 - 14 19 - 25 1,9 - 2,5 13 - 17 1 3
4 - 10 7 - 18 0,7 - 1,8 5 - 12 1 2
< 4 < 7 < 0,7 < 5
1
2)
1
2)
1) Factory position.
2) Do not use salt at this level.
You must adjust the water softener manually and electronically.
Manual adjustment
Turn the water hardness dial to the position 1 or 2
(refer to the table).
Electronic adjustment
1. Open the menu option.
2. Go to Settings .
3. Press the OK touchpad to open the submenu.
4. Go to Water hardness .
5. Press the OK touchpad.
6. Set the level of the water softener.
7. Press the OK touchpad.
8. Press the return touchpad to close the menu option.
Setting the water softener 13
USE OF DISHWASHER SALT
Filling the salt container
1. Turn the cap counterclockwise and open
the salt container.
2. Fill the salt container with 1 litre of water
(only for the first time you fill with salt).
3. Use the funnel to fill the salt container
with salt.
4. Remove the salt around the opening of
the salt container.
5. Turn the cap clockwise to close the salt
container.
When it is necessary to fill the salt container,
the display shows a message. The message
does not show while a washing programme operates.
After you fill the salt container, the display can continue to show the message for some
hours. This does not have an unwanted effect on the operation of the appliance
It is correct that water comes out from the salt container when you fill it with salt.
USE OF DETERGENT AND RINSE AID
20
30
M
A
X
1
2
3
4
+
-
1
2
3
4
5
6
7
Use of detergent
To help the environment, do not use more than the correct quantity of detergent.
Obey the instructions on the detergent packaging.
How to fill the detergent dispenser:
1.
Press the release button
2
to open the lid
7
of the detergent dispenser.
14 Use of dishwasher salt
2.
Put the detergent in the dispenser
1
.
3. If the washing programme has a prewash phase, put a small quantity of detergent on
the inner part of the appliance door.
4.
If you use the detergent tablets, put the tablet in the detergent dispenser
1
.
5. Close the detergent dispenser. Press the lid until it locks into position.
Use long washing programmes when you use the detergent tablets. These cannot fully dis-
solve with short washing programmes and can decrease the washing results.
Use of rinse aid
Rinse aid makes it possible to dry the dishes without streaks and stains.
The rinse aid dispenser automatically adds rinse aid during the last rinsing phase.
Do these steps to fill the rinse aid dispenser:
1.
Press the release button
6
to open the lid
5
of the rinse aid dispenser.
2.
Fill the rinse aid dispenser
3
with rinse aid. The mark 'max' shows the maximum level.
3. Remove the spilled rinse aid with an absorbent cloth to prevent too much foam during
the washing programme.
4. Close the rinse aid dispenser. Press the lid until it locks into position.
When it is necessary to fill the rinse aid dispenser, the display shows a message. The mes-
sage does not show while a washing programme operates.
Adjust the rinse aid dosage
Factory set: position 3.
You can set the rinse aid dosage between position 1 (lowest dosage) and position 4 (highest
dosage).
Turn the rinse aid selector
4
to increase or decrease the dosage.
MULTITAB FUNCTION
The multitab function is for combi detergent tablets.
These tablets contain agents as detergent, rinse aid and dishwasher salt. Some types of tab-
lets can contain other agents.
Be sure that these tablets are applicable for the water hardness in your area (refer to the
instructions on the packaging of the products).
The multitab function deactivates the flow of rinse aid and salt.
The multitab function deactivates the salt and the rinse aid messages.
The programme duration can increase if you use the multitab function.
Activate or deactivate the multitab function before the start of a washing programme. You
cannot activate or deactivate the function when a washing programme operates.
To activate the multitab function
1. Open the menu option.
2. Go to Multitab and activate the multitab function.
Multitab function
15
When you activate the multitab function, it stays on until you deactivate it.
3. Press the OK touchpad.
4. Press the return touchpad to close the menu option.
To deactivate the multitab function and use separately detergent, salt and rinse aid
1. Open the menu option.
2. Go to Multitab and deactivate the multitab function.
3. Press the OK touchpad.
4. Press the return touchpad to close the menu option.
5. Fill the salt container and the rinse aid dispenser.
6. Adjust the water hardness to the highest level.
7. Start a washing programme without dishes.
8. When the washing programme is completed, adjust the water softener to the water
hardness in your area.
9. Adjust the quantity of rinse aid.
LOADING CUTLERY AND DISHES
Refer to the leaflet 'Examples of ProClean loads'.
Hints and tips
Do not put in the appliance items that can absorb water (sponges, household cloths).
Remove the remaining food from the items.
Make soft the remaining burned food on the items.
Put hollow items (cups, glasses and pans) with the opening down.
Make sure that water does not collect in containers or in bowls.
Make sure that cutlery and dishes do not bond together.
Make sure that the glasses do not touch other glasses.
Put small items in the cutlery basket.
Mix the spoons with other cutlery to prevent them to bond together.
When you put the items in the baskets, make sure that the water can touch all surfaces.
Put light items in the upper basket. Make sure that the items do not move.
Water droplets can collect on plastic items and non-stick pans.
16 Loading cutlery and dishes
Beer glass holders
The beer glass holders prevent beer glasses to
move while a washing programme operates.
If you do not use the holders, fold them up or re-
move them. You can also remove the support.
WARNING!
Be careful when you disengage or engage the sup-
port.
To remove the holders and the support, do these steps:
1. Disengage the holders from the support
and remove them.
2. Push the support to the rear part of the
basket to disengage it.
To engage the holders and the support, do these steps:
1. Push the support to the front part of the
basket to engage it.
2. Engage the holders on the support.
Loading cutlery and dishes 17
WASHING PROGRAMMES
Programme Type of soil Type of load Programme description
Automatic
1)
All Crockery, cutlery, pots
and pans
Prewash
Wash 45 °C or 70 °C
Rinses
Dry
70° Pro Heavy soil Crockery, cutlery, pots
and pans
Prewash
Wash 70 °C
Rinses
Dry
Extra silent
2)
Normal soil Crockery and cutlery Prewash
Wash 50 °C
Rinses
Dry
60° Quick
3)
Fresh soil Crockery and cutlery Wash 60 °C
Rinse
50° Energy
4)
Normal soil Crockery and cutlery Prewash
Wash 50 °C
Rinses
Dry
50 Minutes Light soil Crockery and cutlery Wash 55 °C
Rinses
ProZone
5)
Mixed soil Crockery, cutlery, pots
and pans
Prewash
Wash 70 °C
Rinses
Dry
45° Glass Normal or light
soil
Delicate crockery and
glassware
Wash 45 °C
Rinses
Dry
Prewash Use this programme to quickly rinse the
dishes. This prevents the remaining food
to bond on the dishes and bad odours to
come out from the appliance.
Do not use detergent with this pro-
gramme.
Rinse
1) The appliance senses the type of soil and the quantity of items in the baskets. It automatically adjusts the
temperature and quantity of the water, the energy consumption and the programme time.
2) This is the most silent washing programme. The pump works at a very low speed to decrease the level of noise.
Because of the low speed, the programme time is long.
3) With this programme you can wash a load with fresh soil. It gives good washing results in a short time.
4) This is the standard programme for test institutes. With this programme you have the most efficient use of
water and energy consumption for crockery and cutlery with normal soil. Refer to the supplied leaflet for test
information.
5) With this programme you can wash a load with mixed soil. Very heavy soil in the lower basket and normal soil in
the upper basket. The water pressure in the lower basket is three times higher than in the upper basket. The
temperature of the water in the lower basket is 25% higher than in the upper basket.
18 Washing programmes
Functions
Programme Extra hygiene ProBoost
Automatic Yes, with effect Yes, without effect
70° Pro Yes, without effect Yes, with effect
Extra silent Yes, without effect Yes, without effect
60° quick Yes, with effect Yes, without effect
50° Energy Yes, with effect Yes, without effect
50 Minutes Yes, with effect Yes, without effect
ProZone Yes, without effect Yes, without effect
45° Glass Yes, without effect Yes, without effect
Prewash Yes, without effect Yes, without effect
Consumption values
Programme
1)
Energy (kWh) Water (litre)
Automatic 0,9 - 1,7 8 - 15
70° Pro 1,4 - 1,6 13 - 14
Extra silent 1,1 - 1,2 9 - 11
60° Quick 0,8 9
50° Energy 0,9 - 1,0 9 - 11
50 Minutes 1,0 - 1,1 10 - 11
ProZone 1,3 - 1,5 14 - 15
45° Glass 0,8 - 0,9 11 - 12
Prewash 0,1 4
1) The display shows the programme time.
The water pressure and temperature, the variations of the mains supply and the quantity of
dishes can change the consumption values.
SELECT AND START A WASHING PROGRAMME
Starting the washing programme
1. Close the appliance door.
2. Activate the appliance.
3. Set the washing programme and functions.
4. Press the start touchpad, the countdown of the delay start or the washing programme
starts automatically.
The start of the appliance does not automatically occur if the salt container and the
rinse aid dispenser are empty. The related messages show in the display. Press again
Select and start a washing programme
19
the start touchpad, the countdown of the delay start or the washing programme
starts.
When the countdown of the delay start is completed, the washing programme starts
automatically.
The opening of the appliance door interrupts the countdown of the delay start. When you
close the door, the countdown continues from the point of interruption.
Cancelling the delay start
1. Press the start touchpad.
2. Follow the indications in the display to cancel the delay start.
3. Press the start touchpad. The washing programme starts automatically.
Interruption of a washing programme
Open the appliance door.
The washing programme stops.
Close the appliance door.
The washing programme continues from the point of interruption.
Cancelling the washing programme
If the washing programme has not started, you can change the selection.
To change the selection while the washing programme operates, it is necessary to cancel
the programme.
1. Press the start touchpad.
2. Follow the indications in the display to cancel the washing programme.
Make sure that there is detergent in the detergent dispenser before you start a new wash-
ing programme.
End of the washing programme
When the washing programme is completed, an intermittent acoustic signal sounds and the
display shows a message.
1. Deactivate the appliance.
2. Open the appliance door.
3. For better drying results, keep the appliance door ajar for some minutes.
Remove the items from the baskets
Let the dishes become cold before you remove them from the appliance. Hot dishes can
be easily damaged.
First remove the items from the lower basket, then from the upper basket.
There can be water on the sides and on the door of the appliance. Stainless steel be-
comes cool more quickly than the dishes.
20 Select and start a washing programme
1 / 1

Aeg-Electrolux F99009W0P User manual

Category
Dishwashers
Type
User manual

Aeg-Electrolux F99009W0P is a dishwasher designed to provide efficient and convenient dish cleaning. Equipped with various features, it offers customizable washing cycles, automatic detergent and rinse aid dispensing, and a spacious interior to accommodate a significant number of dishes. Additionally, it boasts a user-friendly control panel with a display for easy program selection and monitoring.

Ask a question and I''ll find the answer in the document

Finding information in a document is now easier with AI

Ask the document