Amana AMV5164AAW Owner's manual
- Category
- Microwaves
- Type
- Owner's manual
This manual is also suitable for

iiiiiiiiiiiiiiiii_
I!i!i!iiiiiiiiii!!_i!iii!_!
Use&CoreGuide
Model AMV5164AA/AC
Important Safety Instructions .................. 2-4
Features ........................................................ 5-6
Operating Instructions ............................ 7-20
Care and Cleaning ................................. 21-22
Cooking Utensils .......................................... 23
Troubleshooting ..................................... 24-25
Warranty ......................................................... 26
Guide d'utilisation et d'entretien .............. 27
Guia de Uso y Cuidado ................................ 53
Keep instructions for future reference.
Be sure Use & Care Guide stays with oven.
Form No. A/04/04 _2004 Maytag Appliances 3828WSA3927 Part No. 8112P262-60

What You Need to Know About
Safety Instructions
Warning and Important Safety Instructions appearing in this
Use & Care Guide are not meant to cover all possible
conditions and situations that may occur. Common sense
caution, and care must be exercised when installing,
maintaining, or operating microwave.
Always contact your dealer, distributor, service agent, or
manufacturer about problems or conditions you do not
understand.
Recognize Safety Symbols, Words,
Labels

Grounding Instructions
Oven MUST be grounded, Grounding
reduces risk of electric shock by _1_1
providing an escape wire for the
electric current if an electrical short
occurs. This oven is equipped with a
cord having a grounding wire with a grounding plug. The
plug must be plugged into an outlet that is properly
installed and grounded. See Installation Instructions.
Consult a qualified electrician or servicer if grounding
instructions are not completely understood, or if doubt
exists as to whether the oven is properly grounded.
Do not use an extension cord, If the product power
cord is too short, have a qualified electrician install a
three-slot receptacle. This oven should be plugged into a
separate 60 hertz circuit with the electrical rating as
shown in specifications table. When the oven is on a
circuit with other equipment, an increase in cooking
times may be required and fuses can be blown.
Microwave operates on standard household current,
110-120V.
Federal Communications
Commission Radio Frequency
Interference Statement
(U.S.A. Only)
This equipment generates and uses ISM frequency energy
and if not installed and used properly, that is in strict
accordance with the manufacturer's instructions, may
cause interference to radio and television reception. It has
been type tested and found to comply with limits for ISM
Equipment pursuant to part 18 of FCC Rules, which are
designed to provide reasonable protection against such
interference in a residential installation.
However, there is no guarantee that interference will not
occur in a particular installation. If this equipment does
cause interference to radio or television reception, which
can be determined by turning the equipment off and on,
the user is encouraged to try to correct the interference by
one or more of the following:
• Reorient the receiving antenna of the radio or television.
• Relocate the microwave oven with respect to the
receiver.
• Move the microwave oven away from the receiver.
• Plug the microwave oven into a different outlet so that
the microwave oven and the receiver are on different
branch circuits.
The manufacturer is not responsible for any radio or
television interference caused by unauthorized
modification to this microwave oven. tt is the
responsibility of the user to correct such interference.
Precautions to Avoid Possible
Exposure to Excessive
Microwave Energy
A. DO NOT attempt to operate this oven with the door open
since open door operation can result in harmful exposure
to microwave energy. It is important not to defeat or
tamper with the safety interlocks.
B. DO NOT place any object between the oven front face
and the door to allow soil or cleaner residue to
accumulate on sealing surfaces.
C. DO NOT operate the oven if it is damaged. It is
particularly important that oven door close properly and
that there is no damage to:
1. door (bent),
2. hinges and latches (broken or loosened),
3. door seals and sealing surfaces.
D. Oven should not be adjusted or repaired by anyone
except properly qualified service personnel.
SAVE THESE INSTRUCTIONS

SAVE TH ESE I NSTRUCTIONS

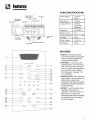
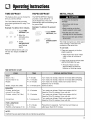
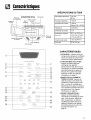
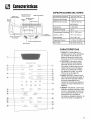
|entures
Window with
Metal Shield
Door Handle
Model and Serial
Number Plate Vent Grille
Glass Turntable
Cooking Guide
Metal Rack
Door Safety
Lock System
Cooktop/Countertop Light
Grease Filter
@
@
@
@
@
@
@
8@ B88 ['00 F<(_© S
Hi/L_s/[Nf
ib:i
H_/kc/Uf_
I
Panel
@
®
@
@
@
@
@
@
@
@
@
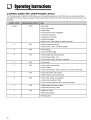
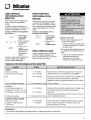
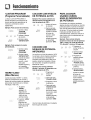
OVEN SPECIFICATIONS
Power Supply 120 VAC,
60 Hz
Input Power 1,500 W
Cooking Power 1,000 W
(IEC 60705
Standard)
Frequency 2,450 MHz
Rated Current 13 A
Outer Dimensions 291W_6"x 1670
(WxHxD) x 153h''
Cavity Volume 1.6 Cu. Ft.
Net Weight 52 Ibs.
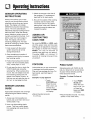
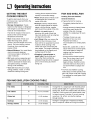
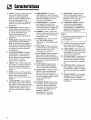
FEATURES
,
,
,
DISPLAY: The Display includes
a clock and indicators to tell you time
of day, cooking time settings and
cooking functions selected.
POPCORN: Touch this pad when
popping popcorn in your microwave
oven. The oven's sensor will tell the
oven how long to cook depending on
the amount of humidity itdetects
from the popcorn. See page 11 for
more information.
BAKED POTATO: Touch this pad to
cook potatoes. The oven's sensor will
tell the oven how long to cook
depending on the amount of humidity
it detects from the potato.See page 12
for moreinformation.
REHEAT: Touch this pad to reheat
casserole, dinner plate, and
soup/sauce. The oven's sensor will
tell the oven how long to cook
depending on the amount of humidity
coming from the food. See page 12
for more information.

5,COOK:Touchthispadtocookfrozen
entree,casserole,andrice.Theoven's
sensorwilltelltheovenhowlongto
cookdependingontheamountof
humiditycomingfromthefood.See
page12formoreinformation.
6.VEGETABLE:Touchthispadtocook
vegetables.Theoven'ssensorwilltell
theovenhowlongtocookdepending
ontheamountofhumidityitdetects
fromthevegetables.Seepage12for
moreinformation.
7,PIZZASLICE:Touchthispadto
reheatpizza.Theoven'ssensorwill
telltheovenhowlongtocook
dependingontheamountofhumidity
itdetects.Seepage11formore
information.
8.CUSTOMPROGRAM:Touchthis
padtorecallonecookinginstruction
previouslyprogrammedintomemory.
Seepage9formoreinformation.
9,MORE+:Touchthispadtoaddten
secondsofcookingtimeeachtime
youpressit.Seepage9formore
information.
10.LESS-:Touchthispadtosubtract
tensecondsofcookingtimeeach
timeyoupressit.Seepage9for
moreinformation.
11,AUTODEFROST:Meat,poultry,fish.
Touchthispadtoselectfoodtypeand
defrostfoodbyweight.Seepage14
formoreinformation.
12.TIMEDEFROST:Touchthispadto
defrostmostotherfrozenfoods.See
page15formoreinformation.
13,RAPIDDEFROST:Thispadprovides
RAPIDdefrostfor1.0poundoffrozen
food.Seepage15formoreinforma-
tion.
14.NUMBER:Touchnumberpadsto
entercookingtime,powerlevel,
quantities,orweights.
15.POWERLEVEL:Touchthispadto
selectacookingpowerlevel.
16.COOKTIME:Touchthispadtoseta
cookingtime.Seepage9formore
information.
20,
CONTROLSETUP:Touchthispad
tochangetheoven'sdefaultsettings
forsound,clock,displayspeedand
defrostweight.Seepage7formore
information.
21,ADD30SEC:Touchthispadtoset
andstartquicklyat100%powerlevel.
Seepage8formoreinformation.
22.TURNTABLEON/OFF:Touchthis
padtoturnofftheturntable.OFFwill
appearinthedisplay.Seepage7for
moreinformation.
23.
17,HOLDWARM:Touchthispadto 24.
keephot,cookedfoodswarminyour
microwaveovenforupto99minutes
99seconds.Seepage8formore
information. 25,
NOTE:
oThisoptionisnotavailablein
sensorcookanddefrostmodes.
18,STOP/CLEAR:Touchthispadto
stoptheovenortoclearallentries.
26,
19,ENTER/START:Touchthispadto
startafunction.Ifyouopenthedoor
afterovenbeginstocook,touch
ENTER/STARTagain. 27,
CLOCK:Touchthispadtoenterthe
timeofday.Seepage7formore
information.
LIGHTTIMER:Touchthispadtoset
thelighttimer.Seepage8formore
information.
KITCHENTIMER:Touchthispadto
setthekitchentimer.Seepage7for
moreinformation,
VENTHI/LO/OFF:Touchthispadto
turnthefanonoroff.Seepage7for
moreinformation.
LIGHTHI/LO/OFF:Touchthispadto
turnonthecooktop/countertoplight.
Seepage8formoreinformation.

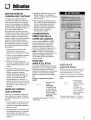
Operndn9Instructions
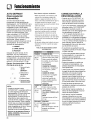
LEARN ABOUT YOUR
MICROWAVE OVEN
This section discusses the concepts
behind microwave cooking and
introduces you to the basics you
need to know to operate your
microwave oven. Please read this
information before use.
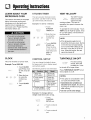
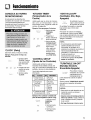
CLOCK
This oven includes a 12-hour clock.
Example: To set 8:00 AM,
Ck_ <
1. Touch CLOCK
pad.(Press once
for AM, twice for
PM)
8 0 0
CI k
2. Enter the time
by using the
number key
pad.
3. Touch CLOCK
pad.
KITCHEN TIMER
You can use your microwave oven
as a timer. Use the Timer for timing
up to 99 minutes, 99 seconds.
Example: To set for 3 minutes.
1. Touch
KITCHEN
°rim__¢ TIMER pad.
2. Enter the time
by using the
3 O C_ number key
pad.
_St; ;';
3. Touch ENTER/
START pad.
When the time
is over, you will
hear beeps and
END wiJJ
display.
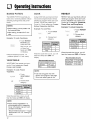
CONTROL SETUP
You can change the default values
for beep sound, clock, display speed
and defrost weight.
See following chart for more information.
1 BeepON/ 1 Sound ON
OFF control 2 Sound OFF
2 Clock display 1 Clock ON
control 2 Clock OFF
Display 1 Slow speed
2 Normal speed
3 Fast speed
Defrost weight 1 Lbs.
mode selected 2 Kg.
Example: To change defrost
weight mode (from Lbe. to Kg).
1. Touch
or r'_l CONTROL
_;_l_ SETUP pad.
2
2. Touch number 4
pad.
Touch number 2
pad.
VENT HI/LO/OFF
The VENT moves
w:;_' steam and other
Hi/Lo/©ff
vapors from the
cooking surface. The vent will
operate at low speed whenever the
oven is on.
To operate the vent manually: Touch
VENT once for High fan speed, twice
for Low fan speed, or three times to
turn the fan off.
NOTE:
• If the temperature gets too hot
around the microwave oven, the fan
in the vent hood will automatically
turn on at the HIGH setting to cool
the oven. It may stay on up to an
hour. When this occurs, the vent
cannot be turned off.
TURNTABLE ON/OFF
For best cooking
off/of results, leave the
turntable on. tt can
be turned off for large dishes.
Press TURNTABLE ON/OFF to turn
the turntable on or off.
NOTES:
• This option is not available in sen-
sor cook and defrost modes.
• Sometimes the turntable can
become hot to touch, Be careful
touching the turntable during and
after cooking.
• Do not run the oven empty.

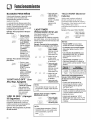
CHILD LOCK
You may lock the control panel to
prevent the microwave from being
accidentally started or used by
children.
The Child Lock feature is also useful
when cleaning the control panel.
Child Lock prevents accidental
programming when wiping the
control
panel.
Example: To set the child lock.
1. Touch STOP/
CLEAR pad.
2. Touch and hold
ENTER/START
_ ;;_"_; pad more than 4
seconds.
LOCKED will
appear in the
display window
with two beeps.
Example: To cancel the child lock,
1. Touch and hold
_t_, ENTER/START
_}_uu _' pad more than 4
seconds.
LOCKED will
disappear and
you hear two
beeps.
LIGHT HI/LO/OFF
Touch LIGHT
HIiLO/OFF pad
once for bright
n/Lo/_ light, twice for
night light, or three
times to turn the
light off.
ADD 30 SEC.
A time-saving pad, this simplified
control lets you quickly set and start
microwave cooking without the need
to touch the ENTER/START pad.
Example: To set ADD 30 SEC. for 2
minutes,
1.TouchADD30
SEC.pad4times.
The ovenbegins
cookingand display
showstime
countingdown.
LIGHT TIMER
You can set the LIGHT to turn on
and off automatically at any time.
The light comes on at the same time
every day until reset.
Example: Turn on 2:00 AM, turn off
7:00 AM.
/ itr;_H"
1. Touch LIGHT
TIMER
pad.(Press once
for AM, twice for
PM.)
2. Enter the time
you want the
LIGHT to turn
on.
2 0 O
3. Touch LIGHT
TIMER pad
L I_t again.(Press
once for AM,
twice for PM.)
4. Enter the time
71 C_ C} you want the
LIGHT to turn
off.
5. Touch ENTER/
_ _ _, START pad.
NOTE:
• To reset the time to turn on and
off the LIGHT, repeat steps 1 to 5.
Example: To cancel the LIGHT
TIMER.
1. Touch LIGHT
r m_, TIMER pad.
2. Touch STOP/
CLEAR pad.
NOTE:
• If you want to cancel the LIGHT
TIMER in operation, touch
the l.gh_ pad.
Hi/Lo/Off
HOLD WARM
You can keep cooked food warm in
your microwave oven for up to 99
minutes 99 seconds. You can use
HOLD WARM by itself or to follow a
cooking cycle automatically.
Example: To use HOLD WARM.
1. Touch HOLD
vv_m WARM pad.
2. Touch ENTER/
START pad.
NOTES:
• HOLD WARM operates for up to
99 minutes 99 seconds.
• Food cooked covered should be
covered during HOLD WARM.
• Pastry items (pies, turnovers,
etc.) should be uncovered during
HOLD WARM.
• Complete meals kept warm on a
dinner plate can be covered
during HOLD WARM.
Liquid 1-2 cups
Dry 5-10 ozs.
To make HOLD WARM automati-
cally follow another cycle:
• While you are programming the
cooking instructions, touch HOLD
WARM before touching ENTER/
START.
• When the last cooking cycle is
over, you will hear two beeps and
"HOLD WARM" will appear in the
oven display.
• You can set HOLD WARM to
follow AUTO DEFROST, or multi-
cycle cooking.

Operndn9Instructions
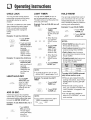
CUSTOM PROGRAM
CUSTOM PROGRAM lets you recall
one cooking instruction previously
placed in memory and begin cooking
quickly.
Example: To cook for 2 minutes.
1. Touch CUSTOM
_:__,tr'÷:_T_ PROGRAM
pad.
2 C} 2. Enter the cook
time.
3. Touch ENTER/
6,':_::'--°'_=:_T START pad.
Example: To recall
program.
1.
.
Ent@/'
the custom
Touch CUSTOM
PROGRAM
pad.
Touch ENTER/
START pad.
When the cook
time is over, you
will hear four
beeps and END
will display.
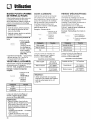
MORE+/LESS-
By using the MORE+ or LESS- keys,
all of the pre-programmed cook and
time cook features can be adjusted
to cook food for a longer or shorter
time.
Less-
1. Pressing
MORE+ will add
10 seconds of
cooking time
each time you
press it.
2. Pressing LESS-
will subtract 10
seconds of
cooking time
each time you
press it.
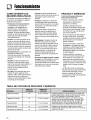
COOKING AT HIGH
POWER LEVELS
Example: To cook food for 8
minutes 30 seconds at 100% power,
1. Enter the cook
time.
_St,_Pt
2. Touch ENTER/
START pad.
When the cook
time is over,
you will hear
four beeps and
END will
display.
COOKING AT LOWER
POWER LEVELS
HIGH power cooking does not
always give you the best results with
foods that need slower cooking, such
as roasts, baked goods, or custards.
Your oven has 10 power settings in
addition to HIGH.
Example: To cook food for 7
minutes 30 seconds at 70% power.
1. Enter the cook
7 _Z_ C_ time.
2. Touch POWER
l..,_v_:1 LEVEL pad.
3. Enter the power
level.
4. Touch ENTER/
START pad.
When the cook
time is over, you
will hear four
beeps and END
will display.
See cooking
guide for Power
levels, page 10.
COOKING WITH
MORE THAN ONE
COOK CYCLE
For best results, some recipes call for
one Power Level for a certain length
of time, and another Power Level for
another length of time.Your oven can
be set to change from one to another
automatically, for up to three cycles if
the first heating cycle is defrost.
Example: To cook food for 3
minutes at 100% power and then
70% power for 7 minutes 30
seconds.
3 0 0
1. Enter the first
cook time.
2. Touch COOK
/::rYvk TIME pad.
3. Enter the
7' second cook
time.
4. Touch POWER
Io,,,_! LEVEL pad.
5. Enter the power
level.
6. Touch ENTER/
START pad.
When the cook
time is over, you
will hear four
beeps and END
will display.

Operndn9Instructions
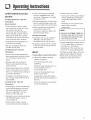
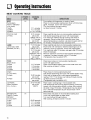
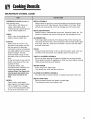
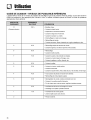
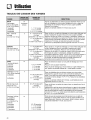
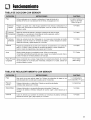
COOKING GUIDE FOR LOWER POWER LEVELS
The 10 power levels in addition to HIGH allow you to choose the best power ]eve] for the food you are cooking. Below
are listed all the power levels, examples of foods best cooked at each level, and the amount of microwave power you
are using.
10 High 100% • Boil water.
9 9O%
8 80%
7 70%
6 60%
5 50%
4 40%
3 30%
2 20%
1 10%
0
• Cook ground beef.
• Make candy.
• Cook fresh fruits and vegetables.
• Cook fish and poultry.
• Preheat browning dish.
• Reheat beverages.
• Bacon slices. Place utensil on metal oven rack.
• Reheat meat slices quickly.
• Saute onions, celery, and green pepper.
• All reheating.
• Cook scrambled eggs.
• Cook breads and cereal products.
• Cook cheese dishes, veal.
• Cook cakes, muffins, brownies, cupcakes.
• Cook pasta.
• Cook meats, whole poultry.
• Cook custard.
• Cook whole chicken, turkey, spare ribs, rib roast, sirloin roast.
• Cook less tender cuts of meat.
• Reheat frozen convenience foods.
• Thaw meat, poultry, and seafood.
• Cook small quantities of food.
• Finish cooking casserole, stew, and some sauces.
• Soften butter and cream cheese.
• Heat small amounts of food.
• Soften ice cream.
• Raise yeast dough.
• Standing time.
10

Operndn9Instructions
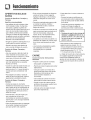
SENSOR OPERATING
INSTRUCTIONS
Sensor Cook allows you to cook
most of your favorite foods without
selecting cooking times and power
levels. The display will indicate
SENSING during the initial sensing
period. The oven automatically
determines required cooking time for
each food item. When the internal
sensor detects a certain amount of
humidity coming from the food, it will
tell the oven how much longer to
heat. The display will show the
remaining heating time. For best
results for cooking by Sensor, follow
these recommendations:
1. Food cooked with the sensor
system should be at normal
storage temperature.
2. Glass turntable and outside of
container should be dry to assure
best cooking results.
3. Foods should always be covered
loosely with microwavable plastic
wrap, waxed paper, or a lid.
4. Do not open the door or touch the
STOP/CLEAR pad during the
sensing time. When sensing time
is over, the oven beeps twice and
the remaining cooking time will
appear in the display window. At
this time you can open the door to
stir, turn, or rearrange the food.
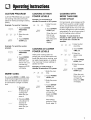
SENSOR COOKING
GUIDE
Appropriate containers and coverings
help assure good Sensor cooking
results.
1. Always use microwavable con-
tainers and cover them with lids or
vented plastic wrap.
2. Never use tight-sealing plastic
covers. They can prevent steam
from escaping and cause food to
overcook.
3. Match the amount to the size of
the container. Fill containers at
least half full for best results.
4. Be sure the outside of the cooking
container and the inside of the
microwave oven are dry before
placing food in the oven. Beads of
moisture turning into steam can
mislead the sensor.
ADDING OR
SUBTRACTING
COOK TIME
By using the MORE+ or LESS- pads
all of the sensor cook and time cook
settings can be adjusted to cook food
for a longer or shorter time. Pressing
MORE+ will add 10 seconds of
cooking time each time you press it.
Pressing LESS- will subtract 10
seconds of cooking time each time
you press it.
POPCORN
POPCORN lets you pop commercial-
ly packaged microwave popcorn.
Pop only one package at a time. For
best results, use fresh bags of
popcorn.
Example: To pop popcorn
1. Touch
POPCORN pad.
When the cook
p_ :r _ time is over, you
will hear four
beeps and END
will display.
• Recommended amounts:
3.0-3.5 ozs.
PIZZA SLICE
Reheating pizza with PIZZA SLICE
lets you reheat one or several slices
of pizza without selecting cooking
times and power levels.
Example: To reheat 2 slices of
pizza.
1. Touch PIZZA
SLICE pad.
Pizza
:_ir:_,* When the cook
time is over, you
will hear four
beeps and END
will display.
• Recommended amounts: 1-3 slices,
(about 3-5 ozs. each slice).
11

Operndn9Instructions
BAKED POTATO
The BAKED POTATO pad lets you
bake one or several potatoes without
selecting cooking times and power
levels.
NOTES:
• Before baking, pierce potato with
fork several times.
• After baking, let stand for 5 min-
utes.
Example: To cook 2 potatoes.
1. Touch BAKED
POTATO pad.
When the cook
_o time is over, you
will hear four
beeps and END
will display.
• Recommended amounts: 1-4
potatoes (about 9-11 ozs. each)
VEGETABLE has preset cook pow-
ers for 3 food categories: Fresh,
Frozen, and Canned.
Example: To cook Frozen
Vegetableo
1. Touch
VEGETABLE
pad.
_ 2. Choose food
category.
Fresh 1
Frozen 2
Canned 3
When the cook time is over, you will
hear four beeps and END will display.
NOTE:
• Place canned vegetables in a
microwavable bowl or casserole.
Cover with plastic wrap and vent.
Let stand 5 minutes.
- Recommended amounts: 1-4 cups
- Recommend 1/4"-1/2" venting of
cover.
COOK
Using COOK lets you heat common
microwave-prepared foods without
needing to program times and Cook
Powers. COOK has preset Cook
Power for 3 food categories: Frozen
Entree, Casserole, and Rice.
Example: To cook Rice.
1. Touch COOK
pad.
3 2. Choose food
category.
Frozen Entree 1
Casserole 2
Rice 3
When the cook time is over, you will
hear four beeps and END will
display.
Recommendedamounts:
Frozen Entree 10-21 ozs.
Casserole 1-4 cups
Rice 1/2-2 cups
NOTE:
• Use only long grain rice with
sensor cook program. See page
20 to cook other types of rice.
REHEAT
REHEAT lets you heat foods without
needing to program times and Cook
Powers. REHEAT has preset Cook
Powers for 3 categories: Casserole,
Dinner Plate, and Soup/Sauce.
Example: To reheat Casserole.
1. Touch REHEAT
pad.
2. Choose food
category.
Dinner Plate 1
Soup/Sauce 2
Casserole 3
When the cook time is over, you will
hear four beeps and END will display.
Recommendedamounts:
Dinner Plate 1-2 servings
Soup/Sauce 1-4 cups
Casserole 1-4 cups
12

Operndn9Instructions
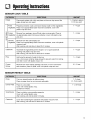
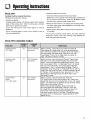
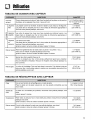
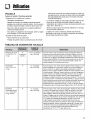
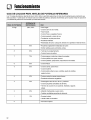
SENSOR COOK TABLE
Potato Pierce each potato with a fork and place on the oven tray around the 1 - 4 medium approx.
edge, at least one inch apart. 8 -10 ozs. each
Fresh
Vegetable
LU
Frozen
_ Vegetable
I..u
0
I..u
> Canned
Vegetable
Casserole
Rice
Frozen
Entree
Prepare as desired, wash, and leave residual water on the vegetables.
Place in an appropriately-sized microwave container, cover with
plastic wrap and vent.
Remove from package, rinse off frost under running water. Place in
an appropriately-sized microwave container, cover with plastic wrap
and vent.
Remove from the outer display can.
Place in an appropriately sized microwave container, cover with plastic
wrap and vent.
After cooking, stir and allow to stand for 3 minutes.
Assemble the ingredients per the recipe in a 1-2 quart casserole.
Cooking with plastic wrap and vent.
After cooking, stir and allow to stand for 3 minutes
Add twice the amount of water to the rice.
Use a microwave container large enough to prevent water from boiling
over dish. Cover with plastic wrap or lid.
Remove from outer display package. Slit cover. If not in microwave-
safe container, place on plate, cover with plastic wrap and vent.
1 - 4 cups
1 - 4 cups
1 - 4 cups
1 - 4 cups
1/2- 2 cups
10 - 21 ozs.
SENSOR REHEAT TABLE
Pizza This is a reheat function for leftover pizza. 1 - 3 slices
Place on paper towel on a microwave safe plate. (3 - 5 ozs. each)
Dinner Plate Place on a low plate. 1 - 2 servings
Cover with vented plastic wrap.
Let stand 3 minutes.
Soup/Sauce Place in shallow microwavable casserole. 1 - 4 cups
Cover with vented plastic wrap.
After cooking, stir and let stand 3 minutes.
Casserole Cover dish containing the casserole with plastic wrap and vent. 1 - 4 cups
After cooking, stir and allow to stand for 3 minutes.
13

Operndn9Instructions
AUTO DEFROST
Three defrost choices are preset in
the oven. The defrost feature
provides you with the best defrosting
method for frozen foods, because the
oven automatically sets the
defrosting times for each food item
according to the weight you enter.
For added convenience, the AUTO
DEFROST includes a built-in tone
mechanism that reminds you to
check, turn over, separate, or
rearrange the food during the defrost
cycle. Three different defrosting
options are provided.
1. MEAT
2. POULTRY
3. FISH
After touching the AUTO DEFROST
once, select the food category.
Available weight ranges for Meat,
Poultry and Fish are 0.1 to 6.0 Ibs.
Example : To defrost 1.2 Ibe of
meat.
£,_._ 1. Touch AUTO
DEFROST pad.
2. Choose food
category.
3. Enter the
weight.
4. Touch
ENTER/START
pad.
NOTES:
• After you touch ENTER/START,
the display counts down the
defrost time. The oven will beep
once during the Defrost cycle. At
this time, open the door and turn,
separate, or rearrange the food as
needed. Remove any portions that
have thawed then return frozen
portions to the oven and touch
ENTER/START to resume the
defrost cycle.
• The oven will not stop during
the BEEP unless the door is
opened
For best reeutte:
• Remove fish, shellfish, meat, and
poultry from its original closed
paper or plastic package (wrapper).
Otherwise, the wrap will hold steam
and juice close to the foods, which
can cause the outer surface of the
foods to cook.
• Form the meat into the shape of a
doughnut before freezing. When
defrosting, scrape off thawed meat
when the beep sounds and
continue defrosting.
• Place foods in a shallow glass
baking dish or a on a microwave
roasting rack to catch drippings.
o Foods should still be somewhat icy
in the center when removed from
the oven.
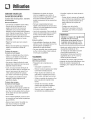
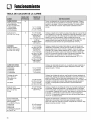
AUTO DEFROST TABLE
MEAT
0.1to6.0Ibs
POULTRY
0.1to6.0Ibs
FISH
0.1to6.0Ibs
BEEF
Ground beef, Round steak,
Cubes for stew, Tenderloin
steak, Potroast, Rib roast,
Rump roast, Chuck roast,
Hamburger patty.
LAMB
Chops (1-inchthick),
Rolledroast.
PORK
Chops (1/2-inch thick), Hot
dogs, Spareribs, Country-
style ribs.
Rolledroast, Sausage.
POULTRY
Whole (under 4 Ibs),Cut up,
Breasts (boneless).
CORNISH HENS
Whole.
TURKEY
Breast (under 6 Ibs).
FISH
Fillets,Whole Steaks.
SHELLFISH
Crab meat, Lobster tails,
Shrimp, Scallops.
DEFROST TIPS
• When using AUTO DEFROST, the
weight to be entered is the net
weight in pounds and tenths of
pounds (the weight of the food
minus the container).
• Use AUTO DEFROST only for raw
food. AUTO DEFROST gives best
results when food to be thawed is a
minimum of 0°F (taken directly from
a true freezer). If food has been
stored in a refrigerator-freezer that
does not maintain a temperature of
5°F or below, always program a
lower food weight (for a shorter
defrosting time) to prevent cooking
the food.
• If the food is stored outside the
freezer for up to 20 minutes, enter a
lower food weight.
• The shape of the package alters the
defrosting time. Shallow rectangular
packets defrost more quickly than a
deep block.
• Separate pieces as they begin to
defrost. Separated pieces defrost
more easily.
• You can use small pieces of alu-
minum foil to shield foods like
chicken wings, leg tips, and fish
tails, but the foil must not touch the
side of the oven. Foil causes arcing,
which can damage the oven lining.
• Shield areas of food with small
pieces of foil if they start to become
wa rm.
• For better results, a preset standing
time is included in the defrosting
time.
• For best results, elevate food to be
defrosted on a microwave safe
roasting rack. This prevents the
possibility of warm meat juices
cooking food during defrost.
14

Operndn9Instructions
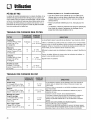
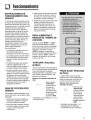
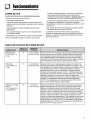
TIME DEFROST RAPID DEFROST METAL RACK
This feature allows you to choose the
time you want to defrost.
The Time Defrost Chart provides
some basic guidelines for using Time
Defrost.
Example: To defrost for 2 minutes.
1. Touch TIME
/:_:_/r.c_ DEFROST pad.
2. Enter the
Z _ C_ O defrosting time
you want.
3. Touch
_ ;__'_' ENTER/START
pad.(Defrost
starts)
When the defrost time is over, you
will hear four beeps and END will
display.
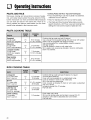
TIME DEFROST CHART
The RAPID DEFROST feature
provides a rapid defrost for 1.0
pound frozen food. The oven
automatically sets the defrosting time
for ground beef.
Example: To defrost lib. ground
beef.
1. Touch RAPID
DEFROST pad.
2. Touch
ENTER/START
pad.
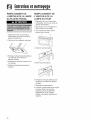
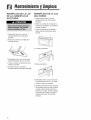
The metal rack gives you extra space
when cooking in more than one
container at the same time.
To use rack:
1. Place rack securely in the four
plastic supports.
• Rack MUST NOT touch metal
walls or back of microwave
oven.
2. Place equal amounts of food both
ABOVE AND BELOW rack.
• Amount of food must be
approximately the same to
balance out cooking energy.
MEAT
Bacon (1 lb.)
Ground meat (1 lb.)
Roasts
Steaks, chops and cutlets
POULTRY
Chicken, broiler-fryer
cut up (24¼2to 3 Ibs.)
Chicken, whole (2 to 3 Ibs.)
Cornish hen
FISH & SEAFOOD
Fillets (1 lb.)
Shellfish, small pieces (1 lb.)
2 - 4 minutes
4V2 - 6 minutes
4V=- 6 minutes
4V: - 6 minutes per lb.
13 - 16 minutes
15 - 18 minutes
5 - 7 minutes per lb.
Turn meat over at beep. Stand for 5 minutes after defrosting.
Turn meat over at beep. Stand for 5 minutes after defrosting.
Turn meat over at beep. Shield warm areas with foil.
Stand for 5 to 10 minutes.
Same as above.
Turn meat over at beep. Shield warm areas with foil.
Stand for 20 to 30 minutes. Cover with foil.
Turn meat over at beep. Shield warm areas with foil.
Stand for 20 to 30 minutes. Cover with foil.
Turn meat over at beep. Shield warm areas with foil.
Stand for 20 to 30 minutes. Cover with foil.
4 - 5_/_minutes Place block in casserole. Turn food over and break up
4 - 5 minutes after beep. Stand for 5 minutes.
NOTE: J• Defrost times are approximate and are intended as guidelines.
15

Operndn9Instructions
GETTING THE BEST
COOKING RESULTS
To get the best results from your
microwave oven, read and follow the
guidelines below.
• Storage Temperature: Foods
taken from the freezer or refrigerator
take longer to cook than the same
foods at room temperature.
The time for recipes in this book is
based on the normal storage
temperature of the food.
• Size: Small pieces of food cook
faster than large ones, pieces
similar in size and shape cook more
evenly. For even cooking, reduce
the power when cooking large
pieces of food.
• Natural Moisture: Very moist foods
cook more evenly because
microwave energy is attracted to
water molecules.
• Stir foods such as casseroles and
vegetables from the outside to the
center to distribute the heat evenly
and speed cooking. Constant
stirring is not necessary.
• Turn over foods like pork chops,
baking potatoes, roasts, or whole
cauliflower halfway through the
cooking time to expose all sides
equally to microwave energy.
• Place delicate areas of foods, such
as asparagus tips, toward the
center of the dish.
• Arrange unevenly shaped foods,
such as chicken pieces or salmon
steaks, with the thicker, meatier
parts toward the outside of the dish.
• Shield, with small pieces of
aluminum foil, parts of food that
may cook quickly, such as wing tips
and leg ends of poultry.
• Let It Stand: After you remove the
food from the microwave, cover
food with foil or casserole lid and let
it stand to finish cooking in the
center and avoid overcooking the
outer edges. The length of standing
time depends on the density and
surface area of the food.
• Wrapping in waxed paper or
paper towel: Sandwiches and
many other foods containing
prebaked bread should be wrapped
prior to microwaving to prevent
drying out.
FISH AND SHELLFISH
Cooking Fish and Shellfish:
General Directions
• Prepare the fish for cooking.
- Completely defrost the fish or
shellfish.
- Arrange unevenly shaped pieces
with thicker parts toward the
outside of the dish. Arrange
shellfish in a single layer for even
cooking.
- The type of cover you use
depends on how you cook.
Poached fish needs a
microwavable lid or vented plastic
wrap.
- Baked fish, coated fish, or fish in
sauce needs to be covered lightly
with waxed paper to keep the
coating crisp and sauce from
getting watery.
- Always set the shortest cooking
time. Fish is done when it turns
opaque and the thickest part
begins to flake. Shellfish is done
when the shell turns from pink to
red and the flesh is opaque and
firm.
•The Fish and Shellfish Cooking
Table below provides specific direc-
tions with Power Level and Cooking
Time settings for most types of fish
and shellfish.
FISH AND SHELLFISH COOKING TABLE
¸¸¸¸
Fish fillets
Fish steaks
Whole fish
Scallops
Shrimp, shelled
HI
HI
7
HI
HI
31/2-41/2minutes
41/2-51/2minutes
4I/2-6 minutes
31/2-5minutes
3I/2-5 minutes
Arrange fish in a single layer with thickest portion
toward outside edge of 11/2quart microwavable
baking dish. Brush with melted butter and season,
if desired. Cook covered with vented plastic wrap.
Let stand covered 2 minutes. If you are cooking
more than 1 lb. offish, turn the fish halfway
through cooking.
Arrange in a single layer. Prepare as directed
above, except stir instead of turning the shellfish.
16

APPETIZERS/SAUCES/
SOUPS
Cooking Appetizers: Tips and
Techniques
Recommended
®Crisp crackers, such as melba
toast, shredded wheat, and crisp
rye crackers are best for
microwave use.Wait until party
time to add the spreads. Place a
paper towel under the crackers
while they cook in the microwave
oven to absorb extra moisture.
o Arrange individual appetizers in a
circle for even cooking.
®Stir dips to distribute heat and
shorten cooking time.
Cooking Sauces: Tips and
Techniques
®Use a microwavable casserole or
glass measuring cup that is at least
2 or 3 times the volume of the
sauce.
®Sauces made with cornstarch
thicken more rapidly than those
made with flour.
o Cook sauces made with cornstarch
or flour uncovered so you may stir
them 2 or 3 times during cooking for
a smooth consistency.
o To adapt a conventional sauce or
gravy recipe, reduce the amount of
liquid slightly.
Cooking Soups: Tips and
Techniques
o Cook soups in a microwavable dish
which holds double the volume of
the recipe ingredients to prevent
boil-over, especially if you use
cream or milk in the soup.
o Generally, cover microwaved soups
with VENTED plastic wrap or a
microwavable lid.
®Cover foods to retain moisture.
Uncover foods to retain crispness.
®Avoid overcooking by using the
minimum suggested time. Add
more time, if necessary, only after
checking the food.
®Stirring occasionally will help blend
flavors, distribute heat evenly, and
may even shorten the cooking time.
®When converting a conventional
soup recipe to cook in the
microwave, reduce the liquid, salt,
and strong seasonings.
Not Recommended
®Appetizers with a crisp coating or
puff pastry are best done in a
conventional oven with dry heat.
®Breaded products can be warmed
in the microwave oven but will not
come out crisp.
Cooking Meat: General Directions
®Prepare the meat for cooking.
- Defrost completely.
- Trim off excess fat to avoid
spattering.
- Place the meat, fat side down, on
a microwavable rack in a
microwavable dish.
- Use oven cooking bag for less
tender cuts of meat.
- Arrange the meat so that thicker
portions are toward the outside of
the dish.
- Cover the meat with waxed paper
to prevent spattering.
®Tend the meat as it cooks.
- Drain juices as they accumulate to
reduce spattering and keep from
overcooking the bottom of the
meat.
- Shield thin or bony portions with
strips of foil to prevent
overcooking.
NOTE:
• Keep the foil at least 1 inch from
the oven walls, and do not cover
more than one-third of the meat
with foil at any one time.
• Let the meat stand covered with foil
10-15 minutes after you remove it
from the oven. The internal
temperature of the meat may rise
from 5-10 ° F during standing time.
The Meat Cooking Table on the next
page provides detailed directions,
Power Level, and Cooking Time
settings for most cuts of meat.
17

Operndn9Instructions
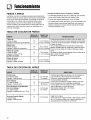
MEAT COOKING TABLE
,i,_ii_ii!ii!ii!ii!ii!ii!ii!ii!ii!ii!ii!ii!ii!ii!ii!ii!ii!ii!ii!ii!ii!ii!ii!ii!ii!ii!ii!ii!ii!ii!ii!ii!ii!ii!ii!ii!ii!ii!ii!ii!ii!ii!ii!ii!ii!ii!ii!ii!ii!ii!ii!ii!ii!ii!ii!ii!ii!ii!ii!ii!ii!ii!ii!ii!ii!ii!ii!ii!ii!ii!ii!ii!ii!ii!ii!ii!ii!ii!ii!i!i!!_i_i_i_!_!_!!_i_;_;_;_i_i_i;i_._!_!_!_!_!_!_!_!_!_!_!_!_!_!_!_!_!_!_!_!_!_!_!_!_!_!_!_!_!_!_i_iii!_!_i__i_i_!_!_!_!_!_!__!_!_!_!_!_!_!_!__!_!_!_!_!_!_!_!_,!,_!_!j!_.i!i!i!i!i!i!i!i!i!i!i!i!i!i!i!i!i!i!i!i!i!i!i!i!i!i!i!i!i!i!i!i!i!i!i!i!i!i!i!i!i!i!i!i!i!i!i!i!i!i!i!i!i!i!i!i!i!i!i!i!i!i!i!i!i!i!i!i!i!i!i!i!i!i!i!i!i!i!i!i!i!i!i!i!i!i!i!i!i!i!i!i!i!i!i!i!i!i!i!i!i!i!i!i!i!i!i!i!i!i!i!i!i!i!i!i!i!i!i!i!i!i!i!i!i!i!i!i!i!i!i!i!i!ii_ii_iii!ii_i!Ei_'ii!i_i_i__i!_i!_i!_i!_i!_i!_!_!_!_!__!_!_!_!_!_!_!_!__!_!_!_!_!_!_!_!__!_!_!_!_!_!_!_!__!_!_!_!_!_!_!_!__!_!_!_!_!_!_!_!__!_!_!_!_!_!_!_!__!_!_!_!_!_!_!_!__!_!_!_!_!_!_!_!__!_!_!_!_!_!_!_!__!_!_!_!_!_!_!_!__!_!_!_!_!_!_!_!__!_!_!_!_!_!_!_!__!_!_!_!_!_!_!_!__!_!_!_!_!_!_!_!__!_!_!_!_!_!_!_i!_,_,_
HI Form patties with depression in center of each.
BEEF
Hamburgers,
Fresh or defrosted
(4 oz. each)
1 patty
2 patties
4 patties
Sirloin tip roast
(3-4 Ibs.)
LAMB
Lamb roast, rolled
boneless (3-4 Ibs.)
PORK
Bacon slices
2 slices
4 slices
6 slices
10 slices
Chops
(5-7 oz. each)
2 chops
4 chops
Loin Roast,
rolled, boneless
(3V_- 4_/_Ibs.)
HI
HISausage links,
Fresh or Frozen,
defrosted
(1-2 oz. each)
2 links
4 links
6 links
10 links
1-1_/=minutes
1q_-2 minutes
2q_-3V_ minutes
8-10 minutes
per pound
RARE (135°F)
11-13 minutes
per pound
MEDIUM (155°F)
11-12 minutes
per pound
RARE (135°F)
12-13 minutes
per pound
MEDIUM (145°F)
13-14 minutes
per pound
WELL (155°F)
1V_-2 minutes
2-3 minutes
4-5 minutes
7-8 minutes
18-20 minutes
per pound
15-17 minutes
per pound
25-27 minutes
per pound
(165°F)
45-60 seconds
1-1_/=minutes
1q_-2 minutes
13/4-2minutes
Place on microwavable roasting rack. Brush with browning
agent, if desired. Cover with waxed paper.
Turn over halfway through cooking.
Let stand covered 1 minute.
Place roast fat side down on microwavable roasting rack.
Add desired seasonings and cover with waxed paper.
Turn meat over halfway through cooking and shield if
necessary. Remove roast from microwave oven when
desired temperature is reached. Let stand covered with foil
15 minutes. (Temperature may rise about 10°F).
Place roast fat side down on microwavable roasting rack.
Brush lamb with marinade or desired seasonings such as
rosemary, thyme or marjoram. Cover with waxed paper.
Turn roast over after 15 minutes, and again after 30 minutes.
Shield if necessary.
Remove roast from microwave when desired temperature
is reached. Let stand covered with foil 15 minutes.
(Temperature may rise about 10°F).
Place bacon slices on microwavable roasting rack.
Cover with paper towels.
Place microwavable roasting rack on the metal oven rack.
After cooking, let stand 1 minute.
Place chops in microwavable baking dish.
Add desired seasonings and cover with vented plastic wrap.
Cook until no longer pink or until internal temperature
reaches 170° F. Turn chops over halfway through cooking.
Let stand covered 5 minutes.
(Temperature may rise about 10°F).
Place roast in cooking bag in microwavable dish.
Add seasonings and browning agent if desired. Close bag
loosely with microwavable closure or string. After cooking,
let stand in bag 15 minutes. (Temperature may rise about
10°F.) Internal temperature of pork should reach 170°F
before serving.
Pierce links and place on microwavable roasting rack.
Cover with waxed paper or paper towel.
Turn over halfway through cooking.
After cooking, let stand covered 1 minute.
18

Operndn9Instructions
POULTRY
Cooking Poultry: General Directions
• Prepare the poultry for cooking.
- Defrost completely.
- Arrange poultry pieces with thicker pieces at the outside
edge of the baking dish. When cooking legs, arrange
them like the spokes of a wheel.
-Cover the baking dish with waxed paper to reduce
spattering.
- Use a browning agent or cook with a sauce to give a
browned appearance.
• Watch the poultry as it cooks.
- Drain and discard juices as they accumulate.
- Shield thin or bony pieces with small strips of aluminum
foil to prevent overcooking. Keep foil at least 1 inch
from the oven walls and other pieces of foil.
• Poultry is done when it is no longer pink and the juices
run clear. When done, the temperature in the thigh meat
should be 180-185°F.
• Let the poultry stand after cooking covered with foil for
10 minutes.
The Poultry Cooking Table below provides detailed
directions, Power Level, and Cooking Time settings for
most cuts and types of poultry.
POULTRY COOKING TABLE
Chicken whole
(3-3q_ Ibs.)
HI
HI
12-13 minutes
per pound
6-7 minutes
per pound
Cornish Hens
whole
(1-1 _/_Ibs. each)
dish with thicker pieces to the outside. Brush with butter or
browning agent and seasonings if desired. Cover with
waxed paper. Cook until no longer pink and juices run
clear. Let stand covered 5 minutes.
Before cooking, wash and shake off water. Place breast
side down on a microwavable roasting rack. Brush with
butter, or browning agent and seasoning if desired. Cover
with waxed paper. Cook _/sof estimated time. Turn breast
side up, brush with butter, or browning agent. Replace
waxed paper. Cook _/sof estimated time again. Shield if
necessary. Cook remaining q3 of estimated time or until no
longer pink and juices run clear. Let stand covered with foil
10 minutes. (The temperature may rise about 10°F.) The
temperature in the thigh should be 180°F-185°F when
the poultry is done.
Before cooking, wash and shake the water off.
Tie wings to body of hen and the legs to tail. Place hens
breast side down on microwavable rack. Cover with waxed
paper. Turn breast side up halfway through cooking. Shield
bone ends of drumsticks with foil.
Remove and discard drippings. Brush with butter or
browning agent and seasonings if desired. Cook until
no longer pink and juices run clear. Remove hens from
microwave when they reach desired temperature.
Let stand covered with foil 5 minutes. (Temperature may
rise about 10°F). Temperature in breast should be 170°F
before serving.
19

Operndn9Instructions
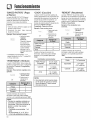
PASTA AND RICE
Microwave cooking and conventional cooking of pasta,
rice, and cereal require about the same amount of time,
but the microwave is a more convenient method because
you can cook and serve in the same dish. There is no
stirring needed and leftover pasta tastes just like fresh
cooked when reheated in the microwave oven.
Cooking Pasta and Rice: Tips and Techniques
• If you are planning to use rice or pasta in a casserole,
undercook it so it is still firm.
• Allow for standing time with rice, but not for pasta.
• The Pasta and Rice Cooking Tables below provide
specific directions, with Power Level and cooking time
settings for most common types of pasta and rice.
PASTA COOKING TABLE
Spaghetti
4 cups water
Add 8 ozs. spaghetti
Macaroni
3 cups water
Add 2 cups macaroni
Lasagna noodles
4 cups water
Add 8 ozs. lasagna
noodles
Egg noodles
6 cups water
Add 4 cups noodles
HI 9-1 0 minutes
5 71/2-81/2minutes
HI 6-7 minutes
5 51/2-61/2minutes
HI 7-8 minutes
5 11-12q2 minutes
HI 8-1 0 minutes
5 5t/2-61/2minutes
Combine hot tap water and salt, if desired.
Use a 2-quart microwavable baking dish and cover with vented
plastic wrap for spaghetti and lasagna noodles.
Use microwavable lid or vented plastic wrap for macaroni
and egg noodles.
Cook as directed in chart or until water boils.
Stir in pasta; cook covered as directed in chart or until tender.
Drain in a colander.
RICE COOKING TABLE
Long grain
211/,_cups water
Add 1 cup rice
HI 5-7 minutes
3 19 minutes
Brown
21/4cups water HI 41/2-51/2minutes
Add 1 cup rice 3 28 minutes
Long grain and
wild rice mix
21/3cups water
Add 6 oz. package
Quick cooking
1 cup water
Add 1 cup rice
HI
3
HI
4-5 minutes
24 minutes
2-3minutes
Combine hot tap water and salt, if desired, in 2 quart
microwavable casserole.
Cover with microwavable lid or vented plastic wrap.
Cook as directed in chart or until water boils.
Stir in rice and any seasonings.
Cook covered as directed in chart or until water is absorbed
and rice is tender.
Let stand covered 5 to 10 minutes.
Fluff with fork.
Cook water until it boils.
Stir rice into boiling water and let stand, covered 5 to 10
minutes or until water is absorbed and rice is tender.
Fluff with fork.
2O
Page is loading ...
Page is loading ...
Page is loading ...
Page is loading ...
Page is loading ...
Page is loading ...
Page is loading ...
Page is loading ...
Page is loading ...
Page is loading ...
Page is loading ...
Page is loading ...
Page is loading ...
Page is loading ...
Page is loading ...
Page is loading ...
Page is loading ...
Page is loading ...
Page is loading ...
Page is loading ...
Page is loading ...
Page is loading ...
Page is loading ...
Page is loading ...
Page is loading ...
Page is loading ...
Page is loading ...
Page is loading ...
Page is loading ...
Page is loading ...
Page is loading ...
Page is loading ...
Page is loading ...
Page is loading ...
Page is loading ...
Page is loading ...
Page is loading ...
Page is loading ...
Page is loading ...
Page is loading ...
Page is loading ...
Page is loading ...
Page is loading ...
Page is loading ...
Page is loading ...
Page is loading ...
Page is loading ...
Page is loading ...
Page is loading ...
Page is loading ...
Page is loading ...
Page is loading ...
Page is loading ...
Page is loading ...
Page is loading ...
Page is loading ...
Page is loading ...
Page is loading ...
Page is loading ...
Page is loading ...
-
 1
1
-
 2
2
-
 3
3
-
 4
4
-
 5
5
-
 6
6
-
 7
7
-
 8
8
-
 9
9
-
 10
10
-
 11
11
-
 12
12
-
 13
13
-
 14
14
-
 15
15
-
 16
16
-
 17
17
-
 18
18
-
 19
19
-
 20
20
-
 21
21
-
 22
22
-
 23
23
-
 24
24
-
 25
25
-
 26
26
-
 27
27
-
 28
28
-
 29
29
-
 30
30
-
 31
31
-
 32
32
-
 33
33
-
 34
34
-
 35
35
-
 36
36
-
 37
37
-
 38
38
-
 39
39
-
 40
40
-
 41
41
-
 42
42
-
 43
43
-
 44
44
-
 45
45
-
 46
46
-
 47
47
-
 48
48
-
 49
49
-
 50
50
-
 51
51
-
 52
52
-
 53
53
-
 54
54
-
 55
55
-
 56
56
-
 57
57
-
 58
58
-
 59
59
-
 60
60
-
 61
61
-
 62
62
-
 63
63
-
 64
64
-
 65
65
-
 66
66
-
 67
67
-
 68
68
-
 69
69
-
 70
70
-
 71
71
-
 72
72
-
 73
73
-
 74
74
-
 75
75
-
 76
76
-
 77
77
-
 78
78
-
 79
79
-
 80
80


Amana AMV5164AAW Owner's manual
- Category
- Microwaves
- Type
- Owner's manual
- This manual is also suitable for
Ask a question and I''ll find the answer in the document
Finding information in a document is now easier with AI
in other languages
Related papers
-
Whirlpool AMANA AMC6158BAS Owner's manual
-
Amana AMV5164BAQ Owner's manual
-
-
-
-
-
-
Amana AMV5164AA Owner's manual
-
Amana MV-1773MAB Owner's manual
-
Other documents
-
Goldstar MV1604SB Owner's Manual & Cooking Manual
-
Maytag UMC5200BAS Owner's manual
-
Jenn-Air JMV8166BA Owner's manual
-
Maytag MMV5207BCS17 Owner's manual
-
LG MV-1501MG Owner's manual
-
Maytag MMV5207BAB Owner's manual
-
-
-
Jenn-Air JMV8208BAB Owner's manual
-