Uniflame EWTS9151M Owner's manual
- Category
- Space heaters
- Type
- Owner's manual

Manufactured in China for:
Blue Rhino Global Sourcing, Inc.
Winston-Salem, NC USA
1.800.762.1142, www.bluerhino.com
© 2009 Blue Rhino Global Sourcing, Inc. All Rights Reserved
Endless Summer
®
is a Registered Trademark of Blue Rhino Global Sourcing, Inc.. All Rights Reserved. EWTS9151M-OM-105 ES
WARNING
FOR YOUR SAFETY:
1. Improper installation, adjustment, alteration,
service or maintenance can cause injury or
property damage.
2. Read the installation, operation, and
maintenance instructions thoroughly before
installing or servicing this equipment.
3. Failure to follow these instructions could
result in fire or explosion, which could
cause property damage, personal injury, or
death.
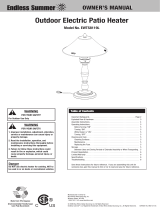
Outdoor Electric Patio Heater
Model No. EWTS9151M
®
OWNER’S MANUAL
Table of Contents
Important Safeguards . . . . . . . . . . . . . . . . . . . . . . . . . . . . . . . . . . . . . . . . . . . Page 2
Exploded View & Hardware . . . . . . . . . . . . . . . . . . . . . . . . . . . . . . . . . . . . . . . . . . . 3
Assembly Instructions. . . . . . . . . . . . . . . . . . . . . . . . . . . . . . . . . . . . . . . . . . . . . . . 4
Operating Instructions. . . . . . . . . . . . . . . . . . . . . . . . . . . . . . . . . . . . . . . . . . . . . . . 5
Before Turning “ON”
. . . . . . . . . . . . . . . . . . . . . . . . . . . . . . . . . . . . . . . . . . . . . 5
Turning “ON”
. . . . . . . . . . . . . . . . . . . . . . . . . . . . . . . . . . . . . . . . . . . . . . . . . . . 5
While Heater is “ON”
. . . . . . . . . . . . . . . . . . . . . . . . . . . . . . . . . . . . . . . . . . . . . 5
Turning “OFF”
. . . . . . . . . . . . . . . . . . . . . . . . . . . . . . . . . . . . . . . . . . . . . . . . . . 5
Cleaning and Care . . . . . . . . . . . . . . . . . . . . . . . . . . . . . . . . . . . . . . . . . . . . . . . . . 6
Cleaning Surfaces
. . . . . . . . . . . . . . . . . . . . . . . . . . . . . . . . . . . . . . . . . . . . . . . 6
Maintenance
. . . . . . . . . . . . . . . . . . . . . . . . . . . . . . . . . . . . . . . . . . . . . . . . . . . 6
Replacing the Fuse
. . . . . . . . . . . . . . . . . . . . . . . . . . . . . . . . . . . . . . . . . . . . . . 6
Storage. . . . . . . . . . . . . . . . . . . . . . . . . . . . . . . . . . . . . . . . . . . . . . . . . . . . . . . . . . 6
Between Uses and During Periods of Extended Inactivity or When Transporting
. 6
Product Registration . . . . . . . . . . . . . . . . . . . . . . . . . . . . . . . . . . . . . . . . . . . . . . . . 6
Limited Warranty . . . . . . . . . . . . . . . . . . . . . . . . . . . . . . . . . . . . . . . . . . . . . . . . . . 7
Specifications. . . . . . . . . . . . . . . . . . . . . . . . . . . . . . . . . . . . . . . . . . . . . . . . . . . . . 7
Troubleshooting . . . . . . . . . . . . . . . . . . . . . . . . . . . . . . . . . . . . . . . . . . . . . . . . . . . 7
Save these instructions for future reference. If you are assembling this unit for
someone else, give this manual to him or her to read and save for future reference.
WARNING
FOR YOUR SAFETY:
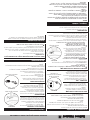
For Outdoor Use Only
Danger
Do NOT use electric heater for cooking. NOT to
be used in or on boats or recreational vehicles.
Made from 70% Bagasse
(Environmentally Friendly Sugar
Cane Pulp By-product)

®
Outdoor Patio Heater Model No. EWTS9151M Contact 1.800.762.1142 for assistance. Do not return to place of purchase.
When using electrical appliances, basic safety precautions should always
be followed including the following:
1. Read all instructions before using this heater.
2. This heater is hot when in use. To avoid burns, do not let bare skin
touch hot surfaces. If provided, use handles when moving this heater.
Keep combustible materials, such as furniture, pillows, bedding, papers,
clothes, and curtains at least a 3 feet (0.9 m) from the front of the
heater and keep them away from the sides and rear.
3. Extreme caution is necessary when any heater is used by or near
children or invalids and whenever the heater is left operating and
unattended.
4. Always unplug heater when not in use.
5. Do not operate any heater with a damaged cord or plug or after the
heater malfunctions, has been dropped or damaged in any manner.
Return heater to authorized service facility for examination, electrical or
mechanical adjustment, or repair.
6. This heater is not intended for use in bathrooms, laundry areas and
similar indoor locations. Never locate heater where it may fall into a
bathtub or other water container.
7. Do not run cord under carpeting. Do not cover cord with throw rugs,
runners, or similar coverings. Arrange cord away from traffic area and
where it will not be tripped over.
8. To disconnect heater, turn controls to off, then remove plug from outlet.
9. Connect to properly grounded outlets only.
10. Do not insert or allow foreign objects to enter any ventilation or
exhaust opening as this may cause an electric shock or fire, or
damage the heater.
11. To prevent a possible fire, do not block air intakes or exhaust in any
manner. Do not use on soft surfaces, like a bed, where openings may
become blocked.
12. A heater has hot and arcing or sparking parts inside. Do not use it in
areas where gasoline, paint, or flammable liquids are used or stored.
13. Use this heater only as described in this manual. Any other use not
recommended by the manufacturer may cause fire, electric shock, or
injury to persons.
14. Avoid the use of an extension cord because the extension cord may
overheat and cause a risk of fire. However, if you have to use an
extension cord, the cord shall be No. 16 AWG minimum size and rated
not less than 1500 watts.
15. SAVE THESE INSTRUCTIONS.
This heater is for outdoor use only.
This heater is NOT for commercial use.
This is for use with electricity.
Longer detachable power-supply cords or extension cords are
available and may be used if care is exercised in their use.
If a longer detachable power-supply cord or extension cord is used,
a. The cord shall be no. 16 AWG minimum size and rated not less than
1,500 watts.
b. The marked electrical rating of the cord set or extension cord
should be at least as great as the electrical rating of the appliance,
and
c. The cord should be arranged so that it will not drape over the
countertop or tabletop where it can be pulled on by children or
tripped over unintentionally.
ELECTRIC SHOCK CAN KILL OR RESULT IN SERIOUS INJURY. TO
PREVENT ELECTRICAL SHOCK:
a. Use only with GFI (Ground Fault Interrupter) protected circuit.
b. Do not use heater when raining.
c. To prevent heater from being splashed or falling into water, do not
use heater within 10 feet of pool, pond, or other body of water.
d. Keep heater and cord dry and out of rain at all times.
e. Do not operate heater that has a damaged cord, plug, or metal probe.
Call our customer service.
f. Never remove grounding plug, or use with an adapter to two prongs.
g. Keep electric plugs off ground, and dry.
The use of alcohol, or prescription or non-prescription drugs may
impair the consumer’s ability to properly assemble or safely operate
the appliance.
Do not store or use gasoline or other flammable liquids or vapors
within 25 feet (7.62 m) of this appliance.
Do not use in an explosive atmosphere. Keep heater area clear and
free from combustible materials, gasoline and other flammable vapors
and liquids.
DO NOT use this heater near any unprotected combustible
constructions.
Do not alter this heater in any manner.
Do not use the heater unless it is COMPLETELY assembled and all
parts are securely fastened and tightened.
This heater should be thoroughly inspected on a regular basis.
Use only Blue Rhino Global Sourcing, Inc. factory authorized parts. The
use of any part that is not factory authorized can be dangerous. This
will also void your warranty.
Do not use this appliance without reading “Operating Instructions” in
this manual.
Do not touch metal parts of heater until it has completely cooled
(about 45 min.) to avoid burns, unless you are wearing protective gear
(pot holders, gloves, BBQ mittens, etc.).
Do not touch hot surfaces.
Do not use in or on boats or recreational vehicles.
Do not leave a lit heater unattended, especially keep children and pets
away from heater at all times.
Do not attempt to move heater when in use. Allow the heater to cool
before moving or storing.
Always use your heater on a hard, non-combustable level surface.
High temperature, keep electrical cords, drapery, and other furnishings
at least 3 feet (0.9 m) from the front of the heater and away from the
side and rear.
After a period of storage and/or nonuse, inspect for any abrasion,
wear, cuts to the electrical cord.
The use of accessory attachments not recommended by the appliance
manufacturer may cause injuries.
Store products indoors when not in use – out of the reach of children.
Servicing should be done only while the heater is disconnected from
the power supply.
To ensure continued protection against electrical shock, connect only
to properly grounded outlets. Use with GFI protected electric outlet only.
Do not immerse in water. Disconnect electric cord from outlet before
cleaning, servicing and/or removing heating element.
Do not partially or fully cover or obstruct this heater.
Please use protective gloves when assembling this product.
Do not force parts together as this can result in personal injury or
damage to the product.
Use this heater only as descibed in this manual. Any other use not
recommended by the manufacturer may cause fire, electrical shock, or
injury to persons.
To reduce risk of shock, keep cord connection dry.
Product must be fully assembled before operating the heater.
Do not clean this product with a water spray or the like.
Deaths, serious injury or damage to property may occur if the above is
not followed exactly.
Safety First
DANGERS and Cautions
IMPORTANT SAFEGUARDS

Outdoor Patio Heater Model No. EWTS9151M Contact 1.800.762.1142 for assistance. Do not return to place of purchase.
page no.
3
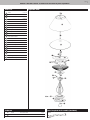
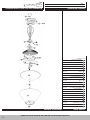
Parts List
1
Finial
56-01-600
2
Shade Assembly
56-01-601
3
Shade Pole
56-01-602
4
Dome*
56-01-603
5
Dome Brace*
56-01-495
6
Plastic Insulator*
56-01-496
7
Heat Reflector*
56-01-498
8
Inner Support Post*
56-01-509
9
Heating Element Clip (4)*
56-01-499
10
Heating Element*
56-01-500
11
Wire Guard*
56-01-501
12
Bottom Guard Plate*
13
Post*
56-01-605
14
Fuse Cap*
56-01-504
15
Fuse (250V, 15A)*
56-01-505
16
Control Housing*
17
Body
56-01-604
18
Base*
19
Power Cord*
20
Weight Plate*
21
Inner Support Post*
22
Power Cord Clamp
56-01-606
* Pre-assembled
Exploded View
Hardware
A
Screw
M3x12 Nickel Plated
2 pcs
B
Nut
M10 Nickel Plated
1 pc
Tools Required for Assembly (Included)
Wrench
4
1
2
10
6
12
11
5
3
7
17
18
19
20
9
8
9
14
15
16
13
21
22

®
Outdoor Patio Heater Model No. EWTS9151M Contact 1.800.762.1142 for assistance. Do not return to place of purchase.
1
DO NOT RETURN PRODUCT TO STORE.
For assistance call 1.800.762.1142 toll free. Please have
your owner’s manual and serial number available for
reference.
For Easiest Assembly:
• To avoid losing any small components or hardware,
assemble your product on a hard level surface that does
not have cracks or openings.
• Clear an area large enough to layout all components and
hardware.
• When applicable, tighten all hardware connections by
hand first. Once the step is completed, go back and fully
tighten all hardware.
• Follow all steps in order to properly assemble your
product.
Note: Two (2) adults may be required for assembly.
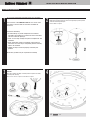
Assembly Instructions
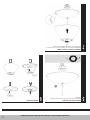
2
Attach Body to Head Assembly
Hold head assembly stationary, while securing body to prevent power
cord from becoming damaged.
Note: Do NOT over tighten.
3
Attach Base Assembly, Pull Excess Power Cord, and
Secure
Aline base nodule with body assembly nodule to prevent the body
assembly from twisting.
Note: Use the wrench to tighten nut. Do NOT over tighten.
4
Secure Power Cord
A
x 2

Outdoor Patio Heater Model No. EWTS9151M Contact 1.800.762.1142 for assistance. Do not return to place of purchase.
page no.
5
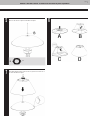
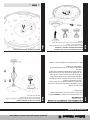
Assembly Instructions
5
Attach Shade Pole
Note: Use the wrench to tighten nut. Do NOT over tighten.
B
x 1
7
Place Shade and Attach Finial
Note: While tightening finial, make sure the four (4) feet of the shade rest on
the dome. Do NOT over tighten.
6
Assemble Shade

®
Outdoor Patio Heater Model No. EWTS9151M Contact 1.800.762.1142 for assistance. Do not return to place of purchase.
Cleaning Surfaces
1. Wipe surfaces clean with a solution of water and mild dishwashing detergent or baking
soda.
2. Wipe clean with damp cloth.
Note: While cleaning your unit, be sure to keep the area around the heating element dry at all
times. Do not submerge the heating element. If the heating element is submerged in water, do
NOT use it. It must be replaced.
Maintenance
To enjoy years of outstanding performance from
your heater, make sure you perform the following
maintenance activities on a regular basis:
1. Keep exterior surfaces clean.
2. Air flow must be unobstructed. Keep circulating air
passages around the heating element clean.
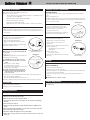
Replacing the Fuse
1. Push the power button. (Illustration 2)
2. Unplug the power cord from the wall outlet.
3. Using a screwdriver, remove the fuse cover.
(Illustration 4)
4. Carefully remove the old fuse, and replace with the
new fuse. (Illustration 5)
Note: ONLY replace the old fuse with a
250V 15A fuse.
5. Reattach the fuse cover.
Note: Do not over tighten
6. Follow the Turning “ON” instructions or the Storage
Instructions.
Storage
Between Uses and During Periods of Extended Inactivity or
When Transporting:
1. Push the power button. (Illustration 2)
2. Unplug the power cord from the wall outlet.
3. Store heater upright in an area sheltered from direct contact with inclement weather (such
as rain, sleet, hail, snow, dust and debris).
4. If desired, cover heater to protect exterior surfaces and to help prevent build up in air
passages.
Wait until heater is cool before covering.
Product Registration
For faster warranty service, please register your product immediately at www.bluerhino.com or
call 1.800.762.1142.
Cleaning and Care (continued)
Illustration 4
Remove fuse cover
Illustration 5
Remove old fuse
NOTE: Heater functions best WITHOUT an extension cord.
If an extension cord is necessary:
• Use a UL approved, 3 prong plug (grounded)
cord shall be no. 16 AWG minimum size
and rated not less than 1500 watts.
• Never connect two or more extension cords together.
• Use the shortest extension cord possible.
• Keep connections dry and off the ground.
• Avoid draping the electric heater cord where children or animals could encounter it.
Before Turning “ON”
1. Make sure all labels, packaging and protective films have been removed from the heater.
2. Heater should be thoroughly inspected before each use, and by a qualified service person at
least annually.
Turning “ON”
1. Plug the power cord into a dry GFI (Ground Fault
Interrupter) 3 plug outlet. (Illustration 1)
2. Push the power button.
(Illustration 2)
Note: The red LED light will glow while the heater
is on.
Note: When restarting the heating element will start up
slowly before getting to full power.
While Heater is “ON”
If heater tips over, the heater will automatically
turn “OFF”.
If heater tips over:
1. IMMEDIATLEY unplug power cord from the wall outlet.
2. Carefully turn the heater upright.
CAUTION: Dome, pole and shroud cover may
be hot. Use heat resistant gloves to set heater
upright.
3. Inspect heater to ensure no damage.
If no damage continue to next step.
If there is damage call a qualified technician to inspect
and make any necessary repairs.
Do NOT use the heater if there is any sign of
damage. A qualified technician should inspect
and make any nescessary repairs before the
heater is used again.
4. Plug the power cord into a dry GFI (Ground Fault Interrupter) 3 plug outlet. (Illustration 1)
5. Push the power button.
(Illustration 2)
Note: The red LED light will glow while the heater is on.
Note: When restarting the heating element will start up slowly before getting to full power.
Turning “OFF”
1. Push the power button. (Illustration 2)
2. Unplug the power cord from the wall outlet.
Cleaning and Care
Notices
1. Abrasive cleaners will damage this product.
2. Never use oven cleaner to clean any part of heater.
3. Do not clean any heater part in a self cleaning oven. The extreme heat will damage
the finish.
4. Inspect heater before each use.
5. Have heater inspected annually and repairs should be made by a qualified service
person.
6. Do not clean heater with combustible or corrosive cleaners. Use warm, soapy water.
7. Do not paint engine, engine panels or dome.
8. This heater should be thoroughly cleaned on a regular basis.
9. After a period of storage and/or non use, inspect for any abrasion, wear or cuts to the
power cord.
Operating Instructions
Illustration 1
Metal Screw
Connecting the power cord to a
dry GFI 3 plug outlet.
Illustration 2
Power button

Outdoor Patio Heater Model No. EWTS9151M Contact 1.800.762.1142 for assistance. Do not return to place of purchase.
page no.
7
Limited Warranty
Blue Rhino Global Sourcing, Inc (“Vendor”) warrants to the original retail purchaser of this
product, and to no other person, that if this product is assembled and operated in accordance
with the printed instructions accompanying it, then for a period of one (1) year from the date
of purchase, all parts in such product shall be free from defects in material and workmanship.
Vendor may require reasonable proof of your date of purchase. Therefore, you should retain
your sales slip or invoice. This Limited Warranty shall be limited to the repair or replacement of
parts, which prove defective under normal use and service and which Vendor shall determine
in its reasonable discretion upon examination to be defective. Before returning any parts, you
should contact Vendor’s Customer Service Department using the contact information listed
below. If Vendor confirms, after examination, a defect covered by this Limited Warranty in any
returned part, and if Vendor approves the claim, Vendor will replace such defective part without
charge. If you return defective parts, transportation charges must be prepaid by you. Vendor will
return replacement parts to the original retail purchaser, freight or postage prepaid.
This Limited Warranty does not cover any failures or operating difficulties due to accident,
abuse, misuse, alteration, misapplication, improper installation or improper maintenance or
service by you or any third party, or failure to perform normal and routine maintenance on
the product as set out in this owner’s manual. In addition, the Limited Warranty does not cover
damage to the finish, such as scratches, dents, discoloration, rust or other weather damage,
after purchase.
This Limited Warranty is in lieu of all other express warranties. Vendor disclaims all warranties
for products that are purchased from sellers other than authorized retailers or distributors,
including the warranty of merchantability or the warranty of fitness for a particular purpose.
VENDOR ALSO DISCLAIMS AND ANY ALL IMPLIED WARRANTIES, INCLUDING WITHOUT
LIMITATION THE IMPLIED WARRANTIES OF MERCHANTABILITY AND FITNESS FOR A PARTICULAR
PURPOSE. VENDOR SHALL HAVE NO LIABILITY TO PURCHASER OR ANY THIRD PARTY FOR ANY
SPECIAL, INDIRECT, PUNITIVE, INCIDENTAL, OR CONSEQUENTIAL DAMAGES. Vendor further
disclaims any implied or express warranty of, and assumes no responsibility for, defects in
workmanship caused by third parties.
This Limited Warranty gives the purchaser specific legal rights; a purchaser may have other
rights depending upon where he or she lives. Some jurisdictions do not allow the exclusion or
limitation of special, incidental or consequential damages, or limitations on how long a warranty
lasts, so the above exclusion and limitations may not apply to everyone.
Vendor does not authorize any person or company to assume for it any other obligation or
liability in connection with the sale, installation, use, removal, return, or replacement of its
equipment, and no such representations are binding on Vendor.
Blue Rhino Global Sourcing, Inc.
Winston-Salem, North Carolina USA
(800) 762-1142
Specifications
Certifications:
CSA International Requirement 22.2 No. 46-M1988
UL 1278
Fuel:
Electric
Power:
Maximum 1,200 Watts
Voltage:
120V AC
Frequency:
60 Hz
Net Weight:
16 lbs / 7.2 Kgs
Unit Dimensions:
19.7 in L x 19.7 in W x 37.4 in H / 50 cm x 50 cm x 95 cm
Manufacturer:
Blue Rhino Global Sourcing, Inc
Made In:
China
Troubleshooting
Problem Possible Cause Prevention/Cure
Unit will not operate
Not plugged in Plug cord into grounded outlet
Fuse is blown Replace fuse
Loose wiring Call Customer Care Center
Reset Button is not activated Press restoration button
Heating Element is worn out Contact Customer Care at 1.800.762.1142 for new heating element
and replacement instructions.
If problems can not be corrected by using these methods, please contact 1.800.762.1142 for assistance.

®
Outdoor Patio Heater Model No. EWTS9151M

®
Calentador eléctrico para patio, modelo nº EWTS9151M

Calentador eléctrico para patio, modelo nº EWTS9151M Si necesita ayuda llame al 1.800.762.1142. No vuelva al lugar de compra.
página
7
Garantia limitada
Blue Rhino Sourcing, Inc (“el fabricante”) garantiza al comprador original, al detal, de este
producto, y a ninguna otra persona, que si la unidad se arma y opera de acuerdo con las
instrucciones impresas que la acompañan y por un período de un (1) año a partir de la fecha
de compra, todas las piezas de este producto estarán libres de defectos en material y mano
de obra. El fabricante podrá requerir prueba razonable de la fecha de compra. Por lo tanto,
usted debe conservar el recibo de venta o la factura. Esta garantía limitada estará limitada a
la reparación o reemplazo de las piezas que resulten defectuosas en condiciones de servicio y
uso normal y las que un examen indique, a satisfacción del fabricante, que están defectuosas.
Antes de devolver cualquier pieza, comuníquese con el Departamento de Servicio al Cliente
(Customer Service Department) del fabricante. Si el fabricante confirma el defecto y aprueba
el reclamo, el fabricante decidirá reemplazar tales partes sin costo alguno. Si se le pide
que devuelva las partes defectuosas, los costos de transporte deberán ser prepagados. El
fabricante devolverá las partes al cliente con costo de transporte o envío prepagados.
Esta garantía limitada no cubre fallas o dificultades de operación debidas a accidente, abuso,
mal uso, alteración, empleo en usos inapropiados, instalación defectuosa o mantenimiento
o servicio inapropiado o falla en la realización de mantenimiento normal y rutinario como se
prescribe en este manual del usuario.
Además, la garantía limitada no cubre daños al terminado de la unidad, tales como rasguños,
abolladuras, descoloridos, oxidaciones y otros daños causados por la intemperie después de la
compra de la unidad.
Esta garantía limitada reemplaza cualquier otra garantía. El fabricante no asume ninguna
responsabilidad por garantías de productos vendidos por quienes no sean distribuidores o
vendedores al detal autorizados. Esta exención de responsabilidad incluye cualquier garantía
de comerciabilidad o la garantía de aptitud para un propósito en particular. EL FABRICANTE NO
SE HACE RESPONSABLE POR NINGUNA GARANTIA IMPLICITA INCLUYENDO, SIN LIMITACIONES,
LAS GARANTIAS IMPLICITAS DE COMERCIABILIDAD Y ADAPTABILIDAD A UN PROPOSITO
PARTICULAR. EL FABRICANTE NO ASUME RESPONSABILIDAD ANTE EL COMPRADOR O
ANTE CUALQUIER TERCERA PERSONA POR DAÑOS ESPECIALES, INDIRECTOS, PUNITIVOS,
INCIDENTALES O CONSEQUENCIALES. El fabricante, además, no asume responsabilidad por
garantías implícitas o expresas por defectos de mano de obra causados por terceras personas.
Esta garantía limitada le da al comprador derechos legales específicos y el comprador puede
tener otros derechos según el lugar donde el comprador o la compradora residan. Ciertas
jurisdicciones no permiten limitaciones en cuanto a la duración de una garantía implícita, de
manera que esta limitación puede no ser aplicable a usted.
El fabricante no autoriza a ninguna persona o compañía para asumir por el fabricante
cualquier otra obligación a responsabilidad relacionada con la venta, instalación, uso,
remoción, devolución o reemplazo de este equipo y cualquier representación de esta
naturaleza no obliga al fabricante.
Blue Rhino Sourcing, Inc
Winston-Salem, North Carolina 27105, EE.UU.
(800)-762-1142
Especificaciones
Certificaciones:
Requerimiento 22.2 No. 46-M1988
UL 1278
Combustible:
Corriente eléctrica
Potencia:
1,200 vatios máximo
Voltaje:
120V CA
Frequencia:
60 Hz
Peso neto:
16 libras / 7.2 kg
Dimensionses de la unidad:
19,7 pulgadas de largo x 19,7 pulgadas de ancho x 37,4 pulgadas de alto /
50 cm x 50 cm x 95 cm
Fabricante:
Blue Rhino Global Sourcing, Inc
Fabricado en:
China
Resolución de problemas
Problema Causa posible Prevención/medida correctiva
La unidad no funciona
Unidad no enchufada. Enchufe el cable de alimentación en el receptáculo con conexión a
tierra.
Fusible quemado. Reemplace el fusible.
Alambrado desconectado. Llame al Centro de Atención al Cliente.
Botón de recuperación de graduación inicial no ha sido activado. Presione el botón de restauración.
El elemento de calefacción se ha quemado. Llame al Centro de Atención al Cliente al 1.800.762.1142 para obtener
un nuevo elemento de calefacción e instrucciones para reemplazarla.
Para ayuda más detallada, sírvase visitarnos en www.bluerhino.com o llamarnos al 1.800.762.1142 para ayudarle inmediatamente.

®
Calentador eléctrico para patio, modelo nº EWTS9151M Si necesita ayuda llame al 1.800.762.1142. No vuelva al lugar de compra.
Limpieza de las superficies
1. Limpie las superficies con agua y detergente suave de
lavado de platos o con soda de hornear.
2. Enjuague las superficies con agua limpia.
Nota: Cuando limpie la unidad, asegúrese de mantener
seca en todo momento el área alrededor del elemento de
calefacción. No sumerja el elemento de calefacción. Si el
elemento cae al agua, NO lo use. Debe ser reemplazado.
Mantenimiento
Para gozar por años de un rendimiento excepcional de su
calentador, verifique que usted realiza con regularidad las
siguientes operaciones de mantenimiento:
1. Mantenga limpias las superficies exteriores.
2. Mantenga libres de obstrucciones las aberturas de
ventilación. Mantenga limpios y libre de obstrucciones
los pasajes de aire alrededor del elemento de
calefacción.
Reemplazo del fusible
1. Presione en botón del interruptor (ilustración 2).
2. Desenchufe del receptáculo de pared el cable de
alimentación.
3. Con un destornillador remueva la cubierta del fusible
(vea la ilustración 4).
4. Cuidadosamente remueva el fusible usado y
reemplácelo con un nuevo fusible (vea la ilustración 5).
Nota: El fusible de reemplazo debe ser ÚNICAMENTE de 250 Voltios y 20 Amperios.
5. Vuelva a colocar la cubierta de fusible.
Nota: No la apriete demasiado.
6. Siga las instrucciones de encendido para operar la unidad o las de almacenamiento para
guardarla.
Almacenamiento
Entre uso y uso y durante períodos largos de inactividad o para
su transporte:
1. Presione en botón del interruptor (ilustración 2).
2. Desconecte el cable eléctrico.
3. Almacene el calentador de pie en una zona protegida del contacto directo con las
inclemencias atmosféricas (como la lluvia, el aguanieve, el granizo, el polvo y la suciedad).
4. Si lo desea, cubra el calentador para proteger las superficies exteriores y ayudar a evitar las
obstrucciones en los conductos de aire.
Espere hasta que el calentador esté frío antes de cubrirlo.
Registro del producto
Para beneficiar del servicio de garantía más rapidamente, sírvase registrar su unidad
inmediatamente visitando nuestro sitio Internet www.bluerhino.com o llamando al
1.800.762.1142.
Ilustración 3
Remueva la tapa del fusible
Ilustración 4
Remueva el fusible usado
Limpieza y cuidado
NOTA: El calentador funciona mejor SIN cables de extensión.
Si es necesario usar un cable de extensión:
•
Use un enchufe de 3 clavijas clasificado por UL (con conexión a tierra). El cable debe
ser de calibre núm. 16 AWG como mínimo y tener clasificación para 1500 vatios
mínimo.
• Nunca conecte, uno a otro, dos o más cables de extensión.
• Use la extensión más corta posible.
• Mantenga las conexiones secas y sin tocar el piso.
• Evite colocar el cable del calentador donde los niños o animales puedan
accidentalmente halarlo.
Antes de encender la unidad (ON)
1. Verifique que todos los empaques, etiquetas y
envolturas de protección han sido removidos del
calentador.
2. El calentador debe inspeccionarse minuciosamente
antes de cada uso y por un especialista en servicio
calificado por lo menos una vez al año.
Encendido - “ON”
1. Enchufe el cable de alimentación de corriente en el
receptáculo de 3 aletas del tipo GFI (Interruptor de
conducto a tierra), (vea la ilustración 1).
3. Presione el botón del interruptor (vea la ilustración 2).
Nota: Cuando el calentador se vuelva a encender
el elemento de calefacción comenzará a encender
lentamente antes de llegar a su potencia total.
Cuando el calentador está encendido (ON)
Cuando el calentador está encendido (ON), si el calentador se voltea, la unidad se
apaga (OFF) automáticamente.
Si el calentador se voltea:
1. IMEDIATAMENTE desenchufe el cable de alimentación, del receptáculo de pared.
2. Cuidadosamente vuelva a colocar el calentador en su
posición vertical.
PRECAUCION: La cúpula, el poste, la gualdera y la
cubierta de la gualdera pueden estar calientes.
Use guantes resistentes al calor para volver a
colocar el calentador en posición vertical.
3. Inspeccione el calentador para verificar que no ha
sufrido ningún daño. Si no observa ningún daño,
continúe con el siguiente paso. Si la unidad se ha
dañado, llame a un técnico calificado para que
examine la unidad y haga las reparaciones que sean
necesarias.
NO use el calentador si muestra cualquier
signo de daño. Un técnico calificado deberá
inspeccionar la unidad y hacer cualquier
reparación que sea necesaria antes de volver a usar la unidad.
4. Enchufe el cable de alimentación de corriente en el receptáculo de 3 aletas del tipo GFI
(Interruptor de conducto a tierra) (vea la ilustración 1).
5. Presione en botón del interruptor (ilustración 2).
Nota: La luz DEL quedará encendida cuando en calentador esté funcionando.
Nota: Cuando el calentador se vuelva a encender el elemento de calefacción comenzará a
encender lentamente antes de llegar a su potencia total.
Apagado (OFF)
1. Presione en botón del interruptor (ilustración 2).
2. Desenchufe el cable de alimentación del receptáculo eléctrico.
Limpieza y cuidado
Avisos
1. No use productos de limpieza abrasivos pues dañarán este aparato.
2. No utilice nunca productos limpiahornos para limpiar cualquier pieza del calentador.
4. Inspeccione el calentador cada vez que vaya a usarlo.
5. Pida que una persona calificada para dar servicio a la unidad examine
cuidadosamente el calentador anualmente y haga las reparaciones que considere
necesarias.
6. No limpie el calentador con limpiadores corrosivos o combustibles. Use agua tibia
con jabón.
7. No pinte el motor, los paneles del motor o la cúpula.
8. Este calentador debe limpiarse completamente a intervalos regulares.
9. Después de que la unidad ha estado almacenada o sin usar por un cierto tiempo,
examínela para detectar signos de abrasión, desgaste o cortes en el cable de
alimentación.
Instrucciones de operación
Ilustración 2
Metal Screw
Conexión del cable de
alimentación en un receptáculo
de 3 aletas GFI.
Ilustración 2
Botón del interruptor

Calentador eléctrico para patio, modelo nº EWTS9151M Si necesita ayuda llame al 1.800.762.1142. No vuelva al lugar de compra.
página
5
Instrucciones de armado
5
Acople el polo de la pantalla
Nota: Utilice la llave de tuercas para apretar la tuerca. NO apriete
demasiado.
B
x 1
7
Coloque la pantalla y acople el florón
Nota: Mientras aprieta el florón, asegúrese de que los cuatro (4) pies de la
pantalla descansen sobre la cúpula. NO apriete demasiado.
6
Acople la pantalla

®
Calentador eléctrico para patio, modelo nº EWTS9151M Si necesita ayuda llame al 1.800.762.1142. No vuelva al lugar de compra.
Instrucciones de armado
1
NO DEVUELVA EL PRODUCTO AL LUGAR
DE COMPRA
Si necesita ayuda llame, sin cargo, al 1.800.762.1142.Por
favor tenga a mano su manual y el número del modelo,
para referencia.
Para facilitar el armado:
• Evite la pérdida de componentes pequeños o elementos
de ferretería, armando el producto en un lugar de piso
plano sin aberturas ni hendijas.
• Despeje un área suficientemente grande para disponer
todos los componentes y los elementos de ferretería.
• Cuando sea del caso, apriete a mano, en un principio,
las conexiones de ferretería. Una vez que ha terminado
el paso, apriete completamente todos los elementos de
ferretería.
• Siga todos los pasos en el orden indicado para armar
debidamente esta unidad.
Nota: Se recomienda armar el producto entre (2) adultos
2
Acople el cuerpo al conjunto superior
Mantenga el conjunto superior en posición fija al asegurar el cuerpo
para no dañar el cable de alimentación.
Nota: NO apriete demasiado.
3
Acople el conjunto de la base, jale el cable de
alimentación eléctrica sobrante y asegúrelo
Alinee el nódulo de la base de montaje con el conjunto del cuerpo
para que no se tuerza el cuerpo.
Nota: Utilice la llave de tuercas para apretar la tuerca. NO apriete
demasiado.
4
Asegure el cable de alimentación eléctrica
A
x 2

Calentador eléctrico para patio, modelo nº EWTS9151M Si necesita ayuda llame al 1.800.762.1142. No vuelva al lugar de compra.
página
3
Lista de piezas
1
Florón
56-01-600
2
Pantalla
56-01-601
3
Polo de la pantalla
56-01-602
4
Cúpula*
56-01-603
5
Soporte de la cúpula*
56-01-495
6
Aislador de plástico*
56-01-496
7
Reflector de calor*
56-01-498
8
Poste interior de soporte*
56-01-509
9
Gancho del elemento de
calefacción (4)*
56-01-499
10
Elemento de calefacción*
56-01-500
11
Resguardo de alambre*
56-01-501
12
Placa protectora inferior*
13
Poste*
56-01-605
14
Tapa de fusible*
56-01-504
15
Fusible (250 voltios y 15
amperios)*
56-01-505
16
Carcasa de control*
17
Cuerpo
56-01-604
18
Base*
19
Cable de alimentación*
20
Placa de contrapeso*
21
Poste de soporte interior*
22
Abrazadera del cable de
alimentación eléctrica
56-01-606
* Viene ensamblado
Diagrama de explosión
Elementos de ferretería
A
Tornillo
Niquelado, M3x12
2 pzs
B
Tuerca
Niquelada, M10
1 pz
Herramientas necesarias para el armado (incluidas)
Llave inglesa
4
1
2
10
6
12
11
5
3
7
17
18
19
20
9
8
9
14
15
16
13
21
22

®
Calentador eléctrico para patio, modelo nº EWTS9151M Si necesita ayuda llame al 1.800.762.1142. No vuelva al lugar de compra.
Al utilizar aparatos eléctricos, siempre se deberían seguir simples
precauciones de seguridad, que incluyan lo siguiente:
1. Lea todas las instrucciones.
2. Este calentador, cuando se usa, se calienta especialmente en la
cúpula. Para evitar quemaduras, no toque las superficies calientes sin
adecuada protección para la piel. Mantenga materias combustibles
y artículos tales como cables eléctricos, muebles, papeles, ropas,
y cortinas a una distancia de por los menos 90 cm del frente del
calentador y alejados de sus costados y superficie de atrás.
3. Debe tenerse extremo cuidado cuando el calentador sea utilizado por o
cerca de niños o personas discapacitadas y cuado el calentador se deje
operando sin vigilancia
4.
Siempre desenchufe el calentador cuando no lo esté usando.
5. No haga funcionar esta unidad con el cable de conexión o el
enchufe dañados o después de que el mismo haya presentado un
malfuncionamiento o haya sido dañado. Reclame en el centro de
servicio autorizado para revisar, reparar o ajustar su unidad.
6. Este calentador no está diseñado para uso en baños, áreas de
lavandería y lugares similares en interiores. Nunca ubique el calentador
donde pueda caerse en una tina u otro contenedor de agua.
7. No pase el cable por debajo de una alfombra. No cubra el cable con
alfombras pequeñas, tapetes de pasillo, o cubiertas similares. Coloque
el cable alejado de áreas de tránsito de personas y donde no cree
obstáculos o riesgos de enredar.
8. Para desconectar el calentador, coloque los controles en la posición Off
(apagado), luego extraiga el enchufe del tomacorriente.
9. Use este aparato únicamente con receptáculo eléctrico con conexión a
tierra.
10. No introduzca o permita que objetos extraños entren por las aberturas
de entrada o salida de la ventilación, pues esto puede causar choque
eléctrico, originar un incendio o dañar el calentador.
11. Para evitar un posible incendio, no bloquee de ninguna manera las
entradas ni salidas de aire. No coloque el producto sobre superficies
suaves, como la cama, donde las aberturas podrían bloquearse.
12.
Un calentador tiene partes calientes y de arco o chispa eléctrica en
el interior. No utilice el producto en áreas donde se use o almacene
gasolina, pintura o líquidos inflamables.
13. Use este calentador sólo como se describe en este manual. Cualquier
otro uso no recomendado por el fabricante puede causar incendio,
choque eléctrico o lesiones personales.
14. Evite el uso de un cable de extensión porque éste puede
sobrecalentarse y causar un riesgo de incendio. Sin embargo, si tiene
que usar un cable de extensión, éste debe tener un calibre mínimo de
16 AWG y estar clasificado para no menos de 1500 vatios.
15. GUARDE ESTAS INSTRUCCIONES.
Este calentador es para ser usado al aire libre únicamente.
El calentador NO ha sido diseñado para usos comerciales.
Este calentador debe ser usado con corriente eléctrica únicamente
Existen cables largos de suministro de corriente desconectables o
cables de extensión que pueden usarse si se ejerce cuidado en la
forma de emplearlos.
Si va a usar un cable desconectable de suministro de corriente, o si se
usa un cable de extensión, observe las siguientes precauciones:
a. El cable debe ser de por lo menos Número 16 AWG y debe estar
clasificado para corrientes de por lo menos de 1,500 vatios.
b. La clasificación eléctrica marcada en el cable o en el cable de
extensión debe ser por lo menos de la magnitud de la clasificación
eléctrica de la unidad, y
c. El cable debe estar dispuesto de manera que no cuelgue por
sobre una mesa o un estante donde un niños pueda halarlo o, sin
intención, enredarse en el cable.
EL CHOQUE ELECTRICO PUEDE PRODUCIR LA MUERTE U OCASIONAR
UNA GRAVE LESION. PARA EVITAR EL CHOQUE ELECTRICO:
a. Use la unidad únicamente con circuito protegido con interruptor
para falla de conexión a tierra (GFI).
b. No use este calentador cuando esté lloviendo.
c. Para evitar que el calentador se salpique de agua o caiga en el
agua, no use el calentador a menos de 10 pies (3 metros) de una
piscina, estanque o cualquier otra masa de agua.
d. Mantenga el calentador y el cable secos y protegidos de la lluvia en
todo momento.
e. No opere el calentador con el cable, el enchufe o la sonda de metal
dañados. Llame a nuestro servicio al cliente para reemplazar el
controlador. Este controlador ha sido hecho específicamente para
este calentador.
f. Nunca remueva del enchufe la clavija de conexión a tierra ni use un
adaptador con solo dos clavijas.
g. Mantenga los enchufes eléctricos secos y sin tocar el piso.
El uso de bebidas alcohólicas, medicamentos o drogas de farmacia
puede afectar la habilidad del usuario para armar debidamente u
operar en forma segura este aparato.
No guarde o use gasolina u otros líquidos o vapores inflamables a
menos de 25 pies (7,62 m) de esta unidad.
No lo use en una atmósfera explosiva. Mantenga la zona del
calentador libre de materiales combustibles, gasolina y cualquier otro
vapor o líquido inflamable.
NO USE este calentador cerca de cualquier construcción combustible
que no tenga protección contra la combustión.
No altere el calentador de ninguna forma.
No utilice el calentador a menos que esté COMPLETAMENTE montada y
que todas las piezas estén bien fijadas y apretadas.
Este calentador debe limpiarse y verificarse completamente de manera
regular.
Use únicamente piezas autorizadas de fábrica de Blue Rhino Global
Sourcing, Inc. El uso de cualquier pieza no autorizada de fábrica puede
ser peligroso. Su uso invalida su garantía.
No encienda esta unidad sin haber leído las instrucciones de
“Encendido” que se encuentran en este manual.
No toque las piezas de metal del calentador hasta que no se haya
enfriado completamente (alrededor de 45 minutos) para evitar
quemaduras, a menos que usted tenga puestos elementos de
protección tales como guantes o almohadilla para las ollas, guantes
de barbacoa, etc.
No toque las superficies calientes.
NO instale o utilice el calentador en embarcaciones o vehículos de
recreo.
No deje un calentador encendido sin vigilancia, especialmente,
mantenga los niños y las mascotas lejos del calentador en todo
momento.
No intente mover el calentador mientras esté encendido. Deje que el
calentador se enfríe antes de moverlo o guardarlo.
Coloque siempre el calentador sobre una superficie firme, nivelada y
no combustible.
Alta temperatura: mantenga los cables eléctricos, cortinas y otros
accesorios a una distancia de por lo menos 3 pies (0,9 m) de la parte
frontal del calentador y lejos de los lados y parte posterior
Después de un período de almacenamiento o un tiempo en el cual la
unidad ha dejado de usarse, inspecciónela para detectar cualquier
abrasión, desgaste o cortes en el cable eléctrico.
El uso de accesorios no recomendados por el fabricante de la unidad
puede ocasionar lesiones.
Guarde la unidad en recinto cubierto cuando no esté usándola y fuera
del alcance de los niños.
El servicio de la unidad debe realizarse únicamente cuando el
calentador esté desconectado de la fuente de energía.
Para asegurar una protección constante contra el choque eléctrico,
enchufe la unidad únicamente en receptáculos adecuadamente
conectados a tierra. Para reducir el riesgo de choque eléctrico, use
únicamente receptáculos eléctricos de 3 aletas del tipo GFI – Ground
Fault Interruptor – de conducto a tierra.
No sumerja la unidad en agua. Desconecte el cable eléctrico del
receptáculo antes de limpiar, dar servicio o remover el elemento de
calefacción
No cubra total o parcialmente este calentador ni obstruya su
circulación de aire.
Sírvase usar guantes de protección cuando esté armando este
producto.
No trate de forzar las partes de esta unidad, pues esto puede causar
lesiones personales o dañar el producto.
Use este calentador únicamente en la forma que se describe en este
manual. Cualquier uso que no esté recomendado por el fabricante
puede ser causa de un incendio, choque eléctrico o lesiones
personales.
Para reducir el riesgo de choque eléctrico, mantenga seca la conexión
del cordón.
El producto debe estar totalmente ensamblado antes de hacer
funcionar el calentador.
No limpie este producto con un atomizador de agua u otros productos
similares.
El no seguir exactamente las instrucciones dadas arriba puede
producir daños a la propiedad, lesiones serias y hasta fatales
La seguridad primero
PELIGROS y Precauciones
PRECAUCIONES IMPORTANTES

Outdoor Patio Heater Model No. EWTS9151M
Fabricado en China para:
Blue Rhino Global Sourcing, Inc
Winston-Salem, NC EE.UU.
1.800.762.1142, www.bluerhino.com
© 2009 Blue Rhino Global Sourcing, Inc. Todos los derechos reservados.
UniFlame
®
es una marca registrada de Blue Rhino Global Sourcing, Inc. Todos los derechos reservados. EWTS9151M-OM-105 ES
ADVERTENCIA
PARA SU SEGURIDAD:
1. Una instalación, ajuste, alteración,
reparación o mantenimiento inadecuados
pueden causar lesiones o daños a la
propiedad.
2. Lea atentamente las instrucciones
de instalación, funcionamiento y
mantenimiento del equipo antes de
instalarlo, ponerlo en marcha o darle
servicio.
3. El no seguir estas instrucciones puede
ocasionar un incendio o una explosión, con
sus consecuentes daños a la propiedad,
lesiones personales y hasta accidentes
fatales.
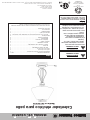
Calentador eléctrico para patio
Modelo no. EWTS9151M
®
MANUAL DEL USUARIO
Indice
Salvaguardias importantes . . . . . . . . . . . . . . . . . . . . . . . . . . . . . . . . . . . . . . . Page 2
Diagrama de explosión y elementos de ferretería . . . . . . . . . . . . . . . . . . . . . . . . . . 3
Instrucciones de armado . . . . . . . . . . . . . . . . . . . . . . . . . . . . . . . . . . . . . . . . . . . . 4
Instrucciones de operación. . . . . . . . . . . . . . . . . . . . . . . . . . . . . . . . . . . . . . . . . . . 5
Antes de encender la unidad (ON)
. . . . . . . . . . . . . . . . . . . . . . . . . . . . . . . . . . 5
Encendido
. . . . . . . . . . . . . . . . . . . . . . . . . . . . . . . . . . . . . . . . . . . . . . . . . . . . . 5
Cuando el calentador está encendido (ON)
. . . . . . . . . . . . . . . . . . . . . . . . . . . . 5
Apagar la unidad (OFF)
. . . . . . . . . . . . . . . . . . . . . . . . . . . . . . . . . . . . . . . . . . . 5
Limpieza y cuidado. . . . . . . . . . . . . . . . . . . . . . . . . . . . . . . . . . . . . . . . . . . . . . . . . 6
Limpieza de las superficies
. . . . . . . . . . . . . . . . . . . . . . . . . . . . . . . . . . . . . . . . 6
Mantenimiento
. . . . . . . . . . . . . . . . . . . . . . . . . . . . . . . . . . . . . . . . . . . . . . . . . 6
Reemplazo del fusible
. . . . . . . . . . . . . . . . . . . . . . . . . . . . . . . . . . . . . . . . . . . . 6
Almacenamiento. . . . . . . . . . . . . . . . . . . . . . . . . . . . . . . . . . . . . . . . . . . . . . . . . . . 6
Entre uso y uso y durante períodos largos de inactividad o para su transporte
. . 6
Registro del producto . . . . . . . . . . . . . . . . . . . . . . . . . . . . . . . . . . . . . . . . . . . . . . . 6
Garantia limitada . . . . . . . . . . . . . . . . . . . . . . . . . . . . . . . . . . . . . . . . . . . . . . . . . . 7
Especificaciones. . . . . . . . . . . . . . . . . . . . . . . . . . . . . . . . . . . . . . . . . . . . . . . . . . . 7
Resolución de problemas . . . . . . . . . . . . . . . . . . . . . . . . . . . . . . . . . . . . . . . . . . . . 7
Conserve estas instrucciones para futuras consultas. Si está montando esta unidad
para otra persona, entréguele este manual para futuras consultas.
ADVERTENCIA
PARA SU SEGURIDAD:
Solamente para uso en exteriores
Peligro
NO use el calentador eléctrico para cocinar en
un interior o calentar un ambiente. NO debe
usarse en o dentro de una embarcación o un
vehículo de recreo.
Hecho con 70% de bagazo
de caña
(subproducto de la caña de
azúcar respetuoso del
medio ambiente)
-
 1
1
-
 2
2
-
 3
3
-
 4
4
-
 5
5
-
 6
6
-
 7
7
-
 8
8
-
 9
9
-
 10
10
-
 11
11
-
 12
12
-
 13
13
-
 14
14
-
 15
15
-
 16
16


Uniflame EWTS9151M Owner's manual
- Category
- Space heaters
- Type
- Owner's manual
Ask a question and I''ll find the answer in the document
Finding information in a document is now easier with AI
in other languages
Related papers
-
Uniflame EWUR810SP Owner's manual
-
-
-
-
-
-
-
-
-
Other documents
-
Endless Summer EWUR810SP User manual
-
 Blue Rhino EWUR840SP User manual
-
-
-
 Blue Rhino EWTS8119L User manual
-
-
-
-
Endless Summer 92000 Owner's manual
-
 Blue Rhino 82300 User manual


