Technoline WS 9310 Specification

Category
Weather stations
Type
Specification

Technoline WS 9310 is a weather station that provides accurate weather forecasts, time, indoor and outdoor temperature readings, and weather tendency indicators. With its ability to receive data from up to three outdoor transmitters, you can monitor temperatures in different locations simultaneously. The weather icons and tendency arrows help you stay informed about upcoming weather changes. The station also features minimum and maximum temperature records for both indoor and outdoor readings, allowing you to track temperature variations over time.

Technoline WS 9310 is a weather station that provides accurate weather forecasts, time, indoor and outdoor temperature readings, and weather tendency indicators. With its ability to receive data from up to three outdoor transmitters, you can monitor temperatures in different locations simultaneously. The weather icons and tendency arrows help you stay informed about upcoming weather changes. The station also features minimum and maximum temperature records for both indoor and outdoor readings, allowing you to track temperature variations over time.

Holder
Detachable stand
WEATHER STATION
INTRODUCTION:
Congratulations on purchasing this innovative 433MHz Weather Station which displays the weather forecast, time,
indoor temperature, and up to three outdoor temperature readings. To enjoy the full benefits of this innovative product,
please read this operating manual.
Weather Station:
FEATURES:
DCF radio-controlled time reception
LCD clock in 24 hour time display
Indoor and outdoor temperature reading in degree Celsius (°C)
Indoor and outdoor temperature with Minimum and Maximum records
Weather tendency indicator and weather icons
Can receive up to three Outdoor transmitters
Table standing or wall mountable (detachable table stand)
Hanging hole
Temperature Transmitter:
SETTING UP:
Please follow these steps to ensure that your new Weather Station works correctly with the temperature
transmitter(s):
Function Keys
Battery
compartment
1. First, insert 2 x AA, IEC LR6, 1.5V batteries into the Weather Station. Once the batteries are in place, all
segments of the LCD will light up briefly. Then the indoor temperature, the time as -:--, and the weather icons
sun and clouds will be displayed. If the indoor temperature is not displayed after a few seconds, remove the
batteries and wait for at least 30 seconds before reinserting them. Once the indoor temperature is displayed
proceed to step 2.
Battery
compartment
2. Within 1-1/2 minutes of activating the Weather station, place 2 x AAA, IEC LR3, 1.5V batteries into the
transmitter.
3. After a few seconds of inserting the batteries into the transmitter, the Weather Station will start receiving data
from the transmitter. The remote temperature will then be displayed on the Weather Station. If this does not
happen after 2 minutes, the batteries will need to be removed from both units and reset from step 1.
4. The Weather Station can take up to 3 remote transmitters. If you have purchased additional transmitters, follow
step 2 for all extra transmitters. However, ensure that you leave 10 seconds in between the reception of the
last transmitter and the set-up of the following transmitter. The Weather Station will number the transmitters in
the order of set-up, i.e. the first transmitter will have the temperature displayed with the channel number 1
against it and so on.
Note: No channel number will show up if there is only one transmitter used.
5. When all the transmitters are set up, there is a testing period, during which the display switches quickly
between all the received transmitters at random, according to which random transmission it receives. Pressing
any key will stop this process and the display will show the temperature for the first transmitter. The process
also stops automatically if no keys are pressed for a few minutes.
6. The DCF-77 time code reception is automatically started just after the Weather Station is activated. This takes
typically between 3 - 5 minutes in good conditions. This time period is an excellent opportunity to locate the
transmitter(s) in suitable location(s) outdoors. In order to ensure sufficient 433 MHz transmission however, this
should under good conditions be no more than 25 meters from where the Weather Station will be finally
positioned (see notes on “Positioning” and “433 MHz Reception”).
7. If after 10 minutes the DCF time has not been received, use the SET key to manually enter a time initially. The
clock will automatically attempt each hour to receive the DCF time. When this is successful, the received time
will override the manually set time.
Note:
Should the total time of inserting the batteries into the transmitters take longer than 1-1/2 minutes from the time of
inserting the batteries into the Weather Station then temperature reception problems may occur. If the temperature is
Battery cover
Battery cover
Battery compartment
not being received, then see Checking for 433MHz reception, before resetting the units (see Resetting the
Weather Station below).
In the event of changing batteries in any of the units, all units need to be reset by following the setting up procedures.
This is because the transmitter at start-up assigns a random security code and this code must be received and stored
by the Weather Station in the first 1-1/2 minutes of power being supplied to it.
BATTERY CHANGE:
It is recommended to replace the batteries in all units on an annual basis to ensure optimum accuracy of these units.
Please participate in the preservation of the environment. Return used batteries to an authorized
depot.
LCD SCREEN
The Weather Station’s LCD is split into 3 sections displaying the information for time, weather forecast, indoors and
outdoors.
After unit reset, all the segments will light up momentarily before displaying:
1. Weather Icon
2. Time “-:--“
3. Indoor temperature in degree Celsius (°C)
4. Hidden Max/Min icon for Indoor/Outdoor Temperature
5. Outdoor Temperature in °C and transmitter identification number
Weather Tendency
Indicator
TIME SETTING:
When the setting up procedures are completed but DCF time has not been received, the time can be set manually.
Outdoor temperature
in ºC
Transmitter
identification
number
Time
Indoor temperature
in ºC
Weather Icon
DCF Tower icon
(for time reception)
Outdoor temperature
reception indicator
Minutes flashing
Hour flashing
To set the time display:
1. Press and hold the SET key at the front of the Weather Station about four seconds to enter the set mode
2. The hour digit starts flashing. Use the “+” key to enter the hour.
3. Press the SET key to enter the minutes. The minute digits start flashing.
4. Press the “+” key to set the minutes.
5. Press the SET key or avoid touching any keys for eight seconds to confirm the time setting.
USING THE WEATHER STATION:
WEATHER FORECAST AND WEATHER ICONS:
The weather forecast and icons can display three weather symbols and two weather tendency indicators in forms of
an arrow. The arrows will change their appearance depending on the air pressure development.
INDOOR TEMPERATURE:
The indoor temperature is displayed on the LCD under the time. The Weather Station’s built in sensor automatically
measures the temperature once the batteries are inserted.
MINIMUM AND MAXIMUM INDOOR TEMPERATURE RECORDINGS:
By pressing the “MIN/MAX” key the current indoor temperature will alternate between the maximum, minimum, and
current temperature recordings (also changes for outdoor temperature). Once a new indoor temperature high or low is
reached, it will automatically set into the Weather Station’s memory.
Note: When current temperature is selected, the MAX or MIN icon will not appear on the LCD.
OUTDOOR TEMPERATURE READING:
The outdoor temperature reading is on the bottom part of the LCD. The Weather Station receives the outdoor
temperature via 433 MHz frequency when the batteries are inserted into the transmitter within the 1-1/2 minutes of the
setting up time (See Setting up above).
Note: Should the outdoor temperature not be received within 2 minutes after inserting the batteries into a transmitter,
then see “Checking 433 MHz reception” below.
MINIMUM AND MAXIMUM OUTDOOR TEMPERATURE READING:
By pressing the “MIN/MAX” key the current outdoor temperature will alternate between the maximum, minimum and
current temperature recordings. Once a new outdoor temperature high or low is reached, it will automatically be set
into the Weather Station’s memory.
Note: When current temperature is selected, the MAX or MIN icon will not appear on the LCD.
RESETTING THE MINIMUM AND MAXIMUM TEMPERATURE RECORDING:
By pressing and holding down the “MIN/MAX” key for about 3 seconds, both the indoor and outdoor minimum and
maximum temperature recordings will be reset to the current indoor and outdoor temperatures.
Important Note:
All the outdoor temperature recordings (max/min in all existing channels) will be reset at the same time.
OUTDOOR TEMPERATURE 1, 2, AND 3
If more than one transmitter is being used, to alternate between the temperature readings of transmitter 1, 2, and 3,
simply press the “CH” key. If the reading is from transmitter 1, then the channel identification number 1 will be
displayed in the outdoor temperature section of the LCD. The same will apply to the next transmitter and so on.
However, if only one transmitter is used, no identification number will be displayed on the LCD.
THE WEATHER FORECASTING ICONS:
There are 3 weather icons on the first section of the LCD, which can be displayed in any of the following
combinations:
Sunny Cloudy with sunny intervals Rainy
For every sudden or significant change in the air pressure, the weather icons will update accordingly to represent the
change in weather. If the icons do not change, then it means either the air pressure has not changed or the change
has been too slow for the Weather Station to register. However, if the icon displayed is a sun or raining cloud, there
will be no change of icon if the weather gets any better (with sunny icon) or worse (with rainy icon) since the icons are
already at their extremes.
The icons displayed forecasts the weather in terms of getting better or worse and not necessarily sunny or rainy as
each icon indicates. For example, if the current weather is cloudy and the rainy icon is displayed, it does not mean
that the product is faulty because it is not raining. It simply means that the air pressure has dropped and the weather
is expected to get worse but not necessarily rain.
Note:
After setting up, readings for weather forecasts should be disregarded for the next 12-24 hours. This will allow
sufficient time for the Weather Station to collect air pressure data at a constant altitude and therefore result in a more
accurate forecast.
Common to weather forecasting, absolute accuracy cannot be guaranteed. The weather forecasting feature is
estimated to have an accuracy level of about 75% due to the varying areas the Weather Station has been designed
for use in. In areas that experience sudden changes in weather (for example from sunny to rain), the Weather Station
will be more accurate compared to use in areas where the weather is stagnant most of the time (for example mostly
sunny).
If the Weather Station is moved to another location significantly higher or lower than its initial standing point (for
example from the ground floor to the first floor of a house), remove the batteries and re-insert them after about 30
seconds. By doing this, the Weather Station will not mistake the new location as being a possible change in air-
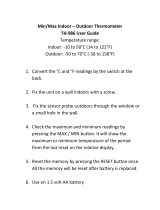
pressure when really it is due to the slight change of altitude. Again, disregard weather forecasts for the next 12 to 24
hours, as this will allow time for operation at a constant altitude.
THE WEATHER TENDENCY INDICATOR
Working together with the weather icons are the weather tendency indicators (located on the top and bottom part of
the weather icons). When the indicator points upwards, it means that the air-pressure is increasing and the weather is
expected to improve, but when indicator points downwards, the air-pressure is dropping and the weather is expected
to become worse.
Taking this into account, one can see how the weather has changed and is expected to change. For example, if the
indicator is pointing downwards together with cloud and sun icons, then the last noticeable change in the weather was
when it was sunny (the sun icon only). Therefore, the next change in the weather will be cloud with rain icons since
the indicator is pointing downwards.
Note: Once the weather tendency indicator has registered a change in air pressure, it will remain permanently
visualized on the LCD.
CHECKING FOR 433 MHz RECEPTION:
In normal surroundings (for example away from interfering sources such as TV sets), the outdoor temperature can
usually be easily received within 1-1/2 minutes. If the outdoor temperature is not displayed on the LCD after 2
minutes, then check the following:
1. The distance of the units should be at least 1.5 - 2.0 meters away from interfering sources such as computer
monitors or TV sets.
2. Avoid placing the units onto or in the immediate proximity of metal doors, window frames or structures.
3. Using other electrical products such as headphones and speakers that operate on the same signal (433 MHz)
can prevent the transmission pick up.
4. Neighbors using electrical products operating on the 433 MHz signal can also cause interference. In most
severe cases, the reception is only possible once all other electrical products using the 433 MHz are switched
off.
5. Within thick concrete rooms such as basements and tower blocks, the 433 MHz signal can be weakened (avoid
placing near metal frames and structures).
6. Transmission can be affected by exposure to extreme temperature conditions. For example, if the weather has
been extremely cold (under -25ºC) for an extended period of time then the transmission signal may be
weakened. (Please bear this in mind when positioning the transmitter).
Note: Should after checking the above list and the outdoor temperature is still not received, then reset the units (see
Resetting the Weather Station below).
RESETTING THE WEATHER STATION:
1. Remove the batteries from the Weather Station and the transmitter(s)
2. Wait at least 30 seconds and repeat the procedures specified in Setting up above.
Note: Remember when resetting, all units have to be reset and to always insert the batteries into the Weather Station
first and then followed by the transmitter(s).
POSITIONING
WEATHER STATION:
The Weather Station comes complete with a detachable stand that gives the option of table standing
or wall mounting. To wall mount:
1. Fix a screw into the desired wall, leaving the head extended out by about 5mm.
2. Using the Weather Station’s hanging hole, carefully hang it onto the screw.
Note: Always ensures that the unit locks onto the screw head before releasing.
OUTDOOR TRANSMITTER:
The Outdoor Transmitter is supplied with a holder that may be attached to a wall with the three screws or double-
sided tape supplied. To attach to the wall using screws, please follow the steps below:
1. Mark the wall using a pen through the holes in the holder to obtain the exact drilling
position.
2. Drill holes in the wall at the points marked.
3. Screw holder onto wall.
The Outdoor Transmitter simply clicks in or out of the holder. When inserting or removing
the Outdoor Transmitter to or from the wall holder please hold both units securely to avoid
tearing the holder from the wall.
There is also double sided tape included with the wall holder. On smooth surfaces this can be used instead of drilling
holes. The mounting surface can, however, affect the transmission range. If for example the unit is attached to a piece
of metal, it may then either reduce or increase the transmitting range. For this reason, we recommend not placing the
unit on any metal surfaces or in any position where a large metal or highly polished surface is in the immediate
proximity (garage doors, double-glazing, etc.). Before securing in place, please ensure that the Weather Station can
receive the 433 MHz signal from the Outdoor Transmitter at the positions that you wish to situate them.
CARE AND MAINTENANCE:
Avoid placing the units in areas prone to vibration and shock as these may cause damage.
Avoid areas where the units can be exposed to sudden changes in temperature, i.e. direct sunlight, extreme
cold and wet/moist conditions as these will lead to rapid changes in temperature which reduces the accuracy of
readings.
When cleaning the LCD and casing, use a soft damp cloth only. Do not use solvents or scouring agents.
Do not submerge the units into water.
Immediately remove all low powered batteries to avoid leakage and damage. Replace only with new batteries
of the recommended size.
Do not make any repairs to the units. Please return them to the original point of purchase for repair by a
qualified engineer. Opening and tampering with the units may invalidate its guarantee.
SPECIFICATIONS:
Temperature measuring range
Indoor : 0ºC to +60ºC with 0.1ºC resolution
(OF.L” displayed if outside this range)
Outdoor : -29.9ºC to +69.9ºC with 0.1ºC resolution
(“OF.L” displayed if outside this range)
Indoor temperature checking intervals : every 10 seconds
Outdoor temperature reception : every 5 minutes
Transmitting frequency : 433.92 MHz
Power source:
Weather Station : 2 x AA, IEC LR6, 1.5V batteries
Transmitter : 2 x AAA, IEC LR3, 1.5V batteries
Battery life for both units : Approximately 12 months (Alkaline batteries recommended)
Dimensions (L x W x H):
Weather Station : 80 x 29.7 x 180 mm (stand excluded)
Transmitter : 59 x 22 x 65 mm (wall bracket excluded)
LIABILITY DISCLAIMER:
The manufacturer and supplier cannot accept any responsibility for any incorrect readings and any
consequences that occur should an inaccurate reading take place.
This product is designed for use in the home only as indication of the temperature.
This product is not to be used for medical purposes or for public information.
The specifications of this product may change without prior notice.
This product is not a toy. Keep out of the reach of children.
No part of this manual may be reproduced without written authorization of the manufacturer.
R&TTE Directive 1999/5/EC
Summary of the Declaration of Conformity: We hereby declare that this wireless transmission device does comply
with the essential requirements of R&TTE Directive 1999/5/EC.
WETTERSTATION
WEATHER STATION
POSTE METEO
WEERSTATION
STAZIONE METEOROLOGICA
ESTACIÓN METEOROLÓGICA
Bedienungsanleitung
Instructions manual
Livret d’instructions
Handleiding
Manuale delle istruzioni
Manual de instrucciones
  • Page 1 1
  • Page 2 2
  • Page 3 3
  • Page 4 4
  • Page 5 5
  • Page 6 6
  • Page 7 7
  • Page 8 8
  • Page 9 9

Technoline WS 9310 Specification

Category
Weather stations
Type
Specification

Technoline WS 9310 is a weather station that provides accurate weather forecasts, time, indoor and outdoor temperature readings, and weather tendency indicators. With its ability to receive data from up to three outdoor transmitters, you can monitor temperatures in different locations simultaneously. The weather icons and tendency arrows help you stay informed about upcoming weather changes. The station also features minimum and maximum temperature records for both indoor and outdoor readings, allowing you to track temperature variations over time.

Ask a question and I''ll find the answer in the document

Finding information in a document is now easier with AI