Garmin 190-00556-10 User manual
- Category
- Navigators
- Type
- User manual

Quest
®
and Quest
®
2
pocket-sized navigator
owner’s manual

© Copyright 2006 Garmin Ltd. or its subsidiaries
Garmin International, Inc.
1200 East 151
st
Street,
Olathe, Kansas 66062, U.S.A.
Tel. 913/397.8200 or 800/800.1020
Fax 913/397.8282
Garmin (Europe) Ltd.
Unit 5, The Quadrangle, Abbey Park Industrial
Estate, Romsey, SO51 9DL, U.K.
Tel. 44/0870.8501241
Fax 44/0870.8501251
Garmin Corporation
No. 68, Jangshu 2
nd
Road, Shijr,
Taipei County, Taiwan
Tel. 886/2.2642.9199
Fax 886/2.2642.9099
All rights reserved. Except as expressly provided herein, no part of this manual may be reproduced, copied, transmitted, disseminated,
downloaded, or stored in any storage medium, for any purpose without the express prior written consent of Garmin. Garmin hereby grants
permission to download a single copy of this manual onto a hard drive or other electronic storage medium to be viewed and to print one
copy of this manual or of any revision hereto, provided that such electronic or printed copy of this manual must contain the complete text
of this copyright notice and provided further that any unauthorized commercial distribution of this manual or any revision hereto is strictly
prohibited.
Information in this document is subject to change without notice. Garmin reserves the right to change or improve its products and to make
changes in the content without obligation to notify any person or organization of such changes or improvements. Visit the Garmin Web site
(www.garmin.com) for current updates and supplemental information concerning the use and operation of this and other Garmin products.
Garmin
®
, AutoLocate
®
, Quest
®
, and TracBack
®
are registered trademarks of Garmin Ltd. or its subsidiaries and may not be used without the
express permission of Garmin.
June 2006 Part Number 190-00556-10 Rev. B Printed in Taiwan

Quest Owner’s Manual i
INTRODUCTION > ABOUT THIS MANUAL
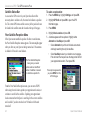
INTRODUCTION
Congratulations on choosing one of the most versatile GPS
navigation systems available! The Garmin
®
Quest
®
utilizes the
proven performance of Garmin GPS and full-featured mapping to
create an unsurpassed mobile navigation system.
About This Manual
This manual covers instructions for the Quest and the Quest 2. To
get the most out of your new navigation system, go through this
Owner’s Manual and learn the operating procedures for your unit.
Introduction—contains the Table of Contents, Warnings and
Cautions, and Care Information.
Getting Started—provides information to help get you started. If
you have never operated a Quest or any type of GPS navigation
unit, try the tutorial on page 2.
Basic Operation—teaches you how to use your Quest to find
items, create routes, and initiate a TracBack
®
.
Using the Main Pages—describes the Map page and other main
pages of your Quest.
Customizing your Quest—explains how to change your Quest’s
settings to meet your specific needs.
Understanding GPS—describes the basics of GPS navigation and
the features on the GPS Information page.
Appendix—contains additional mounting instructions,
specifications, and regulatory information.
Index—provides key words to help you find information.
Manual Conventions
Unless specified, all text and instructions apply to both the Quest
and the Quest 2.
This manual uses the term “select” when you need to choose an
icon, button, or tab. To select something, use the Rocker pad to
move the cursor (or highlighted area) to the position. To activate
the selection, press the OK key.
This manual uses the term WARNING to indicate a
potentially hazardous situation, which, if not avoided, could
result in death or serious injury.
This manual uses the term CAUTION to indicate a
potentially hazardous situation, which, if not avoided, may
result in minor injury or property damage. It may also
be used without the symbol to alert you to avoid unsafe
practices.

ii Quest Owner’s Manual
INTRODUCTION > TABLE OF CONTENTS
Introduction ...........................................................................i
About This Manual ................................................................... i
Manual Conventions ........................................................................ i
Warning ................................................................................... iv
Caution ..................................................................................... v
Caring for the Quest ............................................................... vi
Cleaning the Case ......................................................................... vi
Cleaning the Screen ....................................................................... vi
Storing Your Quest ........................................................................vi
Avoiding Theft ............................................................................... vi
Using the Quest Responsibly ......................................................... vi
Battery Temperature Warning ........................................................ vi
If Your Quest Locks Up… .............................................................vi
Recycling Your Quest .................................................................... vi
Unit Overview ......................................................................1
Introducing the Quest ............................................................. 1
A Tutorial .................................................................................. 2
Vehicle Installation .................................................................. 4
Removing the Quest and the Mount ............................................... 5
Using the Mounting Disk ............................................................... 5
Getting Started ........................................................................ 6
Turning the Quest On and Off ........................................................ 6
Adjusting the External Speaker Volume ......................................... 6
Turning Off Satellite Reception for Indoor Use ............................. 6
Using the Keys ........................................................................ 7
Selecting Options and Entering Data .............................................. 8
Using the On-screen Keyboard ....................................................... 8
Basic Operation ...................................................................9
Finding Places and Routing to Them ................................... 9
Advanced Search Methods and Tips ............................................ 10
Finding an Address or Intersection .............................................. 11
Finding a City ............................................................................... 12
Finding an Exit ............................................................................. 12
Finding Recently-Found Places .................................................... 13
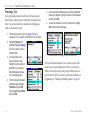
Planning a Trip .............................................................................. 14
My Locations ......................................................................... 15
Saving Your Favorite Places in “My Locations” .......................... 15
Editing a Saved Location .............................................................. 17
Organizing Saved Locations into Categories ............................... 17
Deleting Saved Locations ............................................................. 18
Finding My Locations .................................................................. 18
Setting Your Home Location ................................................ 19
Changing Your Home Location .................................................... 19
Using TracBack ..................................................................... 20
Following Your Track with the Compass Page ............................. 21
Planning and Modifying Routes .......................................... 22
Planning a Route ........................................................................... 22
Saving a Route .............................................................................. 23
Deleting a Saved Route ................................................................ 23

Quest Owner’s Manual iii
INTRODUCTION > TABLE OF CONTENTS
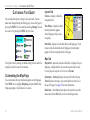
Recalculating a Route ................................................................... 24
Adding a Detour ........................................................................... 24
Adding Via Points ......................................................................... 24
Avoiding Roads and Areas ............................................................ 26
Using the Main Pages .......................................................28
Map Page ................................................................................ 28
Zooming In and Out of the Map ................................................... 28
Panning the Map ........................................................................... 29
Viewing the Map Orientation ....................................................... 30
Data Fields .................................................................................... 30
Next Turn Page ...................................................................... 31
Current Route Page ............................................................... 32
Trip Information Page ........................................................... 33
Customizing Your Quest ..................................................34
Customizing the Map Page ................................................... 34
Layout Tab .................................................................................... 34
Map Tab ........................................................................................ 34
Line, Point, City, and Area Tabs ................................................... 35
Restoring Map Setup Default Settings ......................................... 35
Customizing the Display ....................................................... 36
Customizing the Overall System Setup .............................. 37
Customizing the Route Settings .......................................... 38
Customizing the Units Settings ........................................... 39
Changing the Time Settings ................................................. 39
Changing the Track Setup .................................................... 40
Customizing the Welcome Page .......................................... 41
Viewing Software and Unit Information .............................. 41
Understanding GPS ...........................................................42
The GPS Information Page ................................................... 42
Sky View and Signal Strength Bars .............................................. 43
Satellite Status Bar ........................................................................ 44
Poor Satellite Reception Menu ..................................................... 44
Appendix ............................................................................45
Quest Shortcuts .................................................................... 45
Data Fields ............................................................................. 45
Adding Maps to Your Quest ................................................. 47
Purchasing Additional MapSource Maps ..................................... 47
Controlling Map Views on the Map Page ..................................... 47
Changing Map Families When Finding Places ........................... 48
Specifications ........................................................................ 49
Changing the Fuse ........................................................................ 49
Product and Regulatory Information ................................... 50
Product Registration ..................................................................... 50
Contact Garmin ............................................................................. 50
Software License Agreement ........................................................ 50
FCC Compliance .......................................................................... 51
Declaration of Conformity ............................................................ 51
RSS-310 ........................................................................................ 51
Limited Warranty .......................................................................... 52
Index ...................................................................................53

iv Quest Owner’s Manual
INTRODUCTION > WARNINGS AND CAUTIONS
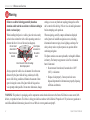
Failure to avoid the following potentially hazardous
situations could result in an accident or collision resulting in
death or serious injury.
When installing the Quest in a vehicle, place the unit securely
so that it does not interfere with vehicle operating controls or
obstruct the driver’s view of the road (see diagram).
Do not mount
where driver’s
field of vision is
blocked.
Do not place
unsecured on
the vehicle
dash.
Do not mount in front of an airbag
field of deployment.
Always operate the vehicle in a safe manner. Do not become
distracted by the Quest while driving, and always be fully
aware of all driving conditions. Minimize the amount of time
spent viewing the screen of the Quest while driving and use
voice prompts when possible. Do not enter destinations, change
settings, or access any functions requiring prolonged use of the
unit’s controls while driving. Pull over in a safe and legal manner
before attempting such operations.
When navigating, carefully compare information displayed
on the Quest to all available navigation sources, including
information from street signs, visual sightings, and maps. For
safety, always resolve any discrepancies or questions before
continuing navigation.
The Quest contains a non-user-replaceable, rechargeable lithium-
ion battery. The battery may present a risk of fire or chemical
burn if mistreated.
• Do not remove from the unit, heat unit above 140°F
(60°C), or incinerate.
• Dispose of unit properly. Contact your local waste
disposal department for information on properly disposing
of lithium-ion batteries.
Warning
WARNING: This product, its packaging, and its components contain chemicals known to the State of California to cause cancer, birth
defects, or reproductive harm. This Notice is being provided in accordance with California’s Proposition 65. If you have any questions or
would like additional information, please refer to our Web site at www.garmin.com/prop65.

Quest Owner’s Manual v
INTRODUCTION > WARNINGS AND CAUTIONS
Failure to avoid the following potentially hazardous
situations may result in injury or property damage.
The Quest is designed to provide you with route suggestions.
It does not reflect road closures or road conditions, traffic
congestion, weather conditions, or other factors that may affect
safety or timing while driving.
Use the Quest only as a navigational aid. Do not attempt to
use the Quest for any purpose requiring precise measurement
of direction, distance, location, or topography. This product
should not be used to determine ground proximity for aircraft
navigation.
The Global Positioning System (GPS) is operated by the
United States government, which is solely responsible for its
accuracy and maintenance. The government’s system is subject
to changes which could affect the accuracy and performance
of all GPS equipment, including the Quest. Although the Quest
is a precision navigation device, any navigation device can be
misused or misinterpreted and, therefore, become unsafe.
Map Data Information: One of the goals of Garmin is to provide customers with the most complete and accurate cartography that is
available to us at a reasonable cost. We use a combination of governmental and private data sources, which we identify in product literature
and copyright messages displayed to the consumer. Virtually all data sources contain inaccurate or incomplete data to some extent. In some
countries, complete and accurate map information is either not available or is prohibitively expensive.
Notice To Drivers in California and Minnesota
: State law prohibits drivers in California and Minnesota from using suction mounts on
their windshields while operating motor vehicles. Other Garmin dashboard or friction mounting options should be used. Garmin does not
take any responsibility for any fines, penalties, or damages that may be incurred as a result of disregarding this notice. (See California
Vehicle Code Section 26708(a); Minnesota Statutes 2005, Section 169.71.)
Caution

vi Quest Owner’s Manual
INTRODUCTION > CARING FOR THE QUEST
Caring for the Quest
The Quest is constructed of high quality materials and does not
require user maintenance other than cleaning.
Cleaning the Case
To clean the unit’s outer casing (except for the screen), use a cloth
dampened with a mild detergent solution, and then wipe dry.
Avoid chemical cleaners and solvents that may damage plastic
components.
Cleaning the Screen
Clean the screen using a soft, clean, lint-free cloth. Use water,
isopropyl alcohol, or eyeglass cleaner if needed. To use these
cleaners, apply the liquid to the cloth and wipe the screen.
Storing Your Quest
Do not store the Quest where prolonged exposure to temperature
extremes may occur (such as in the trunk of a car), as permanent
damage may result.
Avoiding Theft
To avoid theft, take your Quest with you or remove it from view
when you leave your vehicle.
Using the Quest Responsibly
The Quest is equipped with a Safe Mode feature to improve driver
safety. When your vehicle is moving, the Safe Mode disables all
functions that require significant operator attention and could
become a distraction when driving.
Read the warnings on pages iv–v to learn how to install and use
your Quest safely and responsibly.
Battery Temperature Warning
Your Quest contains an internal lithium-ion battery, which can store
more energy than standard batteries. All batteries slowly lose the
amount of energy they can hold over time. To maximize battery
life, limit the unit’s prolonged exposure to excessive heat and direct
sunlight.
If Your Quest Locks Up…
On rare occasions, your Quest may freeze or lock up. In this case,
reset it by pressing the Power key and the IN key at the same time.
The unit turns off. The unit will operate normally when you turn it
on again.
Recycling Your Quest
The California Electronic Waste Recycling Act of 2003 requires
recycling. See www.erecycle.org for more information.

Quest Owner’s Manual 1
UNIT OVERVIEW > INTRODUCING THE QUEST
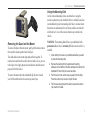
UNIT OVERVIEW
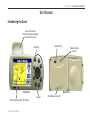
Introducing the Quest
Power/Speaker connector
External antenna
connector
Back View
USB connector
Power Key
Flip-up GPS antenna
(Position the antenna parallel to
the surface of the road.)
Keypad
256-Color high-resolution TFT display
Front View

2 Quest Owner’s Manual
UNIT OVERVIEW > A TUTORIAL
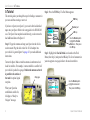
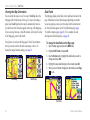
A Tutorial
This tutorial guides you through the steps for finding a restaurant in
your area and then creating a route to it.
If you have a Quest (not a Quest 2), you need to first load detailed
maps onto your Quest. Refer to the setup guide in the DVD-ROM
case. The Quest 2 has map data loaded already; you do not need to
load additional data on the Quest 2.
Step 1: Flip up the antenna and snap your Quest into the vehicle
suction mount. Plug the cable end of the 12-Volt adapter into
your vehicle’s cigarette lighter. See page 4 if you need additional
instructions.
Turn on the Quest. Make certain the antenna is unobstructed as it
looks for satellites. For example, it cannot establish a satellite fix if
your vehicle is parked in a garage. Position the antenna so that it
is parallel to the surface of
the road for optimal signal
reception.
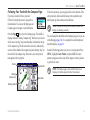
When your Quest has
established a satellite fix,
it displays a “Ready to
Navigate” message.
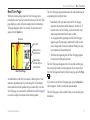
Step 2: Press the FIND key. The Find Menu appears.
FIND key
Use the Rocker pad to
highlight the Food &
Drink icon. Then press
the OK key.
Rocker pad
OK key
Step 3: Highlight the Food & Drink icon located on the Find
Menu (from Step 2) and press the OK key. The list of restaurants in
your area appears on a page similar to the one shown below.
Use the Rocker pad to
highlight a restaurant.
Then press the OK key.
Map page

Quest Owner’s Manual 3
UNIT OVERVIEW > A TUTORIAL
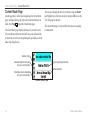
Step 4: Move down the list of restaurants by pressing the Rocker
pad down. When you see a restaurant you like, highlight it and
press the OK key. Information about the restaurant appears on a
page similar to the one shown below.
Highlight Route To to
create a route to this
restaurant. Then press
the OK key.
Step 5: To create a route to this restaurant, highlight the Route To
button located at the bottom of the page (in Step 4) and then press
OK. Your Quest calculates the route and then provides directions.

4 Quest Owner’s Manual
UNIT OVERVIEW > VEHICLE INSTALLATION
Vehicle Installation
Select a suitable location for installing the unit that allows routing
of the power cord and does not interfere with vehicle operation.
Refer to the warnings on pages iv–v.
If you are NOT using a remote antenna, be certain to select
a location where the Quest’s flip-up antenna has a relatively
unobstructed view of the sky. For optimal use, position the
antenna parallel to the surface of the road.
NOTE: An optional external remote antenna (Garmin GA 27C)
may be needed when using the unit in a vehicle with a coated
windshield or an in-screen heating system.
To snap the cradle on the suction mount:
1. Align the ball on the end of the suction mount with the
socket (hole) on the back of the cradle.
2. Press firmly to snap the ball into the socket.
To insert the Quest in the cradle:
Suction
cup
Lever
Release
tab
Cradle
Suction
cup tab
1. Flip up the antenna.
2. Angle the Quest forward as shown above. Fit the bottom of
the Quest into the cradle.
3. Tilt the unit back until it snaps into the cradle.
To mount the vehicle suction mount:
1. To ensure a tight grip, clean and dry your windshield.
2. Pull the lever on the suction cup toward you. Place the
suction cup on your windshield.
3. Flip the lever toward the windshield. Rotate the cradle to
obtain a maximum viewing angle.
4. Plug the power cable into an available receptacle.

Quest Owner’s Manual 5
UNIT OVERVIEW > VEHICLE INSTALLATION
Removing the Quest and the Mount
To remove the Quest from the mount, gently pull the release tab on
the top of the mount up and remove the Quest.
The cradle and suction mount snap apart and back together. To
remove the mount from the cradle, turn the cradle as far as you can
to the right or left. Apply pressure in that direction until the mount
pops out of the ball socket.
To remove the mount from the windshield, flip the lever toward
you. Pull the rubber tab on the suction cup toward you.
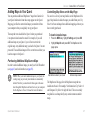
Using the Mounting Disk
Use the enclosed mounting disk as an alternative to using the
suction cup mount on your windshield. Select a suitable location on
your dashboard to place the mounting disk. Select a location where
the unit has an unobstructed view of the sky and does not interfere
with the driver’s view of the road or obstruct any controls in the
vehicle.
WARNING: The mounting disk affixes to your dashboard with
permanent adhesive that is extremely difficult to remove after it is
installed.
1. Clean and dry the area on your dashboard where you want
to place the mounting disk.
2. Remove the backing from the permanent mounting
adhesive on the bottom of the disk and place the disk on the
dashboard. Press firmly for several seconds.
3. Pull the lever on the suction cup up (away from the disk).
Place the suction cup mount on top of the disk.
4. Flip the lever down (toward the disk) to secure the suction
cup mount to the disk.

6 Quest Owner’s Manual
UNIT OVERVIEW > GETTING STARTED
Getting Started
Turning the Quest On and Off
Press and hold the Power
key on the front of the unit to turn
it on or off. When turned on, the Welcome page appears briefly,
followed by a Safe Driving Warning Message. Press the OK key
to acknowledge the message, or wait briefly until the Map page
appears. Your Quest automatically starts searching for satellite
signals to find your current location.
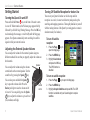
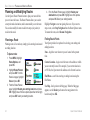
Adjusting the External Speaker Volume
You can adjust the volume for the external speaker using two
different methods. Be sure that you properly adjust the volume on
both controls.
You can adjust the volume using the volume
control knob on the external speaker. Test the
sound level by pressing the Speak key.
You can also press and hold the
Speak
key to open the volume slider. Press the
Rocker pad right to raise the volume or left
to lower it. You can quickly press the Speak
key to adjust the volume to a pre-set level
(low, medium, and high).
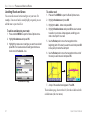
Turning Off Satellite Reception for Indoor Use
You can set your Quest for indoor use which stops satellite
reception. As a result, it conserves the battery and speeds up the
searching and mapping operations. Thoroughly familiarize yourself
with the routing features of the Quest by creating practice routes in
simulator mode (Use Indoors).
To turn off satellite
reception:
1. Press the Page
key to
open the Map page.
2. Press the MENU key.
3. Highlight Use Indoors
and press the OK key.
The GPS function is
disabled.
To turn on satellite reception:
1. Press the Page
key to open the Map page.
2. Press the MENU key.
3. Highlight Acquire Satellites and press OK. The GPS
function is enabled and your Quest begins to acquire
satellites.
Volume
control
Speaker

Quest Owner’s Manual 7
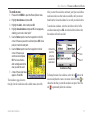
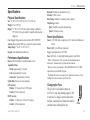
UNIT OVERVIEW > USING THE KEYS
Using the Keys
Use the keys to perform specific tasks such as finding places or planning routes. With the exception of the Power key, press and quickly
release a key to perform its function. If a key has a secondary function, press and hold the key to activate it.
Power—press and hold to turn the Quest on or off.
Press the key once to adjust the illumination of your
screen. When the illumination window appears, use
the Rocker pad to move the slider to the left or right
to dim or brighten your backlight. Press OK.
Page—press to open pages on your Quest. Press
Page
to close the current window or menu and
return to the previous page. When you are entering
data, press Page
to cancel the data entry and
restore the previous value.
Rocker pad—press to move the highlight and move
map pointer any direction.
OK—press to select items. Press OK to reveal
information pages when panning the Map page. To
save your current location in My Locations, press
and hold OK.
FIND—press to search for cities, addresses, and
other points of interest. Press FIND twice to activate
the Recent Finds menu. Press and hold FIND to
“Route Home” (see page 19).
MENU—press to display a menu of options for
the current page. Press MENU twice to open the
Settings menu. Press and hold MENU to activate
the Route Options menu.
OUT—zooms out of the Map page to show a larger
area with less detail. It also scrolls down a list.
Speak—triggers your Quest’s “voice” to repeat
the next turn or current destination when you are
navigating a route. Press and hold to adjust the volume.
IN—zooms in on the Map page to show a smaller
area with more detail. It also scrolls up a list.

8 Quest Owner’s Manual
UNIT OVERVIEW > USING THE KEYS
Selecting Options and Entering Data
Use the OK key and the Rocker pad to select options and activate
your selections.
To select and activate an option or on-screen button:
1. Use the Rocker pad to move up, down, right, or left to the
selection or on-screen button.
2. Press OK to activate the feature.
To exit a menu or return to the previous setting:
Press Page
. The Page key moves backwards through
your steps or menus.
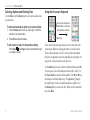
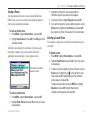
Using the On-screen Keyboard
Return key
The up arrow changes the
capital letters to lower case
and numbers to symbols.
The on-screen keyboard opens when you need to enter data, such
as entering an address or changing the name of a saved location.
The on-screen keyboard is used in a variety of places throughout
the Quest. Its appearance may alter, depending on your purpose for
using it, but it always functions in the same way.
Use the Rocker pad to select a letter or number and then press OK.
To create spaces, select the blank space between the Y and Z. Use
the Clear (Back) box to delete letters/numbers. The ◄ and ► keys
are backspace and forwardspace keys. The up arrow changes
the capital letters to lower case and the numbers to symbols. Use
the Return key to create a new line. When you have entered all
text, select Done.

Quest Owner’s Manual 9
BASIC OPERATION > FINDING PLACES AND ROUTING TO THEM
BASIC OPERATION
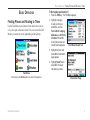
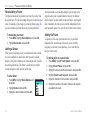
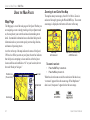
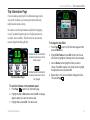
Finding Places and Routing to Them
Use the Find Menu on your Quest to locate and create a route to
a city, street, park, restaurant, or hotel. You can even use the Find
Menu to see rest areas you are approaching on the highway.
Find Menu
Press down on the Rocker pad to see more Find categories.
To find a place and route to it:
1. Press the FIND key. The Find Menu appears.
2. Highlight a category
to help you find your
destination, such as
Food & Drink, Lodging,
Addresses, or All Points
of Interest. Press OK.
A list of places near your
current location appears.
3. Highlight the place and
press OK. An information
page appears.
4. Highlight Route To and
press OK. The Quest
calculates your route.
Find Menu Results List
Information Page

10 Quest Owner’s Manual
BASIC OPERATION > FINDING PLACES AND ROUTING TO THEM
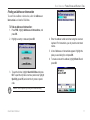
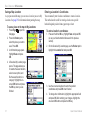
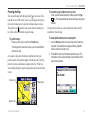
Advanced Search Methods and Tips
The search results list can be quite long. Use the following tips to
narrow your results.
Entering Containing Letters
If you know letters contained in the name of the place you seek,
select the <Containing> box. Use
the on-screen keyboard to enter
letters contained in the name. The
more fully you type the name, the
more accurate your search results.
For example, typing “SU” in order to
find Sun’s Deli returns names such
as Subway and Tropik Sun.
Searching Sub-Categories
If you would like to search for
a type of food (such as Chinese,
Deli, International, or Fast Food),
highlight the All Categories box and
press OK. Highlight a food category
(sub-category) and press OK. A new
filtered list appears with the selected
category.
Panning and Finding
You can find places that are beyond your current location by
panning to a particular area on the map. Open the Map page and
pan the map to the location. Press the FIND key, and all find
options appear that are near the map pointer. See page 29 for
information about panning the map.
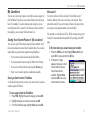
Finding Places Near this Place
After you have found a place, open the item’s information page.
To find another place (such as a hotel or restaurant) near this place,
highlight Find Near and press OK.
Saving this Place to My Locations
After you have found a place, open the item’s information page.
Highlight Save and press OK to save this place to My Locations.
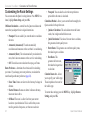
Using the Information Page Menu
After you have found a place, open the item’s information page and
press the MENU key to reveal more options.
To see where this item is located on the map, select
Show Map.
For step-by-step directions from the restaurant to your current
location, select Directions to Me. Select Find Near Current
Route to list all places along your current route.
Using the Containing Field
Using Sub-Categories

Quest Owner’s Manual 11
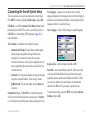
BASIC OPERATION > FINDING PLACES AND ROUTING TO THEM
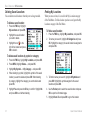
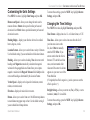
Finding an Address or Intersection
To search for an address or intersection, select the Addresses or
Intersections icon from the Find Menu.
To find an address or intersection:
1. Press FIND, highlight Addresses or Intersections, and
press OK.
2. Highlight a country or state and press OK.
3. To search all cities, highlight Search All Cities and press
OK. To spell the city name or enter a postal code, highlight
Spell City, press OK, and enter the city name or postal
code.
NOTE: Not all map data provides postal code searching.
4. Enter the address number and street using the on-screen
keyboard. For intersections, you only need to enter street
names.
5. A list of addresses or intersections appears. Highlight the
place you are looking for, and press OK.
6. To create a route to this address, highlight Route To and
press OK.

12 Quest Owner’s Manual
BASIC OPERATION > FINDING PLACES AND ROUTING TO THEM
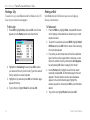
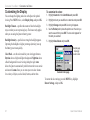
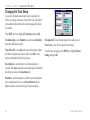
Finding a City
To search for a city, select Cities from the Find Menu. A list of 50
cities near your current location appears.
To find a city:
1. Press FIND, highlight Cities, and press OK. A list of cities
appears. Use the Rocker pad to move down the list.
2. Highlight the <Containing> box and press OK to narrow
your results or find a city not on the list. Type in the name of
the city using the on-screen keyboard.
3. Highlight the city name and press OK. An information page
appears for that city.
4. To go to this city, highlight Route To and press OK.
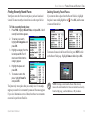
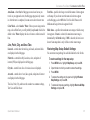
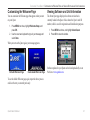
Finding an Exit
Select Exits from the Find Menu to locate exits on highways,
freeways, and interstates.
To find an exit:
1. Press the FIND key, highlight Exits, and press OK. All exits
on the highway or interstate that are closest to your current
location are listed.
2. To search for a particular exit, press MENU, highlight Select
Exit Road, and press OK. Enter the name of the road using
the on-screen keyboard.
3. If you know you want to stop at an exit that has a particular
type of service, such as a gas station or rest area, you can
narrow the number of exits by selecting the All Categories
box and pressing OK. Select a category from the list.
4. Use the Rocker pad to highlight an exit from the search
results list and press OK. An information page for that exit
appears. If the exit contains services, these businesses
appear on the exit’s information page. Highlight the
business you want to visit and press OK to view information
about it.
5. To go to this exit, highlight Route To and press OK.
Page is loading ...
Page is loading ...
Page is loading ...
Page is loading ...
Page is loading ...
Page is loading ...
Page is loading ...
Page is loading ...
Page is loading ...
Page is loading ...
Page is loading ...
Page is loading ...
Page is loading ...
Page is loading ...
Page is loading ...
Page is loading ...
Page is loading ...
Page is loading ...
Page is loading ...
Page is loading ...
Page is loading ...
Page is loading ...
Page is loading ...
Page is loading ...
Page is loading ...
Page is loading ...
Page is loading ...
Page is loading ...
Page is loading ...
Page is loading ...
Page is loading ...
Page is loading ...
Page is loading ...
Page is loading ...
Page is loading ...
Page is loading ...
Page is loading ...
Page is loading ...
Page is loading ...
Page is loading ...
Page is loading ...
Page is loading ...
Page is loading ...
Page is loading ...
-
 1
1
-
 2
2
-
 3
3
-
 4
4
-
 5
5
-
 6
6
-
 7
7
-
 8
8
-
 9
9
-
 10
10
-
 11
11
-
 12
12
-
 13
13
-
 14
14
-
 15
15
-
 16
16
-
 17
17
-
 18
18
-
 19
19
-
 20
20
-
 21
21
-
 22
22
-
 23
23
-
 24
24
-
 25
25
-
 26
26
-
 27
27
-
 28
28
-
 29
29
-
 30
30
-
 31
31
-
 32
32
-
 33
33
-
 34
34
-
 35
35
-
 36
36
-
 37
37
-
 38
38
-
 39
39
-
 40
40
-
 41
41
-
 42
42
-
 43
43
-
 44
44
-
 45
45
-
 46
46
-
 47
47
-
 48
48
-
 49
49
-
 50
50
-
 51
51
-
 52
52
-
 53
53
-
 54
54
-
 55
55
-
 56
56
-
 57
57
-
 58
58
-
 59
59
-
 60
60
-
 61
61
-
 62
62
-
 63
63
-
 64
64


Garmin 190-00556-10 User manual
- Category
- Navigators
- Type
- User manual
Ask a question and I''ll find the answer in the document
Finding information in a document is now easier with AI
Related papers
-
Garmin Toyota Quest 2 Reference guide
-
-
Garmin Automobile Accessories User manual
-
-
-
Garmin StreetPilot Series StreetPilot i5 Owner's manual
-
-
-
-