Page is loading ...

Swish Trampoline Basketball
Ring with Bracket for Hyperjump
Rectangular Trampoline
USER MANUAL
WARNING: The disassembled product may contain small parts
which pose a choking hazard to children under 3.
IMPORTANT:
The owner’s manual contains safety, assembly, use and maintenance instructions. This product must be
assembled by an adult who has read and understood these instructions. Keep the packaging away from
children and dispose of all packaging before use.
For the installer and your children’s safety, it is important to fully read and understand the instructions and safety
hazards before commencing the assembly of the product.

TABLE OF
CONTENTS
I. GENERAL SAFETY INSTRUCTIONS
1.1 Danger for Children
1.2 Risk of Injuries
1.3 Product Damage
1.4 Assembly Advice
II. SAFETY INSTRUCTIONS
III. SWISH BASKETBALL RING
- PARTS LIST
IV. SWISH BASKETBALL RING
- ASSEMBLY INSTRUCTIONS
V. BRACKET - PARTS LIST
VI. BRACKET - ASSEMBLY
INSTRUCTIONS
VII. WARRANTY
3
3
3
3
4
5
7
9
11
12
13

3
I. GENERAL SAFETY INSTRUCTIONS
NOTE: This product is intended for indoor and outdoor domestic use only.
GENERAL SAFETY INSTRUCTIONS
1.1 DANGER FOR CHILDREN
WARNING: No eating while using the product at the same time.
• Children do not recognize potential dangers from this product. The unassembled
product must be stored out of reach of children and pets.
• This product may only be used with adult supervision at all times.
• The packaging material is not suitable for children due to choking and suffocation
hazards.
• Do not use the product if it is damaged or defective. If it is damaged or defective,
please contact a qualified technician.
• Check the product before each use. Defective parts must be changed immediately
as they can impair the function and the safety of the product.
• No more than one person to use the product at the same time.
• Use the product only on even and non-slipping surfaces. Never use it near water and
keep sufficient space around for safety.
• Beware of moving parts such as the springs or elastics, which could catch your arms
and legs. Do not place any objects or body parts in the product’s openings.
• Do not make alterations to the product. Only use original spare parts. Qualified
technicians should only carry out repairs – improper repairs can lead to danger
for the user. Use this product only as described in this manual.
1.2 RISK OF INJURIES
1.3 PRODUCT DAMAGE

4
• The assembly of the product must be done carefully and by an able-bodied adult. If
in any doubt, ask a technically qualified person.
• Before you start with the assembly, read the instructions carefully.
• Remove all packaging materials and lay down all parts on an open space. This gives
you an overview and simplifies the assembly procedure.
• Check with the parts list that all parts are available. Dispose of the packaging
material when the assembly is completed.
• Beware that when using tools or doing technical work, there is always a risk of
injuries. Assemble the product with care.
• Create a danger free environment; for example, do not let tools lay around the
workspace. Store the packaging material in a way that cannot cause any danger.
• After installing the product according to the instruction manual, en sure all screws,
bolts and nuts are correctly installed and tightened and that all joints are secure.
• Reasonable space must be kept between the product and possible sources of
danger, such as other equipment swimming pools and fences.
• The assembly of the product must be done carefully and by an able-bodied adult. If
in any doubt, ask a technically qualified person.
• The product must be assembled correctly before use.
• Your play structure must be installed on a flat horizontal surface with a minimum
of 2m between it and any structure or obstacle such as a fence, garage house, tree
branches, cloths lines, or electric cables.
• Modifications made to the original product shall be carried out according to the instructions
of the manufacturer.
• The product must always be used in a well-lit area.
• Do not place anything under the product.
• Use gloves during assembly and disassembly.
• Outdoor products should be equipped with a device that in strong wind conditions avoid
displacement due to wind (e.g. steel bars in the ground or loads like sand bag or water bags).
• In certain areas during winter, snow buildup and the low temperatures can damage the
product. It is recommended to remove snow buildup and to store the product indoor.
• We strongly recommend visual inspections every 3 months to insure the integrity of the entire
product. Replace any parts as necessary.
1.4 ASSEMBLY ADVICE
GENERAL SAFETY INSTRUCTIONS

5
• Read and follow all of the warnings and use instructions for your trampoline and
safety enclosure.
• Read and follow all rules specified on the warning labels that came with your trampoline safety
enclosure and basketball set. If labels or signs become lost or unreadable please replace.
• The Swish Basketball Ring should be used only as described in this manual. The basketball set
must only be mounted to a compatible safety enclosure system. It should never be mounted on
any other device in any manner not described in this manual. Do not attach anything to the
basketball set or safety enclosure that is not a manufacturer-approved accessory or part of the
enclosure system.
• Do not allow more than one person on the trampoline. Do not allow more than one person inside
the trampoline enclosure. Use by more than one person at the same time can result in serious
injury. This includes "one-on-one" type games and any other games or activities where more than
one person is on the trampoline at the same time.
• Do not hang from, kick or climb on any part of the basketball set or safety enclosure.
• Remove all jewellery watches and hair clips before using the basketball set.
• Wear clothing free of drawstrings hooks loops or anything that could get caught in the basketball
set or safety enclosure.
• Do not use the trampoline or basketball set while under the influence of alcohol or drugs.
• Do not install the basketball set on a pole that is near or over a missing or damaged frame pad.
• When not in use store the basketball provided with your set in a dry location.
• Use the trampoline and basketball set only with mature, knowledgeable supervision.
• Do not hang on the hoop. While the Swish Basketball Set is designed to withstand rigorous use
the hoop is not designed to be hung on. Hanging on the hoop can damage the enclosure
pole and trampoline to which the basketball set is installed. Damage resulting from hanging
on the hoop is not covered by warranty.
II. SAFETY INSTRUCTIONS
NOTE: Compatibility cannot be guaranteed with other brand trampolines.
It is the responsibility of the owner to become familiar with the safety rules and to convey these
rules to all users.
SAFETY INSTRUCTIONS

6
OVERHEAD CLEARANCE Adequate overhead clearance is essential. A minimum of 24 feet
from ground level is recommended. Provide clearance for wires, tree limbs and other possible
hazards.
LATERAL CLEARANCE Lateral clearance is essential. Place the basketball set away from walls,
structures, fences, and other play areas. Maintain a clear space on all sides of the trampoline
and trampoline enclosure.
LEVEL SURFACE Place the trampoline and trampoline enclosure on a level surface before
installing and using the basketball set.
LIGHTING Use the basketball set in a well-lighted area. Artificial illumination may be required for
indoor or shady areas.
SECURITY Secure the trampoline and trampoline enclosure against unauthorized and
unsupervised use.
UNDERNEATH CLEARANCE Remove any obstructions from beneath the trampoline and
trampoline enclosure.
NOTE: The trampoline enclosure is only to be used as an enclosure for a trampoline and
the trampoline must be of the appropriate size as covered by the specific enclosure
The owner and of the trampoline are responsible to make all users aware of practices
specified in the instructions. Do not install the basketball set on a pole with damaged
pads.
SAFETY INSTRUCTIONS

7
Backboard
x 1
Net
x 1
Short
x 1
Connection Plate
x 1
Ring
x 1
Flat Plate
x 2
Long
x 1
Clamp
x 1
III. SWISH BASKETBALL RING - PARTS LIST
A
C
E
G
B
D
F
H
PARTS LIST
SWISH BASKETBALL RING - PARTS LIST

8
FITTINGS
L-1 L-2 L-3
M-1 M-2 1
2 3
4
5
x 2
x 3 x 1
x 1
x 4
M6 x 3 M8 x 5 M5 x 1
M6 x 6 M8 x 7 M8 x 12mm
M6 x 36mm M5 x 75mm
M8 x 100mm
M8 x 40mm
PREPARATION
Remove all parts and hardware from
the carton and place them on a clean
soft surface. Check carefully to make
sure nothing is missing. Dispose of all
packaging material properly.
Please recycle.
Two adjustable wrenches; or
wrenches or sockets in the following
sizes: 10mm, 13mm and 17mm
THE FOLLOWING ITEMS ARE
REQUIRED FOR ASSEMBLY
(NOT INCLUDED)
TOOL
10mm
13mm
17mm
SWISH BASKETBALL RING - PARTS LIST

9
NOTE: Some components may have been pre-assembled.
NOTE: Ensure the bracket is fitted the right way up (larger section down)
to allow the hoop to swing upwards against the backboard.
STEP 1 Attach the net on the loop as the picture showing.
L-3
L-3
STEP 2 Connect the ring with connection plate using bolt through the
joint and locked with .
B E 3
3
C
B
IV. SWISH BASKETBALL RING - ASSEMBLY INSTRUCTIONS
SWISH BASKETBALL RING - ASSEMBLY INSTRUCTIONS

10
STEP 3 Attach the flat plate on the backside of backboard locked by using two bolts
and two washers then to attach the ring on the front of backboard at the joint
by using three nuts through six washers and three . Then to fit the spring
on the connection plate as the figure shows.
D A
A
4
21
1
2
1
M-2
L-1
L-1
M-1
B
NOTE: Ensure the bracket is fitted the
right way up (larger section down)
to allow the hoop to swing upwards
against the backboard.
STEP 4
Attach the whole basketball set onto the
brackets for your trampoline, lock it with
two clamps by using four bolts
through four washers and four
nuts .
F 5
M-2
L-2
L-2 L-2
L-2
L-2
55
5
5
A
F
M-2
M-2M-2
M-2
M-1
M-1
M-2
M-2
L-2
D
H
G
SWISH BASKETBALL RING - ASSEMBLY INSTRUCTIONS

11
U Bolt x 2
Nut x 4
Plastic Spacer x 2
V. BRACKET - PARTS LIST
D
F
E
PARTS LIST
BRACKET - PARTS LIST
TOOLS NEEDED:
K
1Tube A
2Tube B
3Tube C

12
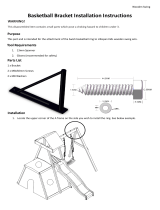
VI. BRACKET - ASSEMBLY INSTRUCTIONS
BRACKET - ASSEMBLY INSTRUCTIONS
STEP 1
Build Tubes (A, B, C) as per picture in right, use bolt set (D, E, F) to fix it with surround poles
(refer to fig 1), then use tool spanner (K) to tighten all nuts when you adjust the basketball
bracket in right position that fits your basketball board.
For Basketball board assembly, please refer to the original manual .
3Tube C
1Tube A 2Tube B
Fig. 1

13
VII. WARRANTY
AUSTRALIAN CONSUMER LAW
Many of our products come with a guarantee or warranty from the manufacturer. In addition, they come
with guarantees that cannot be excluded under the Australian Consumer Law. You are entitled to a
replacement or refund for a major failure and compensation for any other reasonably foreseeable loss
or damage.
You are entitled to have the goods repaired or replaced if the goods fail to be of acceptable quality
and the failure does not amount to a major failure. Full details of your consumer rights may be found at
www.consumerlaw.gov.au.
Please visit our website to view our full warranty terms and conditions:
www.lifespankids.com.au/Warranty-Policy-Kids
WARRANTY AND SUPPORT
Please email us at [email protected] for all warranty or support issues.
For all warranty or support related enquiries, please lodge a support ticket first by sending us an email.
WARRANTY


www.lifespankids.com.au
/