19
Menu Operations
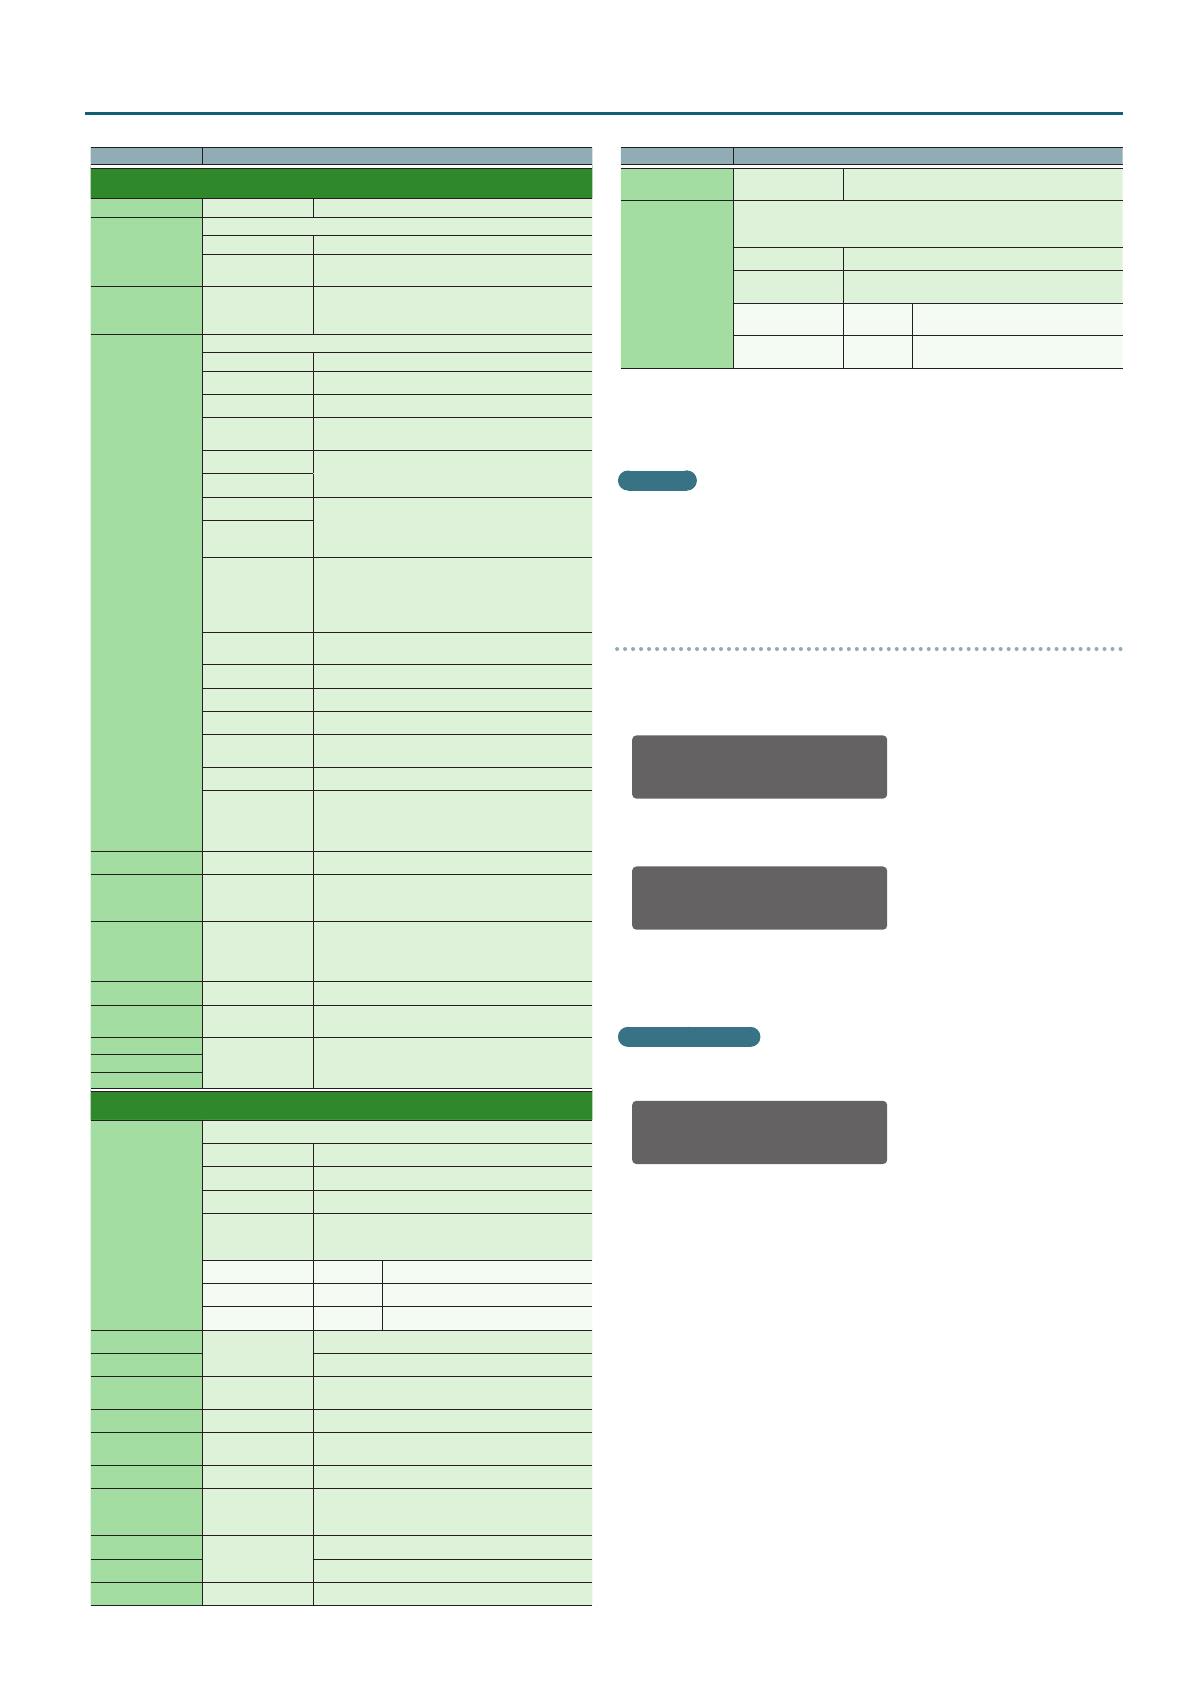
Parameter Value (Bold: default) / Explanation
Mic1–3 Setting
Gain -60–-10–0 dB Species the mic gain.
EQ
Species the type of equalizer.
EQUALIZER An equalizer with general-purpose settings.
ISOLATOR
An equalizer with an extremely strong amount of
volume cut.
EQ Hi
EQ Mid (*1)
EQ Low
-127–0–127
Adjust the volume of the high, mid, and low-
frequency regions.
FX
Species the vocal eect.
REVERB Reverb is applied.
ECHO Echo is applied.
REVERB ECHO Reverb and echo are applied simultaneously.
DUB ECHO
Adds a delayed sound several times while attenuating
it.
PITCH UP
Raise or lower the pitch of the voice.
PITCH DOWN
FORMANT UP
Raise or lower the formant of the voice.
Selecting DOWN gives the voice a masculine
character, and selecting UP gives the voice a feminine
character.
FORMANT DOWN
AUTO PITCH
Pitch-corrects the voice.
If you hold down the [SHIFT] button and press the
channel [CUE] button, the pitch-correction follows
the key information of the song that’s loaded into
the deck.
ROBOT
Transforms your voice into that of a robot, with a
xed pitch and an expressionless character.
DOUBLE Layers the same voice to add depth.
HARMONY ABOVE Adds harmony to the voice a fth above.
HARMONY BELOW Adds harmony to the voice a fourth below.
MEGAPHONE
Gives your voice a distorted character as if you were
speaking through a megaphone.
RADIO
Simulates sound heard from a radio.
TEMPO DELAY
Delay is applied.
If you hold down the [SHIFT] button and press the
channel [CUE] button, the tempo-correction follows
the tempo of the song that’s loaded into the deck.
FX Depth (*1) 0–255 Adjusts the depth of the vocal eect.
Low Cut 0–2–10
Adjusts the strength of the low cut lter applied to
the mic audio.
Higher values produce a stronger eect.
Noise Gate 0–2–10
Species the strength of the noise gate applied to
the mic audio.
As the value increases, even higher-level sound will
be cut.
Pan L50–C00–R50 Specica il pan (posizione stereo) in uscita.
Duck Level -6, -12, -18, -24, INF
Adjusts the output level of other than the mic when
the [DUCK] button is turned on.
Duck (Mstr)
ON, OFF
Species whether the MASTER OUT, BOOTH OUT, and
ZONE OUT output audio is aected by ducking (ON)
or is not aected (OFF).
Duck (Both)
Duck (Zone)
MsterOut Setting / BoothOut Setting / ZoneOut Setting
Assign
Specify the signal that is output from each output jack.
ALL MIX (*2) All signals are mixed and output.
BOOTH MIX (*3) Signals other than mic audio are mixed and output.
DECK ONLY Only the signals of channels 1–4 are output.
CUSTOM
Press the [SELECT (ENTER)] knob, and you can specify
for each signal whether it will be output (ON) or will
not be output (OFF) from each jack.
Ch1–4 ON, OFF Channel 1–4 signals
Mic1, 2 ON, OFF Mic 1 and 2 audio
Aux ON, OFF Signals input to the AUX IN jacks
EQ Low Gain
-12–0–12
Species the gain of the equalizer’s low range.
EQ LoMid Gain Species the gain of the equalizer’s low-mid range.
EQ LoMid Freq 16–630–22400 Hz
Species the cuto frequency of the equalizer’s
low-mid range.
EQ HiMid Gain -12–0–12 Species the gain of the equalizer’s high-mid range.
EQ HiMid Freq 16–4000–22400 Hz
Species the cuto frequency of the equalizer’s
high-mid range.
EQ Hi Gain -12–0–12 Species the gain of the equalizer’s high range.
Comp Low
Comp Mid
Comp High
0–24
Adjust the compressor depth for the low, mid, and
high-frequency ranges.
Limiter
OFF, ON
Species the limiter on/o.
Mono Mode If this is “ON,” the signal is output as mono.
Pan L50–C00–R50 Species the output panning.
Parameter Value (Bold: default) / Explanation
Attenuator 0–40 dB
Species the attenuation level of the output. The
output level is decreased by the specied amount.
Sub.W Mode
(*4)
Cuts the high-mid region of the signal that is output from the selected jack.
This is eective when used in conjunction with speakers other than the
main speakers in order to strengthen the low-frequency region.
OFF The signal is not converted for a sub-woofer.
ON
You can make detailed settings by pressing the
[SELECT (ENTER)] knob.
CutO 30–200 Hz
Species the cuto frequency of the
lter.
Slope
-12 dB/oct,
-24 dB/oct
Adjusts the amount of lter
attenuation.
(*1) This is shown if Mic3 Setting is selected.
(*2) This is set to the default value for MsterOut Setting and ZoneOut Setting.
(*3) This is set to the default value for BoothOut Setting.
(*4) This is shown if ZoneOut Setting is selected.
Shortcut
5 By holding down the mic section’s MIC 1 or 2 [ON] button and turning the
[SELECT (ENTER)] knob, you can set the gain of mic 1 or mic 2.
5 By holding down the mixer section’s channel [CUE] button and turning
the [SELECT (ENTER)] knob, you can set the eect for each channel.
Saving a Scene (Scene Save)
1. Press the [MENU] button.
2. Turn the [SELECT (ENTER)] knob to select “Scene Save,” and
press the knob.
Scene Save
1:Standard <
3. Turn the [SELECT (ENTER)] knob to select the save-destination
scene, and press the knob.
Save 1:Standard
NAME CANCEL[OK]
5 To save the scene as it is, proceed to step 6.
5 If you decide to cancel, use the [SELECT (ENTER)] knob to make “CANCEL”
blink, and press the knob.
Assigning a name
4. Use the [SELECT (ENTER)] knob to make “NAME” blink, and
press the knob.
Edit Save Name
Standard <EXE>
_
5. Enter characters.
1. Use the [SELECT (ENTER)] knob to move the cursor to the position
where you want to enter a character, and press the knob.
2. Turn the [SELECT (ENTER)] knob to select a character, and press the
knob.
3. When you have nished assigning the name, turn the [SELECT
(ENTER)] knob to make “<EXE>” blink.
6. Press the [SELECT (ENTER)] knob.
The scene is saved.


