Volvo 2020 Quick start guide

Category
Cars
Type
Quick start guide

This manual is also suitable for

S60
T W I N E N G I N E
QUICK GUIDE
VÄLKOMMEN!
This Quick Guide describes a selection of features and functions in your Volvo. Additional owner's information is available in your vehicle, in
an app and on the Internet.
THE CENTER DISPLAY
The Owner's Manual is available in the center display in top view.
MOBILE APP
The Owner's Manual is available as an app (Volvo Manual) for smart-
phones and tablets. The app also contains instructional videos for certain
functions.
VOLVO'S SUPPORT SITE
Go to Volvo Cars' support site (support.volvocars.com) for manuals and
instructional videos. Additional assistance and information about your
vehicle and owning a Volvo is also available on the support site.
PRINTED INFORMATION
The glove compartment contains a printed supplement to the Owner’s
Manual containing information about fuses and specifications as well as a
summary of other important and practical information. A complete printed
version of the owner's information (or a new Owner's Manual supplement)
can be ordered.
CONTENT
01. GETTING TO KNOW YOUR VOLVO
This chapter gives you information on some of Volvo's systems and services, and an overview of the inside and out-
side, and the center display.
02. CHARGING
This chapter describes the vehicle's charging status, how to handle the charge module, and the meaning of the sym-
bols in the instrument panel.
03. INTERIOR AND CONNECTIONS
This chapter provides information about features and functions in the passenger compartment e.g. seat settings and
Internet connection.
04. CENTER DISPLAY VIEWS
This chapter contains information about the center display's main views, which control many of the vehicle's func-
tions.
05. SMART DRIVING
This chapter describes several driver support functions and offers tips on how to drive more economically.
06. VOICE CONTROL
This chapter provides a list of commands/phrases you can use with the voice control system.
07. SUPPLEMENTARY INFORMATION
Warning, caution and note texts, which must be read.
All options and accessories, known at the time of publication, are marked with an asterisk: *.
01
GETTING STARTED
The following functions, concepts and tips are intended to help familiar-
ize you with your Volvo as quickly as possible.
Volvo ID
Volvo ID is a personal ID that gives you access to a number of services
with a single username and password. Some examples are Volvo On
Call, navigation* and the opportunity to schedule service and repairs.
You can create a Volvo ID via the Volvo On Call app or directly in your
vehicle.
Sensus
Sensus is your vehicle's intelligent interface and includes all of its solu-
tions relating to entertainment, connecting to the Internet, navigation*
and information services. Sensus enables communication between you,
the vehicle and the digital world around you.
Volvo On Call
Volvo On Call gives you direct contact with your vehicle and enhanced
comfort and assistance 24 hours a day. With the Volvo On Call app, you
can see if e.g. any bulbs need replacing and if washer fluid needs to be
filled. You can lock and unlock the vehicle, check the fuel level and find
your nearest service station. Preconditioning can also be set and
started via the vehicle's parking climate or the engine remote start
function
1
. Download the Volvo On Call app to get started.
Volvo On Call also gives you access to roadside assistance, other
security services and emergency assistance using the ON CALL and
SOS buttons in the ceiling console.
Driver profiles
Many of the vehicle's settings can be adapted to the driver's personal
preferences and saved in one or more driver profiles. Each of the
remote keys can be linked to a driver profile. See the section "Top
view" in this Quick Guide for more information on driver profiles.
Preconditioning before driving
Make it a habit to precondition the vehicle before driving to create a
more comfortable passenger compartment temperature. From the cen-
ter display's climate view, select the
Parking climate tab or activate the
function via the Volvo On Call app. Full preconditioning is only available
when the vehicle is connected to an electrical outlet.
1
Available on certain markets and models.
01
01
EXTERIOR OVERVIEW
Checking and calibration of tire pressure (TPMS)* is performed
via TPMS in the Car Status app in the center display's app view. If
inflation pressure is too low, the
symbol will be steadily illumi-
nated in the instrument panel. If inflation pressure is low, check and
adjust the inflation pressure in all four tires and tap Store Pressure
to store the new tire pressure.
The Car Status app is used to check engine oil level. You can
also view any status-related messages and schedule service and
repairs*.
Hybrid battery charging is performed via the charging socket.
Open the charger door by pressing it lightly. To help maximize driv-
ing range, begin each trip with a fully charged battery.
Door mirrors can be automatically* tilted down when reverse gear
is engaged. When the vehicle is locked/unlocked, the door mirrors
can be automatically folded in/out. Activate these functions under
Settings My Car Mirrors and Convenience in the center
display's top view.
Keyless locking/unlocking* makes it possible to lock or unlock
the vehicle simply by having a remote key in your possession, e.g. in
a pocket. The remote key must be within approximately 1 meter
(3 feet) from the vehicle.
To unlock the vehicle, grasp one of the door handles or press the
rubberized button under the trunk lid's handle. To lock the vehicle,
press one of the indentations on the outside of a door handle.
Avoid touching both the outside and inside of the door handles at
the same time.
The panoramic roof* has an opening glass section with a sun
shade and can be operated using a control above the rearview mir-
ror when the vehicle is in at least ignition mode I. Open to ventila-
tion position by pressing the control upward and close by pulling
the control downward. To fully open the panoramic roof, pull the
control rearward twice. Close by pulling the control downward twice.
Foot-operated opening of the trunk lid* is possible by making a
slow forward kicking motion under the left-hand part of the rear
bumper. For it to be possible to open the trunk lid using the foot
movement sensor, the vehicle must be equipped with keyless lock-
ing/unlocking*. The remote key must be within a range of approxi-
mately 1 meter (3 feet) behind the vehicle for foot movement oper-
ation to be possible.
01
01
LOCKING/UNLOCKING
Remote key
Press briefly to lock doors, trunk lid and fuel filler door and arm the
alarm.
A long press closes all side windows simultaneously.
Press briefly to unlock doors and trunk lid and disarm the alarm.
Press and hold to open all door windows at the same time.
Press briefly to unlock and disarm only the trunk lid.
Press and hold to mechanically open the trunk lid.
The panic alarm activates the turn signals and horn to attract atten-
tion in emergency situations. To activate, press and hold the button
for at least three seconds or press the button twice within three
seconds. The function can be switched off using the same button
after it has been activated for at least five seconds. Otherwise, it will
switch off automatically after three minutes.
Charger door
Make sure the vehicle is unlocked and the ignition is off before con-
necting or disconnecting the charging cable.
1. Press the rear section of the door and release.
2. Open the charger door.
The charging cable's coupler will lock into the charging socket when
charging has started. Charging is interrupted if the vehicle is unlocked
but will restart after a short time if the cable is not disconnected.
Private (valet) locking
Private locking locks the trunk lid and the rear seat backrest, which can
be practical when, for example, the vehicle is taken in for service or at a
hotel.
In the center display's Function view, tap Private Locking
to activate/deactivate the function.
A pop-up window will appear showing whether the func-
tion is activated or deactivated. A four-digit code must be
selected each time the function is activated. The first
time the function is used, an extra security code must be
selected.
Locking* the glove compartment is performed manually using the
enclosed key which is located inside the glove compartment.
01
01
INTERIOR OVERVIEW
Center display is used to control many of the vehicle's main func-
tions, e.g. media, navigation*, climate control, driver support systems
and in-vehicle apps.
The instrument panel displays information about driving, e.g.
speed, rpm, navigation* and active driver support. You can select
which information should be shown in the instrument panel in the
app menu, which is opened using the right-hand steering wheel
keypad. Settings can also be made via
Settings My Car
Displays in the center display's top view.
The head-up display* supplements the vehicle's instrument panel
and projects information on the windshield. It can be activated in
the center display's Function view.
Start knob is used to start the vehicle. Turn clockwise and release
into the ignition position I. Hold the brake pedal depressed and turn
the start knob clockwise to start the vehicle. Switch off the vehicle
by turning the start knob clockwise.
Drive modes* are selected using the control in the tunnel console.
Press the control and roll it to choose between Hybrid, Pure,
Constant AWD, Power and Individual in the center display. Con-
firm by pressing the control. Individual drive mode enables you to
customize a drive mode's characteristics to your preferences. To
activate individual drive mode, tap
Settings My Car
Individual Drive Mode in the center display's Top view.
The parking brake is activated by pulling up the control. A
symbol will appear in the instrument panel. Release it manually by
pressing the control down while depressing the brake pedal. Auto-
hold brakes (
) keep the vehicle stationary when it is stopped, e.g.
at a traffic light, even if the brake pedal is not depressed.
Before driving the vehicle into a car wash, deactivate the Automatic
Braking and Automatic Parking Brake Application functions. Deac-
tivate Automatic Parking Brake Application in the center display's
Top view by tapping
Settings My Car Parking Brake and
Suspension
.
Passenger airbag: A sensor system determines what is occupying
the front passenger seat and activates/deactivates the front pas-
senger side's airbag. See the Owner's Manual for important safety-
related information regarding this.
01
01
CENTER DISPLAY
The center display is used to adjust settings and control most of the
vehicle's functions. The center display has three main views: home view,
function view and app view. You can reach the function view and app
view from the home view by swiping right or left. There is also a top
view that you can access by swiping down from the top section of the
display.
Change the appearance of the center display and the instrument
panel by choosing a theme in
Settings My Car Displays in top
view. You can also select a dark or light background for the center dis-
play.
Return to the home view from another view by means of a short
press on the physical home button under the display. The last mode
used for the home view will then be shown. A further short press on the
home button sets all of the home view's tiles in standard mode.
To clean the center display, press and hold the home button under the
display to lock the touchscreen function. Press the home button briefly
to reactivate the display.
The status bar at the top of the display shows the status of current
vehicle activities and functions. Shown on the left is network and con-
nection information, with media-related information; the time and back-
ground activity indicator shown on the right.
In the climate row at the bottom you can set temperature and seat
comfort by tapping on the respective icon. Open the climate view by
tapping on the center button in the climate row.
01
02
CHARGING THE HYBRID BATTERY
Your Volvo is equipped with an electric motor that primarily powers the
vehicle at low speeds and a combustion engine that powers the vehicle
at higher speeds and during more active driving. The time required to
charge the hybrid battery depends on the charging current the wall
socket can supply. The hybrid battery is also recharged during light
braking or engine braking, e.g. on a downslope. All types of charging
are indicated in the instrument panel.
Storing the charging cable
The charging cable is located under the trunk floor.
Starting charging
The start battery is charged while the hybrid battery is charging and will
stop charging when the hybrid battery is fully charged.
1. Connect the charging cable to a wall socket. Never use an extension
cord.
2. Open the charger door by pressing it lightly.
3. Push the charging handle all the way into the vehicle's socket. The
charging cable will automatically lock into the charging socket and
charging will begin within approximately 5 seconds.
Stopping charging
1. Press the
2
button on the remote key to unlock the vehicle. Charg-
ing will stop.
2. Press the lock button on the charging socket and then remove the
charging cable from the vehicle.
3. Close the charger door.
4. Disconnect the charging cable from the wall socket.
5. Replace the charging cable under the trunk floor.
If the charging cable is not removed from the socket it will automatically
relock into place after a short period after unlocking in order to help
maximize charging and driving range and to enable preconditioning of
the vehicle before driving. The charging cable can be released from the
socket again if the vehicle is unlocked using the remote key. For vehi-
cles with keyless locking/unlocking*, the vehicle can be locked and
unlocked using the door handle.
2
This must be done even if the vehicle's doors are already unlocked. If the vehicle is not unlocked
using the unlock button, the charging cable or the system could be damaged.
02
HYBRID BATTERY CHARGE STATUS
The hybrid battery's charge status can be checked in the charging
socket, via the charge module, in the instrument panel and in the Volvo
On Call app.
Indicator lamps in the charging module
When the charging cable is plugged into a wall socket, the indicator
light on the charge module (the device connected to the wall socket)
will flash red once. A safety check will be performed. When the charg-
ing cable is ready to be used, the indicator light will glow steadily blue.
The light will flash blue while charging is in progress. When the light
glows steadily blue, charging is complete. Flashing/steady red – a fault
has been detected.
Charging socket indicator lights
White - courtesy light.
Yellow - standby mode (waiting for charging to begin).
Blue – timer set.
Flashing green - charging is in progress.
Steady green - charging completed (the light will go out after a short
time).
Steady red - a fault has been detected.
Instrument panel
The symbol's color indicates the hybrid battery's charging status.
Blue light - charging is in progress.
Green light - the battery is fully charged.
Red light - a fault has occurred. Check that the charging cable
is properly connected to the vehicle's charging socket and to
the 120/240-volt wall socket.
02
4.5
HYBRID-RELATED INFORMATION IN THE
INSTRUMENT PANEL
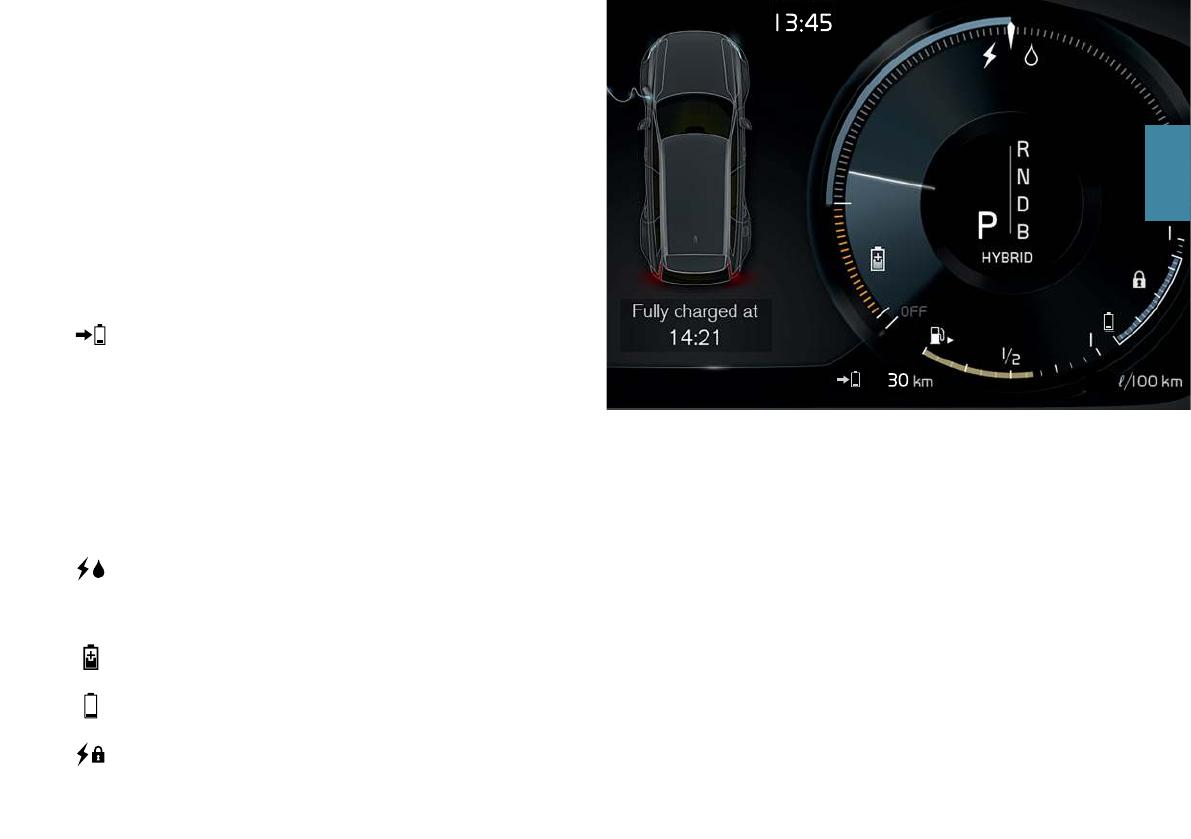
Various symbols and animations will be displayed in the instrument
panel, depending on the drive mode selected.
Electrical current and fuel consumption are indicated in a gauge to the
right. Consumption is affected by driving style. When the white indicator
line passes the white arrow at the top of the gauge, the combustion
engine will start. When the indicator line is in the orange section of the
gauge, the hybrid battery is being charged, e.g. during light braking.
Distance to discharged battery
This indicator shows the approximate distance that can be driven
before the hybrid battery is discharged. This distance is affected
by a number of factors, e.g. driving style, speed and ambient tem-
perature, and may vary during the course of a drive. In normal con-
ditions, you can expect a range of 25-45 km (15-27 miles). The
initial value displayed when the hybrid battery is fully charged
shows a maximum possible distance rather than an estimate of
the range on electrical power and is adjusted during your drive.
When “---” is displayed in the instrument panel, there is no guar-
anteed electrical current remaining in the battery.
Symbols in the instrument panel
A solid white symbol indicates which power source is being used.
A "lightning" symbol indicates that the electric motor is being
used and a "drop" symbol indicates the combustion engine is
being used.
Indicates that the battery is being charged, e.g. during engine
braking.
This gauge indicates the current charge level in the hybrid battery.
Electrical current is also used by the climate system.
Indicates that the Charge or Hold functions are active. These are
activated from the center display's Function view. Charge means
that the hybrid battery is being charged if its charge level is low.
Hold means that the battery level is being retained for later use.
Starting and stopping the combustion engine
The vehicle calculates when the combustion engine, electric motor or
both need to be used. When running on the electric motor, the vehicle
may sometimes need to start the engine automatically due to external
factors, e.g. low ambient temperatures. The combustion engine will
always start when the hybrid battery has reached its lowest charge
level.
02
POWER* FRONT SEATS
Use the controls on the outside of the seat to adjust e.g. seat position
and lumbar support*. The two controls that together form the shape of
a seat are used to adjust the seat position. The third, the multi-function
control*, is used to adjust the comfort functions, e.g. massage*.
The seat-shaped controls
Use the lower section of the control to adjust the height of the seat
cushion or move the entire seat. Use the rear section of the control to
adjust backrest tilt.
The multifunction control
3
Settings for massage*, side bolsters*, lumbar support* and seat cushion
extension* are adjusted using the multifunction control.
1. Turn the multifunction control upward/downward to open the seat
settings window in the center display.
2. Switch between the various functions in the center display by turning
the control upward/downward.
3. Adjust the setting of the selected function by pressing the upper/
lower/front/rear sections of the control.
Storing positions
1.
Adjust the seat, door mirrors and head-up display* to the desired
positions and press the M button on the door panel. The indicator
light in the button will illuminate.
2.
Press and hold down memory button 1 or 2 within three seconds. An
audible signal will sound and the indicator light in the M button will
go out.
To use your stored position:
With door open - press one of the memory buttons and release.
With door closed - press and hold one of the memory buttons until the
seat reaches the stored position.
3
On vehicles with four-way support*
03
FOLDING THE BACKRESTS IN THE REAR SEAT*
Make sure that the backrest and head restraint do not come into con-
tact with the back of the seat in front when folding down. The front
seats may need to be adjusted in order to fold down the backrests.
Folding down the backrests
The vehicle must be stationary and at least one rear door must be open
before a backrest can be folded down.
1. Fold down the center seat's head restraint manually.
2. Press and hold one of the buttons on the parcel shelf on the left side
of the vehicle.
3. The seat will no longer be locked but will remain in the same posi-
tion. The head restraints folds down automatically.
4. Fold down the backrest manually to the horizontal position.
Folding up backrests
1. Move the backrest upward/rearward until it locks into position.
2. Return the head restraint to the upright position manually.
3. If needed, adjust the center seat's head restraint.
03
STEERING WHEEL
Adjusting the steering wheel
You can adjust the position of the steering wheel for both height and
depth.
1. Push the lever under the steering wheel forward and adjust the
steering wheel to the desired position.
2. Pull the lever back to the locked position.
Left-side steering wheel keypad
Driver support functions are selected in the instrument panel using the
and arrow buttons on the left-side steering wheel keypad. When
the driver support symbol is white, the function is active. A gray symbol
indicates that the function is disabled or in standby mode.
Symbols in the instrument panel:
Cruise Control helps the driver maintain a set speed.
Adaptive Cruise Control* helps the driver maintain a constant
speed and a set time interval to the vehicle ahead.
Pilot Assist helps keep the vehicle between the traffic lane mark-
ings by providing steering assistance, and helps maintain a con-
stant speed and a set time interval to the vehicle ahead.
Tap
to start or cancel the selected function.
Tap / to increase/decrease the set speed by 5 km/h (5 mph).
Press and hold the button to change the speed in increments. Release
the button when the desired speed is reached.
/ decreases/increases the distance to the vehicle ahead when
using Adaptive Cruise Control and Pilot Assist.
Pressing
also resumes the stored speed for the selected function.
03
  • Page 1 1
  • Page 2 2
  • Page 3 3
  • Page 4 4
  • Page 5 5
  • Page 6 6
  • Page 7 7
  • Page 8 8
  • Page 9 9
  • Page 10 10
  • Page 11 11
  • Page 12 12
  • Page 13 13
  • Page 14 14
  • Page 15 15
  • Page 16 16
  • Page 17 17
  • Page 18 18
  • Page 19 19
  • Page 20 20
  • Page 21 21
  • Page 22 22
  • Page 23 23
  • Page 24 24
  • Page 25 25
  • Page 26 26
  • Page 27 27
  • Page 28 28
  • Page 29 29
  • Page 30 30
  • Page 31 31
  • Page 32 32
  • Page 33 33
  • Page 34 34
  • Page 35 35
  • Page 36 36
  • Page 37 37
  • Page 38 38
  • Page 39 39
  • Page 40 40
  • Page 41 41
  • Page 42 42
  • Page 43 43
  • Page 44 44
  • Page 45 45
  • Page 46 46
  • Page 47 47

Volvo 2020 Quick start guide

Category
Cars
Type
Quick start guide
This manual is also suitable for

Ask a question and I''ll find the answer in the document

Finding information in a document is now easier with AI