Page is loading ...

r
I www.russellhobbs.com
25600
Register online for an EXTRA year guarantee
Visit www.russellhobbs.co.uk/productregister/
You must register within 28 days of purchase

2
H B
e
f
i
j
g
k
l
m
hh
AB
h
C
MAX

3
Read the instructions, keep them safe, pass them on if you pass the iron on.
IMPORTANT SAFEGUARDS
Follow basic safety precautions, including:
This appliance can be used by children aged from 8 years and above
and persons with reduced physical, sensory or mental capabilities or
lack of experience and knowledge if they have been supervised/
instructed and understand the hazards involved. Children shall not
play with the appliance. Cleaning and user maintenance shall not
be done by children unless they are older than 8 and supervised.
Use and store the appliance out of reach of children under 8 years.
Between uses, the steamer must be rested on a stable, level, heat-
resistant surface.
Don’t leave the appliance unattended while plugged in, or while it’s
resting between uses.
Unplug the appliance before lling, before cleaning, and after use.
Don’t operate the appliance if it’s dropped or damaged, or if it
malfunctions or leaks.
If the cable is damaged, return the appliance in order to avoid a
hazard.
¬ The surfaces of the appliance will get hot during use.
b Do not use this appliance near bathtubs, showers, basins or other vessels containing water.
• Never use anything except water to ll or clean the appliance.
• Never steam clothing that is being worn.
• Never aim steam directly at people, animals or plants. Steam is hot and can cause serious
burns and scalds if used without care.
• Never hold the steam head downwards while at rest, or tilt it backwards as this may cause
hot water to be discharged and possible injury.
• Ensure the appliance is switched o and cooled down before tting or removing
attachments.
• Don’t use the appliance for any purpose other than those described in these instructions.
HOUSEHOLD USE ONLY
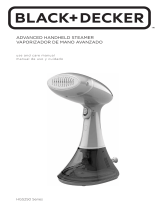
PARTS
1. Steam trigger lock
2. Steam trigger
3. Handle
4. Water tank
5. Power button
6. Lint attachment
7. Delicate attachment
8. Upholstery attachment

4
BEFORE USING FOR THE FIRST TIME
• Remove labels, stickers and packaging from the appliance.
• Read all instructions and warnings.
IMPORTANT INFORMATION
• For best performance, we recommend using distilled, puried or ltered water in your
steamer. Tap water contains minerals that can build up inside your steamer over time and
reduce its eciency or even cause damage.
• Never use perfumes, oils or other additives.
• Always check the garment’s care label before steaming, and always test fabrics for
colourfastness in an inconspicuous area. Steamers are not recommended for use on leather,
suede, vinyl, plastic, or other materials that are sensitive to steam.
• During use the steamer and accessories will become HOT. Never try to t or remove
attachments while still hot.
• After preheating, prime the water pump by holding the steam trigger until steam forms.
• It is normal to feel or hear the water pump inside the device. It may become louder when
the water level in the tank is low. Check and rell the tank when required.
• Small amounts of dripping might occur during use. If excessive, your steamer needs time to
get back up to full temperature. Just allow the steamer a minute to reheat.
• Wearing clothes immediately after ironing or steaming can actually create wrinkles. Always
allow the clothing to cool for about 5 minutes before wearing.
ATTACHMENTS
Your steamer has three attachments:
Lint attachment
Use on garments labelled k l that allow the use of steam.
Tip: The pad on the attachment helps remove lint, hair, and animal
fur.
Delicate attachment
Use on garments labelled j that allow the use of steam.
Tip: For items with printing/embellishment, turn the garment inside
out to avoid damage to sensitive areas.
Upholstery attachment Use to sanitise and refresh bedding, mattresses, curtains, plush toys,
furniture, and hard surfaces (such as worktops or desks that are not
heat sensitive).
Always test for colourfastness and heat sensitivity on an
inconspicuous area.
Fitting/Removing (Fig. A)
1. Make sure that the steamer and attachment are cool.
2. Hook the top of the attachment over the top edge of the steamer.
3. Click the bottom edge into place.
4. Remove the attachment using the tab. When removing the attachment, watch out for
condensation that may have built up during use.

5
FILLING
1. Place the steamer on its base on a stable surface.
2. Pull out the removable water tank (Fig. B)
3. Gently open the rubber cover at the top of the tank.
4. Fill until the water reaches the “MAX” level mark on the top of the tank (Fig. C). Do not
overll. Close the rubber cover securely.
5. Dry o any excess water from the tank then ret it into the base until it clicks.
• To rell at any time during use, turn the steamer o by pressing the power button until the
blue indicator light goes out, unplug from outlet, and follow the above procedure.
• After relling, allow to reheat for 45 seconds and then prime the pump by holding the
steam trigger until steam forms.
USING
• If the label says “do not iron” or shows this icon i, t the delicate attachment and make
sure to test on an inconspicuous area prior to steaming the entire garment.
• If the label says “do not steam” or shows this icon m, do not steam the garment.
1. Hang the garment in an area that will not be aected or damaged by the heat and steam,
such as on a shower curtain rail, or in an open doorway.
2. Fit any attachment you wish to use.
3. Plug the steamer in then press the power button. The blue power button light will slowly
ash, indicating that the steamer is heating.
4. After about 45 seconds the power light will stay on, indicating the steamer is preheated.
5. Prime the water pump by holding steam trigger until steam forms.
6. To generate steam, press the steam trigger. As long as the trigger is held, steam will emit
from the steamer. When the trigger is released, the steam will stop.
• To generate a constant ow of steam without holding the trigger, press the steam trigger
and then slide the steam trigger lock downwards. You can then release pressure on the
steam trigger. To turn the steam o, press the trigger, slide the steam trigger lock upwards,
then release the trigger.
7. With your free hand keep the fabric taut. Steam the garment with slow, downward strokes,
keeping the head of the steamer in contact with the fabric.
8. When you have nished, press and hold the power button until the blue light goes out
(about 3 seconds) and unplug.
9. Stand the steamer on its base and allow it to completely cool o before storing. To avoid
mineral buildup, empty the tank after each use.
Auto shut o
Your steamer will automatically switch to auto shut-o mode after being left inactive for 15
minutes. The power button light will ash rapidly to indicate this. To resume steaming, press the
steam trigger or power button and wait for your steamer to fully reheat.
CARE AND MAINTENANCE
1. Make sure steamer is o, unplugged and completely cool.
2. Wipe all surfaces with a clean damp cloth.
3. After the steamer has been thoroughly dried, turn it back on and lightly steam over an old
cloth. This will help remove any residue left in the steam holes.
4. To avoid mineral buildup, empty the tank after each use.

6
Cleaning attachments
• Lint attachment: Wipe with damp cloth to clean.
• Delicate attachment: Wash with cold water and small amounts of a gentle cleanser if
needed. The fabric cannot be removed.
• Upholstery attachment: The fabric can be removed and hand washed with cold water and a
gentle cleanser.
TROUBLESHOOTING
Problem Possible Cause Solution
The steamer is plugged in but
not heating.
The auto shut-o has
activated.
Press the steam trigger or
press the power button to
activate the steamer.
Not enough steam or no
steam is coming out of the
steamer.
The steamer is not heated to
full temperature.
Always allow steamer to
preheat at least 45 seconds, or
until the power button light
stops ashing.
There is not enough water in
the water tank.
Fill the water tank.
The water pump hasn’t been
primed.
After preheating, always
prime the water pump by
holding the steam trigger
until steam forms.
Discoloured water is coming
through the holes and
staining the fabric.
Residue has built up in the
water tank.
Empty the water tank after
each use. Only use distilled,
ltered, or puried water.
Perfumed or scented
additives were used.
Never use perfumed or
scented additives.
Steamer is leaking or spitting. Steamer is not hot enough. Allow the steamer to heat for
about 45 seconds.
Water tank is running low. Fill the water tank.

7

T22-9000840
RECYCLING
W
To avoid environmental and health problems due to hazardous substances,
appliances and rechargeable and non-rechargeable batteries marked with
one of these symbols must not be disposed of with unsorted municipal
waste. Always dispose of electrical and electronic products and, where
applicable, rechargeable and non-rechargeable batteries, at an appropriate
ocial recycling/collection point.
SERVICE
If you ring Customer Service, please have the Model Number to hand, as we won’t be able to
help you without it. It’s on the rating plate (usually underneath the product).
The product isn’t user-serviceable. If it’s not working, read the instructions, check the plug fuse
and main fuse/circuit breaker. If it’s still not working, consult your retailer.
If that doesn’t solve the problem – ring Customer Service – they may be able to oer technical
advice.
If they advise you to return the product to us, pack it carefully, include a note with your name,
address, day phone number, and what’s wrong. If under guarantee, say where and when
purchased, and include proof of purchase (till receipt). Send it to:
Customer Service
Spectrum Brands (UK) Ltd
Fir Street, Failsworth, Manchester M35 0HS
email: support@russellhobbs.com
telephone: 0345 658 9700 (local rate number)
Please note: If you have purchased the product within the last 6 months, please contact the
retailer in the rst instance to deal with any matters relating to warranty.
GUARANTEE
Defects aecting product functionality appearing within the guarantee period will be corrected
by replacement or repair at our option provided the product is used and maintained in
accordance with the instructions. Your statutory rights are not aected.
Guarantee period = 2 years from rst retail purchase.
To claim an extra 1 year guarantee, register your product online within 28 days of purchase.
Register at: www.russellhobbs.co.uk/productregister/
Consumables are guaranteed only for their recommended lifecycle. Replacement/Spare parts*
are excluded and are only covered by a 1 year warranty.
* Examples include lters, removable grill plates, drip trays/crumb trays etc.
J ONLINE
www.russellhobbs.com for more products
I REGISTER ONLINE
Register online for an EXTRA year guarantee*.
Visit www.russellhobbs.co.uk/productregister/
*You must register within 28 days of purchase.
/