Page is loading ...

使用說明書
Model : DFCX80116
產品型號
: DFCX80116
User Manual

2
繁體中文
3
11

3
EN
3
USER MANUAL
USER MANUAL 3
How to use the appliance
4-5
4
4
4
4
4
4-5
4
5
6
6
6
6
6
6
7
8
9-10
Control panel
Indicators
First time use
Daily use
Opening of the door during the cycle
Programs
Care label
Options
Care and Maintenance
Emptying the water tank after each cycle
Cleaning the door lter after each cycle
Cleaning the bottom lter when the relevant indicator turns on
Transport and Handling
Product Description
Troubleshooting
Installation Guide
Safety Instructions
INDEX
4
You can download the Safety Instructions, User Manual, Product Fiche and Energy data by:
• Visiting our website - docs.whirlpool.eu
• Using QR Code
• Alternatively, contact our After-sales Service (See phone number in the warranty booklet). When
THANK YOU FOR BUYING A WHIRLPOOL PRODUCT.
In order to receive a more complete assistance,
please register your product on
www.whirlpool.com.hk
EN
Quick guide
Before using the appliance carefully read the Safety Instructions.
xxxxxxxxxxxx
xxxx
Before using the appliance carefully read the Safety Instructions.
xxxxxxxxxxxx
xxxx
PROGRAMS
Eco cotton (kg Max*)
Mixed (kg 4)
This programme is ideal for drying cotton and synthetic fabrics
together.
Bed linen (kg Max*)
This programme is intended for drying cotton sheets.
Shirts (kg 3)
This is a programme for Shirts made from cotton or cotton
blend/synthetics.
Sport (kg 4)
For drying sports garments made of synthetics or cotton.
Duvet
Programme intended to dry bulky garments, such as single duvet.
Jeans (kg 3)
of robust For drying cotton jeans-wear and garments made
cotton, like denim, such as trousers and jackets.
Easy ironing
Refresh
A short programme suitable for refreshing bres and garments
by means of fresh air. Do not use with garments that are still wet.
It can be used on with any load size but is more eective with
small loads. The cycle duration is about 20 minutes.
FIRST TIME USE
Make sure that the water tank is correctly inserted. Make sure
that the drain hose on the back of the dryer is xed correctly,
either to the dryer’s water tank, or to your domestic sewage
system.
DAILY USE
Doing this will keep your machine working at its BEST!
Remember to empty your water tank after each drying cycle.
Remember to clean your lters after each drying cycle. (Refer
to section Care & Maintenance).
1.
Open the door and load garments. Always refer to instructions on
clothing labels and the max loads indicated in the Programs
section. Empty pockets. Make sure garments do not get caught
between the door and/or the door filter.
2. Close the door.
3.
4. Select the programme according to the laundry type.
5. Select the options, if necessary.
6. To start the cycle, press the Start/Pause button.
7. At the end of the drying cycle, a buzzer will beep. An indicator
on the control panel signals the end of the cycle. Pull the load
out immediately to prevent the formation of creases on laundry.
8. Turn the machine o by pressing the button On/O, open the
door and pull clothing out. If the machine is not switched o
manually, after about a quarter of an hour from the cycle end,
the appliance turns o automatically to save energy.
If this last stage is not carried out immediately, some machines
and/or some programmes/options are equipped with Crease Care
system. For some hours, after the end of drying, the drum rotates
at regular intervals to prevent the formation of creases. In case of
power failure, it is necessary to press the button Start/Pause to
restart the cycle.
OPENING OF THE DOOR DURING THE CYCLE
During operation, it is possible to open the door. After having
closed it, press the button Start/Pause again to restart the dryer.
*
MAX LOAD 8 Kg
(Dry
load)
CARE LABEL
Always check the care labels, especially when placing garments in
woleB .emit tsr if eht rof reyrd elbmut eht are the most commonly
used symbols:
May be tumble dried.
Tumble dry – low heat.
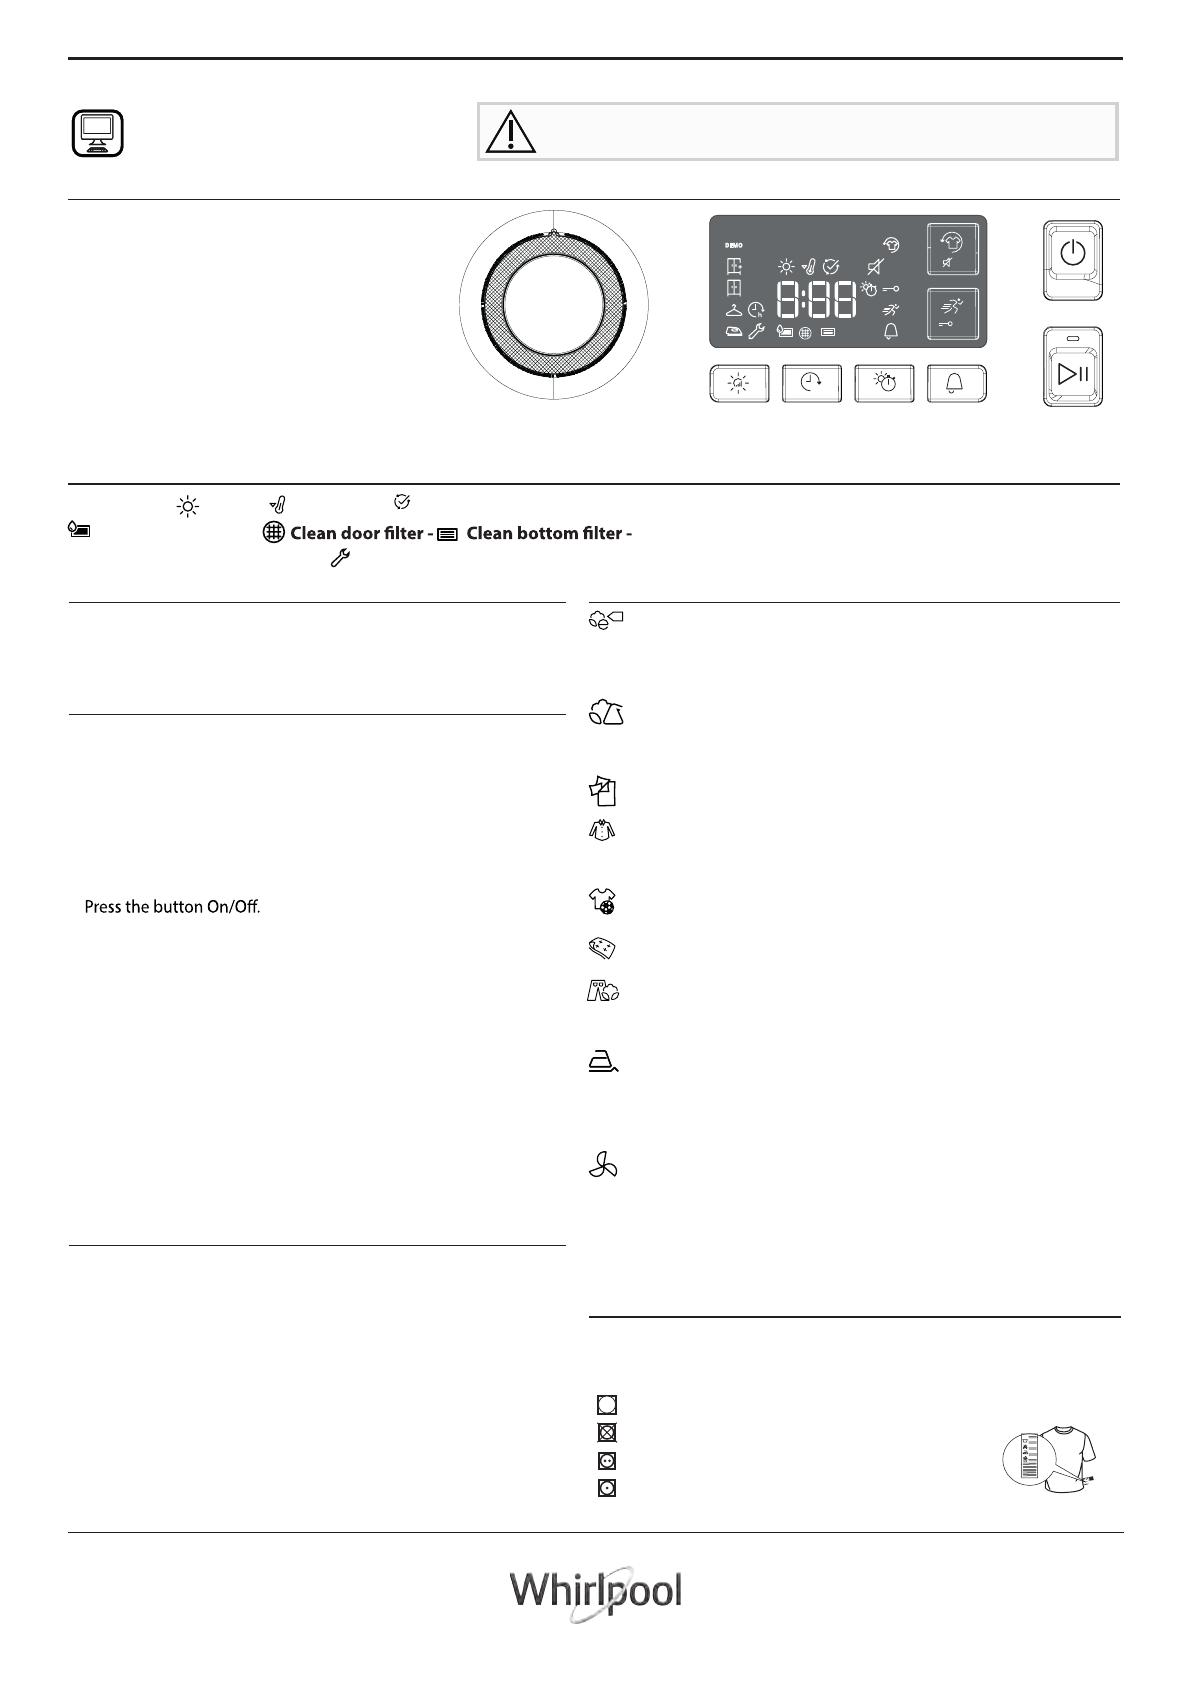
CONTROL PANEL
1 ON/OFF button (Reset if long pressed)
2 Program selection Knob
3 Start/Pause button
Options buttons
4 Dryness level
5 Start delay
6 Timed drying
7 Cycle end
8 Rapid (Key lock if long pressed)
9 Fresh care (Mute if long pressed)
INDICATORS
Cycle phase: Drying - Cool down - End of cycle.
Empty water tank -
Refer to Troubleshooting section: Failure: Call After-Sales Service
DEMO
Demo mode
3
2
7
8
4 5 6
3’’
1
3
2
9
7
8
4 5 6
3’’
3’’
h
h
4
Do not tumble dry.
Tumble dry – high heat.
^(2:16)
^Default Duration(H:Min)
^(1:40)
^(2:51)/ Rapid (2:41)
^(1:21)/ Rapid (1:11)
^(00:20)
Standard cotton programme, suitable to dry normally wet
cotton laundry. Most ecient programme in terms of energy
consumption for drying cotton laundry.
This cycle allows to extend the bres of garments thus
making ironing and folding easier. Do not use in case of
garments that are still wet. Suitable for small loads of cotton
textiles or cotton blends.
5
OPTIONS BUTTONS
These buttons serves to personalise the selected programme according to personal requirements.
Not all options are available for all programmes. Some options are incompatible with the ones
previously set. The buzzer and/or blinking indicators will signal the incompatibility. If the option is
available, the option indicator will stay on. Some options may be kept in the memory of the
programme if selected in the previous drying.
Rapid 30' (kg 0.5 )
Ideal for drying cotton garments spun at high speed in the
dryer.
Coloured (kg Max*)
Programme for gentle drying suitable for coloured
garments.
Silk (kg 0.5 )
Gentle drying of silk garments.
Wool kg 1
Programme for drying wool clothing. It is advisable to turn
the garments inside out before drying. Leave to dry naturally
the heaviest edges that are still damp.
Delicates kg 2
For drying delicate laundry which needs gentle treatment.
Synthetics kg 4
For drying laundry made of synthetic bres.
OPTIONS
After selecting the programme, the various options can be
set, if necessary.
Dryness level
Press the related button several times to obtain a dierent
level of residual moisture on garments. An indicator signals the
level being selected.
Iron dry: a very delicate ironing. Suitable for making ironing
of garments easier immediately after the end of the cycle.
Hanger dry: a level intended for delicate garments ready to
be hanged.
Cupboard dry: the garments are ready to be folded and put
away.
Extra dry: used for garments to be worn at the end of the
cycle.
Timed drying
This option allows to set the drying time. Press the corresponding
button to set the required time for drying. An indicator on the
control panel signals the time being selected.
Start delay
h
Rapid
Enables quicker drying.
Fresh care
Key lock
Mute
•
To activate the option, keep the button pressed until the
indicator goes on.
•
To disable the option, keep the button pressed until the indicator
goes o.
Cycle end
This option activates a prolonged buzzer at the end of the cycle.
Enable
it if you are not sure to hear the normal sound at the end
of the cycle. This option remains in memory if selected in the
previous drying.
If garments are left inside the drum after the end of the cycle,
they are subject to bacterial proliferation. This option allows to
prevent this proliferation by controlling the temperature and the
rotation of the drum. This treatment has a max. duration of 6
hours after the end of the programme set. This option remains in
memory if selected in the previous drying.
If this option is used together with the Start Delay, a crease
treatment (a periodic rotation of the drum) is added in the Start
Delay phase.
This option makes all machine controls inaccesible, except the
button On/O. When the machine is on: to activate the option,
keep the button pressed until the indicator goes on. To disable the
option, keep the button pressed until the indicator goes o. This
option remains in memory if selected in the previous drying.
This option turns o all sounds of control panel. Only warnings
remain active.
5
^Default Duration(H:Min)
^(00:30)
^(02:40)
^(01:35)
^(00:51)
^(00:50)
^(01:30)
The duration of these programs will depend on the size of the
load, types of textiles, the spin speed used in your washer
and any
extra options selected. In machines equipped
with display, the duration of the cycles is shown on the
control panel. The remaining time is constantly checked and
adjusted during the drying cycle to show the best possible
estimate.
This option allows you to set the delay of the cycle start. Press
the corresponding button several times to obtain the required
delay. After having reached the max. settable time, the option is
reset by pressing the button again. An indicator on the control
panel signals the time being selected. After having pressed the
button Start/Pause, the machine signals the remaining time
for the cycle start. In case of door opening, after closing, it is
necessary to press the button Start/Pause.
6
You can download the Safety Instructions, User Manual, Product Fiche and Energy data by:
• Visiting our website - docs.indesit.eu
• Using QR Code
• Alternatively, contact our After-sales Service (See phone number in the warranty booklet). When
THANK YOU FOR BUYING A INDESIT PRODUCT.
In order to receive a more complete assistance,
please register your product on
www.indesit.eu/register
EN
Quick guide
Before using the appliance carefully read the Safety Instructions.
xxxxxxxxxxxx
xxxx
Before using the appliance carefully read the Safety Instructions.
xxxxxxxxxxxx
xxxx
Power consumption
0.50
left-on mode (Pl) - Watts 1.00
Programs Kg kWh Minutes
Eco Cotton *
8 4.76 130
Eco Cotton
4 2.47 70
Synthetics 4 1.83 90
*This is the reference programme for the energy label and suitable to
dry normal wet cotton laundry. This is the most ecient programme
in terms of energy consumption for drying wet cotton laundry.
(Standard/Default starting conguration)
TRANSPORT AND HANDLING
Never lift the dryer by holding it at the worktop.
1. Unplug the dryer.
2. Make sure that door and water tank are properly closed.
drain hose on the rear of the dryer again (see Installation Guide).
CARE AND MAINTENANCE
Unplug the dryer during the cleaning and maintenance
procedures.
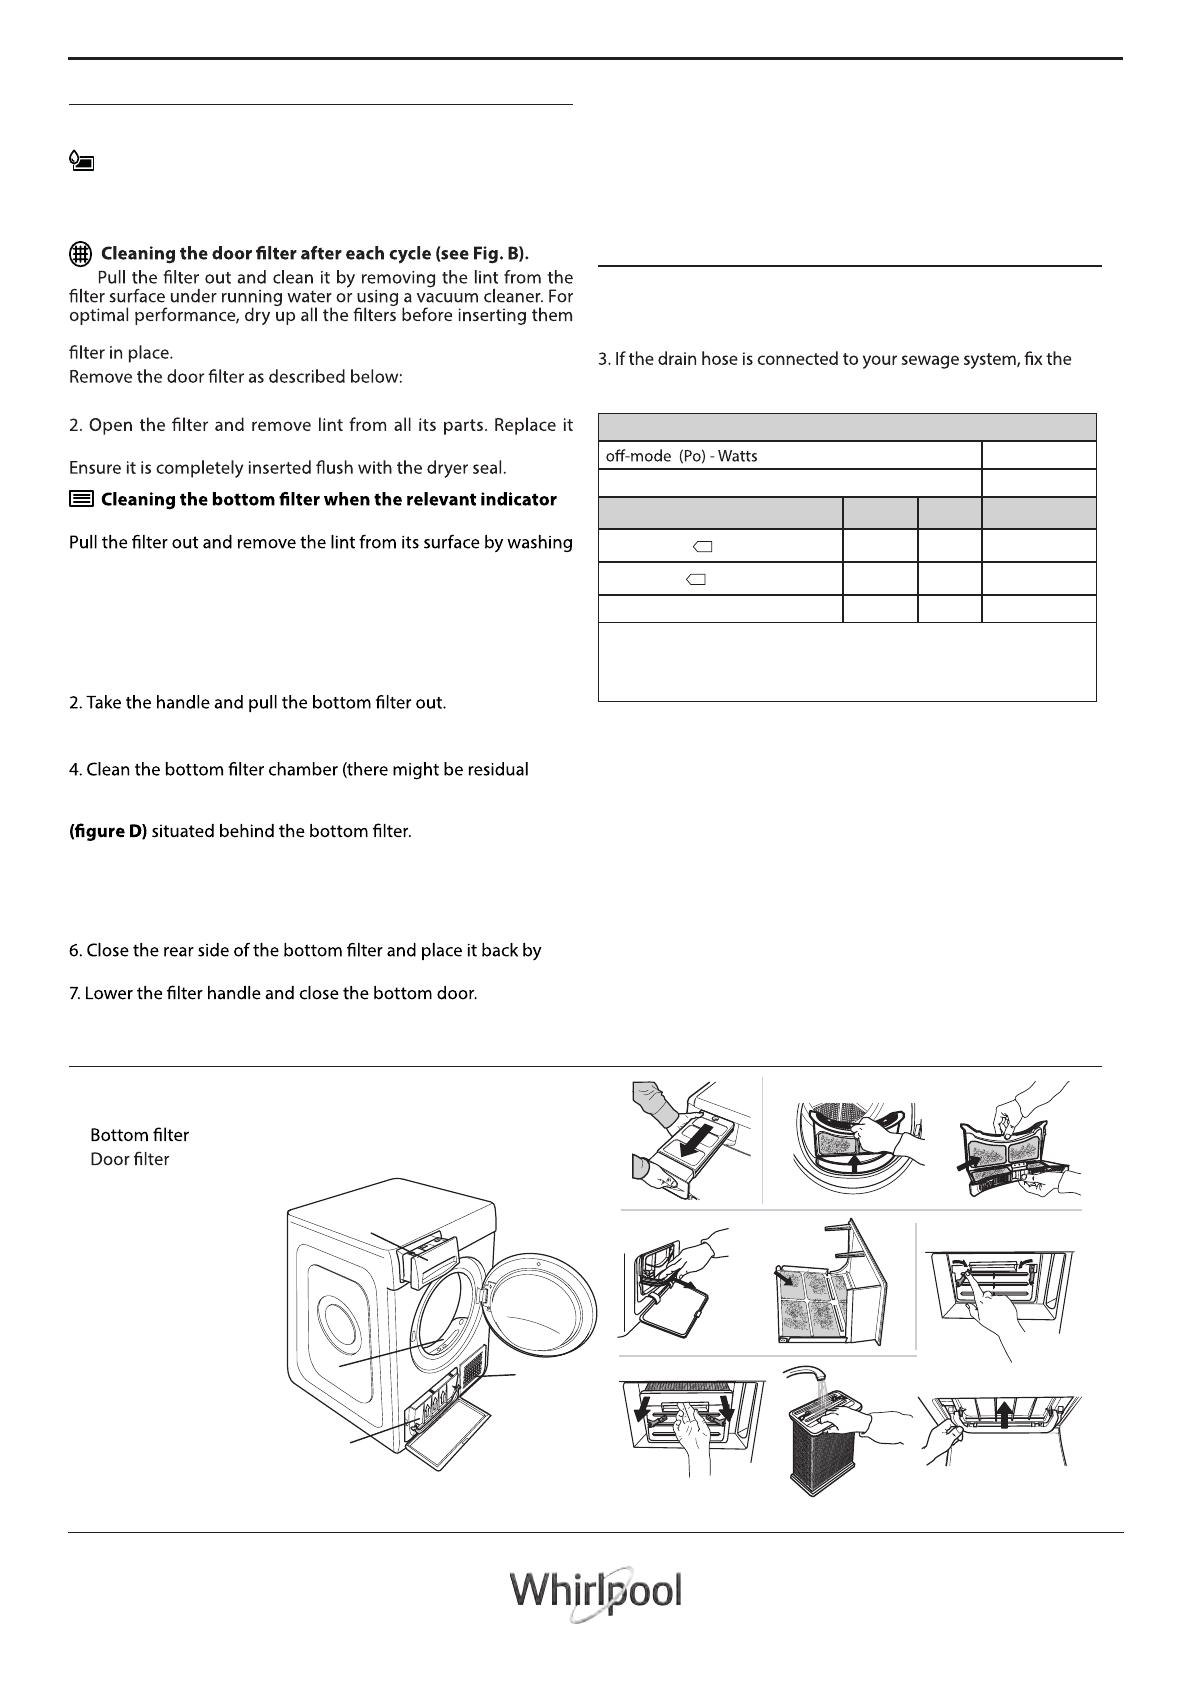
Emptying the water tank after each cycle (see Fig. A).
Pull the container out of the dryer and and empty it into a
sink or other suitable drain, then place it back. Do not use the dryer
without having inserted the container back in place.
back in place. Do not use the dryer without having reinserted the
1. Open the door and pull upwards.
correctly.
turns on (see Fig. C).
1. Open t
he bottom door.
3.
Open the rear side of the lter and remove the lint from the
inner surface of the mesh.
water: this is normal).
5a. Approximately every 3 months, clean the condensing unit
5b. Lower the levers situated on the sides of the condenser.
After having removed the condenser, clean it under running
water.
5c. Place the condenser back in place and lift the levers.
checking it is perfectly integrated in place.
8. Make sure the air intake is free.
PRODUCT DESCRIPTION
1. Water Tank
2. Air Intake
3. and condenser
4.
BA
1
4
2
3
DC
3
The lters are essential parts for drying. They are intended
to collect the lint formed during drying process. In case of
clogged lters, the air ow inside the dryer would be
seriously aected: the drying times would be longer, the
energy consumption would increase and the dryer could be
damaged. If these procedures are not carried out properly,
the dryer may not start.
it under running water or by using a vacuum cleaner.
However, it is advisable to clean this lter after each cycle to
optimise drying performance. Do not use the dryer without having
inserted the lter in place rst.
Remove the bottom lter and the condenser as described below:
7
You can download the user manual by:
• Visiting our website - www.whirlpool.com.hk
•
Alternatively, contact our After-Sales Service (See phone number in the warranty booklet). When
EN
Quick guide
xxxxxxxxxxxx
xxxx
xxxxxxxxxxxx
xxxx
TROUBLESHOOTING
Before contacting the Service Centre, refer to the table below. Often the malfunctions are minor and can be solved in few minutes.
Malfunction Possible cause Solution
The tumble
dryer does not
turn on.
The plug is not inserted into the socket. Insert the plug into the socket.
The plug is faulty.
Try to plug another appliance in the same socket. Do not use
connecting electrical devices to the socket, as adapters or extensions.
A power failure occurred. Await the reactivation of the power supply.
The tumble
dryer does not
start.
The door is open. Close the door.
A time delay for the cycle start was set.
For machines equipped with this function: await the end of the delay
The button Start/Pause was not pressed to start
the program.
Press the button Start/Pause.
The function Key Lock was enabled (in case of
machines equipped with this option).
Refer to the Options section and, if the Key Lock is present, disable
it. Switching the machine off is not enough to disable this option.
The drying
times are very
long.
An appropriate maintenance was not carried
out.
Refer to the section Care & Maintenance and perform the operations
described.
The programme, the time and/or the drying
level set are not suitable for the type and the
amount of load inserted into the dryer.
Refer to the sections Programs and Options to find the programme
and the options most suitable for the type of load.
The garments are too wet.
Carry out a washing cycle with higher spin speed to remove as much
water as possible.
The dryer may be overloaded.
Refer to the Programs section to check the max. load for each
programme.
The programme
did not end.
A power failure might have occurred.
In case of power failure, it is necessary to press the button Start/Pause
to restart the cycle.
Water tank The water tank is full. Emtpy the water tank. Refer to the section Care & Maintenance.
and/or bottom
operation.
intake is free. Carrying out these operations improperly may cause
damages.
DEMO
The cycle lasts
few minutes.
The dryer is in DEMO mode. The DEMO
indicator is on.
Disable the DEMO mode. The following actions must be carried out
in sequence, without breaks. Switch the machine on and then
switch it off again. Press the Start/Pause button until the buzzer is
heard. Switch the machine on again. The “DEMO” indicator ashes
. ffo snrut neht dna
The presence
of wrench
symbol signals a
malfunction.
The machine sensors detected a failure.
Switch the dryer off and unplug it. Open the door immediately and
pull laundry out, to allow the heat to dissipate. Wait for about 15
minutes. Reconnect the dryer to the power supply, load the
laundry and restart the drying cycle. If the problem still occurs,
contact the After-Sales Service Centre and communicate the
.yalpsid eht no gnihsa lf stigid dna srettel
For instance: F3 and E2
4

8
1
2a
2b
4
5a
6
1
2
5b
..............
xxx V ~ xx Hz
xx
A
IPX4
xxxxxxxx
xxxx-xxxx W
33
5
EN
max 100 cm
39 inch
15 mm
15 mm
10 mm
min 1.5 cm - max 2 cm
min 0.59 inch - max 0.79 inch
Quick guide
INSTALLATION GUIDE

9
IMPORTANT TO BE READ AND OBSERVED
PERMITTED USE
Do not dry unwashed items in the tumble dryer.
Take care that no lint or dust has accumulated around
the dryer.
Do not overdry the laundry.
INSTALLATION
6
SAFETY INSTRUCTIONS
This symbol reminds you to read this instruction manual.
Before using the appliance, read these safety instructions.
Keep them nearby for future reference. These instructions and
the appliance itself provide important safety warnings, to be
observed at all times. The manufacturer declines any liability
for failure to observe these safety instructions, for inappropriate
use of the appliance or incorrect setting of controls.
Children from 8 years old and above and persons with
reduced physical, sensory or mental capabilities or lack of
experience and knowledge can use this appliance only if they
are supervised or have been given instructions on safe use
and understand the hazards involved. Children must not play
with the appliance. Cleaning and user maintenance must not
be carried out by children without supervision.
Very young children (0-3 years) should be kept away from
the appliance. Young children (3-8 years) should be kept
away from the appliance unless continuously supervised.
Fabric softeners, or similar products, should be used as
specied by the fabric softener instructions.
The appliance must be handled and installed by two or more
persons - risk of injury. Use protective gloves to unpack and
install - risk of cuts.
If you want to stack the dryer on a washing machine, rst
contact our After-Sales Service or your specialist dealer to verify
the complete list of suitable models. The stacking is only possible
if the dryer is attached to the washing machine by means of the
appropriate stacking kit available through our After-Sales Service
or your specialist dealer. Instructions for the correct assembly are
supplied with the stacking kit.
The appliance must not be installed behind a lockable door, a
sliding door or a door with a hinge on the opposite side to that of
the tumble dryer, in such a way that a full opening of the tumble
dryer door is restricted.
If the dryer is installed near to a gas or coal stove, provide a
heat insulating plate (85 cm x 57 cm) in between, as the side
facing the stove is covered with aluminium foil.
Exhaust air must not be discharged into a ue which is used
for discharging fumes from appliances burning gas or other fuels.
The appliance shall be placed against the wall to limit access
to its rear side.
Take care not to use a carpet which obstructs ventilation
openings in the base of the dryer.
If the dryer is installed under a worktop, provide a distance of 10
mm between the upper panel of the dryer and any objects above
it, and 15 mm between the sides of the appliance and the walls or
furniture units adjacent to it.
This appliance is not for professional use. Do not use the
appliance outdoors.
WARNING: Never stop a tumble dryer before the end of
the drying cycle unless all items are quickly removed and
spread out so that the heat is dissipated.
Oil-soaked items should not be dried in the tumble dryer
due to their high ammability.
Do not load the machine above the maximum capacity
(kg of dry cloth) indicated in the programme table.
CAUTION: The appliance is not intended to be operated
by means of an external switching device, such as a timer, or
separate remote controlled system.
This appliance is intended to be used in household and
similar applications such as: sta kitchen areas in shops,
oces and other working environments; farm houses; by
clients in hotels, motels, bed & breakfast and other residential
environments.
Never open the door forcibly or use it as a step.
Items that have been soiled with substances such as
cooking oil, acetone, alcohol, petrol, kerosene, spot removers,
turpentine, waxes and wax removers should be washed in hot
water with an extra amount of detergent before being dried in
the tumble dryer. Items such as foam rubber (latex foam),
shower caps, waterproof textiles, rubber-backed articles and
clothes or pillows tted with foam rubber pads should not be
dried in the tumble dryer. Remove all objects from pockets,
such as lighters and matches. Do not use the tumble dryer if
industrial chemicals have been used to clean it.
Installation, including water supply (if any), electrical
connections and repairs must be carried out by a qualied
technician. Do not repair or replace any part of the appliance
unless specically stated in the user manual.
Keep children away from the installation site. After unpacking the
appliance, make sure that it has not been damaged during
transport. In the event of problems, contact the dealer or your
nearest After-Sales Service. Once installed, packaging waste
(plastic, styrofoam parts etc.) must be stored out of reach of
children-risk of suocation. The appliance must be disconnected
from the power supply before any installation operation-risk of
electric shock. During installation, make sure the appliance does
not damage the power cable-risk of re or electric shock. Only
activate the appliance when the installation has been completed.
Install the dryer in rooms with adequate ventilation (open
door, ventilation grid or slot larger than 500cm² ) in order to
avoid the backow of gases into the room from appliances
burning other fuels, including open res.

10
The symbol on the product or on the accompanying
documentation indicates that it should not be treated as
domestic waste but must be taken to an appropriate collection
center for the recycling of electrical and electronic equipment.
The packaging material is 100% recyclable and is marked with the
recycle symbol.
ELECTRICAL WARNINGS
7
EN
Quick guide
It must be possible to disconnect the appliance from the
power supply by unplugging it if plug is accessible, or by a multi-pole
switch installed upstream of the socket in accordance with the
wiring rules and the appliance must be earthed in conformity
with national electrical safety standards.
Do not use extension leads, multiple sockets or adapters. The
electrical components must not be accessible to the user after
installation. Do not use the appliance when you are wet or
barefoot. Do not operate this appliance if it has a damaged power
cable or plug, if it is not working properly, or if it has been
damaged or dropped.
If the supply cord is damaged, it must be replaced with an
identical one by the manufacturer, its service agent or similarly
qualied persons in order to avoid a hazard - risk of electric shock.
Make sure that all lint traps are cleaned before starting any
drying cycle.
The various parts of the packaging must therefore be disposed of
responsibly and in full compliance with local authority regula-
tions governing waste disposal.
This appliance is manufactured with recyclable or reusable
materials. Dispose of it in accordance with local waste disposal
regulations.
For further information on the treatment, recovery and recycling
of household electrical appliances, contact your local authority,
the collection service for household waste or the store where you
purchased the appliance. This appliance is marked in compliance
with European Directive 2012/19/EU, Waste Electrical and
Electronic Equipment (WEEE). By ensuring this product is
disposed of correctly, you will help prevent negative conse-
quences for the environment and human health.
WARNING: Ensure that the appliance is switched o and
disconnected from the power supply before performing any
maintenance operation; never use steam cleaning equipment -
risk of electric shock.
DISPOSAL OF PACKAGING MATERIALS
CLEANING AND MAINTENANCE
DISPOSAL OF HOUSEHOLD APPLIANCES
/