Page is loading ...

Thank you for purchasing a quality VALCO product. Please read and follow the instructions outlined in this
guide carefully. Familiarise yourself with the construction and safety features; be sure that you understand all
the warnings and safety guidelines before use.
Retain this guide in a safe place for future reference.
PRODUCT REFERENCE GUIDE
LATITUDE STROLLER
valco
baby
© Copyright VE 2007
Due to our policy of continuous product
development, this product is constantly
evolving. It is possible that some features or
procedures outlined here have changed since
this document was written.
If you are unsure of any procedure shown
here, please contact us via the web at
info@valco.com.au to obtain the most up
to date information before use. Include the
batch number, which can be found on a
sticker on the frame.
All pictures and diagrams herein are provided
for illustration purposes only. Actual product,
colour or fabric may vary. VALCO reserves the
right to modify or alter any specication or
colour without notice or obligation to modify
any product previously purchased
FURTHER INFORMATION
In Australia/New Zealand
www.valco.com.au
www.valco.co.nz
In North America only
www.valcobaby.com
1800 610 7850

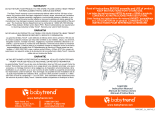
assembly
FIGURE A
1. Lift the handle upward toward you. The frame will begin
to open.
2. Continue opening the frame until you hear it “click” into
the fully locked position.
Install the rear axle/brake bar
FIGURE B
3. With the brake levers (3a) facing AWAY from the stroller,
align the plastic brake housings with the rear legs (3b).
Firmly push each housing onto the corresponding leg
until it locks into place. Test by pulling on the rear axle.
Insert rear wheels
FIGURE C
4. Depressing the button in the centre hub of the rear
wheel, insert each wheel axle in turn, into the wheel
hub. Push the wheel as far as it will go before releasing
the button. IMPORTANT: PULL EACH WHEEL SLIGHTLY
BACK TOWARDS YOU TO ENSURE THAT IT HAS FULLY
ENGAGED IN THE AXLE.
Insert front wheel
5. Insert the front swivel wheel over the housing on the
front legs. IMPORTANT: BE SURE THAT THE SWIVEL
LOCK LEVER IN THE HOUSING IS AT THE TOP.
6. To x the front wheel in the non swivel position, turn the
wheel so that the two notches on both housings line
up. Press down rmly on the swivel lock until it locks
into place.
Install the bumper bar
FIGURE D
7. Align the ends of the bumper bar with the housing
located on either side of the seat.
8. Insert the ends into the housing. Keep pushing until
they lock into place. IMPORTANT: NEVER LIFT YOUR
STROLLER BY THE BUMPER BAR.
adjustIng the bumper bar
9. To lower/raise the bumper bar, simultaneously press
the release buttons and move to desired position.
adjustIng the footrest
10. To lower/raise the footrest, simultaneously press the
release buttons and move the footrest to the desired
position.
A
C
D
B
click
click
1
2
3a
3b
7
10
9
PRESS
4
5
6
7

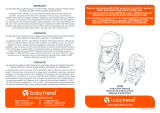
InstallIng the hood
11. Align the plastic hood housings over the corresponding
housing on either side of the stroller frame. Align
EACH straight track on the stroller housing with the
corresponding “hole” in the hood housing. Slide the
hood housing downward over the track so that it
completely engages on to the stroller frame.
12. Fix the velcro strap around each handle bar to secure
the hood completely.
usIng the harness
FIGURE F
Your child MUST always be harnessed while in the stroller.
TO OPEN YOUR HARNESS:
13. Push down on both Buckle Prongs.
14. Simultaneously press the release button in the
centre of the buckle.
15. Lift the buckles from the Buckle Housing.
TO SECURE YOUR CHILD IN THE HARNESS:
16. Overlap buckles (16a) and (16b) so that they t
together to form one complete buckle.
17 Insert the completed buckle into the Buckle Housing
until it engages securely in place.
adjustIng your handle
FIGURE G
18. Your handle can be adjusted to multiple positions.
Press the centre locking button while simultaneously
moving the handle up or down. Releasing the button
will allow the handle to lock into the next position.
seCurIng your brakes
19. With your foot press down on the centre of the brake
lever to simultaneously engage the brake in both
wheels. To release, simply lift the lever with your
foot. IMPORTANT: ALWAYS TEST THAT THE BRAKES
ARE FULLY ENGAGED BY PUSHING THE STROLLER
FORWARD AND BACKWARD.
to fold your latItude stroller
FIGURE H
20. Lift the levers, located on both sides of the stroller, up
towards you. When you feel the frame release, gently
lower the handle towards the brake bar.
21. You can lock the frame closed by stretching the locking
strap over the frame, placing the metal catch over the
rivet head in the chassis. HINT: FOR MOST COMPACT
RESULTS YOU MAY NEED TO SWIVEL THE FRONT
WHEEL.
E
PRESS
DOWN
HOLD
DOWN
PUSH
RELEASE
HOLD
CLICK
11
12
13
14
15
16a
16b
17
18
19
F
G
H
20
21

WARNINGS
Your child’s safety is your responsibility ………
• Be sure to check that all clamps and buckles are securely xed in place before use.
• Check all parts for breakage or fatigue before use. Discontinue immediately if any part is found to be
damaged or broken.
• The maximum weight of the child for which the stroller was intended is 20kg’s.
• Can be used from birth+. A cocoon specially designed to be used with a stroller is recommended when any
fully reclining stroller is used with a newborn.
• Never run with a newborn baby in any pram or stroller until the child can sit up unassisted (approximately 6
months).
• Never use this stroller on stairs or an escalator.
• Always ensure that your child is clear of all moving parts when adjusting the stroller.
• Never leave your child unattended in the stroller.
• When in the stroller your child must ALWAYS wear the safety harness, correctly tted and adjusted, all times.
• DO NOT hang shopping bags from the handles as this may affect the stroller’s stability.
• Always use the basket provided, the maximum weight in the basket is 3.5kg’s.
• Do not carry additional children. It may be unsafe to use any accessories other than VALCO approved ones.
• This stroller is manufactured for use with one child only.
• This product is intended for domestic use only. It is not intended for commercial use.
CARE & MAINTENANCE
• Clean the frame using a mild detergent and a damp cloth. Dry thoroughly afterwards. Do not use abrasives.
• Gently wipe the hood and seat with a clean damp cloth. Dry thoroughly after cleaning in the shade or in a well
ventilated area until dry.
• Never leave the stroller directly exposed to sunlight for long periods of time as fabric and plastic parts may become
damaged and/or discoloured.
• Moving parts may be lubricated with WD-40 or another silicon coating product. DO NOT USE OIL OR GREASE BASED
PRODUCTS. Regular lubrication lengthens the life of the stroller.
• Replace any broken or damaged parts IMMEDIATELY with approved parts only. DO NOT USE the stroller until it has
been repaired.
• When using the stroller in sandy areas, clean thoroughly after use to remove sand and/or salt from the wheel
mechanisms.
• In areas near the ocean, treat all metal parts including screws and springs with an anti oxidizing agent to prevent
oxidation and rust. This may lengthen the life of your stroller.
In Australia/New Zealand
www.valco.com.au
www.valco.co.nz
In North America only
www.valcobaby.com
1 800 610 7850
valco
baby
your reClInIng system
FIGURE I
Our system offers an almost innite amount of individual
seat adjustments.
TO RECLINE: While squeezing the centre release
mechanism in a pincer action, ease the seat down to the
desired position.
TO INCLINE: Place your hand at the centre of the rear of
the seat. Pull the incline strap while gently pushing on
the rear of the seat until the desired position has been
reached.
PRESS
PULL
I
/