
Fill with rinse aid
Fill with detergent
Select programme
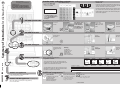
Summary of instructions for dishwasher
Brief and handy:
everything your dishwasher
needs...
Before using for the first
time, read the installation
and operating instructions!
Fill with special salt
Switch on appliance
Press On/Off switch, running time of the
chosen programme appears
When the display shows 0 (end of programme),
press On/Off switch
Switch off the appliance Everything O.K...
9000 255 658
en
Set the water softening system *
Quickly sorted ...
Find out the water hard-
ness at your water utility
company and enter
* only before using the dish-
washer for the first time or
if the water hardness
changes
Read off the setting ... and then set
– Hold down programme button B and switch on the main
switch, then release the buttons. The display of button B
and the number 4 set by the factory flash.
– Each time button B is depressed, the setting increases by
one; if 7 has been reached, the display jumps back to 0.
– Switch off the main switch. The selected setting has been
stored in the appliance.
Reset
A B C
B
Dissolves limescale (not required for set value 0!)
Unscrew
the lid.
Only before using
the dishwasher
for the first time
pour approx. 1 l /
1 1/4 pt water into
the salt opening.
Pour in max.
1.5 kg / 3 lb 5 oz
salt (never deter-
gent!)
Screw on the
lid. Switch on
dishwasher
immediately.
Everything is sparkling clean ... Refill whenever level indicator is light!
Press mark 1,
lift up lid 2.
Pour in
rinse aid.
Close the
lid. CLICK!
Very dirty dishes, a lot of detergent ...
If required, open
the lid (press the
pin).
Warning,
combination
products are not
suitable for all
programmes,
follow manufac-
turer’s instructions.
Pour in
detergent.
Push the lid
shut, press.
PLOP!
Quick, economical or intensive ...
Programme overview
This overview lists the max. possible number of
programmes. The programmes supplied with your
appliance are indicated on the fascia.
The programme data are values measured in the
laboratory in compliance with Standard EN 50242.
Deviations is practice are possible.
120
2,00
21
17
140
1,05
17
–
70
1,00
17
13
30
0,90
13
–
15
0,10
5
–
80–125
1,10–1,75
13–21
–
45_50_70_ 55_ /65_ 40_
Duration in minutes
Electricity consumption in kWh
Water consumption in litres
with Aquasensor
AutoIntensive Eco Quick
Prerinse
Gentle
h.
Time selection
...switches on as soon as
you press the time
selection button:
Alters the programme
start in hourly steps

Maintenance and care
For perfect rinsing results
Waste water pump *
Filters
Check and,
if required,
clean:
Rotate filter cylinder,
remove filter system
Rinse under
running water
Insert
Screw on filter
system.
NOTE MARK!
* some models
– Set main switch to OFF
– Scoop out any water
– Remove the filters
– Remove the cover (⇒A)
– Check the inner compartment for foreign
objects and, if required, remove foreign
objects
– Re-insert the cover (⇒B)
– Re-insert the filters and screw into position
– Re-insert the cover (⇒B)
– Re-insert the filters and screw into position
Spray arms
Remove blockages/
deposits
Pull up lower arm
Clean under running
water (if required,
use a toothpick)
Insert lower arm
Screw on upper arm
deposits
Unscrew upper arm
A
B
Rectifying minor faults yourself ... ... as it is worth doing it yourself!
Fault Possible causes
Appliance is not running /
stops
Check water supply
Display lights up
Supply fitting not open
Supply hose kinked
Supply fitting jammed or calcified
Open supply fitting.
Install supply hose without kinks.
1. Unscrew water connection.
2. Clean filter in the water connection.
3. Flow rate must be min. 9 l/min.
when water supply is open.
If the flow rate is less, replace
the supply fitting.
Remedial action
Plastic / utensils
discoloured
Too little detergent
Discoloration caused by food colourings
(tomato sauce)
Follow manufacturer’s instructions
(detergent).
Discoloration is harmless; subsequent
rinse cycles will cause it to fade.
Residual water in the
appliance
Waste water pump blocked
The programme
has not yet ended
Clean waste-water pump (see above).
Close the appliance, switch on and
wait until the programme ends
(“end of programme” display lights up)
or terminate programme
(see Terminating the programme).
Fault
Possible causes
Remedial action
Stains and streaks
Milky film on the utensils
(removable)
Rust on the cutlery
Rinse-aid dosage too high / too low
Glasses not dishwasher-proof.
Cutlery not rust-resistant
Hard knife blades are more susceptible
Extraneous rust
Streaks: reduce dosage.
Water or limescale stains: increase
dosage.
Use dishwasher-proof glasses.
Use a detergent suitable for glasses.
Use dishwasher-proof cutlery.
Never wash rusting parts
in the appliance.
More information can be found in the operating instructions
Milky film, glasses cloudy /
dull
(not removable)
Water softening system incorrectly set;
No salt
Correctly set water softening system.
Refill with salt.
Utensils are not clean
Sand or gritty residue
on the utensils
Utensils are situated close together
or one above the other
Too little detergent
Unsuitable programme selected
Spray arm nozzles blocked
Filters dirty, not seated firmly
Spray arms blocked
Separate the utensils, prevent contact
points.
Follow manufacturer’s instructions
(detergent).
Select a more intensive programme.
Clean the spray arms (see above).
Clean the filters (see above).
Arrange the utensils so that the spray
arms can rotate freely.
Stopping the programme ... Loading the dishwasher correctly ...
Press and hold the two
reset buttons simultaneously for
approximately 3 seconds while
the programme is running
(RESET)
”0” appears
The programme will stop
after 1 minute
Switch off the appliance.
Arrange dishwasher-proof utensils (having removed any ash, wax, grease, ink, sticky labels; remove,
large remnants of jam, dairy products and food) according to the operating instructions and check that
the spray arms can rotate freely.
-
 1
1
-
 2
2


Ask a question and I''ll find the answer in the document
Finding information in a document is now easier with AI