Page is loading ...
Authors:
Alex Aguila, Product Test Group
Major Contributor:
Tony Molina, Product Test Group
Implementing FCoE in the Linux
Operating System
This white paper explains using Broadcom-based network adapters and
Dell Force10 and Cisco Nexus switches.

Implementing FCoE in the Linux Operating System
ii
This document is for informational purposes only and may contain typographical errors and
technical inaccuracies. The content is provided as is, without express or implied warranties of any
kind.
© 2012 Dell Inc. All rights reserved. Dell and its affiliates cannot be responsible for errors or omissions
in typography or photography. Dell, the Dell logo, and PowerEdge are trademarks of Dell Inc. Intel and
Xeon are registered trademarks of Intel Corporation in the U.S. and other countries. Microsoft,
Windows, and Windows Server are either trademarks or registered trademarks of Microsoft Corporation
in the United States and/or other countries. Other trademarks and trade names may be used in this
document to refer to either the entities claiming the marks and names or their products. Dell disclaims
proprietary interest in the marks and names of others.
October 2012| Rev 1.0

Implementing FCoE in the Linux Operating System
iii
Contents
Executive summary ................................................................................................... 5
Introduction ........................................................................................................... 5
Described configuration ............................................................................................. 5
Setting up your network infrastructure for FCoE ................................................................ 7
Setting up FCoE for SLES 11 SP 2 .................................................................................. 12
Installing / verifying FCoE support .............................................................................. 12
Configure the FCoE client VLAN .................................................................................. 14
Configure the FCoE client to start at boot ..................................................................... 18
Troubleshooting ...................................................................................................... 20
Setting-up FCoE for RHEL 6.2 ...................................................................................... 25
Installing / verifying FCoE support .............................................................................. 25
Configuring the FCoE client VLAN................................................................................ 26
Configure the FCoE client to start at boot ..................................................................... 28
Troubleshooting .................................................................................................... 28
Conclusion ............................................................................................................ 29
Figures
Figure 1. Network infrastructure diagram. ...................................................................... 7
Figure 2. Results of show fip-snooping enode command. .................................................... 10
Figure 3. Results of show fip-snooping fcf command. ........................................................ 10
Figure 4. Results of FCoE and LLDP query commands. ....................................................... 11
Figure 5. FCoE support not installed............................................................................. 12
Figure 6. Entering Software Management menu. .............................................................. 13
Figure 7. Selecting FCoE packages for installation. ........................................................... 14
Figure 8. Network Services menu. ............................................................................... 15
Figure 9. FCoE client configuration screen with interfaces sub menu. .................................... 15
Figure 10. Create FCoE VLAN interface. .......................................................................... 16
Figure 11. Confirmation of new FCoE VLAN interface. ......................................................... 16
Figure 12. New FCoE VLAN created. .............................................................................. 17
Figure 13. FCoE VLAN is now online. .............................................................................. 17
Figure 14. FCoE LUNs displayed. ................................................................................... 18
Figure 15. Select the FCoE Client Configuration menu. ....................................................... 19
Figure 16. Configure FCoE to start at system boot. ............................................................ 20
Figure 17. Restarting the rclldpad and rcfcoe daemons. ...................................................... 21

Implementing FCoE in the Linux Operating System
iv
Figure 18. Failure to detect installation media. ................................................................ 21
Figure 19. Entering Software Repositories Menu. ............................................................... 22
Figure 20. Deleting Old SLES Software Repository. ............................................................. 23
Figure 21. Adding new SLES Install Media Software Repository. .............................................. 23
Figure 22. Selecting the installation media. ..................................................................... 24
Figure 23. Accepting the License Agreement. ................................................................... 24
Figure 24. No FCoE support is installed. .......................................................................... 25
Figure 25. Mounting the installation media. ..................................................................... 25
Figure 26. Installing FCoE support. ................................................................................ 25
Figure 27. Unmounting the installation media. ................................................................. 26
Figure 28. Creating the FCoE Adapter Configuration file. ..................................................... 26
Figure 29. Setting the DCB_REQUIRED variable to "no". ....................................................... 26
Figure 30. Checking the SUPPORTED_DRIVERS variable. ....................................................... 27
Figure 31. Verifying proper configuration of FCoE VLAN. ...................................................... 27
Figure 32. Verifying LUNs availability. ............................................................................ 28
Figure 33. Configuring FCoE to start at system boot. .......................................................... 28
Figure 34. Verifying that FCoE services are configured to start at boot time .............................. 28
Figure 35. Restarting the lldpad and fcoe daemons. ........................................................... 29

Implementing FCoE in the Linux Operating System
5
Executive summary
This document provides instructions on setting up Fibre Channel over Ethernet (FCoE) using a Dell
Force10 switch, a Cisco Nexus switch, Broadcom-based network adapters, and servers running
supported Linux operating systems. It is intended for intermediate Network and System Administrators
with 2-5 years of experience, and assumes a moderate level of network switch administration expertise
and Linux system administration expertise.
Introduction
Fibre Channel over Ethernet (FCoE) encapsulates Fibre Channel frames over IEEE 802.3 Ethernet
networks equipped with FCoE compliant hardware, thereby reducing the amount of physical IO
connectivity necessary to access Fibre Channel-based storage. However, FCoE can be challenging to
implement due to the complexities involved in correctly configuring the various devices on the
network, such as the SAN, switches, network interface adapters, and operating systems on the servers.
This Dell How-To document is intended to assist you in setting-up FCoE in your environment.
Due to the numerous variances in possible SAN, switch, network interface adapter, and server choices,
it is not possible to write exact instructions for every conceivable supported configuration. As such,
this document is written toward implementing one specific real-world configuration, as detailed in the
Described Configuration section below.
Described configuration
This example used the following Hardware:
SAN: EMC Clariion CX700.
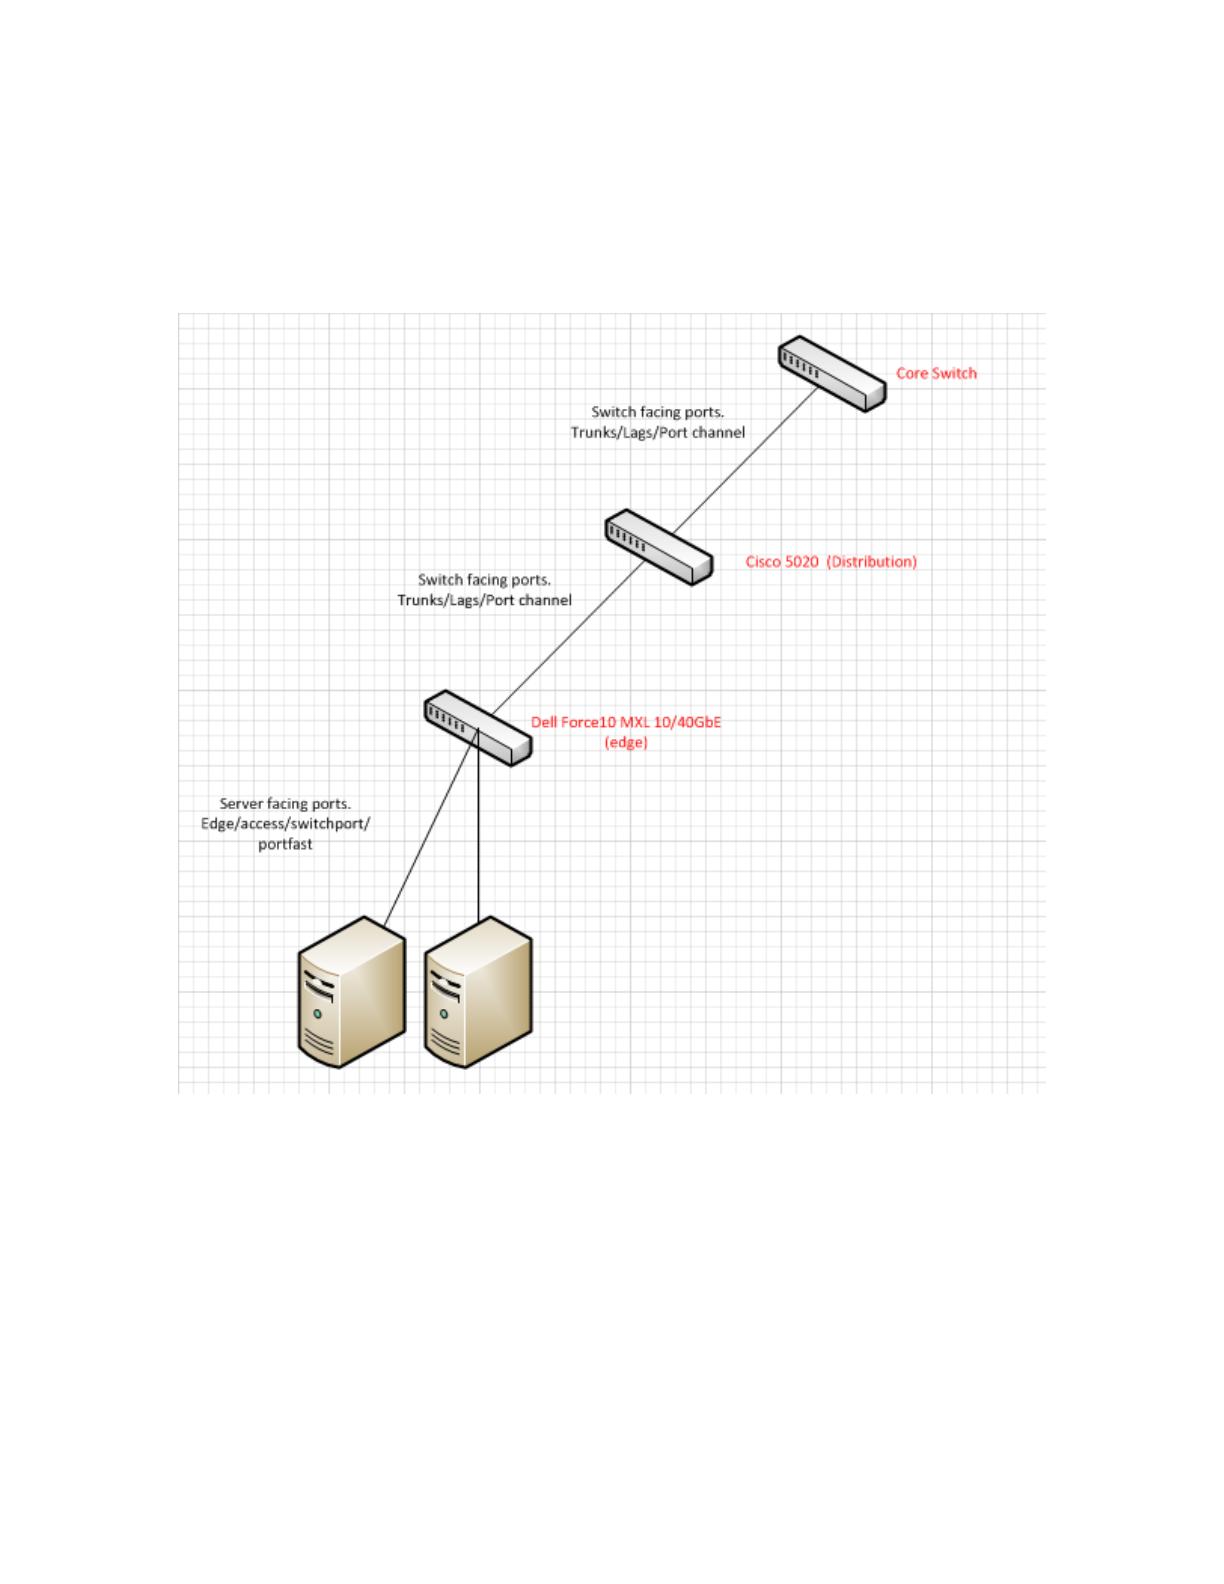
Switches: Dell Force10 MXL 10/40GbE Switch (edge); Cisco Nexus 5020 Switch (distribution);
Appropriate core switch for your network of any applicable make and model (core)
Chassis: Dell M1000e Blade Server Chassis
Server: Dell PowerEdge M520 Server
Network Adapter: Broadcom 57810S Dual-Port 10GbE KR Blade Converged Mezzanine Card
Operating System: Red Hat Enterprise Linux 6.2; SuSE Linux Enterprise Server 11 Service Pack 2

Implementing FCoE in the Linux Operating System
6
Prerequisites
Prior to attempting to configure FCoE for Linux, meet the following prerequisites:
1. The Firmware of the Dell Force10 switch must be up-do-date. Refer to the Dell Support
Website and enter your service tag to download and receive instruction on how to update your
Dell Force10 switch to the latest firmware. In this document, Dell Force10 MXL 10/40GbE
firmware version 8.3.16.1 was used.
2. The Firmware of the Cisco switch must be up-do-date. Refer to the Cisco Support Website to
download and receive instruction on how to update your Cisco switch to the latest firmware.
In this document, Cisco Nexus 5020 firmware version 5.1(3)N2(1a) was used.
3. The firmware of the Broadcom network adapter must be up-to-date. Please refer to Dell
Support Website and enter your service tag to download and receive instruction on how to
update your Broadcom network adapter to the latest firmware. In this document, Broadcom
57810S Dual-Port 10GbE KR Blade Converged Mezzanine Card firmware version 7.2.14 was used.
4. Install the appropriate Linux Operating System and make sure it is functioning on the Dell
PowerEdge server. In addition, the Ethernet interface over which you want FCoE traffic to flow
must be configured and online. Verify that you can ping another device on the network using
this Ethernet interface before attempting to setup FCoE.
5. The driver for the Broadcom network adapter must be up-do-date. Refer to Dell Support
Website and enter your service tag to download and receive instruction on how to install the
latest driver for your Broadcom network adapter. In this document, Broadcom LAN driver for
Linux version 17.2.0 was used.
6. You need access to the installation media for your particular Linux operating system.
7. You must set up the appropriate LUNs for use on your Fibre Channel SAN. The SAN is not aware
that the FCoE is being used and the LUN will be set up and functioning identically as would any
other non-FCoE connected Fibre Channel LUN, regardless of the make and model of the SAN.
Configuration of the SAN is outside the scope of this FCoE-centric document. For instructions
on setting-up the appropriate LUNs for your particular SAN, refer the documentation for your
Fibre Channel SAN.
Implementing FCoE in the Linux Operating System
7
Setting up your network infrastructure for FCoE
Perform the following steps to set up your network infrastructure for FCoE. While performing these
steps, refer to the network diagram in Figure 1.
Network infrastructure diagram. Figure 1.
1. Set up in NPIV mode and enable the FCoE feature on the Cisco Nexus 5020 distribution switch.
From the Global Configuration Mode of the distribution switch, run the following commands:
feature fcoe
feature lcap
feature lldp
feature npiv

Implementing FCoE in the Linux Operating System
8
2. Enable the FCoE feature on the Dell Force10 MXL 10/40GbE edge switch by running the
following commands from the Global Configuration Mode of the edge switch command line:
service-class dynamic dot1p
cam-acl l2acl 4 ipv4acl 2 ipv6acl 0 ipv4qos 2 l2qos 1 l2pt 0 ipmacacl 0 vman-qos 0 ecfmacl 0
fcoeacl 2 iscsioptacl 2
feature fip-snooping
fip-snooping enable
protocol lldp
no advertise dcbx-tlv ets-reco
advertise management-tlv system-description system-name
3. Program the server facing ports (internal ports connected to the PowerEdge blade servers) on
the edge switch by running the following commands from the switch command line:
interface TenGigabitEthernet 0/30
no ip address
mtu 12000
portmode hybrid
switchport
spanning-tree pvst edge-port
!
protocol lldp
dcbx port-role auto-downstream
no shutdown
4. Program the switch facing ports (physically accessible ports on the back of the M1000e chassis)
on the edge switch by running the following commands from the switch command line:
interface TenGigabitEthernet 0/49
description LAG port to Cisco 5020
no ip address
mtu 12000
!
port-channel-protocol LACP
port-channel 2 mode active
!
protocol lldp
no advertise dcbx-tlv ets-reco
dcbx port-role auto-upstream
no shutdown
!
***NOTE: If not in a LAG, omit the highlighted in red above***
5. Create the default VLAN by giving the default-vlan XX command (where XX equals the
VLAN number) from the edge switch command line as seen below:
default-vlan 46
6. Create the FCoE VLAN (this is the actual VLAN that allows FCoE traffic on the edge switch) from
the edge switch command line as seen below:
int vlan 255

Implementing FCoE in the Linux Operating System
9
7. On the Cisco Nexus 5020 distribution switch, make sure that the FCoE VLAN is created and
associated to the appropriate Virtual SAN (VSAN) by running the following from the switch
command line:
interface vlan 255 (creates the VLAN)
FCOE vsan 255 (defines the VLAN as FCoE, and then associates it to VSAN 255)
no shut (turns on the VLAN)
8. On the distribution switch; make sure that the appropriate native VLAN for that interface is set
up as seen below:
interface Ethernet 1/12
switchport mode trunk
switchport trunk native vlan 46
switchport trunk allowed vlan 46,255 (notice that the appropriate FCoE VLAN is
also allowed, VLAN 255)
9. Bind the FCoE-FIP MAC address of the server’s network interface adapter. You can get the
server’s MAC address from the CMC by navigating to Server -> Setup ->FlexAddress from the
CMC management GUI. Be aware of what port your server is on and what side of the fabric
your server is on (for example: Fabric A side 2). You bind this address on the Cisco 5020
distribution switch that is running NPIV mode by running the following commands from the
switch command line:
interface vfc XX (this creates a Virtual Fibre Channel (FVC) interface; XX is any
number id that is available)
bind mac-address a4:ba:db:49:d0:17 (binding FCoE-FIP MAC Address)
no shutdown (this turns on the interface)
10. The last thing to do on the distribution switch is to place the newly created VFC into the
proper VSAN database while in global configuration mode. To do this, run the following
commands from the distribution switch command line:
VSAN database (enter VSAN definition/configuration mode)
VSAN 255 interface vfc 50 (VFC 50 being placed into VSAN 255)
11. On the Dell Force10 MXL 10/40GbE (edge) switch, verify that an FCoE connection was
established. To do this, run the following command on the edge switch command line while in
EXEC mode; see Figure 2 for sample results:
show fip-snooping enode

Implementing FCoE in the Linux Operating System
10
Results of show fip-snooping enode command. Figure 2.
12. Verify that the Fibre Channel forwarder port is enabled and working correctly on the edge
switch. Run the following command from the edge switch command line while in EXEC mode
(see Figure 3 for results):
show fip-snooping fcf
Results of show fip-snooping fcf command. Figure 3.
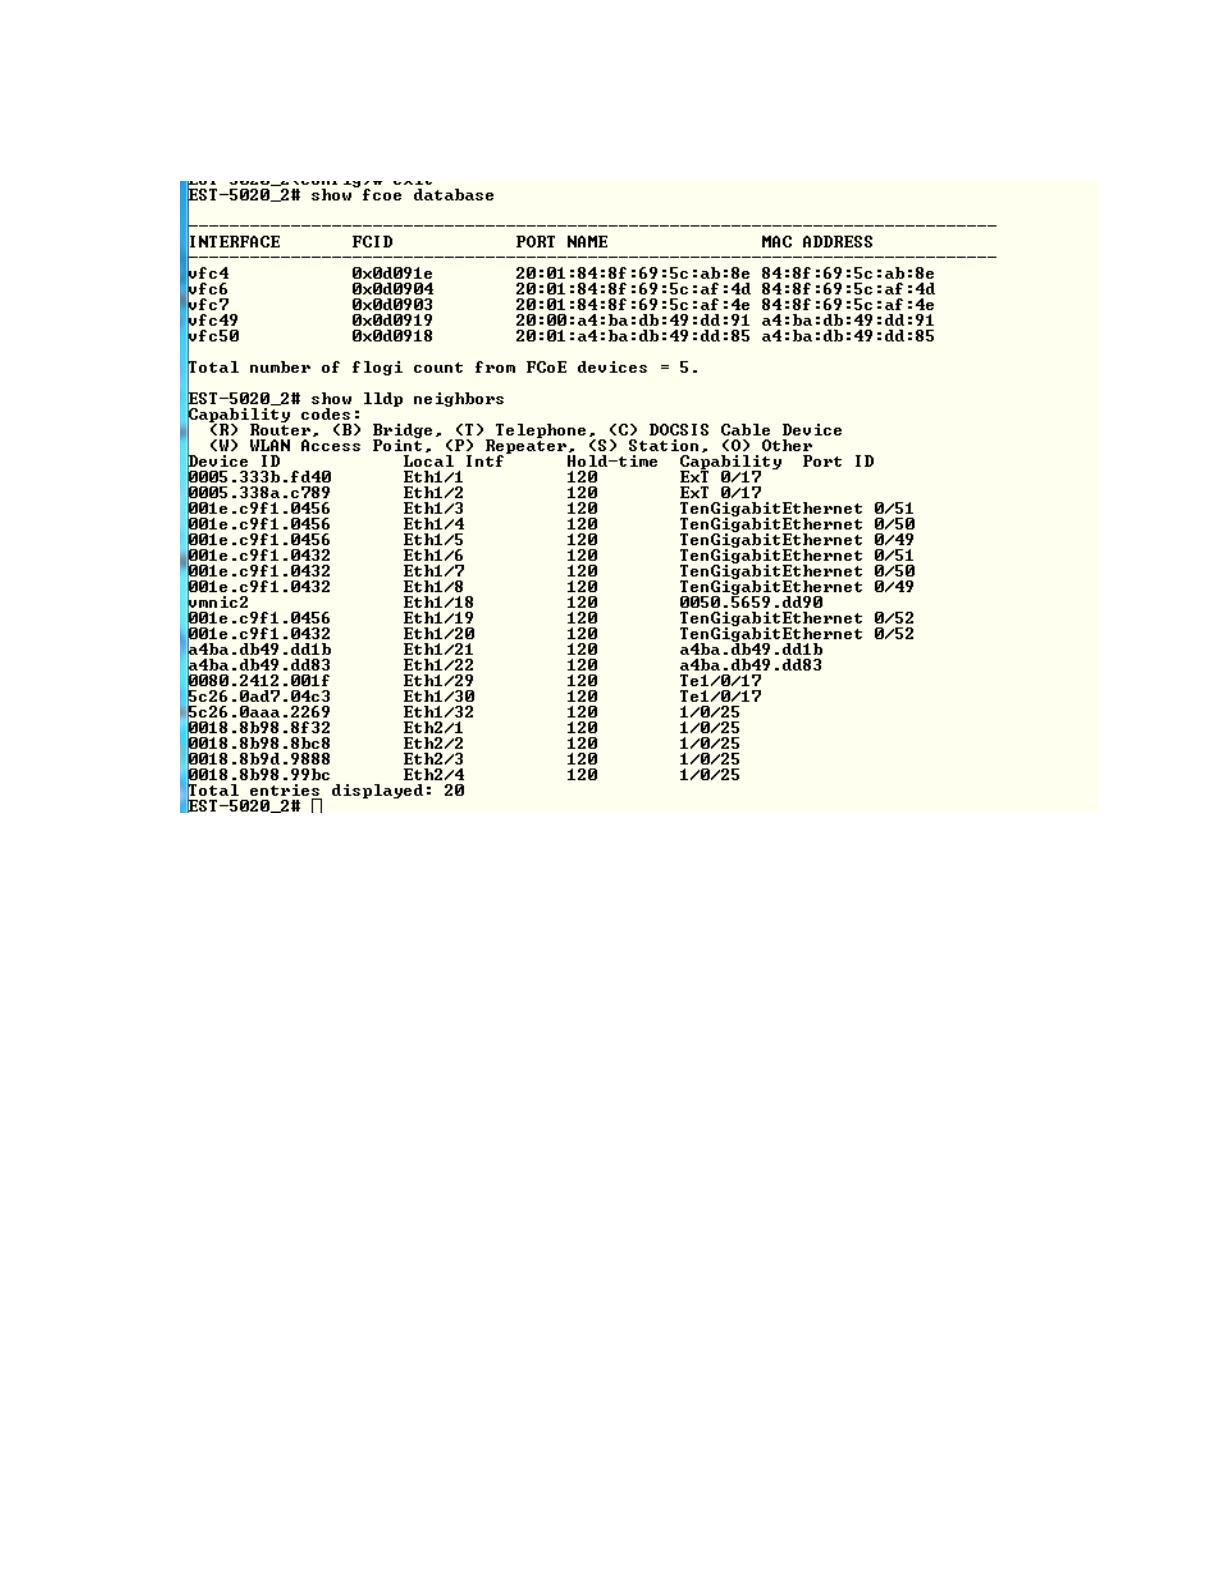
13. To verify on the Cisco Nexus 5020 distribution switch that your server is successfully
connected using FCoE, you can run the following commands in EXEC mode; see Figure 4 for
results:
show fcoe database (this lists the vfcs and their respective active MAC address)
show lldp neighbors (this shows all external connections to the switch, their device
IDs, and their respective incoming ports)
Implementing FCoE in the Linux Operating System
11
Results of FCoE and LLDP query commands. Figure 4.
Implementing FCoE in the Linux Operating System
12
Setting up FCoE for SLES 11 SP 2
Installing / verifying FCoE support
If FCoE support has not been installed in SLES 11 SP2, it must be installed. To verify if FCoE support
was installed in SLES 11 SP2, perform the following steps:
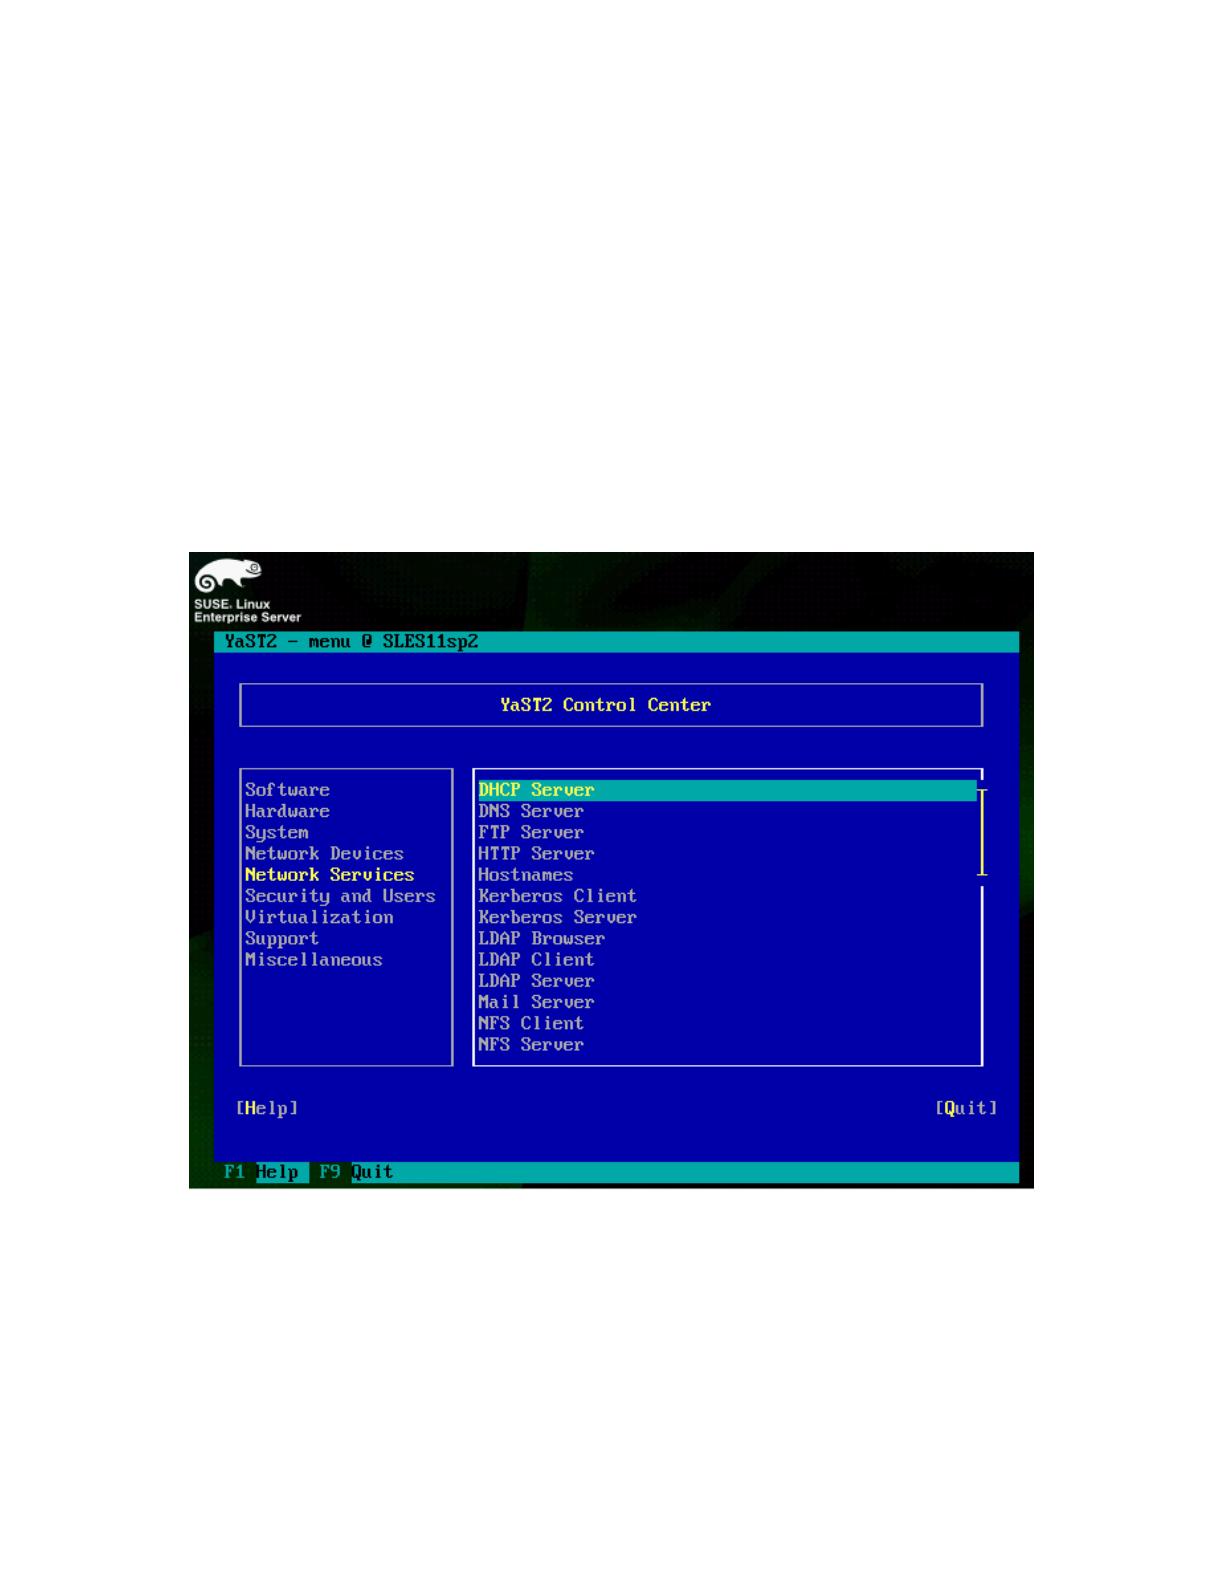
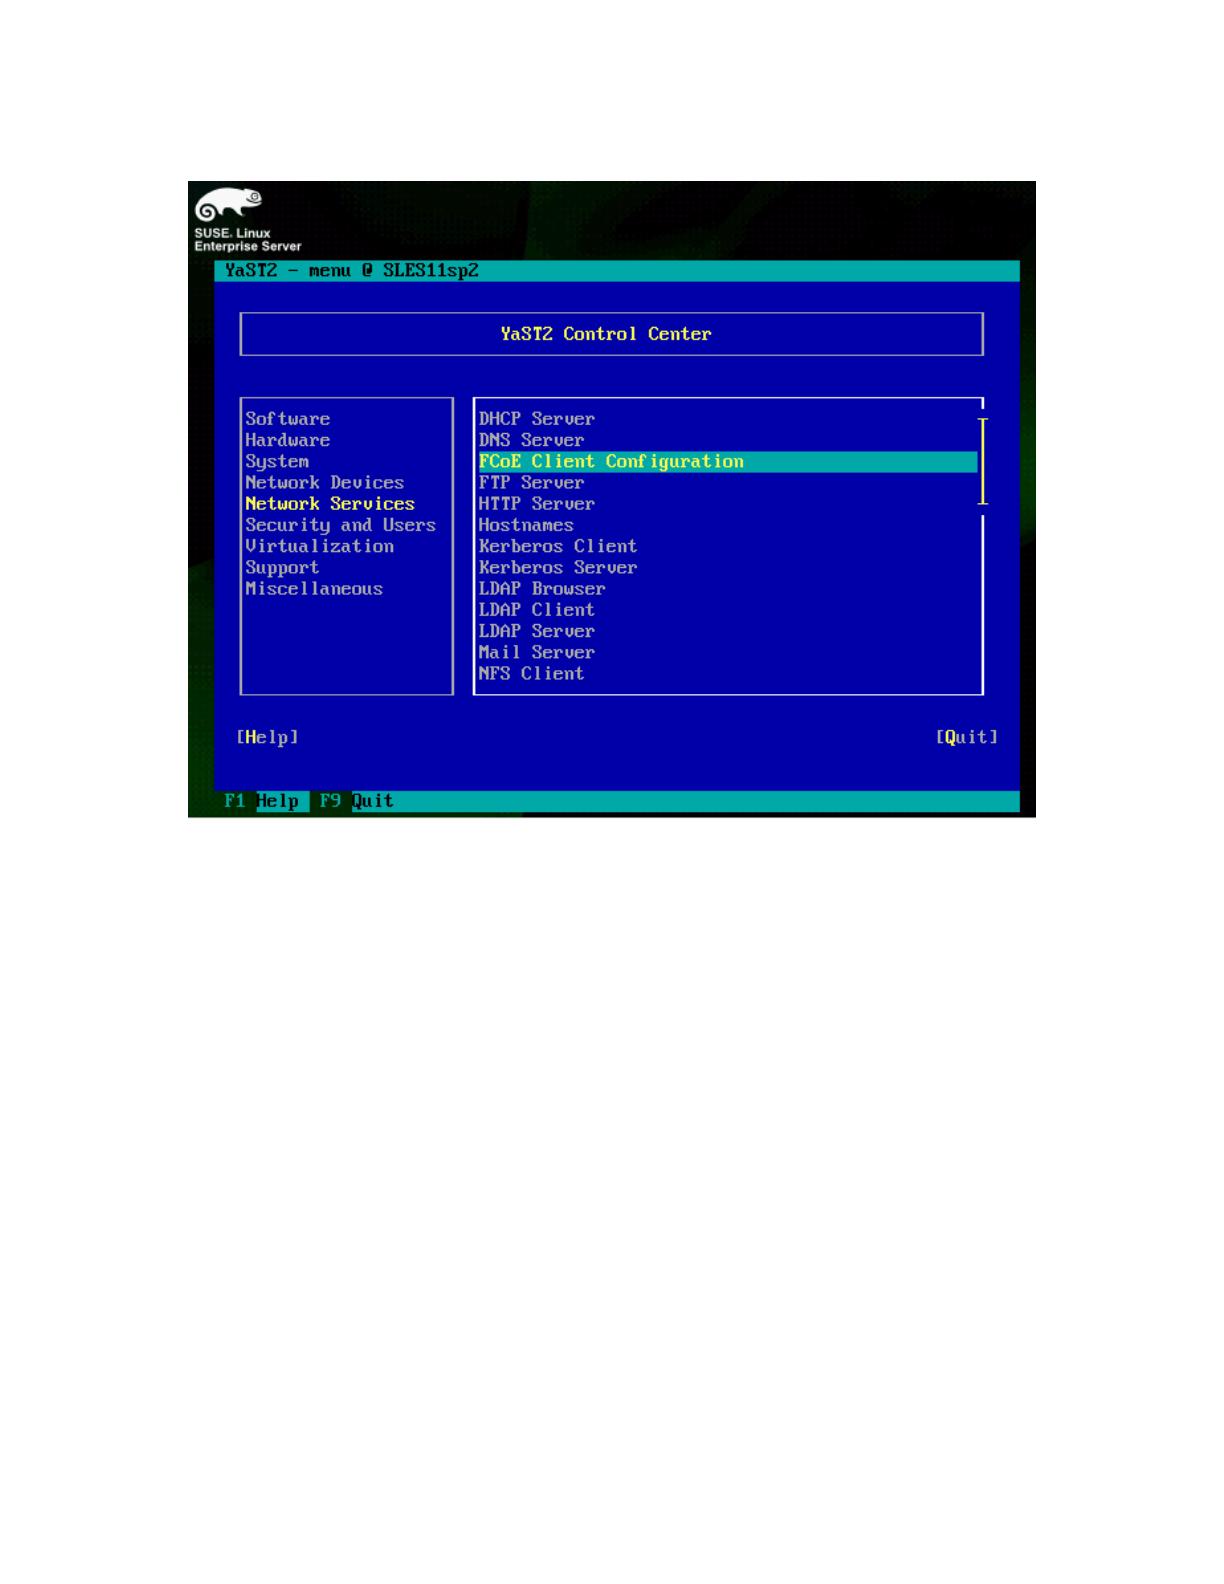
1. Log-in as root, then the start YaST2 Control Center by running the yast command. From
YaST2, select Network Services in the left-side menu, then use the Tab key switch to the
right-side menu. Use the arrow keys to scroll up and down the list of Network Services and
look for FCoE Client Configuration; if FCoE Client Configuration is not listed, as
in Figure 5, then FCoE support is not installed in SLES 11 SP2, and must be installed at this
time.
FCoE support not installed. Figure 5.
Implementing FCoE in the Linux Operating System
13
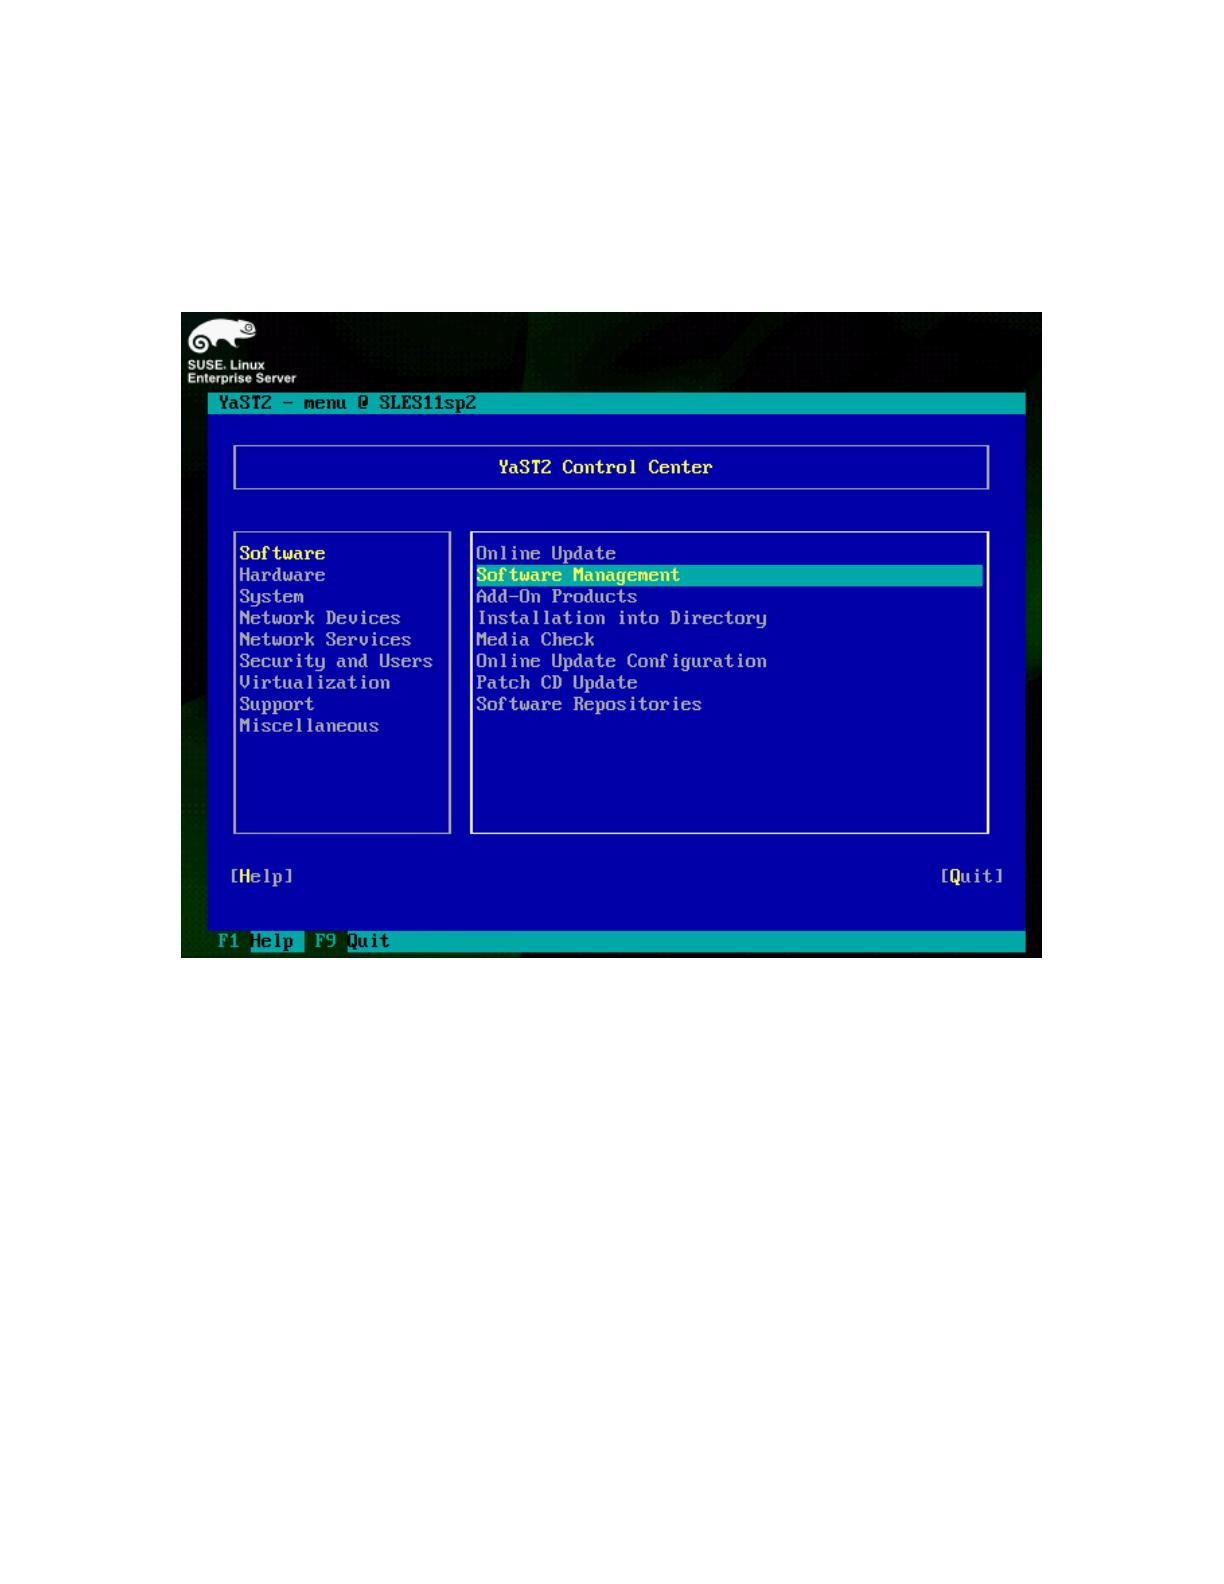
2. To install FCoE and the appropriate support packages, insert Disc 1 of the SLES 11 SP2
installation media into your CD/DVD drive. Next, from YaST2, select Software from the left-
side menu. Then select Software Management in the right-side menu, and press Enter, as in
Figure 6.
Entering Software Management menu. Figure 6.
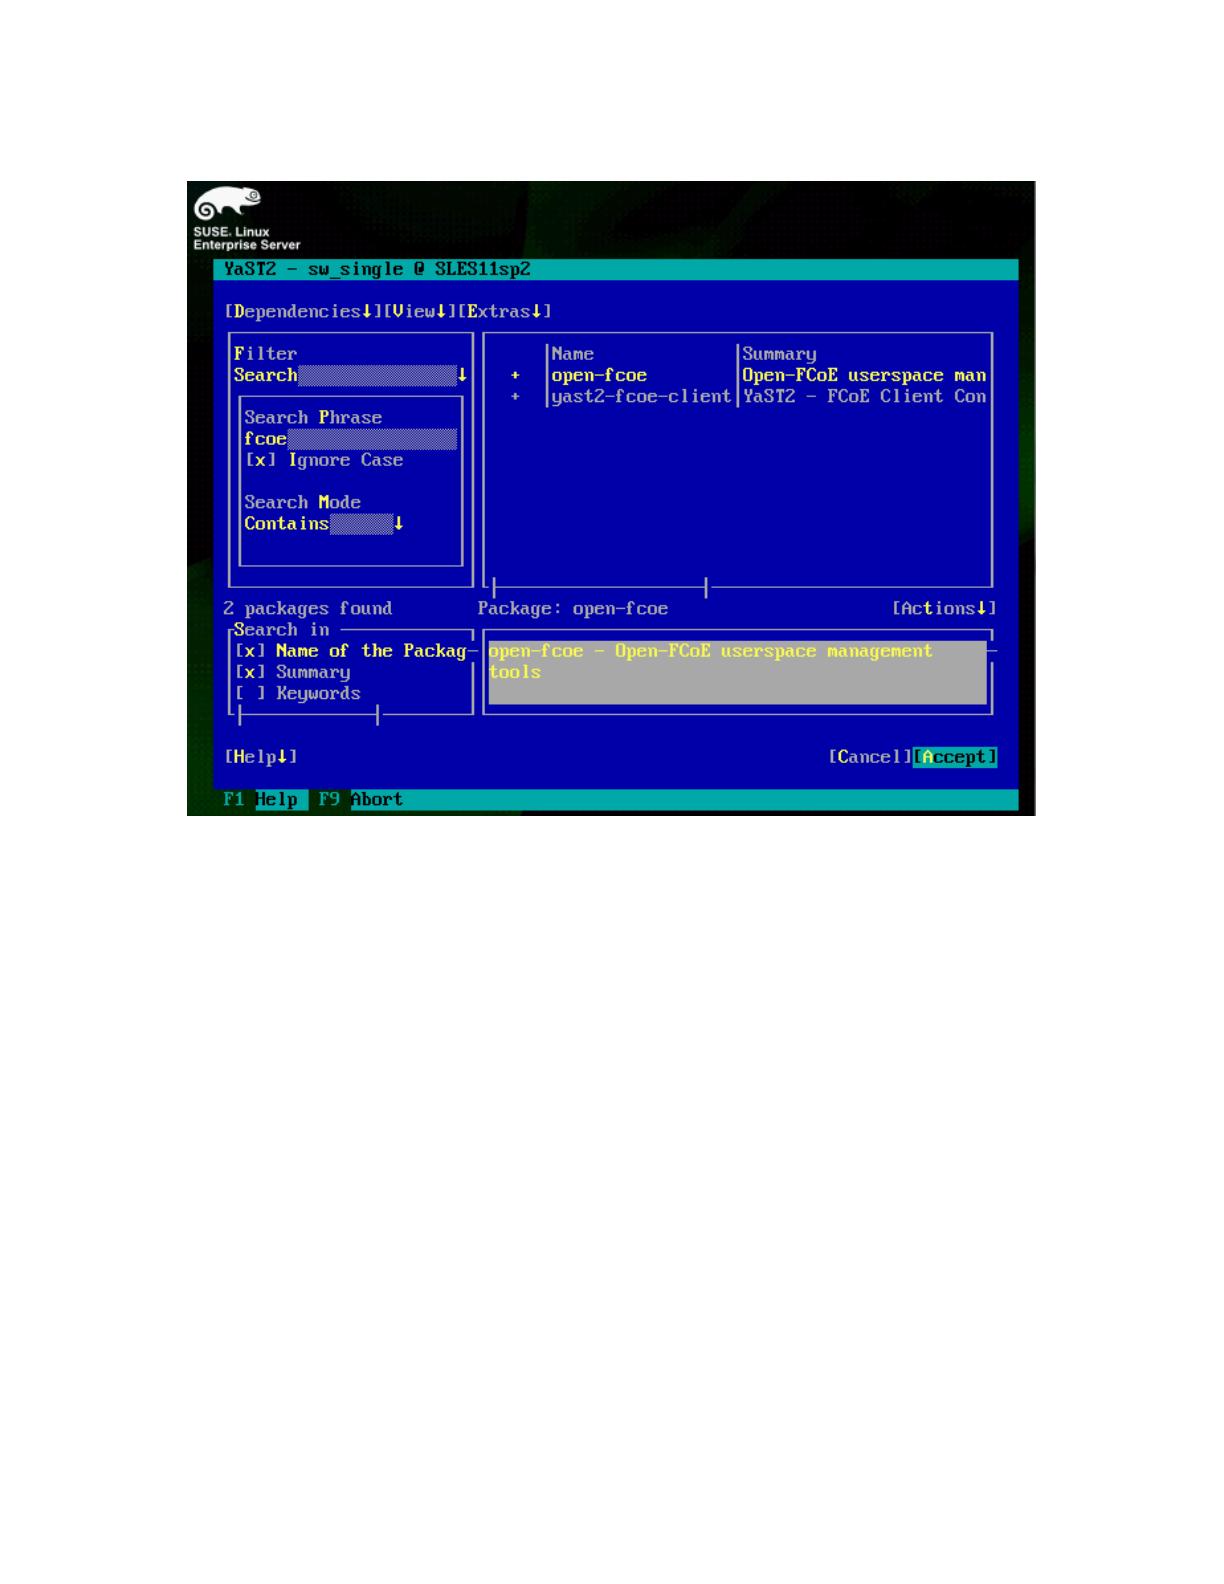
3. Type fcoe into the Search Phrase box, and then press Enter. You should be presented with
open-fcoe and yast2-fcoe-client as installable packages. Use the Tab key to highlight
each of these items, and mark them for installation by using the Space Bar to put a + in front
of each of the packages names. Then select Accept to install the packages, as in Figure 7.
Implementing FCoE in the Linux Operating System
14
Selecting FCoE packages for installation. Figure 7.
You may be prompted to accept any Automatic Changes to resolve dependency issues; if this
happens, select OK to allow the installation to proceed. After the packages install, you are
returned to the YaST2 Control Center. When finished, quit the YaST2 Control Center.
Configure the FCoE client VLAN
Next, configure the FCoE client VLAN by performing the following steps:
1. Start the YaST2 Control Center using the yast command, then select Network Services,
and then FCoE Client Configuration, as in Figure 8.

Implementing FCoE in the Linux Operating System
15
Network Services menu. Figure 8.
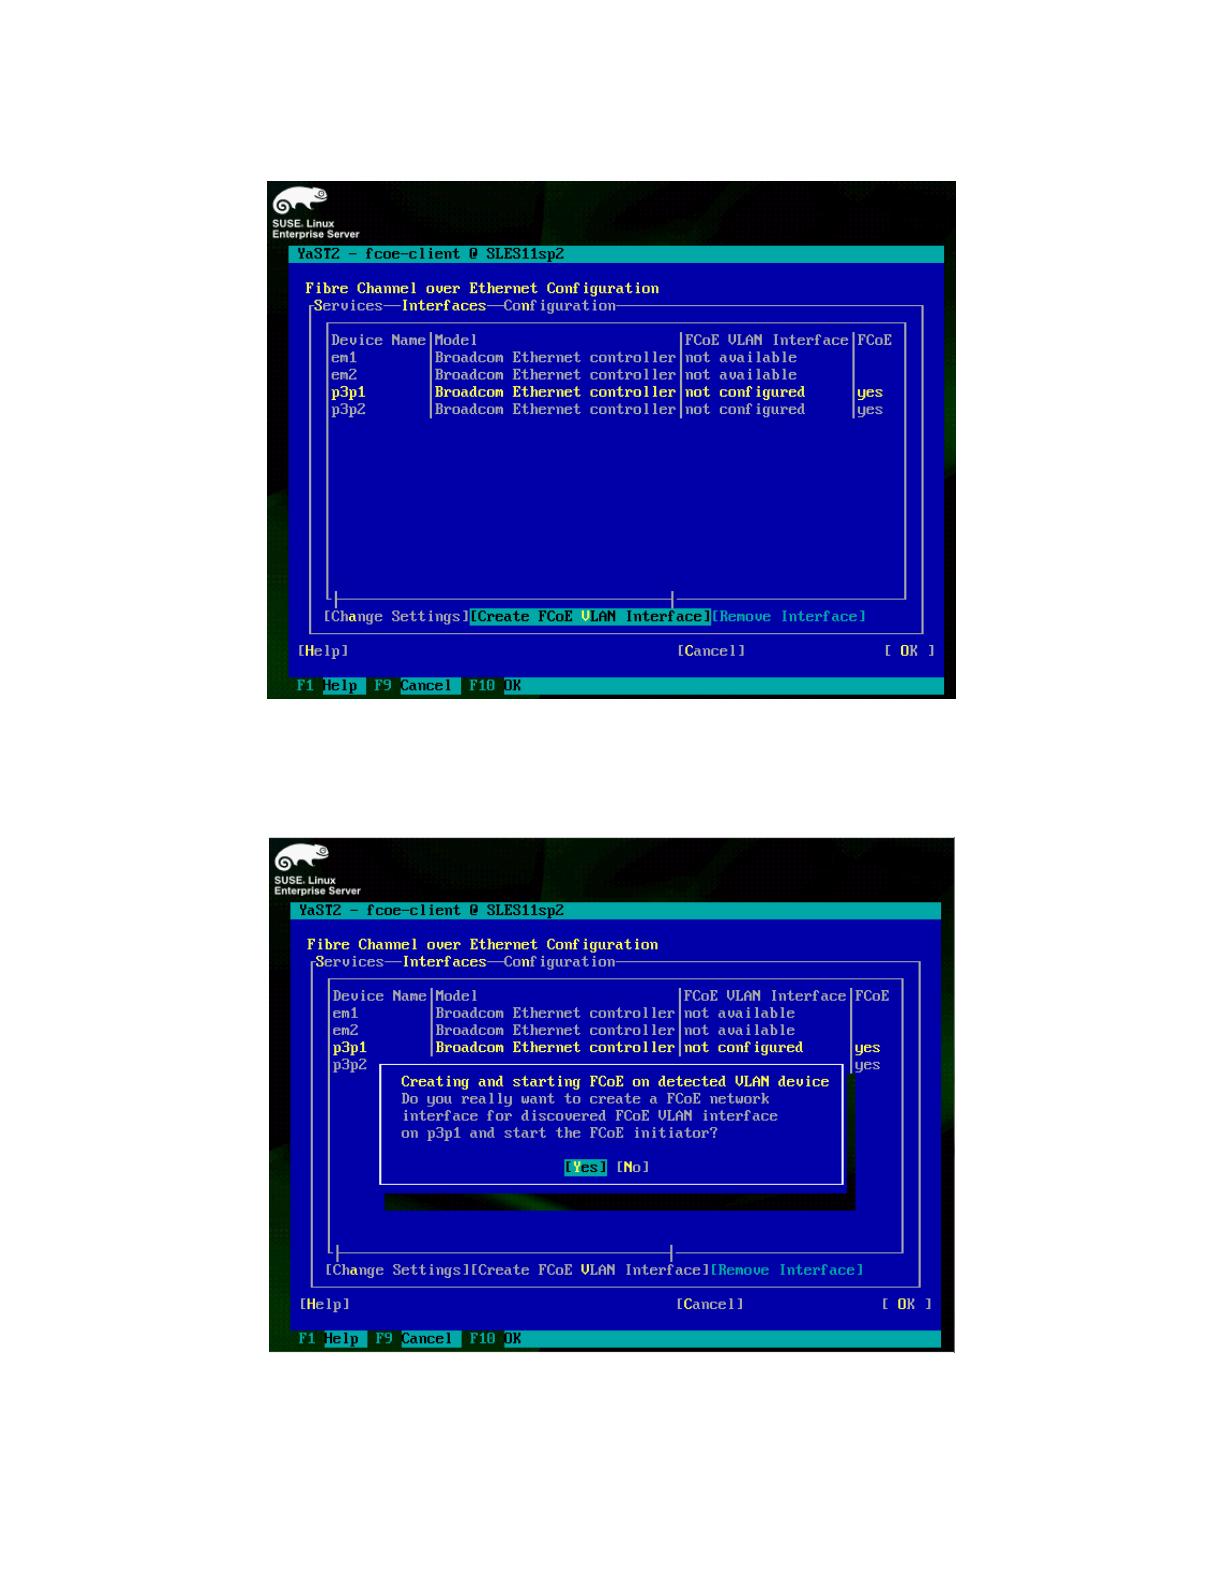
2. You are brought to the Fibre Channel over Ethernet Configuration screen. Use the
Tab key to select the Interfaces sub-menu, as in Figure 9.
FCoE client configuration screen with interfaces sub menu. Figure 9.
Note that the supported Broadcom network adapters have yes listed in the FCoE column, while
unsupported Broadcom network adapters will not have any listing in the FCoE column.
3. Highlight the adapter for which you would like to configure FCoE, and then select Create
FCoE VLAN Interface, as in Figure 10.
Implementing FCoE in the Linux Operating System
16
Create FCoE VLAN interface. Figure 10.
4. You are prompted to confirm whether or not you really want to create a new FCoE VLAN
interface, as in Figure 11; select Yes.
Confirmation of new FCoE VLAN interface.
Figure 11.
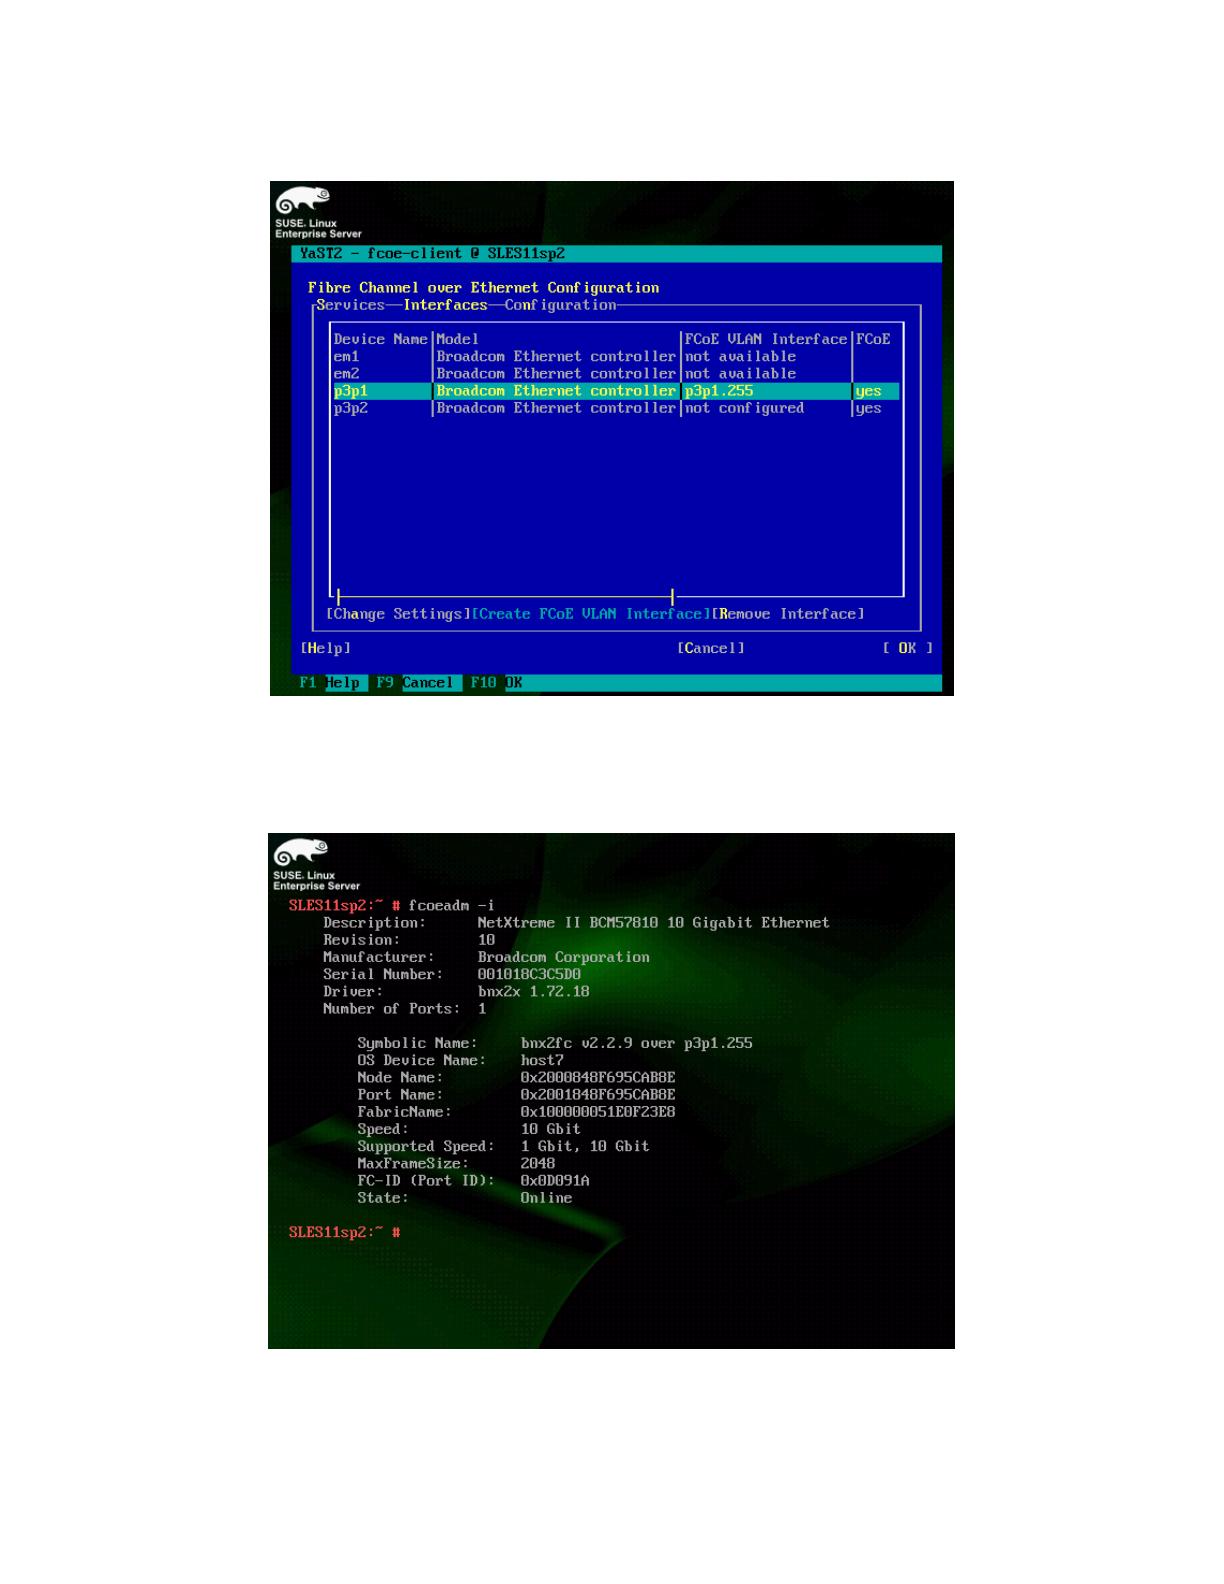
You then see your FCoE VLAN appear in the FCoE VLAN Interface column, as in Figure 12.
Implementing FCoE in the Linux Operating System
17
New FCoE VLAN created. Figure 12.
5. Select OK, and then Quit to return to the command prompt. Run the command fcoeadm -i
to verify that the FCoE VLAN has been successfully brought online, as in Figure 13.
FCoE VLAN is now online. Figure 13.
Implementing FCoE in the Linux Operating System
18
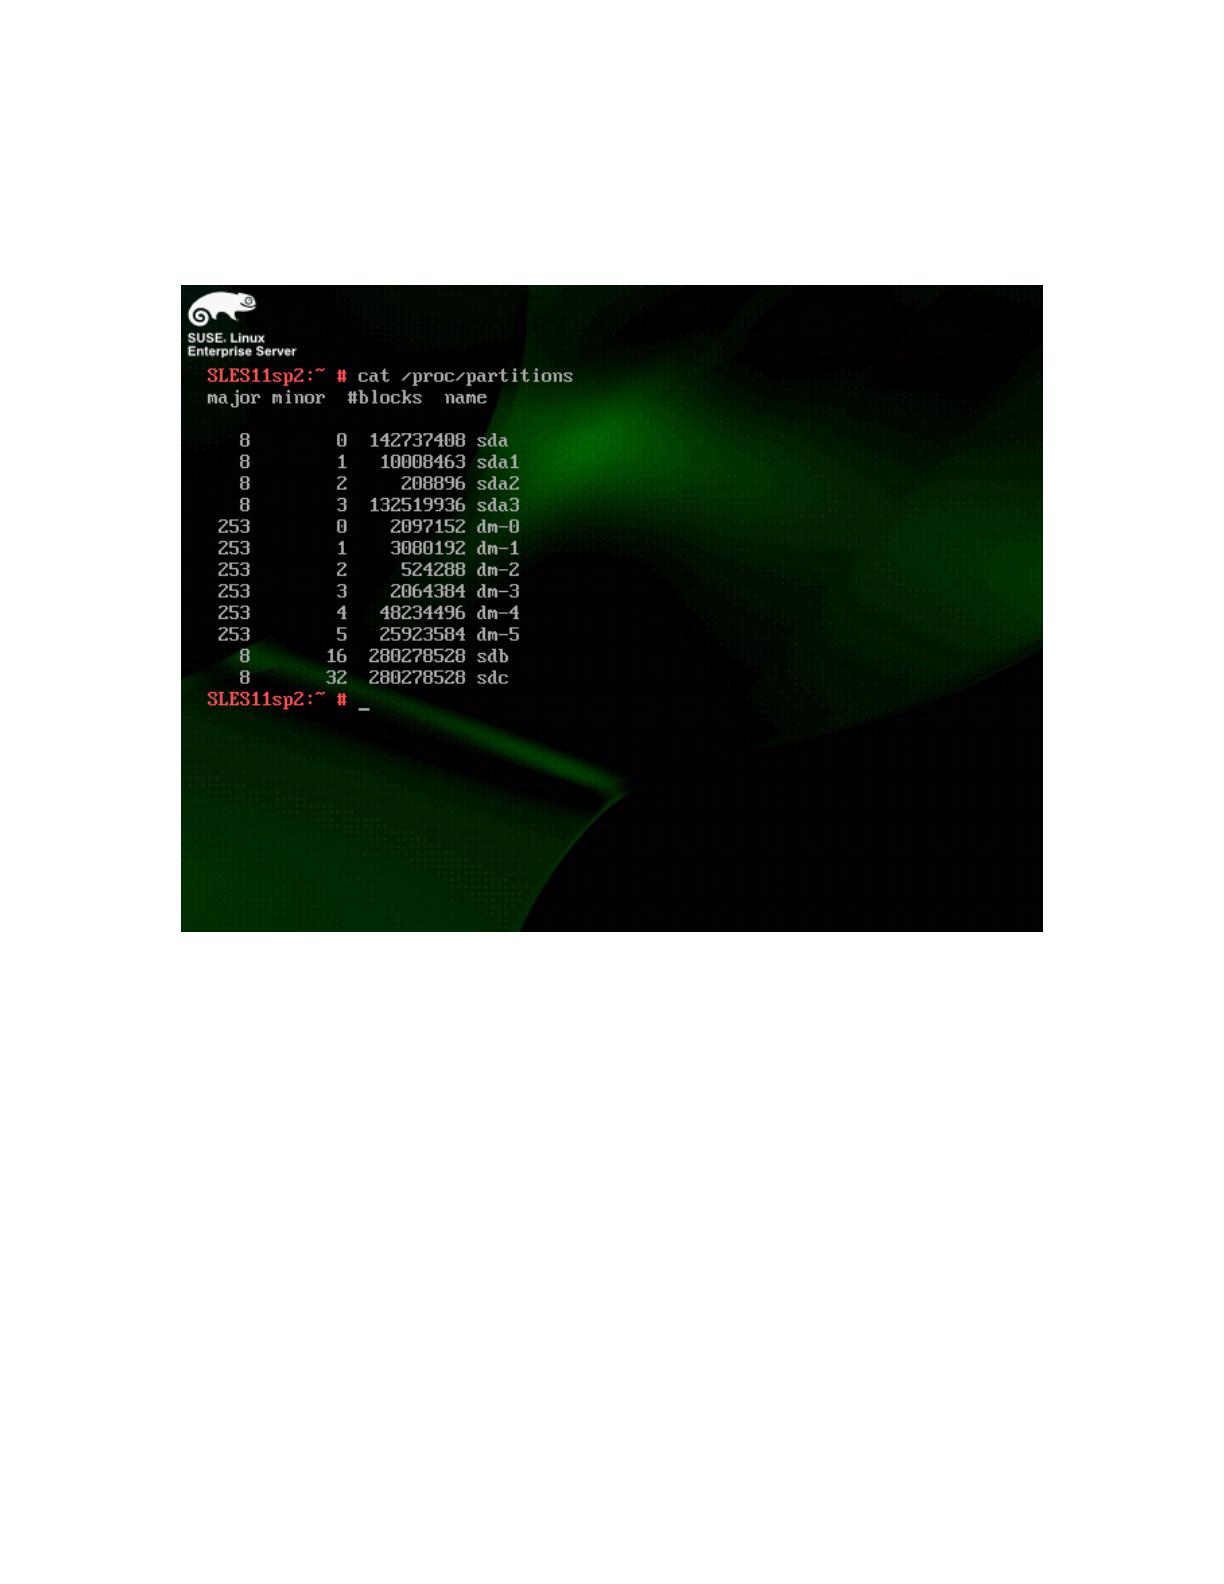
6. Finally, to determine the device names for your FCoE LUNs, run the cat /proc/partitions
command, as in Figure 14. In this example, the FCoE LUNs are listed as /dev/sdb and
/dev/sdc.
FCoE LUNs displayed.
Figure 14.
Partition and mount FCoE LUNs as any other hard disk device.
Configure the FCoE client to start at boot
If you want the FCoE client to start and the FCoE LUNs to automatically be available after every
reboot, configure the appropriate services using YaST2 by performing the following steps:
1. Start the YaST2 Control Center using the yast command, select Network Service, and then
FCoE Client Configuration, as in Figure 15.
Implementing FCoE in the Linux Operating System
19
Select the FCoE Client Configuration menu. Figure 15.
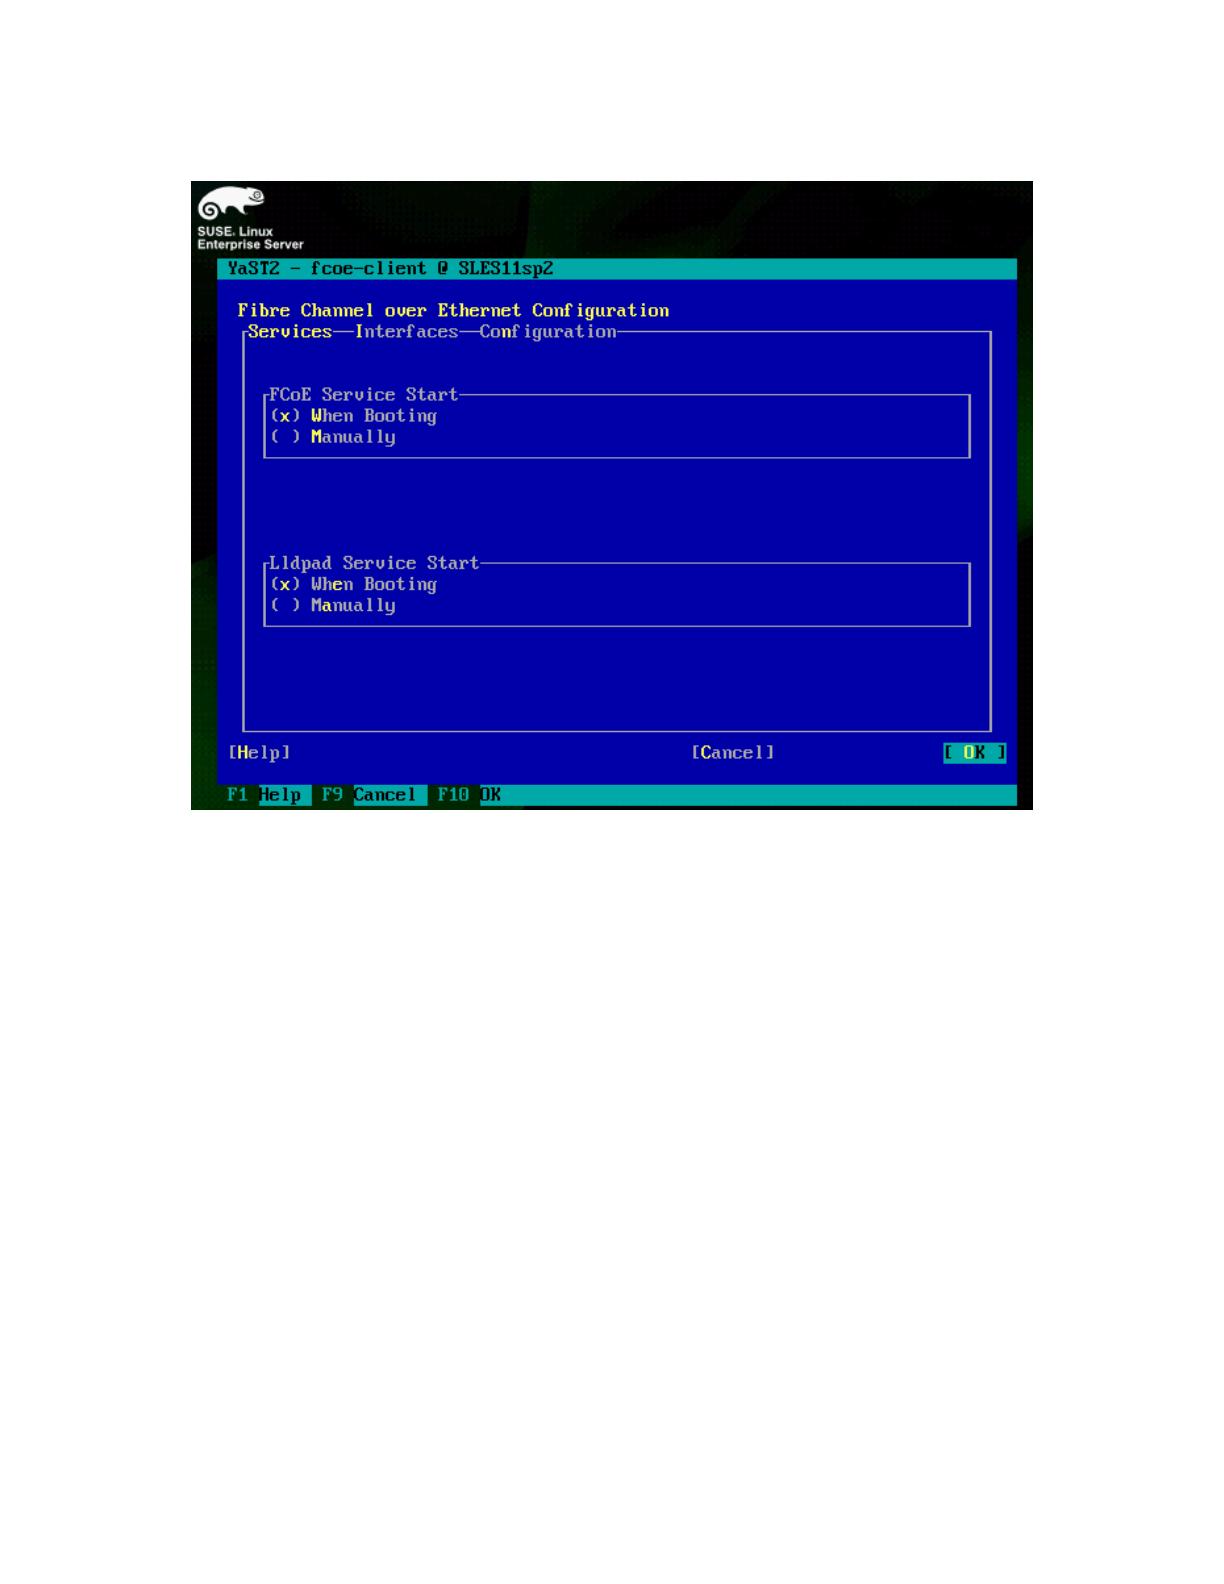
2. Configure FCoE to start when the system boots. Select the Services menu. Then set both
FCoE Services Start and Lldpad Services Start to When Booting, as in Figure 16.
Implementing FCoE in the Linux Operating System
20
Configure FCoE to start at system boot. Figure 16.
3. Click OK and then Quit to return to the command prompt. The FCoE client should now start as
part of SLES 11 SP2s boot process, and the FCoE LUNs should be available after the system
boots.
Troubleshooting
Various conditions may exist on the network that interferes with FIPS snooping, particularly on
congested networks.
If the FCoE client is unable to see the FCoE VLAN after booting, restart the lldpad and fcoe
daemons as a troubleshooting step.
1. To restart the lldpad and fcoe daemons, run the following commands:
rcfcoe stop; rclldpad stop; rclldpad start; rcfcoe start
2. Then check the FCoE VLAN status by running fcoeadm -i. Figure 17 shows VLAN status
details.
/