LUDP8908SN

LG LUDP8908SN User manual

  • Hello! I am an AI chatbot trained to assist you with the LG LUDP8908SN User manual. I’ve already reviewed the document and can help you find the information you need or explain it in simple terms. Just ask your questions, and providing more details will help me assist you more effectively!
www.LGSIGNATURE.com
Copyright © 2020 LG Electronics Inc. All Rights Reserved.
OWNER'S MANUAL
DISHWASHER
MFL69261731
Read this owner's manual thoroughly before operating the appliance and keep it handy for
reference at all times.
LUDP890***
EN ENGLISH SP ESPAÑOL FC FRANÇAIS
TABLE OF CONTENTS
3
4 PRODUCT FEATURES
5 SAFETY INSTRUCTIONS
5 IMPORTANT SAFETY INSTRUCTIONS
10 PRODUCT OVERVIEW
10 Exterior Parts
11 Interior Parts
12 Accessories
13 INSTALLATION
13 Installation Parts and Tools
14 Installation Overview
14 Product Dimensions
14 Product Specifications
15 Preparing Cabinet Opening
16 Preparing Water and Electrical Connections
17 Preparing Dishwasher
18 Attaching Installation Brackets
19 Sliding Dishwasher into Cabinet Opening
21 Connecting Water Supply Line and Power
23 Connecting Drain Hose
25 Leveling Dishwasher
27 Securing Dishwasher to Cabinet Opening
28 Final Installation Check
29 OPERATION
29 Using the Appliance
30 Control Panel
31 Cycles
32 Options
33 Cycle/Option Guide
34 Loading the Dishwasher
34 Loading the Lower Rack
36 Loading the Silverware Basket
37 Loading the Upper Rack
40 Loading the Cutlery Rack
42 Adding Cleaning Agents
44 SMART FUNCTIONS
44 LG ThinQ Application
46 Smart Diagnosis™ Function
47 MAINTENANCE
47 Cleaning the Exterior
47 Cleaning the Interior
47 Seasonal Maintenance and Storage
48 Clogged Drain Air Gap or In-Sink Disposal
49 Cleaning the Filters
50 Cleaning the Spray Arms
51 TROUBLESHOOTING
51 FAQs: Frequently Asked Questions
54 Before Calling for Service
59 LIMITED WARRANTY
59 USA
63 CANADA
67 Warranty Exceptions (U.S. and Canada)
Rev.01_031220
4
PRODUCT FEATURES
PRODUCT FEATURES
QuadWash™ System
Multi-Motion lower spray arm shoots water in various directions and at optimized intensities to reach every
area of the tub. This system provides more powerful and complete cleaning coverage.
Inverter Direct Drive Motor
LG's experience in motor technology results in extraordinary functionality, with advanced features like the Dual
Zone option, whisper-quiet operation, energy efficiency, and durability.
The simple design and high build quality of the motor make it so reliable that it's covered for 10 years under
the warranty.
EasyRack Plus
This easy-to-use system of adjustable tines and rack height provides more flexibility and versatility when
loading dishes of various shapes and sizes.
Hybrid Drying System
This efficient drying system does not use a heating element during the drying process resulting in superior
energy efficiency and gentle care for dishes.
LG ThinQ™
Download the new LG smart phone app to set options, self-diagnose and troubleshoot problems with the
appliance, and access other useful features. This function uses Wi-Fi.
TrueSteam™ Technology
Tiny drops of purified water coat the surfaces of every dish from the steam that fills the tub, resulting in
sparkling clean dishes.
5
SAFETY INSTRUCTIONS
ENGLISH
SAFETY INSTRUCTIONS
READ ALL INSTRUCTIONS BEFORE USE
Your safety and the safety of others are very important.
We have provided many important safety messages in this manual and on your appliance. Always
read and follow all safety messages.
This is the safety alert symbol.
This symbol alerts you to potential hazards that can kill or injure you and others.
All safety messages will follow the safety alert symbol and either the word WARNING or
CAUTION. These words mean:
WARNING
You may be killed or seriously injured if you do not follow instructions.
CAUTION
You may be slightly injured or cause damage to the product if you do not follow instructions.
All safety messages will tell you what the potential hazard is, tell you how to reduce the chance of
injury, and tell you what may happen if the instructions are not followed.
IMPORTANT SAFETY INSTRUCTIONS
WARNING
To reduce the risk of explosion, fire, death, electric shock, scalding or injury to persons
when using this product, follow basic precautions, including the following:
INSTALLATION
Connect to a properly rated, protected, and sized power circuit to avoid electrical overload.
To reduce the risk of severe injury or death, follow all installation instructions.
The appliance must be installed and electrically grounded by qualified service personnel in
accordance with local codes.
Disconnect the power supply line, house fuse or circuit breaker before installing or servicing the
appliance.
When moving or installing the product in a different location, call qualified service personnel for
installation and service.
Keep packing materials out of the reach of children. Packaging material can be dangerous for
children. There is a risk of suffocation.
Moving or installation of the appliance requires two or more people.
This appliance is not designed for maritime use or for mobile installations such as in RVs, trailers, or
aircraft.
6
SAFETY INSTRUCTIONS
Store and install the appliance where it will not be exposed to temperatures below freezing or
exposed to outdoor weather conditions.
This appliance must be positioned near to an electrical power supply.
Do not, under any circumstances, cut or remove the ground from the power supply line.
When installing or moving the appliance, be careful not to pinch, crush, or damage the power supply
line.
Do not install the appliance in humid spaces.
Destroy the carton, plastic bag, and other packing materials after the appliance is unpacked.
Children might use them for play. Cartons covered with rugs, bedspreads, or plastic sheets can
become airtight chambers.
Never attempt to operate this appliance if it is damaged, malfunctioning, partially disassembled, or
has missing or broken parts, including a damaged power supply line.
Adhere to all industry recommended safety procedures including the use of long sleeved gloves and
safety glasses.
The installer must ensure that the dishwasher is completely enclosed at the time of installation.
Use new hoses when connecting the appliance to the water supply. Do not reuse old hoses.
After installing, check the hose connection for leaks.
Do not damage or place heavy items on the power supply line of the appliance.
OPERATION
Repair or immediately replace all power supply lines that have become frayed or otherwise
damaged. Do not use a power supply line that shows cracks or abrasion damage along its length or
at either end.
If you detect a strange sound, a chemical or burning smell, or smoke coming from the appliance,
unplug it immediately, and contact an LG Electronics customer information center.
Never unplug the appliance by pulling on the power supply line.
Do not use an extension cable or adapter with this appliance.
Do not grasp the power supply line or touch the appliance controls with wet hands.
Do not modify or extend the power cable.
If the product has been submerged, contact an LG Electronics customer information center for
instructions before resuming use.
Do not store or use gasoline or other flammable vapors and liquids in the vicinity of this or any other
appliance.
Keep the area underneath and around your appliances free of combustible materials (lint, paper,
rags, etc.), gasoline, chemicals and other flammable vapors and liquids.
This appliance is not intended for use by persons (including children) with reduced physical,
sensory or mental capabilities, or lack of experience and knowledge, unless they have been given
supervision or instruction concerning the use of the appliance by a person responsible for their
safety.
If the electrical supply line is damaged, it must only be replaced by the manufacturer or its service
agent or a similar qualified person in order to avoid a hazard.
Do not abuse, sit on, or stand on the door of the appliance.
Read all instructions before using the appliance and save these instructions.
Use this appliance only for its intended purpose.
7
SAFETY INSTRUCTIONS
ENGLISH
Do not allow children to play on, in or with the appliance. Close supervision of children is necessary
when the appliance is used near children.
Do not tamper with controls.
In the event of a gas leak (propane gas, LP gas, etc.) do not operate this or any other appliance.
Open a window or door to ventilate the area immediately.
Under certain conditions, hydrogen gas may be produced in a hot-water system that has not been
used for two weeks or more. HYDROGEN GAS IS EXPLOSIVE. If the hot-water system has not
been used for such a period, before using the appliance turn on all hot water faucets and let the
water flow from each for several minutes. This will release any accumulated hydrogen gas. As the
gas is flammable, do not smoke or use an open flame during this time.
Fix the drain hose securely in place.
Use only detergents or wetting agents recommended for use in a dishwasher and keep them out of
the reach of children.
Do not let children eat detergent or dishwasher rinse agent.
When loading items to be washed:
Locate sharp items so that they are not likely to damage the door seal.
Load sharp knives with the handles up to reduce the risk of cuts.
Do not wash plastic items unless they are marked "dishwasher safe" or the equivalent. For plastic
items not so marked, check the manufacturers recommendations.
Do not touch the HEATING ELEMENT during or immediately after use.
Do not operate your dishwasher unless all ENCLOSURE panels are properly in place.
Do not abuse, sit on, or stand on the door or dish rack of the dishwasher.
Do not install or store the dishwasher where it will be exposed to weather conditions.
After cleaning the dishes, turn off the faucet. Turn on the faucet again and check the connection
status of water supply hose before cleaning.
Do not open the door while operating. For safety reasons, the drain pump operates if the door is
opened, resulting in a longer cycle time.
Be careful not to catch your hand when closing the door of the product.
Do not plug the dishwasher into a damaged outlet.
Do not install or keep the dishwasher near electrical components or exposed flames.
Do not wash dishes exposed to gasoline, solvents or other flammable materials.
When cleaning, do not spray water on the product directly.
Do not press buttons with a sharp object such as an awl or pin.
Do not use solvent-based detergent.
Do not come into contact with the steam outlet.
Small parts, such as rack clips and filter retaining posts can be a choke hazard to small children if
removed from the dishwasher. Keep out of reach of small children.
8
SAFETY INSTRUCTIONS
MAINTENANCE
Do not repair or replace any part of the appliance. All repairs and servicing must be performed by
qualified service personnel unless specifically recommended in this Owners Manual. Use only
authorized factory parts.
Do not disassemble or repair the appliance by yourself.
Remove any dust or foreign matter from the power supply line.
Disconnect this appliance from the power supply before cleaning and attempting any user
maintenance. Turning the controls to the OFF position does not disconnect this appliance from the
power supply.
Remove the door before the appliance is removed from service or discarded to avoid the danger of
children or small animals getting trapped inside.
Unplug the appliance before cleaning to avoid the risk of electric shock.
Before discarding the appliance, cut off the power supply line and destroy the appliance's control
panel.
GROUNDING INSTRUCTIONS
For a permanently connected dishwasher: This appliance must be connected to a grounded metal,
permanent wiring system, or an equipment-grounding conductor must be run with the circuit
conductors and connected to the equipment-grounding terminal or lead to the appliance.
Connect the ground wire to the green ground connector in the terminal box.
TIP OVER HAZARD
Do not use the dishwasher until completely installed.
Do not push down on the open dishwasher door.
Failure to follow these instructions may result in serious injury or cuts.
SAVE THESE INSTRUCTIONS
9
SAFETY INSTRUCTIONS
ENGLISH
CAUTION
To reduce the risk of minor injury to persons, malfunction, or damage to the product or
property when using this product, follow basic precautions, including the following:
INSTALLATION
Install the product on a firm and level floor.
This dishwasher must be connected to a hot water supply with a temperature range between 120 °F
(49 °C) and 149 °F (65 °C). This temperature range provides the best washing results and shortest
cycle time. The temperature should not exceed 149°F (65 °C) to prevent damage to dishes.
Do not put the drain hose under the dishwasher during installation.
OPERATION
Do not place objects on top of the appliance.
Turn off the water faucets and unplug the appliance if the appliance is to be left for an extended
period of time, such as during vacations.
Do not store or spill liquid detergents, cleaners, or bleaches (chlorine bleach, oxygen bleach) on the
appliance. Doing so may result in corrosion, discoloration or damage to the surface of the appliance.
Do not touch draining water which may be hot.
If the drain hose and the water supply hose are frozen in winter, defrost before using the appliance.
Do not put hands, feet, or metal objects below or behind the appliance.
Do not put the drain hose under the dishwasher during installation.
MAINTENANCE
If cooking oil is spilled on the exterior of the product, wipe it off immediately. Do not clean the exterior
of the product with cleaners which contain alcohol, thinners, bleach, benzene, flammable liquids, or
abrasives. These substances may discolor or damage the appliance.
10
PRODUCT OVERVIEW
PRODUCT OVERVIEW
Exterior Parts
a
Control Panel & Door Handle
b
Front Cover
c
Lower Cover
d
Shipping Brace
e
Safety Cover
f
SignaLight™ (some models)
g
Base
h
Leveling Feet
NOTE
Do not remove the safety cover at any time.
To ensure reliability, each LG dishwasher goes through thorough quality control before it leaves the
factory.
You may find water droplets or water spots from this process inside your new dishwasher.
SignaLight™ (Front Display)
The top-control models have 3 indicator LEDs centered at the top of the front cover.
Red : Error (See the Error Codes in Troubleshooting section.)
White (steady): Normal operation.
White (blinking): Cycle has been paused. (After four minutes in pause mode, the machine turns off.)
Green: Cycle finished normally.
The default “ON” setting keeps the green light on until the door is opened. If the setting is changed to
“OFF”, the green light turns off after 90 seconds. To change the setting, turn the power on and press and
hold the High Temp button for 3 seconds until “ON” or “OFF” appears in the display. The setting is stored
until you change it.
11
PRODUCT OVERVIEW
ENGLISH
Interior Parts
a
Top Wash Impeller
b
Upper Spray Arm
c
Lower Spray Arm
d
Filtration System
e
Detergent and Rinse Aid Dispenser
f
Drying Vent Cover
g
Tub Light
h
Cutlery Rack
i
Upper Rack
j
Silverware Basket
k
Lower Rack
l
Steam nozzle
NOTE
The silverware basket ships installed at the back
of the bottom rack. For best performance, install
it along the right side as shown in the Interior
Parts section.
Remove all packing materials from the exterior
and interior of the dishwasher before installing
the appliance.
2
3
Press the tab to remove the cable tie by hand.
Cutting the tie with a knife or scissors may
damage the rack or the silverware basket.
12
PRODUCT OVERVIEW
Accessories
Included Accessories
Installation brackets
(2ea)
Wood screws (4ea) Hose clamp (1ea) Sound insulation
sheet
Toe-Kick Front
(1ea)
Toe-Kick Rear
(1ea)
Bracket (2ea) Sound Baffle (1ea)
Pad (1ea) Strip (2ea) Damper (2ea)
13
INSTALLATION
ENGLISH
INSTALLATION
Installation Parts and Tools
Parts not Provided
Electrical cable Water supply tube Fittings for tube Coupler Electrical tape
Air gap
Wire nuts for
16-gauge wiring
Hose clamp
UL approved strain
relief
Tools Needed
Flat-blade
screwdriver
Phillips screwdriver
Hole saw min. 2½”
bit
Electrical drill Gloves
Safety glasses Adjustable wrench Tape measure Utility knife Level
¼” Square drive
wrench
Nipper Pliers Wire stripper Tubing cutter
⅜” Square drive
wrench + ½” Socket
14
INSTALLATION
Installation Overview
Preparing Cabinet Opening
Preparing Electrical Wiring
Preparing Water Supply Connection
Preparing the Dishwasher
Removing Lower Cover
Sliding the Dishwasher into Cabinet
Leveling the Dishwasher
Securing the Dishwasher to Countertop
Connecting the Drain Hose
Connecting Water Supply
Connecting Power
Final Check
Product Dimensions
Back view Side view
Water supply hose, drain hose and electric cable
should be passed through this area.
33 /16"
(846 mm)
5
23 /4" (603 mm)
3
4 /2"
(115 mm)
1
33 /8"
(854 mm)
5
2 /16" (75 mm)
15
20 /16" (512 mm)
3
24 /8" (625 mm)
5
4 /4" (120 mm)
3
9 /8"
(238 mm)
3
4 /16"
(119 mm)
5
/4"
(134 mm)
11
1
4 /2"
(115 mm)
1
26 /8 - 26 /16" (676 - 681 mm)
5 13
NOTE
For easiest installation, see marked areas above for water and electrical clearances in base of
dishwasher.
Product Specifications
The appearance and specifications listed in this manual may vary due to constant product improvements.
Electrical requirement 120 V, 60 Hz AC only, minimum 15 A circuit breaker
Water pressure 20 - 80 psi (140 - 550 kPa)
Dimensions
23
3
/
4
"(W) X 24
5
/
8
"(D) X 33
5
/
8
"(H)
603 mm(W) X 625 mm(D) X 854 mm(H)
Inlet water temperature 120 °F (49 °C) minimum, 149 °F (65 °C) maximum
Net weight 95 lbs. (43.1 kg)
15
INSTALLATION
ENGLISH
Preparing Cabinet Opening
This dishwasher is designed to fit a standard
dishwasher opening. An opening may be needed
on both sides to route plumbing and electrical
connections.
To ensure proper drainage, install the
dishwasher no more than 12 ft. (3.65 m) from
the sink.
The location must have sufficient space for the
dishwasher door to open easily and provide at
least 0.1” (2 mm) between the dishwasher and
the cabinet sides.
If installing the dishwasher in a corner, leave a
minimum of 2” (50 mm) between the dishwasher
and the adjacent wall.
The adjacent wall must be free of obstructions.
For flush installations only, you may remove the
cabinet brace
a
inside the cabinet.
1
Select a location as close to the sink as
possible for easy connections to water supply
line, drain hose and electrical connection.
2
To allow for proper clearance of plumbing and
electrical, use the template included with the
literature to determine the clearance on the
side of the cabinet where the cabinet meets
the back wall. Using a 2
1
/
2
” diameter hole saw,
drill a hole in the target area as shown on the
template.
3.5
''
2.5
''
4
''
WARNING
Installation damage is not covered by the
warranty, and leaks caused by improper
installation may result in property damage.
Do not use existing holes unless they are in
the target area.
Failure to properly locate the hole for the
water and drain lines may prevent the
dishwasher from installing flush with the
cabinets and could result in kinked, pinched,
crushed, stressed or damaged lines.
16
INSTALLATION
Preparing Water and
Electrical Connections
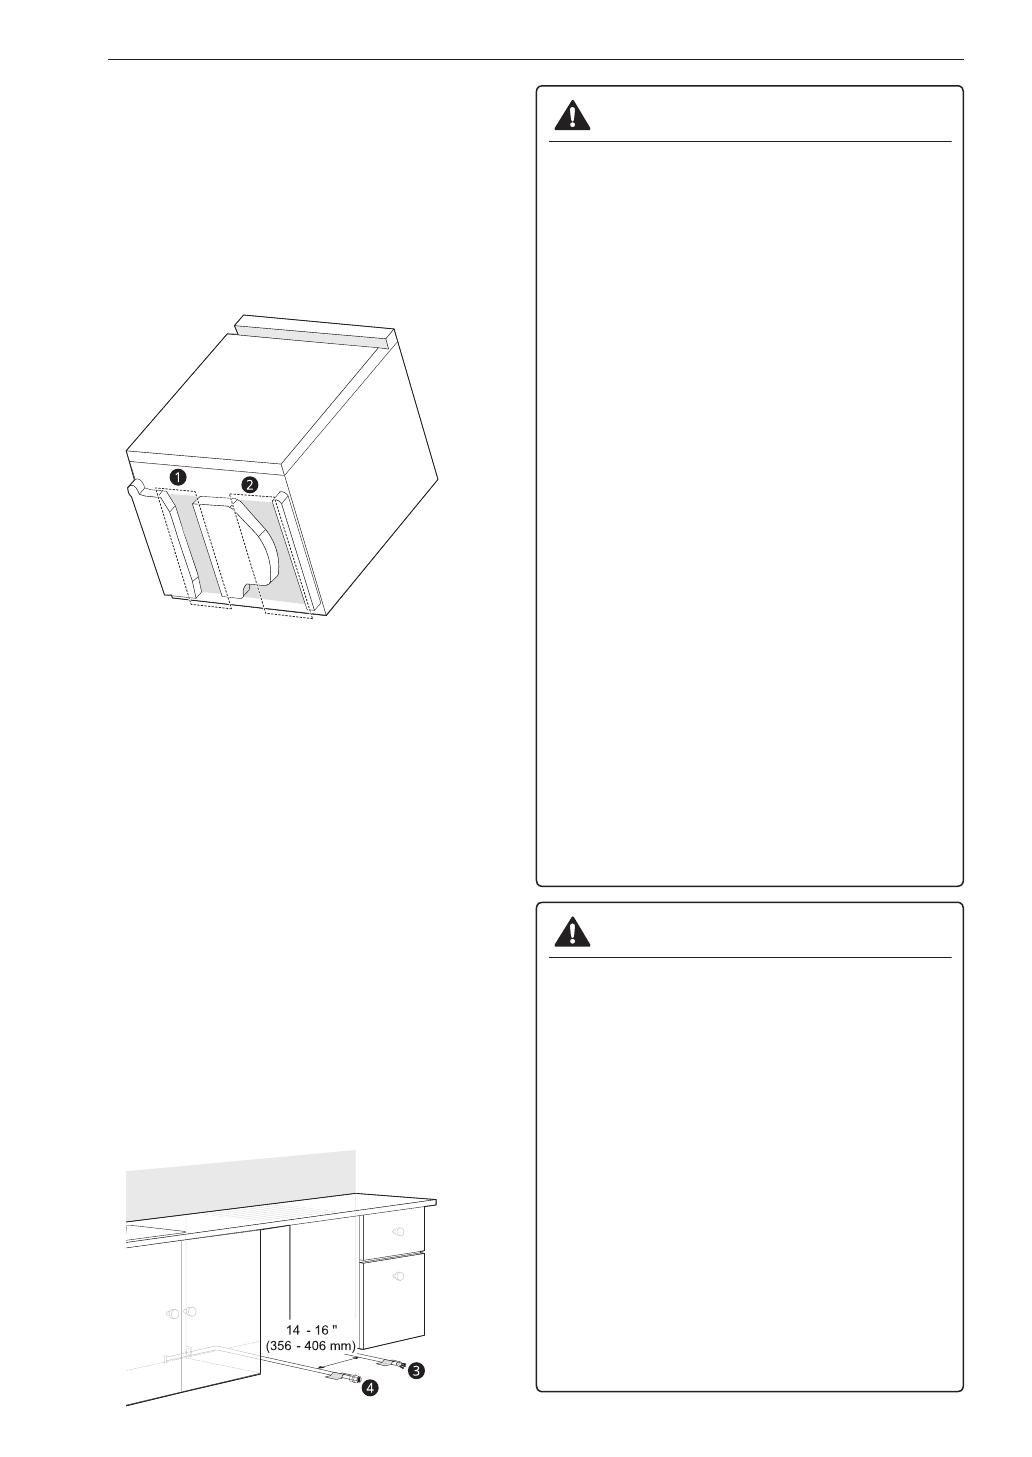
There are 2 channels in the bottom of the
dishwasher for routing the water and electrical
connections. As shown in the bottom view below,
channel
a
is for the water supply line, and
channel
b
is for the electrical cable.
1
Turn off the house water supply and the circuit
breaker or dedicated power before connecting
the dishwasher.
2
Run the water supply line along the floor 6
1
/
2
– 7
3
/
4
” (165–197 mm) from the left side of
the opening and tape it in place in front of the
opening.
3
Run the electrical cable
c
along the floor
14–16” (356–406 mm) from the water supply
line
d
and tape it in place.
The electrical outlet must be within 4 ft. (1.22
m) of either side of the dishwasher.
The best location for the electrical conduit is
on the right side of the back wall. Re-route
the electrical cable before installation if the
electrical conduit pipe is longer than 3” (76
mm) and is centered on the back wall.
WARNING
Water Connection
Do not reuse an old hose. Use only a new
hose when installing the dishwasher. The old
hose could leak or burst causing flooding and
property damage. Contact an LG Customer
Information Center for assistance in buying a
new hose.
Electrical Connection
Use a time-delay fuse or circuit breaker.
Operate this appliance with the correct
voltage as shown in this manual and on the
rating plate.
The wiring must be grounded properly. If
in doubt, have it checked by a qualified
electrician.
Connect the appliance using 3-wires,
including a ground wire.
The appliance and outlet must be positioned
so that the plug is easily accessible.
Do not use an extension cable or adapter
with this dishwasher.
Do not overload the outlet with more than
one appliance.
The included 16AWG wire nuts should be
used.
It is the personal responsibility and obligation
of the product owner to have a proper outlet
installed by a qualified electrician.
CAUTION
When connecting the dishwasher water
supply line to the house water supply, sealing
tape or compound should be used on pipe
threads to avoid leaks. Tape or compound
should not be used on compression fittings.
Connect the dishwasher to a hot water
supply with a temperature range between
120 °F (49 °C) and 149 °F (65 °C). This
temperature range provides the best washing
results and shortest cycle time. To prevent
damage to dishes, the temperature should
not exceed 149 °F (65 °C).
Water supply pressure must be between 20
psi and 80 psi (140–550 kPa). If the water
supply pressure exceeds 80 psi, a pressure
reducing valve must be installed. Otherwise
premature failure of the inlet valve may occur.
17
INSTALLATION
ENGLISH
Preparing Dishwasher
WARNING
Do not remove safety cover
a
. Removal can
result in fire, electric shock or death.
Releasing Drain Hose
Remove the twist tie holding the drain hose to the
back of the shipping brace.
Removable Shipping Brace
The rear shipping brace can be removed if
additional clearance is needed when installing the
dishwasher under a low countertop.
Removing Lower Cover
1
Remove the screws at either side which attach
the lower cover to the dishwasher.
2
Remove the lower cover.
3
If there is insulation padding behind the lower
cover, remove it.
4
Set the parts aside until the installation is
complete.
CAUTION
If you lay the dishwasher on its back, do so
carefully to avoid damaging the drain hose
and the tub.
18
INSTALLATION
Removing Packing Materials from
the Interior
Remove all packing materials from the interior of
the dishwasher before installing the appliance.
2
3
Attaching Installation
Brackets
For countertops made of wood or other material
that will not be damaged by drilling, use the metal
installation brackets provided.
For countertops made of granite, marble, or other
materials that could be damaged by drilling, use
the wood screws to attach the dishwasher to the
cabinet. See installation instructions in Securing
Dishwasher to Cabinet Opening.
NOTE
Installation brackets and screws can be found in
the silverware basket.
1
Insert the tabbed end of the installation
brackets into the slots in the upper frame.
Rotate the brackets until the tabbed ends are
facing up.
2
Bend the tabs on the brackets to secure them
to the frame using a pair of needle nose pliers.
19
INSTALLATION
ENGLISH
Sliding Dishwasher into
Cabinet Opening
CAUTION
Do not pull or lift the dishwasher using the
handle
a
. Doing so can damage the door
and hinges.
Do not push the door of the dishwasher
with knees when sliding the dishwasher into
position. Doing so can damage the front cover.
Do not push the top of the dishwasher. Doing
so can damage the interior of the dishwasher.
NOTE
Open the door and grab the body frame and the
top front opening
b
of the tub to move or lift the
dishwasher.
1
Align the dishwasher with the opening. Make
sure the water supply line and electrical cable
are in the correct positions to slide into their
channels properly.
2
Smooth out or pad the edges of the hole
drilled for the water supply to avoid damaging
the drain hose.
20
INSTALLATION
3
Make sure the drain hose is straight before
feeding the end of it through the hole for the
water supply. As you slide the dishwasher
into the opening, you will want to slowly pull
on the drain hose from inside the cabinet
to take up some slack. Be careful not to
kink, pinch, crush or stress the drain hose
during installation to avoid leaking and water
damage.
4
Gradually slide the dishwasher into the
opening, making sure that the water supply
line and electrical cable are passing freely
through the channels and do not get caught
under the dishwasher.
As you slide the dishwasher into the opening,
stop periodically (or have an assistant help)
to take up the slack by pulling the drain hose
farther into the cabinet.
CAUTION
To avoid malfunctions or leakage, it is
important that the drain hose not get kinked,
pinched, stressed or crushed behind or under
the dishwasher or inside the neighboring
cabinet.
Damage resulting from improper installation
is not covered under the warranty.
5
Remove the tape from the water supply line
and the electrical cable.
/