Power Fist 8095903 Owner's manual
- Category
- Nail Gun
- Type
- Owner's manual

Coil Roofing
Air Nailer
8095903
Owner’s Manual
Warning: Before using this tool, study the manual. Keep these
instructions with this tool for future references.
8095903manual 11/4/05 3:06 PM Page 1

Before Use
• Approved eye protection should always be worn by the operator and
others in the work area
• Always disconnect the air supply before making adjustments, servicing
the tool or clearing jams, and when the tool is not in use
• Never place a hand or any other part of the body in the staple discharge
area at the tool while air supply is connected
• Do not use oxygen or combustible gases as a power source for this tool
• Ear protection may be required in some environments
Safety Instructions
Warning: To avoid severe personal injury or property damage before
using the tool, read carefully and understand the following
safety instructions:
1. Wear safety glasses or goggles. The user and/or employer must ensure
that proper eye protection is worn at all times. Eye protection
equipment must conform to the ANSI or CSA requirements, and
provide both frontal and side protection. Note: non-side shielded
spectacles and face shields alone do not provide adequate protection.
2. Ear protection may be required in some environments. As the working
condition may include exposure to high noise levels that may lead to
hearing damage, ensure that necessary hearing protection is used by the
operator and others in the work area.
3. Do not use any air source beside an air compressor. The tool is
designed to operate on compressed air. Do not operate the tool on any
other high pressure gas, combustible gases (such as oxygen or
acetylene) since there is risk of explosion.
4. Do not operate the tool near a flammable substance.
5. Do not use the wrong fitting. The connector on the tool must not hold
pressure when air supply is disconnected. If a wrong fitting is used, the
tool can remain charged with air after disconnecting and thus be able to
drive a fastener even after the air line is disconnected, possibly causing
injury.
8095903manual 11/4/05 3:06 PM Page 2

6. Disconnect the air supply and empty the magazine when the tool is not
in use. Also when moving to a different work area, adjusting,
disassembling or repairing the tool, and when clearing a jammed
fastener.
7. Inspect screw tightness. Loose or improperly installed screws or bolts
cause accidents and tool damage when the tool is put into operation.
Inspect to confirm that all screws and bolts are tight and properly
installed prior to operating the tool.
8. Do not touch the trigger unless you intend to drive a fastener.
Whenever the air supply is connected to the tool, never touch the
trigger unless you intend to drive a fastener into the work. It is
dangerous to walk around carrying the tool with the trigger pulled, and
this and similar actions should be avoided.
9. Never point the nosepiece toward people as serious accidents may be
caused when misfiring. Be sure the nosepiece is not pointed toward
people when connecting and disconnecting the hose, loading the
fasteners, or during similar operations.
10. Use specified fasteners. The use of fasteners other than specified will
cause tool malfunction. Be sure to use only specified fasteners when
operating the tool.
11. Press the nosepiece to the work properly. Failure to do so can result in
a fastener flying up and is extremely dangerous.
12. Keep hands and body away from the nosepiece. When loading and
using the tool, never place a hand or any part of the body in the
fastener discharge area of the tool. It is very dangerous to hit the
hands or body by mistake.
13. Do not drive fasteners on the top of other fasteners, a fastener could
be deflected, causing injury.
14. Remove fasteners after completing operation. If fasteners are left in
the magazine after operation, there is a danger of a serious accident
occurring prior to the resumption of operation, should the tool be
handled carelessly or when connecting the air fitting. For this reason,
always remove all fasteners remaining in the magazine.
15. Check operation of the contact trip mechanism frequently when using
a contact trip type tool. Do not use the tool if the trip is not working
correctly, as accidental driving of a fastener may result. Do not
interfere with the proper operation of the contact trip mechanism.
8095903manual 11/4/05 3:06 PM Page 3

16. When using the tool outside or on elevated locations such as roofs,
start fastening at the lower part and gradually work your way up.
Fastening backward is dangerous as you may loose your footing.
Secure the hose at a point close to the area you will be working.
Accidents may be caused due to the hose being pulled inadvertently
or getting caught.
17. Never use a tool that is defective or a performs abnormally. Never
actuate the tool into free space. This will avoid any hazard caused by
free flying fasteners and excessive strain on the tool.
Additional Precautions
• Do not use the tool as a hammer
• Always carry the tool by the handle, never carry the tool by the air hose
• The tool must be used only for the purpose it was designed
• Never clamp the trigger in locked operation position
• Keep the tool in a dry place out of reach of children when not in use
• Do not use the tool without safety warning label
• Do not modify the tool from original design or function without
approval by the manufacturer
Specifications
• 11" high (280 mm)
• 4-3/8" wide (112 mm)
• 11" long (280 mm)
• 5.95 lbs (2.7 kg)
• Operating pressure: 70 to 120 PSI
• Do not exceed 120 PSI
• Includes hex wrench and oil
Nail specifications
• 7/8" to 1-3/4" long
• 11 gauge, 0.120" wide, wire-collated
• Smooth shank type
• Air consumption @ 90 PSI: 5.5
CFM average
• Holds 120 nails
8095903manual 11/4/05 3:06 PM Page 4

Tool Fittings
• 1/4" NPT male style plug
• Use with 1/4" minimum I.D. hose
• The fitting must be capable of discharging tool air pressure when
disconnected from the air supply.
Air supply and connections
1. Do not use any power source except an air compressor. The nailer is
designed to operate on compressed air. Do not operate the nailer on any
other high pressure gas, or combustible gases such as oxygen or
acetylene, since there is the danger of an explosion. For this reason,
absolutely do not use anything other than an air compressor to operate
the nailer.
2. Operate within the proper air pressure range. The nailer is designed to
operate within an air pressure range of 70 to 120 PSI. The pressure
should be adjusted to the type of work being nailed. The nailer should
never be operated when the operating pressure exceeds 120 PSI.
3. Do not operate the tool near a flammable substance such as gasoline or
paint thinners. Volatile fumes from these substances could be drawn
into the compressor and be compressed together with the air, resulting
in an explosion.
4. Do not use the wrong fittings. The connector on the tool must not hold
pressure when air supply is disconnected. If a wrong fitting is used, the
tool can remain charged with air after disconnecting and thus will be
able to drive a fastener even after the air line is disconnected, possibly
causing injury.
5. Disconnect the air chuck when the tool is not in use. Always
disconnect when operation has been completed or suspended, when
moving to a different work area, adjusting, disassembling or repairing
the nailer, and when clearing a jammed nail.
8095903manual 11/4/05 3:06 PM Page 5

Fittings: Install a male plug on the tool
which is free flowing and which
will release air pressure from the
tool when disconnected from the
supply hose.
Hoses: Hose with a 1/4" I.D. should have
a max length of 15 ft. For lengths
over 15 ft, use 3/8" I.D. hose. The
supply hose should contain a
fitting that will provide quick
disconnecting from the male plug
on the tool.
Supply source: Use only clean regulated compressed air as a power
source for the tool.
Filter, regulator, lubricator (F.R.L.): (Inline air filter, regulator, oiler)
Refer to tool specifications for
setting the correct operating
pressure for the tool.
Note: a filter will help to get the best performance and minimum wear
from the tool because dirt and water in the air supply are major
causes of wear in the tool. Frequent, but not excessive, lubrication
is required for the best performance. Oil added through the air line
connection will lubricate the internal parts.
Operating Instructions
Eye protection is required to guard against flying fasteners and debris,
which could cause severe eye injury. The user must ensure that proper eye
protection is worn., Eye protection equipment must conform to national
safety standards and provide both frontal and side impact protection.
NOTE: non-side shield spectacles and face shield alone do not provide
adequate protection.
Warning: always disconnect the air supply from the tool when operation
has been completed or suspended, when moving to a different
work area, adjusting, disassembling, or repairing the tool, and
when clearing a jammed fastener.
F.R.L.
8095903manual 11/4/05 3:06 PM Page 6

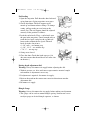
Nail loading
1. Open the magazine. Pull down the door latch and
swing door open. Swing magazine cover open.
2. Check adjustment. The nail support can be
moved up and down to three settings. To change
setting, pull up on the post and twist to the
correct step. The nail support should be adjusted
correctly to the position as follows.
3. Load the coil of nails. Place a coil of nails over
the post in the magazine. Uncoil enough nails to
reach the feed pawl, and place the second nail
between the teeth on the feed pawl. The nail
heads fit in the slot of nose.
• 1-3/4" nails – use bottom step
• 1-1/4", 1-1/2" – use middle step
• 7/8", 1" – use top step
4. Swing cover closed.
5. Close the door. Check that latch engages (if it
does not, ensure that the nail heads are in the slot
on the nose.)
Driving depth adjustment dial.
Warning: Always disconnect air supply before adjusting the dial.
1. With air pressure set, drive nails into a representative material sample
to determine if adjustment is necessary.
2. If adjustment is required, disconnect air supply.
3. Refer to the mark on the contact arm cover for direction to turn the
adjustment dial.
4. Reconnect air supply.
Shingle Gauge
Warning: Always disconnect the air supply before making an adjustment.
1. This gauge can be used to control shingle spacing. Loosen two screws
to adjust gauge to desired shingle exposure, as shown.
8095903manual 11/4/05 3:06 PM Page 7

Driving Fasteners
Contact fire operation (bump fire):
For contact fire operation, hold the trigger and depress the contact arm
against the work surface.
Procedure: A. Hold the trigger. B Depress the contact arm.
Warning: The operator must not hold the trigger pulled on contact trip
tools except during fastening operation, as serious injury could
result if the trip accidentally contacted someone or something
causing the tool to cycle.
Warning: Keep hands and body away from the discharge area of the tool.
Operator note: Do not press the tool against the work surface with
excessive force. Instead, allow the tool to recoil off the
work surface to avoid a second unwanted fastener.
Maintanence
Warning: Do not use gasoline or similar highly flammable liquids to
clean the nailer. Vapour could be ignited by a spark causing an
explosion. Tar and dirt may build up on the nose and trip lever.
This can prevent correct operation. Remove any buildup with
kerosene #3 fuel or diesel fuel. Do not immerse the nailer into
these solvents beyond the height of the nail heads, to avoid
getting the solvent into the drive cylinder. Dry off the nailer
before use. Any oil film left after cleanup will accelerate the
tar build-up, and the nailer will require more frequent re-
cleaning.
Note: Solvents sprayed on the nose to clean and free up the trip may have
the opposite effect. The solvent may soften the tar on the shingles
and cause tar build-up to be accelerated. Dry operation is better, as
noted above.
Note: Do not fire the nailer when it is empty.
8095903manual 11/4/05 3:06 PM Page 8

1. Use an F.R.L. Failure to use an F.R.L. allows the moisture and dirt
inside compressor to pass into the nailer directly. This causes rust and
wear and results in a poor operating performance. The hose length
between F.R.L. and nailer should be no longer than 16-1/2 ft since a
longer length results in a reduction in air pressure.
2. Use recommended oil. Only air tool oil should be used to lubricate the
nailer. Upon completion of operation, place 2 or 3 drops of oil in the
air plug with the jet oiler.
3. It is important that the nailer be properly lubricated. Without proper
lubrication, the nailer will not work properly and parts will wear
prematurely.
4. Inspect and maintain daily or before each operation.
Warning: Disconnect air supply and empty the magazine when
inspecting or maintaining the tool.
• Drain air line filter and compressor
• Keep lubricator filled in F.R.L.
• Clean filter element of F.R.L.
• Tighten all screws
• Keep contact arm moving smoothly
Storage
• When not in use for an extended period, apply a thin coat of the
lubricant to the steel parts to avoid rust.
• Do not store the tool in a cold weather environment. Keep the tool in a
warm area.
• When not in use the tool should be stored in a warm and dry place.
Keep out of reach of children.
• All quality tools will eventually require servicing or replacement of
parts because of wear from normal use.
Troubleshooting / Repairs
The trouble shooting and/or repairs shall be carried out only by the
distributors or by other specialists.
8095903manual 11/4/05 3:06 PM Page 9

Parts List
1 Screw
2 Washer
3 O-ring
4 Exhaust cover
5 Muffler
6 Rubber washer
7 Screw
8 Washer
9 Protector
10 Cap
11 Exhaust seal
12 O-ring
13 Head valve guide
14 O-ring
15 Spring
16 Head valve piston
17 O-ring
18 Head gasket
19 Piston/driver
assembly
20 Cylinder seal
21 Seal bolt
22 Cylinder sleeve
23 O-ring
24 Cylinder ring
25 O-ring
26 Check seal
27 Bumper
28 O-ring
29 O-ring
30 Pilot valve
31 O-ring
32 Trigger valve stem
33 O-ring
34 Trigger valve cap
35 O-ring
36 Nylon nut
37 Washer plate
38 Cover
39 Contact stem
40 Spring
41 C-ring
42 Stop plate
43 Contact arm B
44 Adjust dial
45 Contact arm A
46 Screw
47 Trigger valve
housing
48 Pin retainer
49 O-ring
50 O-ring
51 Trigger spring
52 Contractor sticker
53 Driver guide
54 Tube
55 Magnet housing
56 Magnet point
57 O-ring
58 Pin
59 Feeder spring
60 Feed pawl
61 Pin retainer
62 Nose
63 Screw
64 Contact foot unit
65 Nylon nut
66 Washer plate
67 Handle grip
68 Body
69 End cap gasket
70 End cap
71 Washer
72 Screw
73 Screw
74 Spring pin
75 Spring pin
76 Trigger unit
77 Trigger pin
78 Arm guide
79 O-ring
80 O-ring
81 Feed piston
82 Spring
83 Feed piston stop
84 Spring collar
85 C-ring
86 Sticker
87 Magazine cap
88 Magazine wear clip
89 Spring receiver
90 Nail support
91 Magazine post
92 Spring pin
93 Magazine
94 Spring
95 Screw
96 Screw
97 Nut plate
98 Gauge bracket
99 Shingle gauge
100 Washer
101 Screw
102 Door latch
103 Spring
104 Spring pin
105 Door
106 Pin
107 Check pawl
108 Spring
109 Screw
110 Pin
111 Pin
19A Piston O-ring
8095903manual 11/4/05 3:06 PM Page 10

8095903manual 11/4/05 3:06 PM Page 11
-
 1
1
-
 2
2
-
 3
3
-
 4
4
-
 5
5
-
 6
6
-
 7
7
-
 8
8
-
 9
9
-
 10
10
-
 11
11


Power Fist 8095903 Owner's manual
- Category
- Nail Gun
- Type
- Owner's manual
Ask a question and I''ll find the answer in the document
Finding information in a document is now easier with AI
Other documents
-
Wen 61782 User guide
-
-
-
Harbor Freight Tools 67450 User manual
-
-
Central Pneumatic Item 63454 Owner's manual
-
-
-
-
RIDGID R175RNA User manual