Hatco TOAST-QWIK TQ-10 Series Installation guide
- Category
- Toasters
- Type
- Installation guide
This manual is also suitable for

© 2015 Hatco Corporation
Register Online!
(see page 2)
S'inscrire en ligne!
(voir page 19)
hatcocorp.com
Do not operate this equipment unless you
have read and understood the contents of
this manual! Failure to follow the
instructions contained in this manual may
result in serious injury or death. This
manual contains important safety
information concerning the maintenance,
use, and operation of this product. If
you’re unable to understand the contents
of this manual, please bring it to the
attention of your supervisor. Keep this
manual in a safe location for future
reference.
English = p 2
No opere este equipo al menos que haya
leído y comprendido el contenido de este
manual! Cualquier falla en el seguimiento
de las instrucciones contenidas en este
manual puede resultar en un serio lesión
o muerte. Este manual contiene
importante información sobre seguridad
concerniente al mantenimiento, uso y
operación de este producto. Si usted no
puede entender el contenido de este
manual por favor pregunte a su
supervisor. Almacenar este manual en
una localización segura para la referencia
futura.
Ne pas utiliser cet équipement sans avoir
lu et compris le contenu de ce manuel !
Le non-respect des instructions
contenues dans ce manuel peut entraîner
de graves blessures ou la mort. Ce
manuel contient des informations
importantes concernant l'entretien,
l'utilisation et le fonctionnement de ce
produit. Si vous ne comprenez pas le
contenu de ce manuel, veuillez le signaler
à votre supérieur. Conservez ce manuel
dans un endroit sûr pour pouvoir vous y
référer plus tard.
Français = p 19
WARNING
ADVERTENCIA
AVERTISSEMENT
Toast Qwik
®
Electric Conveyor Toasters
Grille-pain électriques à convoyeur
TQ-10, TQ-400, TQ-800,
TQ-1200, and TQ-1800 Series/Série
Installation and Operating Manual
Manuel d'installation et d'utilisation
P/N 07.04.354.00

2
Form No. TQ2M-0515
English
INTRODUCTION
Hatco Toast-Qwik
®
Electric Conveyor Toasters are specially
designed to accelerate the toasting operation. Products for
toasting pass through a heating chamber for rapid and thorough
toasting. Moisture, sugar content, and thickness of bread
product effect the ability to achieve the perfect toasted product.
Conveyor speed and temperature determine the toasting color.
Hatco toasters are built with quality to meet the demands of
foodservice operations and provide years of trouble-free
performance. The metal-sheathed tubular heating elements are
guaranteed against breakage and burnout for two years.
Hatco Toast-Qwik Electric Conveyor Toasters are products of
extensive research and field testing. The materials used were
selected for maximum durability, attractive appearance and
optimum performance. Every unit is thoroughly inspected and
tested prior to shipment.
This manual provides the installation, safety, and operating
instructions for Toast-Qwik Electric Conveyor Toasters. Hatco
recommends all installation, operating, and safety instructions
appearing in this manual be read prior to installation or
operation of a unit.
Safety information that appears in this manual is identified by
the following signal word panels:
WARNING indicates a hazardous situation which, if not
avoided, could result in death or serious injury.
CAUTION indicates a hazardous situation which, if not
avoided, could result in minor or moderate injury.
NOTICE is used to address practices not related to
personal injury.
WARNING
CAUTION
NOTICE
Important Owner Information ..............................................2
Introduction...........................................................................2
Important Safety Information...............................................3
Model Descriptions...............................................................4
Model Designation................................................................5
Specifications........................................................................6
Plug Configurations.............................................................6
Electrical Rating Charts.......................................................6
Dimensions .........................................................................8
Installation ...........................................................................10
General .............................................................................10
Front or Rear Discharge Installation .................................11
Operation.............................................................................12
General .............................................................................12
Operating Model TQ-10 ....................................................12
Operating TQ-400, -800, -1200, and -1800 Series...........13
Power Save Mode with Indicator Light .............................14
Adjusting the Toast Feed Ramp........................................14
Maintenance ........................................................................15
General .............................................................................15
Daily Cleaning...................................................................15
Cleaning the Toast Feed Ramp ........................................15
Cleaning the Bottom Element Reflector............................15
Troubleshooting Guide ......................................................16
Options and Accessories...................................................17
Limited Warranty.................................................................18
Authorized Parts Distributors............................Back Cover
IMPORTANT OWNER INFORMATION
Record the model number, serial number, voltage, and
purchase date of the unit in the spaces below (specification
label located on the lower left hand side of the unit). Please
have this information available when calling Hatco for service
assistance.
Model No. ________________________________________
Serial No. ________________________________________
Voltage __________________________________________
Date of Purchase __________________________________
Register your unit!
Completing online warranty registration will prevent delay in
obtaining warranty coverage. Access the Hatco website at
www.hatcocorp.com, select the Parts & Service pull-down
menu, and click on “Warranty Registration”.
Business
Hours: 7:00
AM to 5:00 PM Central Standard Time (CST)
(Summer Hours: June to September—
7:00
AM to 5:00 PM CST Monday–Thursday
7:00
AM to 4:00 PM CST Friday)
Telephone: 800-558-0607; 414-671-6350
e-mail: part[email protected]
Fax: 800-690-2966 (Parts and Service)
414-671-3976 (International)
Additional information can be found by visiting our web site at
www.hatcocorp.com.
24 Hour 7 Day Parts and Service
Assistance available in the United States
and Canada by calling 800-558-0607.
CONTENTS

Form No. TQ2M-0515
3
IMPORTANT SAFETY INFORMATION
English
ELECTRIC SHOCK HAZARD:
• Plug unit into a properly grounded electrical receptacle
of the correct voltage, size, and plug configuration. If
plug and receptacle do not match, contact a qualified
electrician to determine and install proper voltage and
size electrical receptacle.
• Turn OFF power switch, unplug power cord, and allow
unit to cool before performing maintenance, cleaning,
setup, or attempting to clear a jam.
• Unit is not weatherproof. Locate unit indoors where
ambient air temperature is a minimum of 70°F (21°C)
and a maximum of 85°F (29°C).
• DO NOT submerge or saturate with water. Unit is not
waterproof. Do not operate if unit has been submerged
or saturated with water.
• Do not steam clean or use excessive water on unit.
• This unit is not “jet-proof” construction. Do not use jet-
clean spray to clean this unit.
• Do not clean unit when it is energized or hot.
• Do not allow liquids to spill into unit.
• Do not pull unit by power cord.
• Discontinue use if power cord is frayed or worn.
• Do not attempt to repair or replace a damaged power
cord. Cord must be replaced by Hatco, an Authorized
Hatco Service Agent, or a person with similar
qualifications.
• NEVER insert a knife, fork, or similar object into
toasting chamber.
• Do not pick up the toaster by inserting fingers into the
toaster feed opening.
• This unit must be serviced by qualified personnel only.
Service by unqualified personnel may lead to electric
shock or burn.
• Use only Genuine Hatco Replacement Parts when
service is required. Failure to use Genuine Hatco
Replacement Parts will void all warranties and may
subject operators of the equipment to hazardous
electrical voltage, resulting in electrical shock or burn.
Genuine Hatco Replacement Parts are specified to
operate safely in the environments in which they are
used. Some aftermarket or generic replacement parts
do not have the characteristics that will allow them to
operate safely in Hatco equipment.
EXPLOSION HAZARD: Do not store or use gasoline or
other flammable vapors or liquids in the vicinity of this or
any other appliance.
If toaster overheats or cooling fan inside unit stops
working, the safety high-limit switch will shut off toaster.
Contact Authorized Service Agent or Hatco for assistance.
WARNING
FIRE HAZARD:
• For front discharge operation: Allow a minimum
clearance of 1" (25 mm) along the sides and rear of unit.
Allow a minimum clearance of 12" (305 mm) in the front.
If safe distances are not maintained, discoloration or
combustion could occur.
• For rear discharge operation: Allow a minimum
clearance of 1" (25 mm) along the sides of unit. Allow a
minimum clearance of 12" (305 mm) in the front and
rear. If safe distances are not maintained, discoloration
or combustion could occur.
• Do not locate toaster under shelving or closer than 12"
(305 mm) from the ceiling.
• Do not place anything on top of toaster. Do not place
toaster near or underneath curtains or other
combustible materials. Items near or on top of toaster
could catch fire causing injury and/or damage to the
toaster.
• In case of fire, disconnect toaster from power source
immediately. This allows unit to cool, making it easier
and safer to put out fire.
Make sure all operators have been instructed on the safe
and proper use of the unit.
This unit is not intended for use by children or persons
with reduced physical, sensory, or mental capabilities.
Ensure proper supervision of children and keep them away
from the unit.
This unit has no “user-serviceable” parts. If service is
required on this unit, contact an Authorized Hatco Service
Agent or contact the Hatco Service Department at
800-558-0607 or 414-671-6350; fax 800-690-2966; or
International fax 414-671-3976.
BURN HAZARD:
• Some exterior surfaces on unit will get hot. Use caution
when touching these areas.
• Do not remove crumb tray for cleaning until toaster is
cool.
Locate unit at the proper counter height in an area that is
convenient for use. Location should be level and strong
enough to support weight of unit and contents.
Always operate toaster with crumb tray installed.
If Warning light comes on, unit is malfunctioning. Turn off
or disconnect unit from power supply and have unit
serviced by a qualified technician.
Toasting of coated or buttered products such as garlic
bread, cheese sandwiches, and sweet rolls is NOT
recommended. Residue will reduce toaster performance
and could ignite inside toaster. Using toaster with food
products listed above will void unit warranty.
CAUTION
WARNING
Read the following important safety information before using this equipment to avoid serious
injury or death and to avoid damage to equipment or property.

4
Form No. TQ2M-0515
IMPORTANT SAFETY INFORMATION
English
MODEL DESCRIPTIONS
All Models
All Toast-Qwik
®
Electric Conveyor Toasters are fast, reliable,
and versatile, toasting 300 to 1800 slices of bread product per
hour depending on the specific model. The front or rear
discharge lets the operator place a Toast-Qwik toaster where it
is most convenient. Every Toast-Qwik toaster includes a toast
collector pan, toast feed ramp, removable crumb tray, and a
factory attached 6' (1829 mm) cord and plug.
Power Save Mode with Indicator Light
All TQ-400, TQ-800, TQ-1200, and TQ-1800 series toasters
have a Power Save mode. During the Power Save mode the
indicator light on the POWER SAVE button will flash. While the
light is flashing the toaster is operating at 50% power. Full power
can be restored within 10 minutes by pushing any button or
adjusting any control knob.
ColorGuard System
All TQ-400, TQ-800, TQ-1200, and TQ-1800 series toasters use
a patented ColorGuard Sensing System that monitors and
automatically adjusts conveyor speed during high usage
periods to assure toast color uniformity.
TQ-10 Model
The TQ-10 model allows for toasting of bread products up to
1-1/2" (38 mm) thick and 9-5/8" (244 mm) wide. The TQ-10
comes equipped with 4" (102 mm) adjustable legs.
TQ-10 Model
TQ-400 Model
The TQ-400 model allows for toasting of bread products up to
1-3/4" (44 mm) thick and 9-5/8" (244 mm) wide.
TQ-405 model
The TQ-405 model allows for toasting of moist or dense bread
products up to 1-3/4" (44 mm) thick and 9-5/8" (244 mm) wide.
TQ-400H Model
The TQ-400H model has a 3" (76 mm) wide opening allowing
for toasting of bread products up to 2-3/4" (70 mm) thick and
9-5/8" (244 mm) wide.
TQ-400BA Model
The TQ-400BA model allows for quick single-sided toasting of
sliced bagels or bun products up to 1-3/4" (44 mm) thick and
9-5/8" (244 mm) wide. Most products can be toasted in as little
as 45 seconds. Toasts cut side facing up.
TQ-400 Series (TQ-400 shown)
Do not locate unit in an area subject to temperatures above
85°F (29°C) or grease from grills, fryers, etc. Excessive
temperatures and grease could cause damage to unit.
Do not locate toaster in an area that restricts air flow
around front or rear of unit. Do not locate toaster in direct
discharge path of air conditioning vent or makeup air vent.
Damage to any countertop material caused by heat
generated from Hatco equipment is not covered under the
Hatco warranty. Contact manufacturer of countertop
material for application information.
NOTICE
Use non-abrasive cleaners and cloths only. Abrasive
cleaners and cloths could scratch finish of unit, marring its
appearance and making it susceptible to soil accumulation.
This unit is intended for commercial use only — NOT for
household use.
Clean unit daily to avoid malfunctions and maintain
sanitary operation.
NOTICE

Form No. TQ2M-0515
5
MODEL DESCRIPTIONS
English
TQ-800 Model
The TQ-800 model allows for toasting of bread products up to
1-3/4" (44 mm) thick and 9-5/8" (244 mm) wide.
TQ-805 Model
The TQ-805 model allows for toasting of moist or dense bread
products up to 1-3/4" (44 mm) thick and 9-5/8" (244 mm) wide.
TQ-800H Model
The TQ-800H model has a 3" (76 mm) wide opening allowing
for toasting of bread products up to 2-3/4" (70 mm) thick and 9-
5/8" (244 mm) wide.
TQ-800BA Model
The TQ-800BA model allows for quick single-sided toasting of
sliced bagels or bun products up to 1-3/4" (44 mm) thick and 9-
5/8" (244 mm) wide. Most products can be toasted in as little as
30 seconds. Toasts cut side facing up.
TQ-800HBA Model
The TQ-800HBA model is designed to provide the flexibility and
performance to toast one side of sliced bagels or bun products
in as little as 30 seconds. Toasts cut side facing up. Maximum
product size allowed is 2-3/4" (70 mm) thick and 9-5/8"
(244 mm) wide.
TQ-800 Series (TQ-800H shown)
TQ-1200 Model
The TQ-1200 is a high speed toaster which has an accelerated
conveyor system allowing faster toasting during periods of high
demand. Two slices of bread products can be toasted in as little
as 15 seconds. This model is capable of toasting bread products
up to 1-3/4" (44 mm) thick and 9-5/8" (244 mm) wide.
TQ-1800 Model
The TQ-1800 model allows for toasting of bread products up to
1-3/4" (44 mm) thick and 13-5/8" (346 mm) wide.
TQ-1800H Model
The TQ-1800H model has a 3" (76 mm) wide opening allowing
for toasting of bread products up to 2-3/4" (70 mm) thick and
13-5/8" (346 mm) wide.
TQT-1800BA Model
The TQ-1800BA model allows for quick single-sided toasting of
sliced bagels or bun products up to 1-3/4" (44 mm) thick and
13-5/8" (346 mm) wide. Most products can be toasted in as little
as 15 seconds. Toasts cut side facing up.
TQ-1800HBA Model
The TQ-1800HBA model is designed to provide the flexibility
and performance to toast one side of sliced bagels or bun
products in as little as 15 seconds. Toasts cut side facing up.
Maximum product size allowed is 2-3/4" (70 mm) thick and
13-5/8" (346 mm) wide when 3 products are placed side by side.
TQ-1800 Series (TQ-1800 shown)
T Q - X X X X H B A
Toast Qwik
Model Number
H = Opening height is 3” (76 mm)
No Character = Opening height is 2” (51 mm)
BA = Toasts one side only
(Buns/Bagels)
No Character = Toasts Both Sides
MODEL DESIGNATION

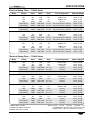
Model Voltage Hertz Watts Amps Plug Configuration Shipping Weight
TQ-10 120 60 1800 15.0 NEMA 5-15P* 42 lbs. (19 kg)
208 60 1830 8.8 NEMA 6-15P 42 lbs. (19 kg)
240 60 1830 7.6 NEMA 6-15P 42 lbs. (19 kg)
200 50/60 2070 10.4 AS 3112 42 lbs. (19 kg)
220–230 (CE) 50/60 1866–2048 8.5–8.9 CEE 7/7, BS-1363, or AS 3112 42 lbs. (19 kg)
230–240 (CE) 50/60 2048–2221 8.9–9.3 CEE 7/7, BS-1363, or AS 3112 42 lbs. (19 kg)
6
Form No. TQ2M-0515
SPECIFICATIONS
English
Electrical Rating Chart — Model TQ-10
The shaded areas contain electrical information for International models only.
* NEMA 5-20P for Canada.
Plug Configurations
Units are supplied from the factory with an electrical cord and
plug. Plugs are supplied according to the application.
ELECTRIC SHOCK HAZARD: Plug unit into a properly
grounded electrical receptacle of the correct voltage, size,
and plug configuration. If plug and receptacle do not
match, contact a qualified electrician to determine and
install proper voltage and size electrical receptacle.
NOTE: Receptacles are not supplied by Hatco, but are
available as accessories.
NOTE: Specification label located on the side of the unit. See
label for serial number and verification of unit electrical
information.
WARNING
Plug Configurations
NEMA 5-15P
CEE 7/7 Schuko
AS 3112
BS-1363
NEMA 6-20P
NEMA 6-15P
NEMA 6-30P
NEMA 5-20P

Model Voltage Hertz Watts Amps Plug Configuration Shipping Weight
TQ-400 120 60 1790 14.9 NEMA 5-15P* 46 lbs. (21 kg)
208 60 2230 10.7 NEMA 6-15P 46 lbs. (21 kg)
240 60 2230 9.3 NEMA 6-15P 46 lbs. (21 kg)
200 50/60 2064 10.3 AS 3112 46 lbs. (21 kg)
220–230 (CE) 50/60 1860–2030 8.5–8.8 CEE 7/7, BS-1363, or AS 3112 46 lbs. (21 kg)
230–240 (CE) 50/60 2030–2210 8.8–9.2 CEE 7/7, BS-1363, or AS 3112 46 lbs. (21 kg)
TQ-405
220–230 (CE) 50/60 2131–2330 9.7–10.1 CEE 7/7, BS-1363, or AS 3112 46 lbs. (21 kg)
230–240 (CE) 50/60 2030–2210 8.8–9.2 CEE 7/7, BS-1363, or AS 3112 46 lbs. (21 kg)
TQ-400H 208 60 2230 10.7 NEMA 6-15P 46 lbs. (21 kg)
240 60 2230 9.3 NEMA 6-15P 46 lbs. (21 kg)
200 50/60 2064 10.3 AS 3112 46 lbs. (21 kg)
220–230 (CE) 50/60 2131–2330 9.7–10.1 CEE 7/7, BS-1363, or AS 3112 46 lbs. (21 kg)
230–240 (CE) 50/60 2030–2210 8.8–9.2 CEE 7/7, BS-1363, or AS 3112 46 lbs. (21 kg)
TQ-400BA 120 60 1780 14.8 NEMA 5-15P* 46 lbs. (21 kg)
208 60 1880 9.0 NEMA 6-15P 46 lbs. (21 kg)
240 60 1880 7.8 NEMA 6-15P 46 lbs. (21 kg)
200 50/60 1878 9.4 AS 3112 46 lbs. (21 kg)
220–230 (CE) 50/60 1765–1930 8.0–8.4 CEE 7/7, BS-1363, or AS 3112 46 lbs. (21 kg)
230–240 (CE) 50/60 1930–2100 8.4–8.8 CEE 7/7, BS-1363, or AS 3112 46 lbs. (21 kg)
Model Voltage Hertz Watts Amps Plug Configuration Shipping Weight
TQ-800 208 60 3330 16.0 NEMA 6-20P† 62 lbs. (28 kg)
240 60 3330 13.9 NEMA 6-15P 62 lbs. (28 kg)
200 50/60 3050 15.3 No Plug 62 lbs. (28 kg)
220–230 (CE) 50/60 3019–3300 13.7–14.4 No Plug 62 lbs. (28 kg)
230–240 (CE) 50/60 3300–3593 14.4–15.0 No Plug 62 lbs. (28 kg)
TQ-805
230–240 (CE) 50/60 3300–3593 14.4–15.0 No Plug 62 lbs. (28 kg)
TQ-800H 208 60 3330 16.0 NEMA 6-20P† 62 lbs. (28 kg)
240 60 3330 13.9 NEMA 6-15P 62 lbs. (28 kg)
200 50/60 3050 15.3 No Plug 62 lbs. (28 kg)
220–230 (CE) 50/60 3019–3300 13.7–14.4 No Plug 62 lbs. (28 kg)
230–240 (CE) 50/60 3300–3593 14.4–15.0 No Plug 62 lbs. (28 kg)
TQ-800BA 208 60 3280 15.8 NEMA 6-20P† 62 lbs. (28 kg)
240 60 3280 13.7 NEMA 6-15P 62 lbs. (28 kg)
200 50/60 3003 15.0 No Plug 62 lbs. (28 kg)
220–230 (CE) 50/60 2791–3050 12.7–13.3 No Plug 62 lbs. (28 kg)
230–240 (CE) 50/60 3050–3321 13.3–13.9 No Plug 62 lbs. (28 kg)
TQ-800HBA 208 60 3280 15.8 NEMA 6-20P† 62 lbs. (28 kg)
240 60 3280 13.7 NEMA 6-15P 62 lbs. (28 kg)
200 50/60 3003 15.0 No Plug 62 lbs. (28 kg)
220–230 (CE) 50/60 2791–3050 12.7–13.3 No Plug 62 lbs. (28 kg)
230–240 (CE) 50/60 3050–3321 13.3–13.9 No Plug 62 lbs. (28 kg)
Form No. TQ2M-0515
7
SPECIFICATIONS
English
Electrical Rating Chart — TQ-400 Series
Electrical Rating Chart — TQ-800 Series
NOTE: TQ-800, TQ-805, TQ-800H, TQ-800BA and
TQ-800HBA 200V, 220-230V (CE) and 230-240V (CE)
equipped with 6' (1829 mm) cord attached, no plug.
* NEMA 5-20P for Canada
† Available with optional 6-30P cord
NEMA 6-20P cord for Canada

Model Voltage Hertz Watts Amps Plug Configuration Shipping Weight
TQ-1800 208 60 4440 21.4 NEMA 6-30P 73 lbs. (33 kg)
240 60 4440 18.5 NEMA 6-30P 73 lbs. (33 kg)
TQ-1800H 208 60 4650 22.4 NEMA 6-30P 73 lbs. (33 kg)
240 60 4650 19.4 NEMA 6-30P 73 lbs. (33 kg)
TQ-1800BA 208 60 4580 22.0 NEMA 6-30P 73 lbs. (33 kg)
240 60 4580 19.1 NEMA 6-30P 73 lbs. (33 kg)
TQ-1800HBA 208 60 4580 22.0 NEMA 6-30P 73 lbs. (33 kg)
240 60 4580 19.1 NEMA 6-30P 73 lbs. (33 kg)
Model Voltage Hertz Watts Amps Plug Configuration Shipping Weight
TQ-1200 208 60 4030 19.4 NEMA 6-30P 65 lbs. (30 kg)
240
60 4030 16.8 NEMA 6-30P 65 lbs. (30 kg)
Model
Width
(A)
Depth
(B)
Height
(C)
Footprint
Width (D)
Footprint
Depth (E)
TQ-10
14-1/2″
(368 mm)
17-3/4″
(451 mm)
13-3/4″
(378 mm)
13-1/8″
(333 mm)
13-3/8″
(340 mm)
8
Form No. TQ2M-0515
SPECIFICATIONS
English
Dimensions — Model TQ-10
Front View Side View
A
D E
C
B
Electrical Rating Chart — Model TQ-1200
Electrical Rating Chart — TQ-1800 Models

Model
Width
(A)
Depth
(B)
Height
(C)
Footprint
Width (D)
Footprint
Depth (E)
TQ-400
14-1/2″
(368 mm)
17-3/4″
(451 mm)
14-7/8″
(378 mm)
12-3/8″
(314 mm)
11-5/8″
(295 mm)
TQ-405
14-1/2″
(368 mm)
17-3/4″
(451 mm)
14-7/8″
(378 mm)
12-3/8″
(314 mm)
11-5/8″
(295 mm)
TQ-400H
14-1/2″
(368 mm)
17-3/4″
(451 mm)
15-7/8″
(403 mm)
12-3/8″
(314 mm)
11-5/8″
(295 mm)
TQ-400BA
14-1/2″
(368 mm)
17-3/4″
(451 mm)
14-7/8″
(378 mm)
12-3/8″
(314 mm)
11-5/8″
(295 mm)
TQ-800
14-1/2″
(368 mm)
22-3/4″
(578 mm)
16-5/8″
(422 mm)
12-3/8″
(314 mm)
13-1/2″
(344 mm)
TQ-805
14-1/2″
(368 mm)
22-3/4″
(578 mm)
16-5/8″
(422 mm)
12-3/8″
(314 mm)
13-1/2″
(344 mm)
TQ-800H
14-1/2″
(368 mm)
22-3/4″
(578 mm)
16-5/8″
(422 mm)
12-3/8″
(314 mm)
13-1/2″
(344 mm)
TQ-800BA
14-1/2″
(368 mm)
22-3/4″
(578 mm)
16-5/8″
(422 mm)
12-3/8″
(314 mm)
13-1/2″
(344 mm)
TQ-800HBA
14-1/2″
(368 mm)
22-3/4″
(578 mm)
16-5/8″
(422 mm)
12-3/8″
(314 mm)
13-1/2″
(344 mm)
TQ-1200
14-1/2″
(368 mm)
22-3/4″
(578 mm)
16-5/8″
(422 mm)
12-3/8″
(314 mm)
13-1/2″
(344 mm)
TQ-1800
18-1/2″
(470 mm)
22-3/4″
(578 mm)
16-5/8″
(422 mm)
16-3/8″
(416 mm)
13-1/2″
(344 mm)
TQ-1800H
18-1/2″
(470 mm)
22-3/4″
(578 mm)
16-5/8″
(422 mm)
16-3/8″
(416 mm)
13-1/2″
(344 mm)
TQ-1800BA
18-1/2″
(470 mm)
22-3/4″
(578 mm)
16-5/8″
(422 mm)
16-3/8″
(416 mm)
13-1/2″
(344 mm)
TQ-1800HBA
18-1/2″
(470 mm)
22-3/4″
(578 mm)
16-5/8″
(422 mm)
16-3/8″
(416 mm)
13-1/2″
(344 mm)
Form No. TQ2M-0515
9
SPECIFICATIONS
English
Dimensions — TQ-400, -405, -400H, -800, -805, -1200, and -1800 Models
Front View Side View
A B
D E
C

10
Form No. TQ2M-0515
INSTALLATION
English
General
Hatco Toast-Qwik
®
Electric Conveyor Toasters are shipped with
most components pre-assembled. Care should be taken when
unpacking the shipping carton to avoid damage to the unit and
the components enclosed.
ELECTRIC SHOCK HAZARD: Unit is not weatherproof.
Locate unit indoors where ambient air temperature is a
minimum of 70°F (21°C) and a maximum of 85°F (29°C).
EXPLOSION HAZARD: Do not store or use gasoline or
other flammable vapors or liquids in the vicinity of this or
any other appliance.
FIRE HAZARD:
• Do not locate toaster under shelving or closer than 12"
(305 mm) from the ceiling.
• Do not place anything on top of toaster. Do not place
toaster near or underneath curtains or other
combustible materials. Items near or on top of toaster
could catch fire causing injury and/or damage to the
toaster.
1. Remove the unit from the carton.
NOTE: To prevent delay in obtaining warranty coverage,
complete online warranty registration. See the
IMPORTANT OWNER INFORMATION section for
details.
2. Remove tape and protective packaging from all surfaces
of the unit.
Locate unit at the proper counter height in an area that is
convenient for use. Location should be level and strong
enough to support weight of unit and contents.
Do not locate unit in an area subject to temperatures above
85°F (29°C) or grease from grills, fryers, etc. Excessive
temperatures and grease could cause damage to unit.
3. Place the unit in the desired location.
• Locate the unit in an area where the ambient air
temperature is constant and between 70°F (21°C) and
85°F (29°C). Avoid areas that may be subject to active
air movements or currents (i.e., near exhaust fans/hoods
and air conditioning ducts).
• Make sure the unit is at the proper counter height in an
area convenient for use.
• Make sure the countertop is level and strong enough to
support the weight of the unit and food product.
• Make sure all the feet on the bottom of the unit are
positioned securely on the countertop.
4. Level the unit by turning the leveling feet on each leg, if
necessary.
WARNING
CAUTION
NOTICE
5. Install the front or rear discharge chutes. Refer to the “Front
or Rear Discharge Installation” procedure in this section.
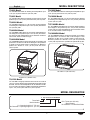
Components
Always operate toaster with crumb tray installed.
6. Install the crumb tray.
a. Position the crumb tray directly below the stop pins
under the conveyor belt at the front of the toaster.
b. Slide the crumb tray into the toaster until the front of the
crumb tray meets the stop pins.
Installing the Crumb Tray
Stop Pins
Crumb
Tray
Crumb
Tray
Toast Collector
Pan
Discharge Chute
CAUTION

Form No. TQ2M-0515
11
Front or Rear Discharge Installation
Toast-Qwik units can be set up so toasted product discharges
at either the front or the rear of the unit.
FIRE HAZARD:
• For front discharge operation: Allow a minimum
clearance of 1" (25 mm) along the sides and rear of unit.
Allow a minimum clearance of 12" (305 mm) in the front.
If safe distances are not maintained, discoloration or
combustion could occur.
• For rear discharge operation: Allow a minimum
clearance of 1" (25 mm) along the sides of unit. Allow a
minimum clearance of 12" (305 mm) in the front and
rear. If safe distances are not maintained, discoloration
or combustion could occur.
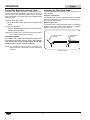
Model TQ-10
Model TQ-10 uses a one piece discharge chute/collector pan.
The installation location determines the discharge area.
For front
discharge:
• Slide the toaster chute into the toaster from the front of the
toaster with the rear lip of the chute on the rear most pins.
TQ-10 Front Discharge
For rear discharge:
• Slide the toaster chute into the toaster from the rear of the
toaster with the lip of the chute over the inside set of pins.
TQ-10 Rear Discharge
WARNING
Pin
Rear
Pin
TQ-400, -800, -1200, and -1800 Series
TQ-400, -800, -1200, and -1800 series toasters use a separate
discharge chute and toast collector pan. The installation location
determines the discharge area.
For front
discharge:
1. Install the discharge chute.
• Place the curved end inward until the rear lip of the chute
is on the rear chute pins.
• Lower the front slots of the chute onto the front chute
pins.
2. Position the toast collector pan, with the open end in first,
over the pan pins.
• Align the slanted notches over the pan pins and lower
into place.
TQ-400, -800, -1200, and -1800 Series Front Discharge
For rear discharge:
1. Remove the discharge chute if it is installed. It is not used
for rear discharge.
2. Slide the toast collector pan, with the open end first, over
the set of pan pins at the rear of the unit.
• Align the slanted notches over the two sets of rear pan
pins and lower into place.
TQ-400, -800, -1200, and -1800 Series Rear Discharge
Toast Collector Pan
Rear
Pan Pins
Toast Collector Pan
Discharge Chute
Pan
Pins
Front ChuteFront Chute
PinPin
Front Chute
Pin
Rear Chute
Pin
INSTALLATION
English

12
Form No. TQ2M-0515
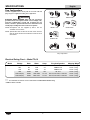
OPERATION
English
TOP HEAT
ON/OFF (I/O) Switch
BOTTOM HEAT
ON/OFF (I/O) Switch
COLOR CONTROL
Control Panel – TQ-10 Series
General
Toast-Qwik
®
Electric Conveyor Toasters are designed designed
for ease of operation. To operate the toaster, perform the
appropriate procedure in this section.
Read all safety messages in the IMPORTANT SAFETY
INFORMATION section before operating this equipment.
BURN HAZARD:
• Some exterior surfaces on unit will get hot. Use caution
when touching these areas.
• Do not remove crumb tray for cleaning until toaster is
cool.
Always operate toaster with crumb tray installed.
Toasting of coated or buttered products such as garlic
bread, cheese sandwiches, and sweet rolls is NOT
recommended. Residue will reduce toaster performance
and could ignite inside toaster. Using toaster with food
products listed above will void unit warranty.
WARNING
CAUTION
Operating Model TQ-10
1. Plug the unit into a properly grounded electrical receptacle
of the correct voltage, size, and plug configuration. See the
SPECIFICATIONS section for details.
2. Move the feed ramp to the desired position. Refer to
“Adjusting the Toast Feed Ramp” in this section for details.
3. Move the TOP HEAT and/or BOTTOM HEAT switches to
the ON (I) position.
• To toast the top
and bottom sides of the bread, place
the TOP HEAT and BOTTOM HEAT switches in the
ON(I) position.
• To toast on the top
side only, place the TOP HEAT
switch in the ON (I) position and the BOTTOM HEAT
switch in the OFF (O)position.
• To toast on the bottom
side only, place the TOP HEAT
switch in the OFF (O) position and the BOTTOM HEAT
switch in the ON (I) position.
4. Turn the COLOR CONTROL to the lightest position while
the unit heats up.
NOTE: Allow approximately 15 to 20 minutes for a warm-up
period.
5. After warm-up period, set the COLOR CONTROL to the
medium position and toast two slices of bread product then
re-adjust the COLOR CONTROL to the desired setting.
NOTE: To toast moist products such as English muffins, rye
bread, or whole wheat, slow the conveyor by turning the
COLOR CONTROL knob to a darker setting (clockwise).

Form No. TQ2M-0515
13
OPERATION
English
Control Panel – TQ-400, -800, -1200, and -1800 Series, Single-Sided Toaster
Power I/O
(on/off) Switch
Color Control
Top Heat
Control
Warning Light
Power Save
Button
Bottom Heat
Control
Control Panel – TQ-400, -800, -1200, and -1800 Series, Two-Sided Toaster
Power I/O
(on/off) Switch
Color Control
Top Heat
Control
Warning Light
Power Save
Button
Bottom Heat
Control
Operating TQ-400, -800, -1200, and -1800
Series
1. Plug the unit into a properly grounded electrical receptacle
of the correct voltage, size, and plug configuration. See the
SPECIFICATIONS section for details.
2. Move the Power I/O (on/off) switch in the I (on) position.
3. Adjust the Top Heat and/or Bottom Heat controls.
• For two sided toasting, turn the Top Heat control and
Bottom Heat control clockwise to the highest setting.
• For one sided toasting, turn the Top Heat control
clockwise to the highest setting and turn the Bottom Heat
control counter-clockwise to the lowest setting.
NOTE: TQ-400BA, -800BA, -800HBA, -1800BA, and -
1800HBA toasters are designed specifically for toasting
one side of a bread product, such as a bun or bagel.
These models toast with the cut side facing up.
NOTE: When toasting a single-sided product such as a bun or
bagel, place the product with the cut side facing up.
Adjust the Bottom Heat control to a light setting, toast
two slices of bread product and adjust the Top Heat
and/or Bottom Heat controls as needed.
4. Turn the Color Control to the lowest position while the
toaster heats up.
NOTE: Allow approximately 15 to 20 minutes for a warm-up
period.
5. After warm-up period, toast two slices of bread product.
Adjust the Color Control if needed.
NOTE: If toasted bread product is too dark with the Color
Control set on the lightest setting, adjust the Top Heat
and/or Bottom Heat controls as needed. (Allow 15 to 20
minutes for toaster to re-adjust to new setting before
resuming operation.)
NOTE: To toast moist products such as English Muffins, rye
bread or whole wheat, slow the conveyor by turning the
Color Control knob to a darker setting (clockwise).
IMPORTANT NOTE
If the Warning light comes on, the unit may be overheating.
Turn off and unplug the unit. Refer to the “Daily Cleaning”
procedure to clean the cooling fan vents. If the unit does not
function properly after cleaning the cooling fan vents, contact
an Authorized Service Agent or Hatco for assistance.

14
Form No. TQ2M-0515
OPERATION
English
Power Save Mode with Indicator Light
All TQ-400, -800, -1200, and -1800 series toasters have a built-
in Power Save Mode with Indicator light feature. This feature
reduces power to the heating elements by 50 percent. During
Power Save Mode the indicator light on the POWER SAVE
button will flash.
To activate Power Save Mode:
1. Press the POWER SAVE button until the indicator light
flashes.
To exit Power Save Mode:
1. Press the POWER SAVE button or turn any knob until the
indicator light stops flashing.
NOTE: Allow a minimum of 2–3 minutes before toasting. Unit is
back up to full power within 10 minutes.
ColorGuard System
All TQ-400, -800, -1200, and -1800 series toasters use
a patented ColorGuard Sensing System that monitors
and automatically adjust conveyor speed during high
usage periods to assure toast color uniformity.
NOTE: The ColorGuard Sensing System is inoperable for
approximately ten minutes after any heat adjustments
are made.
Adjusting the Toast Feed Ramp
The toast feed ramp is installed at the factory and can be used
in two positions.
Automatic Feed Position
For automatic feed, the toast feed ramp should be in an upright
position. Bread products enter the toaster by placing them on
the feed ramp and releasing.
Manual Feed Position
For manual feed, the toast feed ramp should be in a horizontal
position on top of the toaster. Bread products are manually
loaded by placing directly on the conveyor belt.
Toast Feed Ramp
Automatic Feed
Position
Manual Feed
Position

Form No. TQ2M-0515
15
MAINTENANCE
English
General
Hatco Toast-Qwik
®
Electric Conveyor Toasters are designed for
maximum durability and performance with minimum
maintenance.
ELECTRIC SHOCK HAZARD:
• Turn OFF power switch, unplug power cord, and allow
unit to cool before performing maintenance, cleaning,
setup, or attempting to clear a jam.
• DO NOT submerge or saturate with water. Unit is not
waterproof. Do not operate if unit has been submerged
or saturated with water.
• Do not steam clean or use excessive water on unit.
• This unit is not “jet-proof” construction. Do not use jet-
clean spray to clean this unit.
• Do not clean unit when it is energized or hot.
• Do not allow liquids to spill into unit.
• This unit must be serviced by qualified personnel only.
Service by unqualified personnel may lead to electric
shock or burn.
• Use only Genuine Hatco Replacement Parts when
service is required. Failure to use Genuine Hatco
Replacement Parts will void all warranties and may
subject operators of the equipment to hazardous
electrical voltage, resulting in electrical shock or burn.
Genuine Hatco Replacement Parts are specified to
operate safely in the environments in which they are
used. Some aftermarket or generic replacement parts
do not have the characteristics that will allow them to
operate safely in Hatco equipment.
This unit has no “user-serviceable” parts. If service is
required on this unit, contact an Authorized Hatco Service
Agent or contact the Hatco Service Department at
800-558-0607 or 414-671-6350; fax 800-690-2966; or
International fax 414-671-3976.
Daily Cleaning
To preserve the finish of the unit, it is recommended that the metal
surfaces be wiped daily with a damp cloth.
Submerging or saturating unit with water will damage the
unit and void unit warranty.
Use non-abrasive cleaners and cloths only. Abrasive
cleaners and cloths could scratch finish of unit, marring its
appearance and making it susceptible to soil accumulation.
Clean unit daily to avoid malfunctions and maintain
sanitary operation.
1. Turn off the unit, unplug the power cord, and allow the unit
to cool.
2. Remove and empty the crumb tray and the toast collector
pan.
a. Wash the crumb tray and the toast collector pan with
warm water and a mild detergent. Rinse with water.
b. Allow the crumb tray and toast collector pan to air dry, or
dry with a soft cloth.
WARNING
NOTICE
WARNING
BURN HAZARD: Do not remove crumb tray for cleaning
until toaster is cool.
3. Wipe the exterior surfaces of the toaster with a non-
abrasive, damp cloth.
4. Stubborn stains may be removed with a good stainless
steel cleaner or a non-abrasive cleaner. Hard to reach
areas should be cleaned with a small brush and mild soap.
NOTE: The conveyor gear motor and conveyor system are
permanently lubricated and require no lubrication.
5. Check the cooling fan vents and clean any debris
NOTE: TQ-400, -800, -1200, and -1800 series toasters are
equipped with a cooling fan directly below the control
panel area. Check/clean the cooling fan vents monthly
or anytime the Warning light illuminates. For excessive
buildup, use a vacuum cleaner to clear the vents.
Clogged vents will cause the toaster to overheat and
shut down.
Cooling Fan Vents (TQ-400 shown)
6. Reinstall the crumb tray and toast collector pan. Refer to
the INSTALLATION section for instructions.
Cleaning the Toast Feed Ramp
1. Remove the toast feed ramp by pressing in the two wire
spokes and lifting.
2. Wipe clean with a non-abrasive, damp cloth or soak the
ramp in a mild solution of 1 cup (227 mL) ammonia and
1 gallon (3.785 L) of water.
3. Reinstall the toast feed ramp by aligning the wire spokes
with the holes in the toaster.
Cleaning the Bottom Element Reflector
The bottom heating element reflector inside the toasting
chamber has slots that allow bread crumbs to drop through to
the crumb tray. Over an extended period of use, bread crumbs
may build up on the reflector and not drop through onto the tray.
1. Turn off the unit, unplug the power cord, and allow the unit
to cool.
2. Wipe the crumbs onto the crumb tray using a bristle brush.
• To wipe the reflector, place the bristle brush through the
conveyor belt and wipe to each side.
3. Perform the “Daily Cleaning” procedure in this section.
CAUTION
Cooling Fan
Vents
Warning
Light

Symptom Probable Cause Corrective Action
Toast too light. Color Control knob set on a light setting. Turn Color Control knob to a darker setting.
Supply voltage to unit is low. Verify the supply voltage to the toaster matches the
unit specifications.
Toast too dark. Color Control knob set on a dark setting. Turn Color Control knob to a lighter setting.
Supply voltage to unit is high. Verify the supply voltage to the toaster matches the
unit specifications.
Unit takes too long to toast. The first few batches can take longer
because the toaster needs time to heat up
when initially turned on.
Allow toaster to heat up to full operating temperature
before inserting bread product (approximately 15–20
minutes).
Supply voltage to unit is low. Verify the supply voltage to the toaster matches the
unit specifications.
Unit toasts on one side only. Toaster is a “buns” only model. (Model
contains BA in model name.)
Unit is designed to perform in this way.
Bottom Heat or Top Heat Control set too
low.
Turn the Bottom Heat or Top Heat control to a higher
setting.
Heating element defective. Visually check the heating element inside the toaster
during operation. The heating element should glow
red. If the element does not glow, Contact Authorized
Service Agent or Hatco for assistance.
Toaster trips the circuit
breaker or GFCI.
Circuit breaker is not sized properly for the
toaster.
Check circuit breaker for proper sizing.
Wiring fault inside toaster. Contact Authorized Service Agent or Hatco for
assistance.
Toaster conveyor doesn’t
move.
Bread slices or buns jammed in conveyor
track.
Turn off unit, wait for unit to cool, and remove bread
product jamming the conveyor.
16
Form No. TQ2M-0515
TROUBLESHOOTING GUIDE
English
This unit must be serviced by qualified personnel only.
Service by unqualified personnel may lead to electric
shock or burn.
WARNING
ELECTRIC SHOCK HAZARD: Turn OFF power switch,
unplug power cord, and allow unit to cool before
performing any cleaning, setup, or maintenance.
WARNING
Troubleshooting Questions?
If you continue to have problems resolving an issue, please
contact the nearest Authorized Hatco Service Agency or Hatco
for assistance. To locate the nearest Service Agency, log onto
the Hatco website at www.hatcocorp.com and click on
Find Service Agent, or contact the Hatco Parts and Service
Team at:
Telephone: 800-558-0607 or 414-671-6350
e-mail: p[email protected]
Fax: 800-690-2966 or 414-671-3976

Form No. TQ2M-0515
17
OPTIONS AND ACCESSORIES
English
Security Cover
The lockable security cover flips up and down to limit access to
the control panel.
1. Remove the crumb tray.
2. Remove the two front screws on the platform above the
controls.
3. Position the security cover over the control panel, aligning
the mounting holes on the security cover with the screw
holes on the platform.
4. Reinstall the two screws through the security cover and
into the platform. Tighten securely.
5. Reinstall the crumb tray.
Extended Feed Guide
The extended feed guide accessory adds 3” (76 mm) to the
feed ramp (not available for TQ-1800 models).
Automatic Power Save Mode
The optional automatic power Save mode feature switches to
power save mode after 30 minutes of inactivity (not available for
TQ-10 models).
30 Amp Cord (TQ-800 Models)
An optional 30 Amp cord (NEMA 6-30P plug) is available for
208 volt TQ-800 models only.
Receptacles
Receptacles are available as accessories for units using
NEMA 5-20P, NEMA 6-20P, or NEMA 6-30P plugs.
Security Cover
Security
Cover
Platform
Lockable security cover
flips up and down.
Platform
Screw

18
Form No. TQ2M-0515
LIMITED WARRANTY
English
1. PRODUCT WARRANTY
Hatco warrants the products that it manufactures (the
“Products”) to be free from defects in materials and
workmanship, under normal use and service, for a period of
one (1) year from the date of purchase when installed and
maintained in accordance with Hatco’s written instructions or
18 months from the date of shipment from Hatco. Buyer must
establish the Product’s purchase date by registering the
Product with Hatco or by other means satisfactory to Hatco in
its sole discretion.
Hatco warrants the following Product components to be free
from defects in materials and workmanship from the date of
purchase (subject to the foregoing conditions) for the period(s)
of time and on the conditions listed below:
a) One (1) Year Parts and Labor PLUS One (1) Additional
Year Parts-Only Warranty:
Conveyor Toaster Elements (metal sheathed)
Drawer Warmer Elements (metal sheathed)
Drawer Warmer Drawer Rollers and Slides
Strip Heater Elements (metal sheathed)
Display Warmer Elements (metal sheathed air heating)
Holding Cabinet Elements (metal sheathed air heating)
Heated Well Elements — HW and HWB Series
(metal sheathed)
b) One (1) Year Parts and Labor PLUS Four (4) Years
Parts-Only Warranty:
3CS and FR Tanks
c) One (1) Year Parts and Labor PLUS Nine (9) Years
Parts-Only Warranty on:
Electric Booster Heater Tanks
Gas Booster Heater Tanks
d) Ninety (90) Day Parts-Only Warranty:
Replacement Parts
THE FOREGOING WARRANTIES ARE EXCLUSIVE AND IN
LIEU OF ANY OTHER WARRANTY, EXPRESSED OR
IMPLIED, INCLUDING BUT NOT LIMITED TO ANY IMPLIED
WARRANTY OF MERCHANTABILITY OR FITNESS FOR A
PARTICULAR PURPOSE OR PATENT OR OTHER
INTELLECTUAL PROPERTY RIGHT INFRINGEMENT.
Without limiting the generality of the foregoing, SUCH
WARRANTIES DO NOT COVER: Coated incandescent light
bulbs, fluorescent lights, heat lamp bulbs, coated halogen light
bulbs, halogen heat lamp bulbs, xenon light bulbs, LED light
tubes, glass components, and fuses; Product failure in booster
tank, fin tube heat exchanger, or other water heating equipment
caused by liming, sediment buildup, chemical attack, or
freezing; or Product misuse, tampering or misapplication,
improper installation, or application of improper voltage.
2. LIMITATION OF REMEDIES AND DAMAGES
Hatco’s liability and Buyer’s exclusive remedy hereunder will be
limited solely, at Hatco’s option, to repair or replacement using
new or refurbished parts or Product by Hatco or a Hatco-
authorized service agency (other than where Buyer is located
outside of the United States, Canada, United Kingdom, or
Australia, in which case Hatco’s liability and Buyer’s exclusive
remedy hereunder will be limited solely to replacement of part
under warranty) with respect to any claim made within the
applicable warranty period referred to above. Hatco reserves
the right to accept or reject any such claim in whole or in part.
In the context of this Limited Warranty, “refurbished” means a
part or Product that has been returned to its original
specifications by Hatco or a Hatco-authorized service agency.
Hatco will not accept the return of any Product without prior
written approval from Hatco, and all such approved returns shall
be made at Buyer’s sole expense. HATCO WILL NOT BE
LIABLE, UNDER ANY CIRCUMSTANCES, FOR
CONSEQUENTIAL OR INCIDENTAL DAMAGES, INCLUDING
BUT NOT LIMITED TO LABOR COSTS OR LOST PROFITS
RESULTING FROM THE USE OF OR INABILITY TO USE THE
PRODUCTS OR FROM THE PRODUCTS BEING
INCORPORATED IN OR BECOMING A COMPONENT OF
ANY OTHER PRODUCT OR GOODS.
-
 1
1
-
 2
2
-
 3
3
-
 4
4
-
 5
5
-
 6
6
-
 7
7
-
 8
8
-
 9
9
-
 10
10
-
 11
11
-
 12
12
-
 13
13
-
 14
14
-
 15
15
-
 16
16
-
 17
17
-
 18
18


Hatco TOAST-QWIK TQ-10 Series Installation guide
- Category
- Toasters
- Type
- Installation guide
- This manual is also suitable for
Ask a question and I''ll find the answer in the document
Finding information in a document is now easier with AI
Related papers
-
Hatco TQ Series Owner's manual
-
-
-
-
Hatco TPT-240 User manual
-
Hatco TK-100-208 Installation guide
-
-
-
-
Other documents
-
Blizzard BCT2 Electric Conveyor Toaster User manual
-
Globe Food Equipment CPCT1 Installation guide
-
 Merco Savory Toaster ST-1 User manual
-
Metos Hatco TQ-800 Owner's manual
-
Caterchef 688095 User manual
-
Merco / Savory BT-1 User manual
-
Merco / Savory BT-2 Operating instructions
-
-
Merco PD-4 Operating instructions
-
