Page is loading ...

INS178B
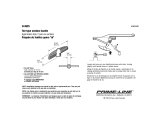
HELPFUL TOOLS HERRAMIENTAS UTILES OUTILS UTILES
ENGLISH ESPAÑOL FRANÇAIS
CHANNEL LOCKS
PINZAS DE EXTENSION
PINCES MULTIPRISES
ADJUSTABLE WRENCH
LLAVE AJUSTABLE
CLÉ ANGLAISE
PENETRATING OIL
ACEITE PENETRANTE
HUILE PÉNÉTRANTE
FLASHLIGHT
LINTERNA
LAMPE DE POCHE
PLIERS
PINZAS
PINCES
FLEXIBLE SUPPLIES
LINEAS DE ALIMENTACION FLEXIBLES
CONDUITES SOUPLES
BASIN WRENCH
LLAVE DE FREGADERO
CLÉ À LAVABO
(2)
SAFETY GLASSES
GAFAS DE SEGURIDAD
LUNETTES DE SÉCURITÉ
/8" DEEP WELL SOCKET
LLAVE A COPA DE 5/8"
CLÉ À DOUILLE
PROFONDE DE 5/8 PO
TWO-HANDLE
BAR SINK FAUCET
MODEL 5900, 85900 SERIES
ROBINET DE BAR À DEUX POIGNÉE
SÉRIE 5900, 85900
MEZCLADORA PARA FREGADERO DE BAR
DOS MANIJAS
SERIES MODELOS 5900, 85900
CONSERVER CES DIRECTIVES POUR
RÉFÉRENCE ULTÉRIEURE
Merci d’avoir acheté un robinet de qualité
MOEN. Avec un peu de soin et d’entretien,
ce robinet vous donnera plusieurs années
de rendement fiable. Lire attentivement
toutes les directives avant de débuter
l’installation.
Des questions lors de l'installation?
Toronto: (905) 829-3400;
Aillieurs au Canada: 1 800 465-6130
CONSEILS POUR RETIRER L’ANCIEN
ROBINET :
ATTENTION : Toujours fermer l’alimentation
en eau avant d’enlever un robinet. Ouvrir le
robinet pour libérer la pression d'eau et pour
s'assurer que l'alimentation en eau est
complèment fermée.
Après des années d'usage,
il peut être difficile d'enlever
l'ancien robinet. Utiliser de
l'huile de dégrippage sur le
dispositif de fixation du robinet
pour effriter la rouille et
desserrer les raccords du
robinet. Enlever le dispositif
de montage avec une clé de
lavabo ou des pinces multiprises ordinaires.
Après avoir retiré l’ancien robinet, nettoyer
complèment la surface de montage.
KEEP INSTRUCTIONS FOR
FUTURE REFERENCE
Thank you for purchasing a quality MOEN
faucet. With simple care and maintenance, it
will provide you with many years of reliable
performance. Please read all instructions
before installation.
Questions During Installation?
1-800-Buy-Moen
(1-800-289-6636)
Toronto 905-829-3400
Rest of Canada - 1-800-465-6130
TIPS FOR REMOVAL OF OLD FAUCET:
CAUTION: Always turn water supplies OFF
before removing old faucet. Turn faucet on to
relieve water pressure and to insure water is
completely off.
After years of use, it may
be difficult to remove your old
faucet. Use a penetrating oil
spray on the faucet mounting
hardware to help loosen
corrosion and assist in removing
the faucet connections. Remove
mounting hardware using a
basin wrench or channel lock
pliers. Thoroughly clean the mounting
surface after removal of your old faucet.
For safety and ease of faucet replacement,
Moen recommends the use of these helpful tools
Para la seguridad y facilidad de repuesto de
la mezcladora, Moen recomienda las siguientes
herramientas
Par mesure de sécurité et pour faciliter
l'installation, Moen suggère l'utilisation
des outils suivants.
!
GUARDE ESTAS INSTRUCCIONES
PARA SU FUTURA REFERENCIA
Gracias por haber comprado una mezcladora
de alta calidad de MOEN. Con un cuidado y
mantenimiento sencillos, le brindará muchos
años de servicio fiable. Favor leer todas las
instrucciones antes de instalar.
Preguntas durante la instalación?
(84) 88-08-26, 88-08-27
o 91-800-84-345
SUGERENCIAS PARA QUITAR LA VIEJA
MEZCLADORA:
¡ADVERTENCIA! Siempre CIERRE la
alimentación de agua antes de quitar la vieja
mezcladora. Abra la mezcladora para aflojar la
presión del agua y para asegurar que el agua
está completamente cerrada.
Después de muchos años de uso,
tal vez sea difícil quitar su vieja
mezcladora. Use un rocío de
aceite penetrante sobre
las herramientas de montaje
dela mezcladora para ayudar a
aflojar la herrumbre y quitar las
conexiones de la mezcladora.
Quite las herramientas de
montaje sirviéndose de una
llave de fregadero o pinzas de
extensión. Limpie cuidadosamente la superficie
de montaje luego de quitar la vieja mezcladora.
!
!
Complies with: ASME A112.18.1M, CSA B125, & NSF 61/9 Cumple con: ASME A112.18.1M, CSA B125, & NSF 61/9
Respecte : ASME A112.18.1M, CSA B125, & NSF 61/9
INS178B

PARTS DIAGRAM DIÁGRAMA DE PIEZAS TABLEAU DES PIÈCES
ENGLISH
ESPAÑOL
FRANÇAIS
1
Lever Handle Insert
(Monticello models only)
not included on all models
Inserto de manija de palanca
(modelos Monticello solamente)
no incluido en todos los modelos
Pièce rapportée pour poignée à manette
(modèles Monticello seulem.) non compris
dans tous les modèles
2
Color Ring
(Monticello lever models only)
Anillo de color
(modelos de palanca Monticello solamente)
Anneau en couleur (modèles à manette
Monticello seulem.)
3
Elbow
(Monticello lever models only)
Codo
(modelos de palanca Monticello solamente)
Coude (modèles à manette Monticello
seulem.)
4
Handle Hub
(Monticello models)
Centro de manija
(modelos Monticello)
Moyeu de poignée (modèles Monticello)
5
Lever Handle Assembly
(Monticello models)
Ensamble de manija de palanca
(modelos Monticello)
Assemblage de poignées à manette
(modèles Monticello)
6
Plug Button
(Monticello cross handle only)
Tapón
(Manija en cruz Monticello solamente)
Enjoliveur de poignée (poignées
cruciformes Monticello seulem.)
7
Handle Screw
(Monticello cross handle only)
Tornillo de manija
(Manija en cruz Monticello solamente)
Vis de poignée (poignées cruciformes
Monticello uniquement)
8
Color Ring
(Monticello cross handle only)
Anillo de color
(Manija en cruz Monticello solamente)
Anneau de couleur (poignées cruciformes
Monticello uniquement)
9
Cross Handle Insert
(Monticello cross handle only)
not included
Inserto de manija en cruz
(Manija en cruz Monticello solamente)
No se incluye
Pièce rapportée pour poignée cruciforme
(poignées cruciformes Monticello
uniquement) non incluse
10
Handle Skirt
(Monticello cross handle only)
Faldón de manija
(Manija en cruz Monticello solamente)
Jupe de poignée (poignées cruciformes
Monticello uniquement)
11
Cross Handle Assembly
(Monticello only)
Ensamble de manija en cruz
Monticello solamente
Assemblage de poignées cruciformes
12
Plug Button
(Traditional models)
Tapón
(Modelos tradicionales)
Enjoliveur de poignée (modèles
Traditional)
13
Handle Screw
(Traditional models)
Tornillo de manija
(Modelos tradicionales)
Vis de poignée (modèles Traditional)
14
Handle Hub
(Traditional models)
Centro de manija
(Modelos tradicionales)
Moyeu de poignée ( modèles Traditional)
15
Lever Handle Insert
(Traditional models)
not included mon all models
Inserto de manija de palanca
(Modelos tradicionales)
no incluido en todos los modelos
Pièce rapportée pour poignée à manette
(modèles Traditional) non incluse non
compris dans tous les modèles
16
Lever Handle Assembly
(Traditional models)
Ensamble de manija de palanca
(Modelos tradicionales)
Assemblage de poignées à manette
(modèles Traditional)
HSILGNE LOÑAPSE SIAÇNARF
71
tuNegdirtraCohcutracedacreuTehcuotraceduorcÉ
81
egdirtraCohcutraCehcuotraC
91
tuNgnitnuoMgniRmirT
)ylnosledomollecitnoM(
ovitarocedollinaedejatnomedacreuT
)etnemalosollecitnoMsoledoM(
eduaennaruopegatnomeduorcÉ
ollecitnoMselèdom(erutinrag
)tnemeuqinu
02
gniRmirT
)ylnosledomollecitnoM(
ovitarocedollinA
)etnemalosollecitnoMsoledoM(
selèdom(erutinrageduaennA
)tnemeuqinuollecitnoM
12
noehctucsEnótepahCecasoR
22
etalPkceDatreibucedacalPriotpmocedeuqalP
32
knahSevlaValuvlávedañaCepapuosedegiT
42
teksaGkceDatreibucedatnuJemrof-etalpedétiéhcnaté’deugaB
52
rehsaW/tuNgnitnuoMejatnomedalednara/acreuTegatnomedellednor/uorcÉ
62
tuNeceipliaTallilocedacreuTtuoba’duorcÉ
72
tuopSadilaSceB
82
gniRgniniateRtuopSadilasednóicneteredollinAcebudeunetereduaennA
92
gnir-OtuopSadilasedOollinAcebudeuqirottnioJ
03
tresnIrotareArodarealedotresnIrerésniàruetaréA
13
llehSrotareArodarealedocsaCruetaréa’ledeppolevnE
23
buHtuopSadilasedortneCcebedueyoM
33
)lanoitidarT(-ylbmessAtuopS)lanoicidarT(adilasedelbmasnE)lanoitidarT(cebedegalbmessA
43
)ylnoollecitnoM(tuNtuopS)ollecitnoM(adilasedacreuT)tnemeluesollecitnoM(cebeduorcÉ
53
)ollecitnoM(ylbmessAtuopS)ollecitnoM(adilasedelbmasnE)ollecitnoM(cebedegalbmessA
1
2
4
3
7
8
11
12
13
15
14
17
18
19
20
21
22
24
27
27
35
30
30
33
31
31
32
34
20
29
28
32
29
28
23
25
26
5
10
9
4
6
16
INS178B
1

INSTALLATION INSTRUCTIONS
CAUTION:
Always turn water OFF before removing existing faucet or disassembling the valve.
Open valve handles to relieve water pressure and insure that complete water shut-off has been accomplished.
Before installing new faucet make sure that the cartridge nuts are in place. The cartridge and cartridge nuts were properly installed and
tested before leaving the factory. Although it is unlikely, it is nevertheless possible that through the handling of the valve by any number
of persons the cartridge nuts may not be properly installed. This should be carefully checked at time of installation. If the cartridge nuts
are not properly installed, water pressure could force the cartridge out of the casting. Personal injury or water damage to the premises
could result.
1. Be sure mounting area is clean and dry. Slide deck gasket
(24),over valve shanks (23) and up against deck plate (22).
Holding faucet assembly upside down, place a 1/4" (6mm)
bead of plumber's putty on the bottom of the deck gasket.
Place faucet in position on the sink, being careful not to
disturb the putty bead. From under the sink, thread mounting
nut/washer (25) (large side up) onto valve shanks (23). Check
faucet position on sink top, and align and match escutcheon
gasket to escutcheon, then HAND-TIGHTEN. Trim excess gas-
ket from around escutcheon. Connect supplies to faucet shank.
If using flexible supply lines, thread onto faucet supplies finger
tight, then tighten with a wrench by rotating one half turn.
!
2.
Traditional models - Rotate spout assembly (33) to
desired location. Make sure spout hub (32) is hand tightened.
Monticello models - Rotate spout assembly (35) to
desired location. Make sure spout hub (32) is hand tightened.
3
3a. HANDLE INSERT ASSEMBLY
(some models come pre-assembled)
MONTICELLO LEVER HANDLE MODELS (5)
Install lever handle (1) with color ring (2) into
handle hub/elbow assembly (3 & 4) and hand tighten.
MONTICELLO CROSS HANDLE MODELS (1
1)
Place cross handle insert (9) onto handle skirt (10),
insert handle screw (7) through color ring (8) and cross handle
insert and tighten. Install plug button (6) over screw head.
TRADITIONAL
LEVER HANDLE MODELS (16)
Install lever handle (15) into handle hub (14).
Be sure that o-ring is in place on insert.
3b. HANDLE ASSEMBLY INSTALLATION
MONTICELLO MODELS:
Use the handle assembly with the red adapter (inside handle hub (4)) for
the hot side and blue adapter for the cold side. Position handle assembly
(5) or (11) on to cartridge stem by aligning curve on stem with curve inside
handle assembly. Rotate lever (1) or cross handle (9) until handle assembly
seats. While holding the lever handle in the open position, hand tighten
handle hub (4) CLOCKWISE.
TRADITIONAL
MODELS:
Align and seat handle hub (14) on to valve.
Insert handle screw (13) and snap plug button in place.
3c. ALL
MODELS
Make connections to supply lines.
Faucet flushing is required, see faucet flushing instructions on page 3.
1
3
5
7
11
10
9
2
4
4
14
8
6
1212
16
13
15
2
1
22
23
23
33
32
24
24
2
35
32

INS178B
Faucets made of leaded brass alloys may contribute small amounts of lead
to water that is allowed to stand in contact with the brass. The amount of lead
contributed by any faucet is highest when the faucet is new. The following steps
may reduce potential exposure to lead from faucets and other parts of the
plumbing system:
•Always run the water for a few seconds prior to use for drinking or cooking
• Use only cold water for drinking or cooking
• If you wish to flush the entire plumbing system of water that has been
standing in the pipes or other fittings, run the cold water until the temperature
of the water drops, indicating water coming from the outside main
• If you are concerned about lead in your water, have your water tested
by a certified laboratory in your area
Moen products have been manufactured under the highest standards of quality and workmanship.
Moen warrants to the original consumer purchaser for as long as the original consumer purchaser
owns their home (the “Warranty Period” for homeowners), that this faucet will be leak and drip-free
during normal use and all parts and finishes of this faucet will be free from defects in material and
manufacturing workmanship. All other purchasers (including purchasers for industrial, commercial and
business use) are warranted for a period of 5 years from the original date of purchase
(the “Warranty Period” for non-homeowners).
If this faucet should ever develop a leak or drip during the Warranty Period, Moen will FREE OF
CHARGE provide the parts necessary to put the faucet back in good working condition and will replace
FREE OF CHARGE, any part or finish that proves defective in material and manufacturing workmanship,
under normal installation, use and service. Replacement parts may be obtained by calling 1-800-289-6636
(Canada 1-800-465-6130), or by writing to the address shown. Proof of purchase (original sales receipt)
from the original consumer purchaser must accompany all warranty claims. Defects or damage caused
by the use of other than genuine Moen parts are not covered by this warranty. This warranty is applicable
only to faucets purchased after December 1995 and shall be effective from the date of purchase as shown
on purchaser’s receipt.
This warranty is extensive in that it covers replacement of all defective parts and finishes. However,
damage due to installation error, product abuse, product misuse, or use of cleaners containing abrasives,
alcohol or other organic solvents, whether performed by a contractor, service company, or yourself, are
excluded from this warranty. Moen will not be responsible for labor charges and/or damage incurred in
installation, repair or replacement, nor for any indirect, incidental or consequential damages, losses,
injury or costs of any nature relating to this faucet. Except as provided by law, this warranty is in lieu of
and excludes all other warranties, conditions and guarantees, whether expressed or implied, statutory or
otherwise, including without restriction those of merchantability or of fitness for use.
Some states, provinces and nations do not allow the exclusion or limitation of incidental or
consequential damages, so the above limitations or exclusions may not apply to you. This warranty
gives you specific legal rights and you may also have other rights which vary from state to state, province
to province, nation to nation. Moen will advise you of the procedure to follow in making warranty claims.
Simply write to Moen Incorporated using the address below. Explain the defect and include proof of
purchase and your name, address, area code and telephone number.
FLUSHING INSTRUCTIONS
Moen Incorporated • 25300 Al Moen Drive • North Olmsted, OH 44070-8022 U.S.A.
In Canada Moen Inc. • 2816 Bristol Circle • Oakville, Ontario L6H5s7
HELPLINE:
1 (800) BUY-MOEN
[289-6636]
In the U.S. call our toll free Helpline number for answers
to any product, installation, or warranty questions.
In Canada:
Toronto: 905-829-3400;
Rest of Canada: 1-800-465-6130
In Mexico:
(84) 88-08-26, 88-08-27,
o 91-800-84-345
IMPORTANT: Pipe chips, sand, stones and other solids found in new and renovated plumbing can damage the sealing
surfaces of the cartridge and cause leaks. To avoid damage, DO NOT TURN ON SUPPLY VALVES until instructed below.
1. After installing and connecting your new faucet, make sure that the handles are in the on or open position
(rotate the cold handle in the clockwise direction, the hot handle in a counter-clockwise direction).
2. Open hot and cold water shut off valves and allow the water to run for 15 seconds.
3. Turn both handles to the off or closed position (counter clockwise for cold, clockwise for hot),
unscrew the aerator from the end of spout and clean any debris from the aerator screen.
4. Replace the aerator and check system for leaks.
CAUTION: Be careful not to
damage the rubber seals when
reinstalling cartridge. During
installation be sure of the following:
• Stem must be in open position
• Key in cartridge fits into notch on
body
• Start cartridge nut by hand,
do not cross thread
• Tighten firmly
!
STEM
TIGE
VÁSTAGO
KEY
CLÉ
CAND
A
NOTCH
ENCOCHE
MUESCA
➤
➤
➤
➤
➤
1. MONTICELLO MODELS:
Holding the lever (1) or cross
(10) handle with one hand,
unscrew the handle hub (4)
counterclockwise as shown
above and set aside.
TRADITIONAL MODELS: Use
a thin bladed instrument to pry
off plug button (12). Remove
handle screw (13). Pull handle
hub (14) up and set aside.
2. Remove cartridge nut (17).
3. Grasp the stem of cartridge
(18) with pliers and pull
straight up. This will remove
the cartridge as one unit.
For reassembly reverse the
steps above.
1
2
4
DISASSEMBLY
MOEN LIFETIME LIMITED WARRANTY CONSUMER INFORMATION
12
13
14
3
3
17
18
/