Page is loading ...

EasyCoder
™
3240 Printer
P/N 063257-005
Getting Started Guide

Intermec Technologies Corporation
6001 36th Avenue West
P.O. Box 4280
Everett, WA 98203-9280
U.S. technical and service support: 1-800-755-5505
U.S. media supplies ordering information: 1-800-227-9947
Canadian technical and service support: 1-800-688-7043
Canadian media supplies ordering information: 1-800-268-6936
Outside U.S. and Canada: Contact your local Intermec service supplier.
The information contained herein is proprietary and is provided solely for the purpose of allowing
customers to operate and/or service Intermec manufactured equipment and is not to be released,
reproduced, or used for any other purpose without written permission of Intermec.
Information and specifications in this manual are subject to change without notice.
1997 by Intermec Technologies Corporation
All Rights Reserved
The word Intermec, the Intermec logo, JANUS, IRL, TRAKKER, EasyCoder, Duratherm, Precision
Print, PrintSet, Virtual Wedge, and CrossBar are trademarks of Intermec Corporation.
Novell is a registered trademark of Novell, Inc.
Kimdura is a registered trademark of Kimberly Clark.
Kapton is a registered trademark of Dupont.
The name Centronics is wholly owned by GENICOM Corporation.
IBM is a registered trademark of International Business Machines Corporation.
Throughout this manual, trademarked names may be used. Rather than put a trademark () symbol
in every occurrence of a trademarked name, we state that we are using the names only in an
editorial fashion, and to the benefit of the trademark owner, with no intention of infringement.

Contents
Preparing the Printer for Connection
Connecting the Printer
1
2

Optimizing Print Quality
3

Co de 39
About This Guide
Use this guide to get your printer up and running for the first time. This getting
started guide walks you through taking the printer out of the box, connecting it
to your system, and verifying that you have communications with your system.
Use this table to locate the information you need to get started.
Preparin
g
the printer for
connection
Chapter 1. This chapter explains how to unpack the
printer, understand the printer front panel, plu
g
in the
printer, load media, load ribbon, and print a test label.
Connecting the printer Chapter 2. This chapter explains how to connect the
printer to
y
our s
y
stem, confi
g
ure the serial port, and
verify that you have established communications.
Optimizing print quality Chapter 3. This chapter explains how to troubleshoot
basic print qualit
y
problems and perform procedures to
maintain print quality.
Related Intermec Manuals and Materials
The manuals and material listed below provide additional information about
printing labels with your 3240 printer. Please visit our Web site at
www.intermec.com for a list of available manuals or to access many of our
current manuals in PDF format. To order printed versions of the Intermec
manuals, contact your local Intermec representative or distributor.
3240 Bar Code Label Printer User’s Manual 063015
Data Communications Reference Manual 044737
The Bar Code Book by Roger C. Palmer 051241
IPL Programming Reference Manual 066396
Printer Companion CD 1-020036

Warranty Information
To receive a copy of the standard warranty provision for this product, contact
your local Intermec sales organization. In the U.S. call (800) 755-5505, and in
Canada call (800) 688-7043. Otherwise, refer to the Worldwide Sales & Service
list that comes with this guide for the address and telephone number of your
Intermec sales organization.
Safety Summary
Your safety is extremely important. Read and follow all warnings and cautions
in this guide before handling and operating Intermec equipment. You can be
seriously injured, and equipment and data can be damaged if you do not follow
the safety warnings and cautions.
Do not repair or adjust energized equipment
alone under any circumstances. Someone capable of providing first aid must
always be present for your safety.
Always obtain first aid or medical attention immediately after an
injury. Never neglect an injury, no matter how slight it seems.
Begin resuscitation immediately if someone is injured and stops
breathing. Any delay could result in death. To work on or near high voltage,
you should be familiar with approved industrial first aid methods.
Never work on energized equipment unless authorized
by a responsible authority. Energized electrical equipment is dangerous.
Electrical shock from energized equipment can cause death. If you must
perform authorized emergency work on energized equipment, be sure that you
comply strictly with approved safety regulations.
Cautions
The cautions in this guide use the following format.
Caution
A caution alerts you to an operating procedure, practice, condition, or
statement that must be strictly observed to prevent equipment damage or
destruction, or corruption or loss of data.
Conseil
Une précaution vous alerte d’une procédure de fonctionnement, d’une méthode,
d’un état ou d’un rapport qui doit être strictement respecté pour empêcher
l’endommagement ou la destruction de l’équipement, ou l’altération ou la
perte de données.

Co de 39
Terms and Conventions
The following special terms and conventions occur throughout this guide.
Terms
“Printer” or “3240” refer to the 3240 bar code label printer.
“Media” is the label or tag stock on which the printer prints labels.
“Host” refers to a personal computer or other computer that communicates
with the printer.
Conventions
The following conventions are used throughout this guide for operating
procedures and descriptions of the printer.
• Feed/Pause refers to the Feed/Pause button on the printer front panel.
• Downloaded commands appear in the order that you send them to the
printer with the following conventions:
Ctrl Bold text represents a key on your keyboard. For example, Ctrl
represents the Control key.
Ctrl-Z When two keys are joined with a dash, press them simultaneously. For
example, if you see the command Ctrl-Z, press the two keys at the
same time.
E3;F3
Type all characters that appear in the Courier font by pressing an
individual key on the keyboard.


Preparing the Printer for Connection
1


Courier
Co de 39
1
•
•
•
•
•
•
•
•
•
Unpacking the 3240 Printer
Remove the accessories, packing material, and the printer from the shipping
container. Set the printer on a clean, stable, flat surface and remove the packing
material. Make sure that you have enough room to open the printer cover. Save
the shipping container and packing materials in case you need to move or ship
your printer.
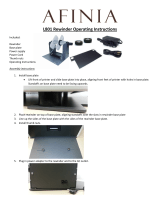
Verify the contents of the shipping container against the list below and the
figure on the following page.
• 3240 printer
• AC power cord
• Ribbon core
• EasyCoder™ 3240 Printer Getting Started Guide
•
Printer Companion CD
• Media roll
• Media support

3240G001.eps
Media roll
Media
support
CD
Getting started
guide
EasyCoder
™
3240 Printer
P/N 054324
Getting Started Guide
EasyCoder
Power
3240
Alert
Feed/Pause
Empty/Pause
3240 Printer
AC power
cord
Ribbon core
precisionprint
Getting Started Guide
P/N 069806-001
Local Area Systems Division
EasyCoder
™
3240 Printer
Reporting Damage or Defects
Intermec thoroughly tests and inspects every 3240 printer before shipping it
from the factory. If you receive any items that are damaged, please take the
following steps to correct the problem:
• Take photographs if necessary.
• Contact the transport carrier.

Courier
Co de 39
1
Understanding the Printer Front Panel
The front of the 3240 printer contains one button (Feed/Pause) and three light
emitting diodes (LEDs) that the printer uses to provide information during
printer operation. The three LED indicators operate as follows:
3240G.002
Power
Alert
Empty/Pause
Feed/Pause
Power
Green LED
Alert
Empty/Pause
Off
On
Off
Flashing
On
Off
Flashing
On
Power off
Power on
Printing or idle
Over-temperature
System fault
Printing or idle
Printer is paused
Media fault
LED State Indicates
Orange LED
Yellow LED
The Feed/Pause button performs the following functions depending on the
mode of the printer:
If the printer is idle: Press and release the Feed/Pause button to feed out one label
or a minimum specified amount of media.
Press and hold the Feed/Pause button to continuously feed
media until you release the button.
Press the Feed/Pause button twice to take the printer offline.
If the printer is printing: Press and release the Feed/Pause button to make the printer
pause.
Press and release the Feed/Pause button again for the printer
to resume printing.
Press and hold the Feed/Pause button to cancel the print job.
When the printer is first
powered on:
Press and hold the Feed/Pause button to print the hardware
configuration label. Refer to “Testing Printer Operation” later
in this chapter.

Plugging In the Printer
The back of the 3240 printer contains the AC power cord receptacle, the serial
communications port, the On/Off (|/O) switch, and two banks of DIP
switches.
1. Turn the On/Off switch to the off (O) position.
2. Make sure you set the DIP switches to their factory default settings.
Set switch 1 on. Set switches 2 through 8 off.
Set switches 1 through 8 off.
1 2 3 4 5 6 7 8 1 2 3 4 5 6 7 8
O
I
Serial
communications
port
On/Off
switch
AC power cord
receptacle
DIP
switches
1 2 3 4 5 6 7 8 1 2 3 4 5 6 7 8
3240G.003
3. Plug the AC power cord into the receptacle at the rear of the printer.
4. Plug the other end of the power cord into a grounded wall outlet or surge
protector.
5. Turn the On/Off switch to the on (|) position. When you power on the
printer, the green LED lights, the yellow LED flashes, and the platen roller
advances. The yellow LED then stays on until you load media.

Courier
Co de 39
1
Opening the Printer
You need to open the printer every time you load media or perform
maintenance procedures.
1. Place the fingers of your right hand between the two notches on the lower
edge of the media cover (the media cover release) and pull the bottom of
the media cover away from the base of the printer.
2. Grasp the front of the media cover with your left hand and lift the front of
the media cover upward to release it from the top of the printer frame.
3. Lift the media cover away from the top of the printer.
3240G.004
Media
cover
Power
3240
Alert
Feed/Pause
Empty/Pause
Media cover
release
(between the two
notches)
1
2
3
EasyCoder
precisionprint

Loading Media for Printing
This procedure explains how to load a roll of media. For the purposes of this
getting started guide, you may want to use the small roll of media that comes
with the printer.
Note:
Attached to the media roll is a label with a three-digit sensitivity number printed
on it. Make sure you save this label. You need this information to set the correct media
sensitivity number. See “Setting the Media Sensitivity Number” in Chapter 3 for more
information.
1. Open the printer.
2. Raise the printhead by rotating the head lift lever clockwise to release it.
3. Turn the supply roll retainer counterclockwise to release it and slide it to
the outer end of the supply roll post. Turn the supply roll retainer clockwise
to lock it in place.
4. Lift the media brake up and slide it towards the front of the printer until it
reaches its resting position.
5. Place the media roll on the supply roll post and position it firmly against
the printer.
6. Lift up on the media brake, slide it toward the back of the printer, and
lower it onto the media roll.
7. Turn the supply roll retainer counterclockwise and slide it up to the edge of
the media roll. Turn the supply roll retainer clockwise to secure.
Note:
If you are using a narrow media roll (less than 1 inch), insert the media
support between the media roll and the supply roll retainer before you secure it in
place.
8. Unscrew the edge guide and slide it all the way to the outer edge of the
lower media guide. Screw the edge guide in place.
9. Pull down on the lower media guide to allow access to the media path.
10. Unroll several inches of media and insert it between the two media guides
and out the front of the printer. Release the lower media guide.
11. If you are using thermal transfer media, you need to load ribbon. For help,
see “Loading Thermal Transfer Ribbon,” later in this chapter.
12. Rotate the head lift lever counterclockwise until it locks in place to lower
the printhead.

Courier
Co de 39
1
➤
➤
Media
Media
backing
Media roll
Head lift
lever
Upper
media guide
Lower
media guide
Supply roll
post
Supply roll
retainer
Edge
guide
Tear
bar
Label
gap
sensor
Lateral
printhead
adjust
Printhead
3240G.005
Media
support
Media
brake
TOF
13. Press the Feed/Pause button until the printer feeds out approximately 6
inches of media.
14. Unscrew the edge guide and slide it inward until it just touches the edge of
the media. Screw it in place.
Note:
Adjust the label gap sensor if you are using narrow media (less than
1 inch wide). For help, see “Accurately Detecting the Start of a Label” in
Chapter 3.
15. If you are loading continuous media or mark label stock, use PrintSet,
your third-party software or the printer command set to tell the printer
what kind of media you are using.
16. Replace the media cover. Your printer is now ready to print labels.
Note:
If you are using narrow media (1 inch or less), it is important that you adjust
the bias adjust screw to achieve the highest print quality possible. For help, see
”Correcting Uneven Print Quality” in Chapter 3
.

Loading Media for Self-Strip Printing
Use self-strip printing in applications where you want to apply labels to a
surface immediately. After printing a label, the printer prints out the label with
the backing removed. The rewinder hub collects the backing after passing over
the self-strip assist roller. The rewinder hub can hold the backing from an entire
roll of media.
Note:
Attached to the media roll is a small label with a three-digit sensitivity number
printed on it. Make sure you save this label. You need this information to set the
correct media sensitivity number. Refer to “Setting the Media Sensitivity Number” in
Chapter 3 for more information.
Note:
If you lift the printhead while printing with self-strip, you may not receive the
best performance from the Precision Print technology. If you must lift the printhead,
remove accumulated liner from the takeup hub before resuming print.
1. Open the printer.
2. Raise the printhead by rotating the head lift lever clockwise to release it.
3. Turn the supply roll retainer counterclockwise to release it and slide it to
the outer end of the supply roll post. Turn the supply roll retainer clockwise
to lock it in place.
4. Lift the media brake up and slide it towards the front of the printer until it
reaches its resting position.
5. Place the media roll on the supply roll post and position it firmly against
the printer.
6. Lift up on the media brake, slide it toward the back of the printer, and
lower it onto the media roll.
7. Turn the supply roll retainer counterclockwise and slide it up to the edge of
the media roll. Turn the supply roll retainer clockwise to secure.
Note:
If you are using a narrow roll of media (less than 1 inch), insert the media
support between the roll of media and the supply roll retainer before you secure it
in place.
8. Unscrew the edge guide and slide it to the outer edge of the lower media
guide. Screw the edge guide in place.
9. Pull down on the lower media guide to access the media path.
10. Unroll several inches of media and insert it between the two media guides
and out the front of the printer. Release the lower media guide.

Courier
Co de 39
1
Power
3240
Alert
Feed/Pause
Empty/Pause
3240G.020
➤
➤
➤
➤
➤
➤
Media
liner
Lateral
printhead
knob
Rewinder
clasp
Rewinder
hub
Self-strip
assist roller
Head lift
lever
Media roll
Supply roll
retainer
Lower media
guide
Media
access door
Supply roll
post
Tear
bar
Printhead
Upper media
guide
EasyCoder
Media
support
Media
brake
11. Pull out 10 to 12 inches of media and remove the exposed labels from the
media liner.
12. Open the media access door and thread the media liner under the self-strip
assist roller and over the rewinder hub in a clockwise direction.
13. Remove the rewinder clasp from the rewinder hub and wind approximately
2 inches of media liner over the rewinder hub.
14. Secure the media by snapping the rewinder clasp onto the rewinder hub.
Turn the rewinder hub clockwise to remove all slack from the media liner
between the tear bar and the rewinder hub.
15. Close the media access door.
16. Use PrintSet, your third-party software or the printer command set to
enable self-strip printing and the label taken sensor.
Note:
See “Adjusting the Printer for Self-Strip Printing” in Chapter 3 for
information on how to position the label taken sensor.
17. Rotate the head lift lever counterclockwise until it locks.
18. Press Feed/Pause to advance approximately 6 inches of media through the
printer. Remove the stripped labels from the front of the printer.

19. Unscrew the edge guide and slide it inward until it just touches the edge of
the media. Screw the edge guide in place.
Note:
Adjust the label gap sensor if you are using narrow media (less than 1 inch
wide). See “Accurately Detecting the Start of a Label” in Chapter 3.
20. Replace the printer cover. The printer is now ready to print labels.
/