
RECORD YOUR
BIBO® SERIAL NUMBER HERE:
_______________________________
The serial number is located on the base of the
BIBO® housing. IMPORTANT NOTE: Removing the serial
number label from the BIBO® will void warranty.
TABLE OF CONTENTS
SAFE OPERATIONS AND USE
PARTS LIST
GETTING STARTED
• Helpful Hints
• Unpacking Your BIBO® – What’s inside the box?
STEPS TO FOLLOW JUST BEFORE MAKING
YOUR FIRST COCKTAIL
MAKING YOUR FIRST COCKTAIL – CONTROLS AND INDICATORS
TIPS FOR MAKING GREAT DRINKS
CLEANING & MAINTENANCE
TROUBLESHOOTING
WARRANTY
LEARNING ABOUT YOUR BIBO® ON youtube.com
REGISTERING YOUR PURCHASE
BIBO® User’s Manual
Read this manual carefully before using the BIBO®. Do not discard. Save for future use.

IMPORTANT SAFEGUARDS – SAFE OPERATION & USE
When using electrical appliances in your home, basic safety
precautions should be followed, including the following:
• Carefully read all instructions before using.
• WARNING: keep all plastic bags away from children to
avoid risk of suocation.
SAVE THESE INSTRUCTIONS.
WARNING TO USERS AND PARENTS:
• DO NOT permit children (under the age of 21) or persons
with impaired reasoning skills to use this appliance.
• Do not touch sharp or cutting surfaces. Use handles and
knobs when available.
• This appliance must be properly installed and located in
accordance with these instructions before it can be used.
• The use of this appliance in any way other than intended
may result in re, electrical shock, or injury and will void
the warranty.
• For best operation, plug the appliance into its own
electrical outlet on a dedicated circuit to prevent ickering
lights, blowing fuses or tripping a circuit breaker.
CORD INSTRUCTIONS
• SHORT CORD INSTRUCTIONS: A short power supply cord
is provided with the product in order to reduce tangling
and tripping hazard.. [If an extension cord is used; (1) the
marked electrical rating of the cord should be at least
as-great-as the electrical rating of the appliance; (2) the
cord should be arranged so that it will not drape over
the countertop or tabletop where it can be pulled on
by children or pets, or be able to cause an unintentional
tripping hazard; and (3) should it be necessary to use an
extension cord, be certain it is rated for appliance use and
includes a 3-prong grounding plug.]
• Do not immerse cords, plugs, or the appliance in
water or any other liquid to protect against re, electric
shock or injury.
• Turn o and unplug this appliance prior to cleaning
or maintenance.
• Do not operate any appliance with a damaged cord or
plug, or after the appliance malfunctions, or is damaged in
any manner.
• Do not let the cord hang over the edge of a table or
counter, or touch hot surfaces.
• To disconnect, press the power button on the BIBO®
appliance to the OFF position and then remove the plug
from the wall outlet.
• This appliance must be plugged into a grounded outlet.
• Do not, under any circumstances, tamper with the plug or
outlet to force the plug to work with anything other than a
grounded outlet.
• Consult a qualied electrician if the grounding instructions
are not completely understood, or if doubt exists as to
whether the appliance is properly grounded.
LOCATION/STORAGE INSTRUCTIONS
• Do not place appliance on or near a stove burner, or in a
heated oven.
• Do not place appliance in a refrigerator or freezer.
• Do not use or store the BIBO® : outdoors, near a swimming
pool, sink, damp basement, or other damp environments.
• Do not ll the water reservoir above the ll line.
• Use only fresh, cold, bottled or ltered clean water in the
water reservoir.
• Filling the water reservoir with any liquid other than
clean water, will cause damage to the appliance and void
the warranty.
• Contact BIBO® Customer Service to report any malfunction
of, or damage to, the BIBO® appliance.
• Do not lift the handle once the mixing or cleaning cycle is
in progress.
• Do not use this appliance for anything other than its
intended use.
UNPACKING INSTRUCTIONS
• Place BIBO® box on a large steady surface (such as a table or
countertop) or on the oor. Open the box.
• Remove enclosed manual and save.
• Turn the box on its side with front of box face down.
• Carefully pull the plastic bag (and packaging materials) toward
you and out of the box. The BIBO® will still be encased in the
polyfoam and be on its side.
• Remove the top polyfoam packing material.
• Carefully remove the top handle assembly (IMPORTANT NOTE:
This assembly contains a sharp blade). Be very careful when
handling this assembly. Set aside.
• Carefully lift the BIBO® o the bottom polyfoam and place it
on a at, steady surface.
• Lift plastic bag o of BIBO®.
• Remember to record the serial number for this appliance on
registration page at the front of this manual. The serial number
can be found on the bottom of the BIBO®.
• Place BIBO® on a at, steady surface. Remove the tape holding
the water reservoir in place.
• Save all packing materials for future shipping or storage of
your BIBO®.
2

WARNING: To avoid suocation, keep this bag and all plastic bags
away from children! A plastic bag is not a toy!
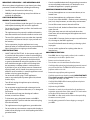
PARTS & FEATURES LIST
A Main appliance housing
B Power cord with transformer
C Cutting handle assembly
D Drip tray
E Drip tray cover
F On/O power button
G LCD control center
H Reservoir
I Cocktail shaker/shot glass combo
J Handle
K Pouch “smart code” reader
L Assembly release buttons (on both sides)
M Front pouch mixer receptor
BIBO® Alcohol Pouches will be available June 2017.
Use enclosed shot glass for proper measurement with
your favorite brand of alcohol.
GETTING STARTED
HELPFUL HINTS
• Plug BIBO® into its own grounded outlet separate from
other appliances. If the electric circuit is overloaded with
other appliances, your BIBO® may not function properly.
• BIBO® recommends using cold, bottled or ltered water, for
the best tasting cocktails.
• Water quality varies from place to place. An undesirable
taste in your cocktail, such as chlorine or other mineral
tastes may be found when using some tap water.
If using a water ltration system, carefully follow
manufacturer’s instructions.
• Cocktails are best when created with cold ingredients.
Therefore, keep the drink mix pouches and the water
refrigerated, for the best tasting, refreshing drink.
• BIBO® appliance parts are not dishwasher safe.
• All removable parts must be washed and dried by hand.
• Keeping your BIBO® clean will help ensure fresh enjoyment
of your BIBO® beverages.
BIBO® has an easy to use “cleaning cycle”. See page 6 for
easy to follow instructions on how to keep your BIBO®
clean and fresh.
Parts & Features List
Read this manual carefully before using the BIBO®. Do not discard. Save for future use.
H
I
B
F
D
E
A
G
M
J
C
3
L
K

SHARP INSTRUMENT/ HAND HAZARD
• This appliance uses a sharp blade to cut open the drink
pouches. The blades come out of large slots in the BIBO®
cutting handle assembly (labeled as part C.) To avoid risk
of injury, keep your ngers, hands or body parts away from
these slots where the blade projects. Handle the BIBO® with
the same respect you give a SHARP KNIFE!
• Keep this and all appliances away from children.
THE BIBO® IS FOR HOUSEHOLD USE ONLY.
PROP. 65 WARNING: THIS PRODUCT CONTAINS A CIRCUIT
BOARD WHICH CONTAINS CHEMICALS, INCLUDING LEAD,
WHICH IS KNOWN TO THE STATE OF CALIFORNIA TO CAUSE
CANCER, BIRTH DEFECTS OR OTHER REPRODUCTIVE HARM.
STEPS TO FOLLOW JUST BEFORE
MAKING YOUR FIRST COCKTAIL
IMPORTANT: You cannot use your BIBO® until it has been set-up for
its rst use as set forth below.
NOTE: If BIBO® has been exposed to temperatures below freezing,
allow appliance at least two hours to reach room temperature
before making a cocktail. A frozen or extremely cold BIBO®
appliance may not operate or function properly.
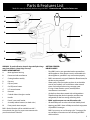
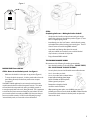
STEP 1: Setting up your BIBO® – See Figure 1
• Unwrap the power cord and transformer/plug. Plug
transformer into a grounded outlet and
insert the electric
cord, with the smaller plug, into the BIBO® appliance – the
receptacle for that small plug is on the bottom of the BIBO®
main appliance housing.
• Remove all pieces of packing tape and clear plastic protective
lm from face of LCD Control Center (Part G).
• Remove reservoir from BIBO® unit. Rinse with warm clean water.
• Insert cutting handle assembly (Part C) into BIBO® main
appliance housing (Part A).
• Close the handle by gently pulling down on it.
Note: if handle does not pull down easily, ensure that you
have the blade assembly seated in main appliance housing
properly – never force the handle down.
• Place an empty 8 ounce glass or cup on the drip tray plate
(Figure 1).
STEP 2: Filling the reservoir – See Figure 2
• Fill reservoir with cold, fresh bottled or ltered water. Do not
use hot water. Do not exceed water limit as indicated by the ll
line on the side of the water reservoir.
• Gently, slide water reservoir and seat it into the back of the
BIBO® main appliance housing (Figure 2).
• Press gently into secure position. You will feel and hear a “click”
when water reservoir is properly seated in the BIBO®.
STEP 3: Prepping BIBO® – See Figure 3
• Press the power button to “ON”. It can be found directly on the
right side of the BIBO® when appliance is facing forward.
• The LCD Control Center light will come on and indicate
“BIBO® logo”.
• Press and hold the “clean” button on the LCD Control Center for
up to 5 seconds until water is owing. This ensures your rst
drink mix will come out with the proper amount of water.
• NOTE: if you have not lled the reservoir with water,
BIBO® will ash a message on the LCD Control Center reading,
“Reservoir low, add water”.
• When the water stops owing, open BIBO® by gently
lifting the handle.
• Remove and empty your 8 ounce glass and place the glass back
onto the drip tray to begin.
• Congratulations! Your BIBO® is now ready to make cocktails!!
Figure 3
Figure 1
4
Figure 2
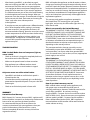
TURN ON

For Use with Bibo® Barmaid
Not Labeled for Individual Sale
Contains no Alcohol
U.S. and foreign patents pending
INSERT POUCH
THIS SIDE FORWARD
How to enjoy a mixologist crafted Bibo cocktail
First, make your mixer:
• Place 8-10 oz glass on drip tray
• Insert this pouch in front slot and lower handle
• Press MIX button
Customize your cocktail:
• Add 1.7oz (or your preferred amount) of vodka
• Add ice, stir and garnish
Cheers!
MAKING YOUR FIRST COCKTAIL
STEP 4: How to insert drink mix pouch – See Figure 4
• Make sure the handle is in the open or up position (Figure 4).
• To insert the drink mix pouch – slide the pouch with color code
panel facing forward, into the front pouch mixer receptor
(see page 3).
Your BIBO® cocktail appliance has an internal pouch smart code
reader located at the front of the rst pouch reservoir. This reader
will read the drink mix pouch ‘color code’, provided the pouch is
inserted properly (with ‘color code’ facing forward). This is important
as it will mix the precise amount of water for your cocktail. Should
you insert the pouch incorrectly your BIBO® will alert you that you
have not inserted correctly. You will see the following message:
“misread drink pouch, re-insert with color code forward.”
STEP 5:
Completing the Process – Making the Perfect Cocktail!
• Gently close the handle, and press down until you hear the
pouch slicing device go through the pouches (Figure 5). There
will be a slight popping sound.
• Immediately, press the “mix” button – which allows the water
and cocktail mix to blend as they pour into the glass. The LCD
Control Center will read “mixing BIBO® cocktail”.
• Liquids will stop owing after about 20 seconds,
now your cocktail mix is ready for you to add the alcohol
of your choice, as directed on the pouch.
• Enjoy a fantastic BIBO® cocktail!
TIPS FOR MAKING GREAT DRINKS
We recommend the following for making great cocktails:
• Store the drink pouches in the refrigerator – DO NOT FREEZE,
WILL CAUSE DAMAGE TO BLADE ASSEMBLY
• Use only fresh, clean and cold bottled water or ltered water.
• Use 3 - 4 ice cubes per drink.
• Use 4 - 6 ice cubes with a cocktail shaker
(
note: before shaking place nger
on lid of shaker to hold in place
.)
Shake vigorously and pour.
• Remember to keep the alcohol
out of the reach of children.
• When pouring your spirits
, use the BIBO® shot glass. It is
perfectly pre-measured to work with the BIBO® cocktail formula.
Just make the drink without the alcohol pouch and pour the
shot into the drink.
Figure 4
Figure 5
5

CLEANING & MAINTENANCE
It is important to keep your BIBO® clean.
It’s simple and easy to do.
We recommend using the cleaning cycle every 10 drinks.
More frequent rinsing is suggested, if you are using drink
avors that have very distinct residual avor. This way the
avor will not carry over to the next drink
(example: Appletini to a Coconut drink).
To clean your BIBO® during a party,
follow these simple steps:
• Make sure you have ample water in the reservoir.
• Place a glass on the drip tray.
• Remove any pouches in the slots.
• Pull handle down completely, press and hold the “clean”
button for 3-4 seconds on the LCD Control Center display.
• BIBO® will display “cleaning in progress”.
• Process takes about 5 seconds.
• Empty rinse-water.
• Use a damp cloth and wipe the pouch smart code reader
found in the front pouch receptor (see page 3, labeled K).
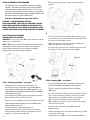
After party cleaning:
• Remove cutting handle assembly (Part C). Simply push in
the release buttons on each side of the appliance and gently
remove cutting handle assembly from the BIBO® appliance
(Figure 6).
• CLEAN: The cutting handle assembly can be cleaned by
submerging in warm soapy water. Place cutting handle
assembly in a bowl or sink large enough to immerse. Let
soak for a few minutes. While the cutting handle assembly
is soaking, remove the drip tray, wash the tray and cover in
warm soapy water.
• RINSE: Submerge assembly in warm rinse water.
Ensure all assembly pieces are rinsed thoroughly and no
soap remains by swishing the cutting handle assembly
around several times.
• DRY: Allow the cutting assembly to dry and return back into
the BIBO® appliance (Figure 7).
• We also recommend emptying the water reservoir and
drying between uses to ensure that water is always fresh
and cold. Empty, dry and return the water reservoir into the
BIBO® appliance.
When not using your BIBO® for extended
periods of time:
• Fill the water reservoir and purge the water system by
pressing the “clean” button until the water reservoir is
empty and no more water ows into your glass.
• If you have forgotten to do that and are using for the rst
time in several months, purge the water system
and execute 3 rinse cycles with fresh water to clean
waterway system.
SERVICE:
Beyond the recommended cleaning and safety procedures
this appliance is not user serviceable. For service
please refer to the Warranty section of this manual.
STORAGE:
Storage of pouches
• All pouches are shelf stable, which means they can
be stored in a cabinet or pantry and do not need
refrigeration. However, we recommend placing in cool
storage for best results.
• Cocktail mix pouches should not be put in freezer!
FROZEN POUCHES WILL CAUSE DAMAGE TO
BLADE ASSEMBLY.
Storage of Appliance
• Do not store in a cold environment, refrigerator or freezer.
Allow 2 hour thaw time at room temperature, any time
the BIBO® may have experienced extreme cold. Do not
store outdoors.
Figure 6
Press release buttons
on both sides to remove
Figure 7
6

• After cleaning your BIBO® as described on page 6,
take care in storing your BIBO® in a safe and frost free
environment. Please be sure to store your appliance
in its upright position to avoid water leakage from the
pump and inner water lines. If you store this appliance
in a cold environment, you run the risk of water freezing
inside the appliance and causing damage. When you
prepare to use it after storage, we recommend rinsing the
water reservoir with fresh, clean water and running the
“clean” cycle a few times without pouches
in the appliance.
• If you plan to move your appliance to a dierent location,
turn it o at the power button, unplug it, and empty
the water reservoir. If your appliance has been in an
environment below freezing, please be sure to let it warm
to room temperature for at least two hours before using.
• Leaving the BIBO® appliance in direct sunlight is not
recommended. The appliance is intended for indoor
use and if left in extreme temperatures of any kind, the
appliance may fail.
TROUBLESHOOTING
BIBO® Cocktail Maker does not have power (light on,
screen is dark).
• Check to see that it is plugged in completely both into
the machine and to the wall outlet.
• Make sure the power button has been turned on.
• Plug appliance into a dierent outlet or circuit.
• Check to see if a fuse or circuit breaker is tripped.
Only water comes out of the cocktail maker.
• Open BIBO® and check to see if drink mix pouch is
inserted into the slot.
• Close handle assembly completely to insure blade has
penetrated and opened the pouch. Then press the “MIX”
button again.
• Check to see if drink mix pouch is frozen solid.
WARRANTY
Limited One-Year Warranty
BIBO® Barmaid, LLC warrants that your BIBO® appliance will
be free of defects in materials or workmanship under normal
home use for one year from the date of purchase.
It is recommended that you ll out and return the
warranty card enclosed with your appliance so that your
purchase information will be stored in our system.
Failure to completely ll out this warranty card will not
negate the warranty.
BIBO® will replace the appliance, at their discretion, without
charge upon receiving the original receipt indicating date of
purchase. Dated sales receipt, electronic invoice or electronic
receipt are all acceptable proofs. If a replacement appliance is
necessary to service this warranty, the replacement appliance
may be new or reconditioned. If a replacement appliance is
sent, a new limited one-year warranty will be applied to the
replacement appliance.
This warranty only applies to appliances operated in
the United States. This warranty gives you specic
legal rights, and you may also have other rights that vary
from state to state.
What is not covered by the Limited Warranty?
THIS WARRANTY DOES NOT COVER CONSEQUENTIAL OR
INCIDENTAL DAMAGES SUCH AS PROPERTY DAMAGE AND
DOES NOT COVER INCIDENTAL COSTS AND EXPENSES
RESULTING FROM ANY BREACH OF THIS WARRANTY, EVEN
IF FORESEEABLE. Some states do not allow the exclusion
or limitations of incidental or consequential damages, so
the above limitation or exclusion may not apply to you
depending on the state of purchase.
This warrantee excludes: damages caused by services
performed by anyone other than BIBO® or its authorized
service providers, use of parts other than genuine BIBO®
parts, or external causes such as abuse, misuse, inappropriate
power supply or acts of God.
Other Limitations
THIS WARRANTY IS EXCLUSIVE AND IS IN LIEU OF ANY
OTHER EXPRESS WARRANTY, WHETHER WRITTEN OR ORAL.
IN ADDITION, BIBO® HEREBY SPECIFICALLY DISCLAIMS ALL
OTHER WARRANTIES WITH RESPECT TO YOUR BIBO® SPECIAL
EDITION / SIGNATURE MODEL A1 BIBO® COCKTAIL MAKER,
INCLUDING ANY IMPLIED WARRANTY OF MERCHANT ABILITY
OR FITNESS FOR ANY PARTICULAR PURPOSE. Some states
do not allow disclaimers of such implied warranties or
limitations on how long an implied warranty lasts, so the
above limitation may not apply to you depending on the
state of purchase.
How do you obtain warranty service?
BIBO® cocktail makers are high-quality appliances and,
with proper care, are intended to provide years of
satisfying performance. However, should the need arise for
you to return your BIBO® for warranty servicing,
simply call BIBO® Customer Service at our toll free number
(888) 827-BIBO (2426)
. Please do not return your appliance
without speaking to BIBO® Customer Service to obtain a
Return Authorization Number (RAN). BIBO® appliances
returned without an RAN number will be returned to the
sender without servicing.
7

BIBO® Barmaid, LLC
P.O. Box 399, Annandale, NJ 08801
BIBO Barmaid LLC is a limited liability company having a place
of buisness in central New Jersey, USA.
Made and printed in China.
US and Foreign patent pending.
BIBO® and RETHINK THE DRINK® are registered trademarks of
BIBO Barmaid LLC.
Other trademarks pending.
©2016 BIBO Barmaid LLC. All rights reserved
REGISTRATION
Thank you for purchasing the BIBO® for
perfect cocktails. Registering your BIBO® is easy.
Go to our website: www.BIBO.com/register.
If you prefer, complete and mail the enclosed
registration card.
Why register?
• Keep up to date on the newest BIBO® innovations.
• Warranty records are at your ngertips for questions
or service needs.
• Proof of purchase is complete in case of loss
for insurance purposes.
Dear New BIBO® Owner,
Our mixologists ensure that you get the perfect cocktail every
time. Enjoy your BIBO® cocktail and always remember to drink
responsibly.
CHEERS!!!!
The BIBO® Team
8
@drinkbibo
@drinkbibo
@drinkbibo @drinkbibo
-
 1
1
-
 2
2
-
 3
3
-
 4
4
-
 5
5
-
 6
6
-
 7
7
-
 8
8


BIBO 121318 User guide
- Type
- User guide
- This manual is also suitable for
Ask a question and I''ll find the answer in the document
Finding information in a document is now easier with AI
Related papers

Other documents
-
HP M127fn Warranty
-
GEDA 7MURA001 User manual
-
Buffalo Tools COBLSET Installation guide
-
HP LaserJet Pro MFP M125 series User guide
-
Teleco Procedures for firmware and criteria updating in MagicSat Easy and FlatSat Easy systems User manual
-
Ricoh R3132x/R3133D User manual
-
LG TPNC1008FA0 Owner's manual
-
Ricoh EK-182-40930 User manual
-
-