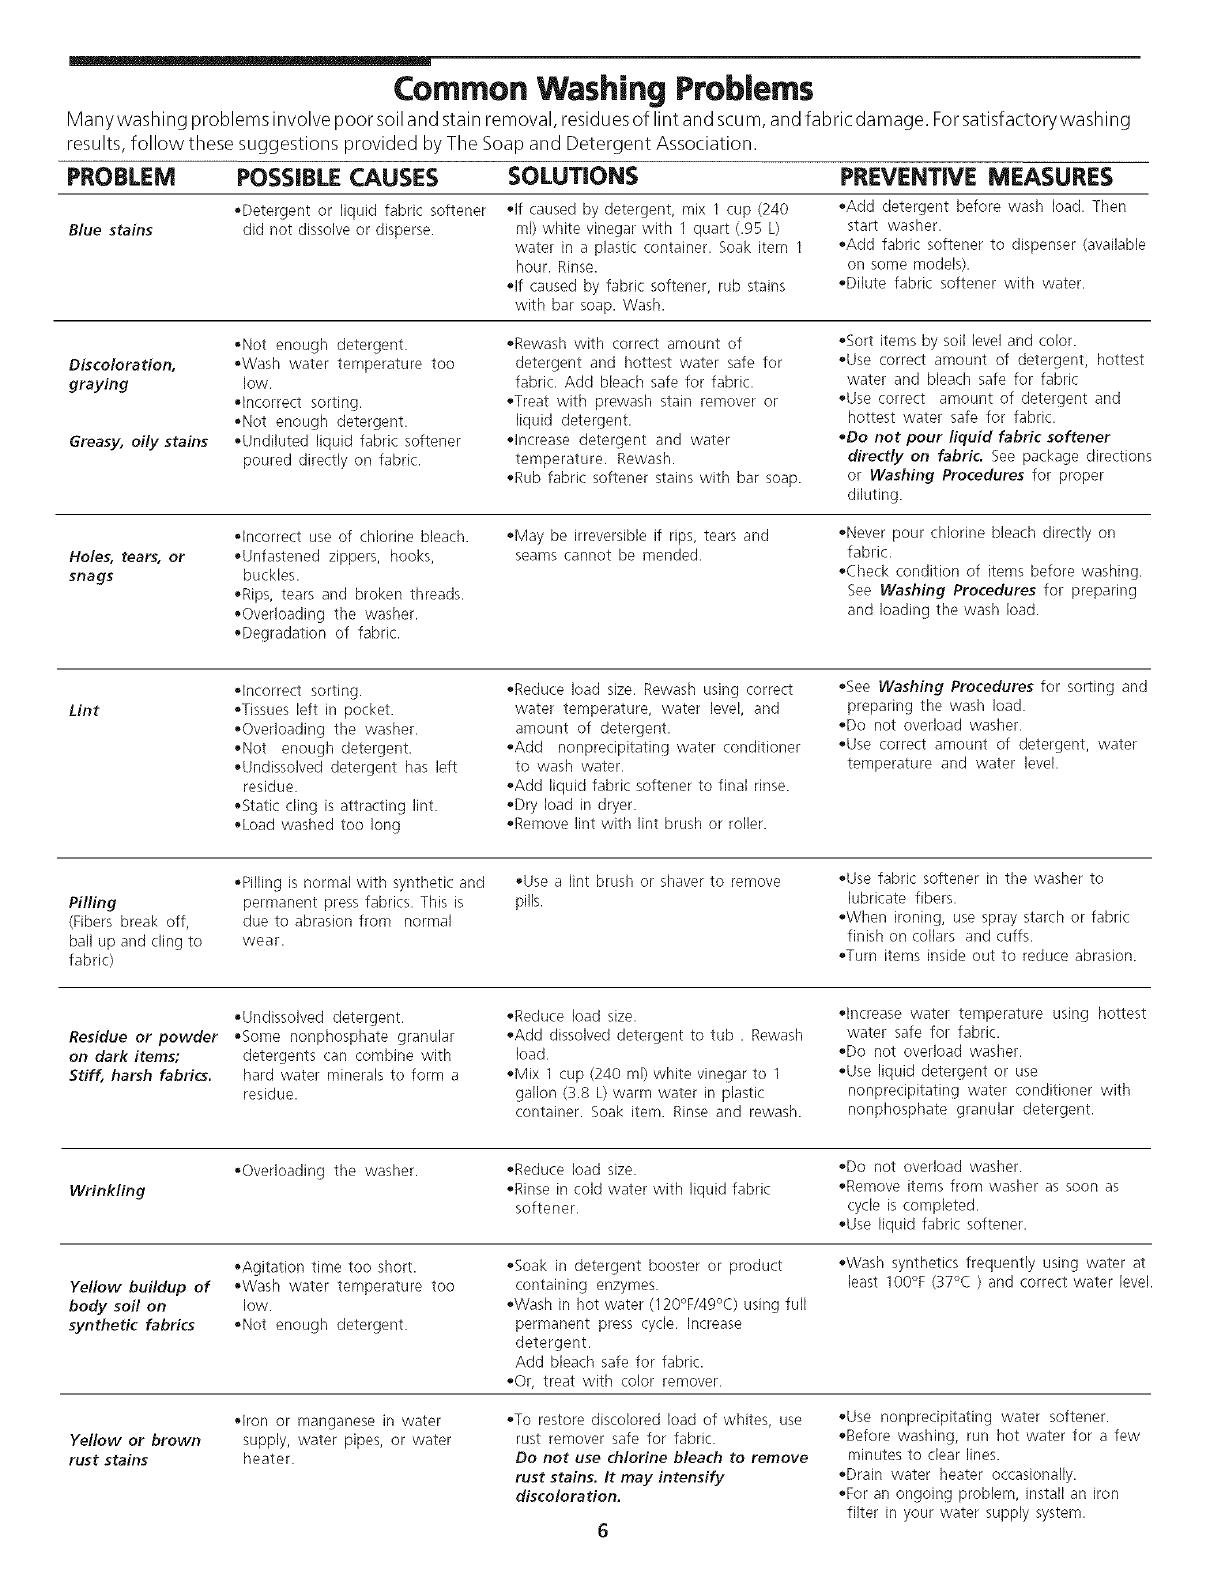
Common Washing Problems
Manywashing problems involvepoor soiland stain removal, residues of lintand scum, and fabric damage. Forsatisfactorywashing
results, follow these suggestions provided by The Soap and Detergent Association.
PROBLEM POSSIBLE CAUSES SOLUTIONS PREVENTIVE MEASURES
• Detergent or liquid fabric softener ,If caused by detergent, mix 1 cup (240 ,Add detergent before wash load. Then
Blue stains did not dissolve or disperse, ml) white vinegar with 1 quart (.g5 L) start washer.
water in a plastic container. Soak item 1 ,Add fabric softener to dispenser (available
hour. Rinse. on some models).
,If caused by fabric softener, rub stains ,Dilute fabric softener with water.
with bar soap. Wash.
Discoloration,
graying
Greasy, oily stains
• Not enough detergent.
•Wash water temperature too
low.
• incorrect sorting.
*Not enough detergent.
• Undiluted liquid fabric softener
poured directly on fabric.
,Rewash with correct amount of
detergent and hottest water safe for
fabric. Add bleach safe for fabric.
,Treat with prewash stain remover or
liquid detergent.
,Increase detergent and water
temperature. Rewash.
,Rub fabric softener stains with bar soap.
,Sort items by soil level and color.
,Use correct amount of detergent, hottest
water and bleach safe for fabric
,Use correct amount of detergent and
hottest water safe for fabric.
,Do not pour liquid fabric softener
directly on fabric. See package directions
or Washing Procedures for proper
diluting.
Holes, tears, or
snags
• incorrect use of chlorine bleach.
• Unfastened zippers, hooks,
buckles.
• Rips, tears and broken threads.
• Overloading the washer.
• Degradation of fabric.
,May be irreversible if rips, tears and
seams cannot be mended.
,Never pour chlorine bleach directly on
fabric.
,Check condition of items before washing.
See Washing Procedures for preparing
and loading the wash load.
Lint
*incorrect sorting.
,Tissues left in pocket.
,Overloading the washer.
,Not enough detergent.
,Undissolved detergent has left
residue.
,Static cling is attracting lint.
,Load washed too long
,Reduce load size. Rewash using correct
water temperature, water level, and
amount of detergent.
,Add nonpredpitating water conditioner
to wash water.
,Add liquid fabric softener to final rinse.
,Dry load in dryer.
,Remove lint with lint brush or roller.
,See Washing Procedures for sorting and
preparing the wash load.
,Do not overload washer.
,Use correct amount of detergent, water
temperature and water level.
Pilling
(Fibers break off,
ball up and cling to
fabric)
• Pilling is normal with synthetic and
permanent press fabrics. TNs is
due to abrasion from normal
weal-.
• Use a lint brush or shaver to remove
pills.
,Use fabric softener in the washer to
lubricate fibers.
,When ironing, use spray starch or fabric
finish on collars and cuffs.
,Turn items inside out to reduce abrasion.
• Undissolved detergent.
Residue or powder ,Some nonphosphate granular
on dark items; detergents can combine with
Stiff, harsh fabrics, hard water minerals to form a
residue.
,Reduce load size.
,Add dissolved detergent to tub . Rewash
load.
,Mix 1 cup (240 ml) white vinegar to 1
gallon (3.8 L) warm water in plastic
container. Soak item. Rinse and rewash.
,increase water temperature using hottest
water safe for fabric.
,Do not overload washer.
,Use liquid detergent or use
nonprecipitating water conditioner with
nonphosphate granular detergent.
Wrinkling
Yellow buildup of
body soil on
synthetic fabrics
Yellow or brown
rust stains
• Overloading the washer.
,Reduce load size.
,Rinse in cold water with liquid fabric
softener.
,Do not overload washer.
,Remove items from washer as soon as
cycle is completed.
,Use liquid fabric softener.
•Agitation time too short.
•Wash water temperature too
low.
*Not enough detergent.
,Soak in detergent booster or product
containing enzymes.
,Wash in hot water (120%/49°0 using full
permanent press cycle. Increase
detergent.
Add bleach safe for fabric.
,Or, treat with color remover.
,Wash synthetics frequently using water at
least IO0°F (37°C) and correct water level.
• iron or manganese in water
supply, water pipes, or water
heater.
,To restore discolored load of whites, use
rust remover safe for fabric.
Do not use chlorine bleach to remove
rust stains. It may intensify
discolora tion.
,Use nonprecipitating water softener.
,Before washing, run hot water for a few
minutes to clear lines.
,Drain water heater occasionally.
,For an ongoing problem, install an iron
filter in your water supply system.


