Page is loading ...

1Deck-Mount Faucet Set Installation Instructions
DECK-MOUNT FAUCET SET
INSTALLATION INSTRUCTIONS
Before installing, read entire installation instructions. Observe all local building and safety codes.
Unpack and inspect the product for any shipping damages. If you nd damages, do not install. Contact Customer
Service at 1-866-855-2284. If you need assistance or have questions while installing your faucet set, contact Customer
Service.
We recommend consulting a professional if you are unfamiliar with installing bathroom xtures and plumbing. Signature
Hardware accepts no liability for any damages to the oor, walls, plumbing or for personal injury during installation.
TOOLS AND MATERIALS:
Adjustable Wrench Basin Wrench Plumber’s Tape or Thread Sealant
Damp Cloth Pliers Screwdrivers (Phillips and Flat Head)
HacksawPipe Wrench
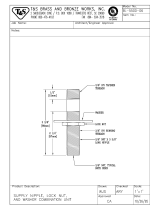
WATER SUPPLY INSTALLATION
1. Place thread sealant or plumber’s tape on the copper or threaded pipes at the
nished oor. Thread the pipe nipples (G) onto the copper or threaded pipes.
Slide the bell anges (H) over the pipe nipples and press the into place.
2. Apply thread sealant to the pipe nipples and attach the straight stop valves (F).
Wipe away any excess sealant with a damp cloth. Allow sealant to cure for 24
hours before use.
3. Slide the compression nuts (D) onto the supply tubes (C).
4. Place the ferrules (E) and supply tubes (C) into the straight stop valves and
tighten the compression nuts.
5. Close the straight stop valves and briey turn on the main water supply to
check for leaks. If leakage occurs, tighten the connections with an adjustable
wrench as necessary. If problems persist, contact Customer Service.
6. Install the tub faucet according to the Faucet Installation section.
PARTS LIST
A. (2) Rubber Cone Washer
E. (2) Ferrule
B. (2) Slip Nut
F. (2) Straight Stop Valve -
½" IPS x ½" OD compression
C. (2) Supply Tube G. (2) ½" NPT Nipple
D. (2) Compression Nut H. (2) Bell Flange
A
F
E
D
C
B
c
h
H
G

2Deck-Mount Faucet Set Installation Instructions
FAUCET INSTALLATION
1. Remove the lock nuts from the bottom of the faucet and insert the faucet through the mounting holes.
2. Hand-tighten washers (if included) and hex nuts to secure.
3. Check to make sure the faucet is properly aligned and adjust as needed. When the faucet is in the proper
position, nish tightening the hex nuts with your adjustable wrench.
4. Attach the hot and cold water supplies to the water inlets on the bottom of the faucet. (Hot water is always on
the left and cold water is always on the right)
Tip: Place plumber’s tape on supplies and pipes before you attach supply lines to ensure leak free connections.
5. Finish your installation by attaching any hoses and/or handles that might be included.
6. After all connections have been made, turn on the water supply, check to make sure that all connections are
tight (no water should be leaking) and that the hot and cold supplies are working correctly. Turn the faucet on
and allow the water to ow through the spout for approximately 60 seconds. If you have a hand shower, divert
the water to the hose and allow the water to ow through the hose for an additional 60 seconds.
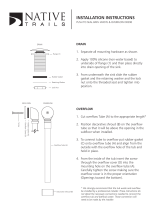
INSTALLATION
Note: Because tubs vary in size, measure your
space thoroughly before installation. Trim pipes
accordingly to ensure a correct t. Go to the
Trimming Drain Pipes section for more information.
1. Apply thread sealant or plumber’s tape to the
threads at each end of all pipes prior to installation. If
two pipes arrive attached, be sure to take them apart
and apply sealant before installing.
2. Connect the tub shoe assembly (A), and rubber
washer to the tub drain (B).
3. Install the overow assembly (C) with the beveled
washer, overow plate, mounting screw (provided)
and any other washers or rubber sealing gaskets
included.
4. Attach the waste and overow tee (D) to the overow
assembly (C) and shoe assembly (A) with sealing
washers and slip nuts.
5. Attach the drain tube and ange (E) to the waste and
overow tee (D) with the sealing washer and slip nut.
A
C
D
E
B
Press and Seal Swivel Drain
Press and Seal Swivel Drain

3Deck-Mount Faucet Set Installation Instructions
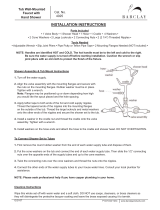
TRIMMING DRAIN PIPES
1. Connect the overow and drain assemblies and pipes to the tub.
2. The T-connection will be attached at the points where the drain
pipes intersect. Measure and mark each pipe so that the ends
reach a little over halfway into the T-Connection hubs.
3. Trim the pipes as necessary with a hack saw with a blade that is
suitable for cutting metal.
/