
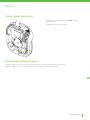
Optimow 10®/Optimow 15®
Robotic Lawnmower
Rasenmähroboter
Cortacésped robótico
Tondeuse à gazon robotique
Gogo Tosaerba
Corta-relva robótico
Robotmaaier
Роботизированная газонокосилка
Robottiruohonleikkuri
Robotgräsklippare
Robotklipper
Robotplæneklipper
Robokosiarka
Robotická sekačka na trávu
Robotická kosačka
Robotska kosilnica
Robotska kosilica
Robotfűnyíró
Robot de tuns iarba
Роботизирана ливадна косачка
Original instructions/Übersetzung der ursprünglichen Anweisungen/Traducción de las instrucciones originales/Tradu-
zione delle istruzioni originali/Traduction des instructions d’origine/Tradução das instruções originais/Vertaling van de
originele gebruiksaanwijzing/Перевод оригинальных инструкций/Alkuperäisten käyttöohjeiden käännös/Översättning
av originalanvisningarna/Oversettelse av den originale bruksanvisningen/Oversættelse af den originale instruktions-
bog/Tłumaczenie oryginalnej instrukcji/Překlad originálního návodu/Preklad originálneho návodu/Prevod izvirnih navo-
dil/Prijevod izvornih uputa/Az eredeti utasítás fordítása/Traducere a instrucţiunilor originale/Превод на оригиналните
инструкции
OPERATOR’S MANUAL
BEDIENUNGSHANDBUCH
MANUAL DEL OPERARIO
MANUALE DI ISTRUZIONI
MANUEL OPÉRATEUR
MANUAL DO OPERADOR
GEBRUIKERSHANDLEIDING
РУКОВОДСТВО ОПЕРАТОРА
KÄYTTÖOPAS
ANVÄNDARHANDBOK
BRUKERHÅNDBOK
BRUGERVEJLEDNING
INSTRUKCJA OBSŁUGI
NÁVOD K OBSLUZE
NÁVOD NA OBSLUHU
PRIROČNIK ZA UPRAVLJAVCA
PRIRUČNIK ZA RUKOVATELJE
KEZELŐI KÉZIKÖNYV
MANUAL DE INSTRUCŢIUNI
РЪКОВОДСТВО НА ОПЕРАТОРА
BG
CS
DA
DE
ES
FI
FR
HU
IT
NL
NO
PL
PT
RO
RU
SK
SL
SV
EN
HR

GREENWORKSTOOLS.EU
2
EN
The materials, technical data, and figures in this manual are provided for guidance only and are not
binding. The manufacturer reserves the right to make any changes to the technical characteristics
and all features of operation, materials, technical data, or figures without prior warning.
The following pages contain important safety and
operating instructions
Carefully read and review all safety instructions,
warnings and cautions contained in this manual.
Failure to read and follow these instructions,
warnings and cautionary statements may result
in severe injury or death to persons and pets or
damage to personal property.

GREENWORKSTOOLS.EU
3
EN
Contents
Product Safety ........................................................................................................... 4
Reading the operator manual ........................................................................4
Operational safety ............................................................................................ 6
Product Unboxing..................................................................................................... 7
Installation .................................................................................................................. 8
Planning Layout and Preparation .................................................................8
Installing and Connecting the Charging Station .......................................9
Position for the charging station as follows: .............................................. 9
Connecting the Power Supply..................................................................... 10
Initial Charging of the Battery ........................................................................11
Installing the Boundary Wire .........................................................................12
Installing a Guide Wire ...................................................................................15
Calibrating and Initial Start Up ......................................................................17
Operation...................................................................................................................18
Starting and Stopping the Mower................................................................18
Switching O the Mower ...............................................................................18
Adjusting Cutting Height ...............................................................................18
Lifting and Carrying the Mower ....................................................................19
Pairing Mobile App to Mower .......................................................................19
Maintenance ........................................................................................................... 20
Removing the Body from Chassis ............................................................. 20
Cleaning ........................................................................................................... 20
Replacing Blades .............................................................................................21
Maintaining the Battery ..................................................................................21
Replacing the Battery ....................................................................................22
Winter Storage Mower ..................................................................................23
Winter storage Charging Station ................................................................23
Troubleshooting ...................................................................................................... 24
Indicator LEDs on Mower .............................................................................24
Symptoms .........................................................................................................25
Breaks in Boundary Wire and Guide Wire................................................25
Technical Data .........................................................................................................26
Environmental Protection ..................................................................................... 27
Warranty Terms .......................................................................................................28
CE Declaration of Conformity ..............................................................................29

GREENWORKSTOOLS.EU
4
EN
EXPLANATION OF SYMBOLS ON THE MOWER
This is a dangerous power tool. Use care when operating and follow all safety
instructions and warnings.
Read the operator manual carefully before operating the mower.
Remove the safety key before working on or lifting the mower.
Hazard of thrown objects during operation.
Keep a safe distance from the mower when operating and keep people, especially
children, pets and bystanders away from the area where mower is being operated.
Do not ride on the mower.
Class III appliance
As a complement to this operator manual, more information is available on the website:
www.greenworkstools.eu
READING THE OPERATOR MANUAL
The following symbols are important for reading and understanding
the operating instructions.
Wear protective gloves
The following system is used in the operator manual to make it easier to understand:
• WARNING! Warning texts alert users and consumers to the existence and nature of hazards so
that they can prevent injury by appropriate conduct during use of the product.
• CAUTION: Caution texts alert users and consumers to the existence and nature of product risks so that
they can prevent damaging the product by appropriate conduct during use of the product.
• NOTE: Notes inform users and consumers about additional information about product use.
• Text written in bold italics refers to another section in the operator manual.
• Text written in bold refers to settings on the mower.
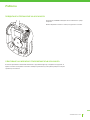
Product Safety

GREENWORKSTOOLS.EU
5
EN
Product Safety
IMPORTANT
READ CAREFULLY BEFORE USE! KEEP FOR FUTURE REFERENCE!
Training
WARNING! Automatic lawnmower! Keep away from the machine! Supervise children!
• Read the instructions carefully. Be familiar with the controls and the proper use of the machine.
• Never allow people unfamiliar with these instructions or children to use the machine. Local regulations
may restrict the age of the operator.
• The operator or user is responsible for accidents or hazards occurring to other people or their property.
Preparation
• Ensure the correct installation of the automatic perimeter delineation system as instructed.
• Periodically inspect the area where the machine is to be used and remove all stones, sticks, wires, bones,
and other foreign objects.
• Periodically visually inspect to see that the blades, blade bolts and cutter assembly are not worn or
damaged. Replace worn or damaged blades and bolts in sets to preserve balance.
• On multi-spindle machines, take care as rotating one blade can cause other blades to rotate.
General
• Never operate the machine with defective guards, or without safety devices, for example deflectors and/
or grass catchers, in place.
• Do not put hands or feet near or under rotating parts. Keep clear of the discharge opening at all times.
• Never pick up or carry an machine while the motor is running.
• Remove (or Operate) the disabling device from the machine
- before clearing a blockage;
- before checking, cleaning or working on the machine.
• Do not leave the machine to operate unattended if you know that there are pets, children or people in the
vicinity.
Maintenance and storage
• Keep all nuts, bolts, and screws tight to be sure the machine is in safe working condition.
• Check the grass catcher frequently for wear or deterioration.
• Replace worn or damaged parts for safety.
• Ensure that only replacement cutting means of the right type are used.
• Ensure that batteries are charged using the correct charger recommended by the manufacturer. Incorrect
use may result in electric shock, overheating or leakage of corrosive liquid from the battery.
• In the event of leakage of electrolyte flush with water/neutralizing agent, seek medical help if it comes
into contact with the eyes, etc.
• Servicing of the machine should be according to manufacturers’ instructions.

GREENWORKSTOOLS.EU
6
EN
OPERATIONAL SAFETY
This operator manual contains all of the basic information concerning the safe operation
and maintenance of the mower.
Product Safety
Carefully read all the safety precautions and instructions in this operator manual before operating
the mower. Save this operator manual for future reference. Follow manufacturer instructions
regarding installation, operation, maintenance, and repair.
This mower is designed to mow grass in open and level areas. Use only equipment
recommended by the manufacturer. All other types of use are incorrect.
This mower conforms to CE safety standards and directives concerning electromagnetic
compatibility, machines, and low voltage.
The mower is not intended for use by persons (including children) with reduced physical, sensory,
or mental capabilities, or lack of experience and knowledge, unless they have been given
supervision or instruction concerning use of the appliance by a person responsible for their safety.
Children should be supervised to ensure that they do not play with the appliance.
The mower must only be operated, maintained, and repaired by persons that fully understand its
special characteristics and safety regulations.
Start the mower in accordance with the instructions. When the safety key is in the Enabled
position, keep your hands and feet away from the rotating blades.
Never put your hands and feet under the mower.
Do not modify the original design of the mower. All modifications void the guarantee.
Switch off mower using the STOP button on the mower when persons, especially children, or
pets are in the cutting area. It is recommended that the mower be programmed for use during
hours when the area is free from persons or pets.
Remove objects from the operating area such as branches, toys, stones, tools that can damage
the blades. The mower can fasten on objects in the operating area and help may be required to
remove the object before the mower can continue mowing.
Never lift up the mower or carry it with the safety key inserted.
Always switch off the mower using the STOP button when the mower is not in use. The mower
can only start when the safety key is inserted and the START button is pressed.
The built-in alarm is very loud. Be careful, especially if the mower is handled indoors.
Do not use the mower with a defective blade disc or body.
Do not let persons who do not know how the mower works and behaves use it.
Do not put anything on top of the mower or its charging station.
Always wear protective gloves when working with the mower’s blades.

GREENWORKSTOOLS.EU
7
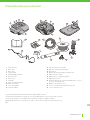
EN
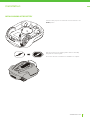
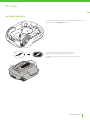
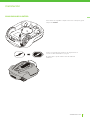
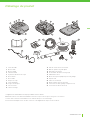
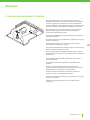
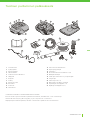
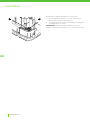
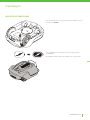
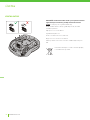
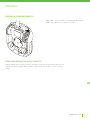
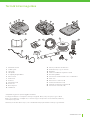
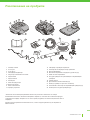
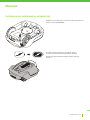
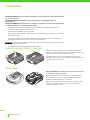
1
2
3
4
5
7
8
9
10
11
12
13
17
19
18
15
21
20
23
22
16
14
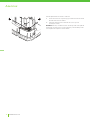
6
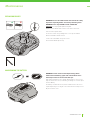
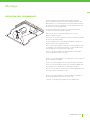
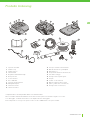
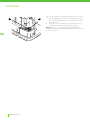
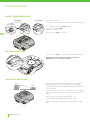
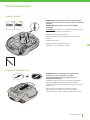
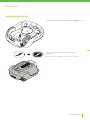
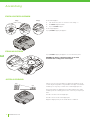
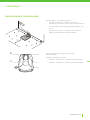
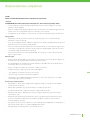
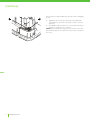
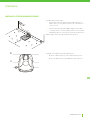
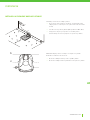
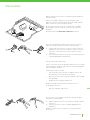
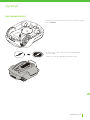
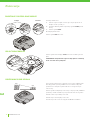
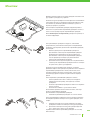
1 Removable cover
2 Stop button
3 Start button
4 LED indicators
5 Cutting height adjustment
6 Rear wheels
7 Front wheels
8 Blade disc
9 Battery cover
10 Carrying handle
11 Safety key
12 Charging station
13 LED for operation check
14 Operator manual and quick guide
15 Power supply*
16 Screws for securing charging station (x5)
17 Low voltage cable
18 Loop wire for boundary and guide wire
19 Wire pegs
20 Extra blades and screws (x3)
21 Ruler (break o carton top)
22 Splice and guide wire connectors (x3)
23 Loop wire connectors (x 3)
* The appearance of the power supply may differ depending on market.
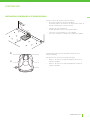
Unbox the mower and installation materials. Make certain that all parts shown in Figure 1 are included and
undamaged. Contact your retailer if any items are missing or damaged.
Keep the Quick Guide in a safe place since it contains the unique pairing code for your mower.
Product Unboxing

GREENWORKSTOOLS.EU
8
EN
Installation
Read the entire section before beginning installation. Installation affects mower capability.
Plan the installation carefully.
The following are the main tasks within the installation:
• Planning layout and preparation
• Installing and connecting the charging station
• Connecting the power supply
• Initial charging of the battery
• Installing the boundary wire
• Installing the guide wire
• Calibrating and initial start up
PLANNING LAYOUT AND PREPARATION
Ensure that the following conditions exist in the operating area where the mower will be used:
• The grass is shorter than 10 cm.
• There are no stones, loose pieces of wood, wire, live mains cables, and other foreign objects.
• The operating area is even and has no ditches, grooves, and steep slopes greater than 35%.
The following tools are required for installation, but not included:
• Hammer/rubber mallet to drive the pegs into the ground
• Combination pliers to cut the boundary wire
• Polygrip to press the couplers together
• Hex key, 6 mm for securing the charging station to ground

GREENWORKSTOOLS.EU
9
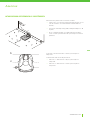
EN
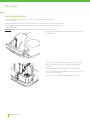
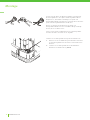
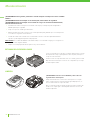
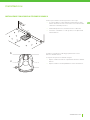
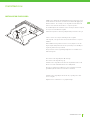
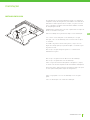
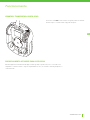
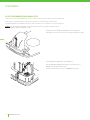
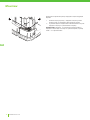
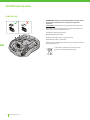
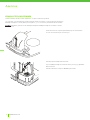
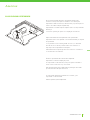
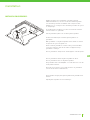
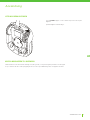
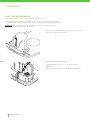
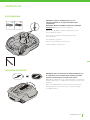
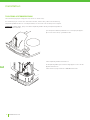
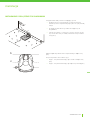
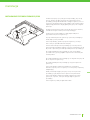
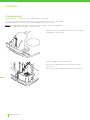
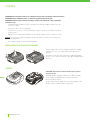
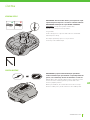
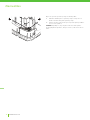
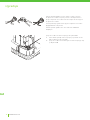
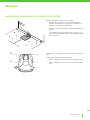
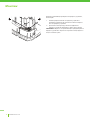
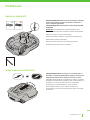
The majority of the charging station must be inside the operating area.
The following two options are shown in figure:
• Option 1 - Charging station is completely inside the operating area.
• Option 2 - Charging station partly outside the operating area.
Installation
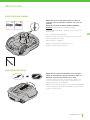
Position for the charging station as follows:
• In a level spot out of direct sunlight
(The front end of the charging station must not be 5 cm higher or
lower than the back end.)
• Within reach of a wall socket
(The low voltage cable is 10 m long.)
• With at least 3 m in front of it and 1 m to each side
(Do not position in confined spaces in the operating area.)
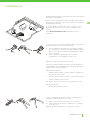
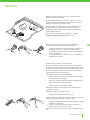
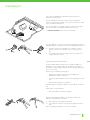
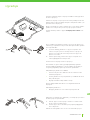
INSTALLING AND CONNECTING THE CHARGING STATION
>1m
>1m
1m
35cm
>3m
10m
1.1.
2.

GREENWORKSTOOLS.EU
10
EN
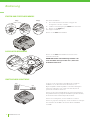
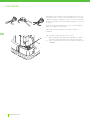
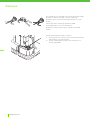
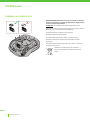
CONNECTING THE POWER SUPPLY
Connect the power supply in a cool, dry environment; out of direct sunlight.
If the power supply is connected to an electrical socket outdoors, it must be approved for outdoor use.
The low voltage cable can cross the operating area if it is stapled down or buried.
CAUTION: Do not cut, splice, or alter the low voltage cable. Altering the low voltage cable will void the
product guarantee.
Installation
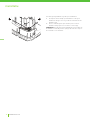
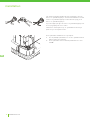
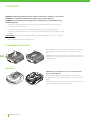
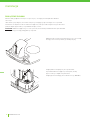
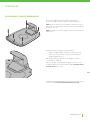
Connect the low voltage cable to the charging station.
Thread the low voltage cable behind the tabs to hold it in place in the
charging station.
Connect the power supply power cable to a 100-240 V wall socket.
Remove the protective cover on the charging station by pressing in the
tabs on each side of the base and lifting away the cover.

GREENWORKSTOOLS.EU
11
EN
Installation
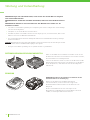
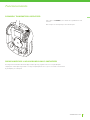
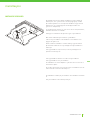
INITIAL CHARGING OF THE BATTERY
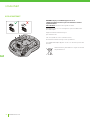
Insert the safety key into the underside of mower and turn to the
Enable position.
Place the mower into the charging station while the boundary
and guide wires are being laid.
The mower cannot be used before the installation is complete.

GREENWORKSTOOLS.EU
12
EN
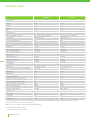
INSTALLING THE BOUNDARY WIRE
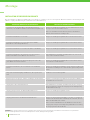
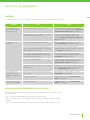
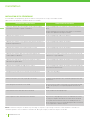
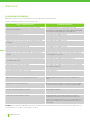
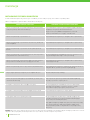
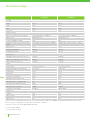
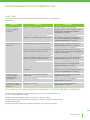
When installing the boundary wire there are a number of situations to consider as described in the table below.
Table 1. Handling Deviations and Obstacles in the Operating Area
VARIATION WITHIN OPERATING AREA BOUNDARY WIRE PLANNING
Fixed obstacles level with lawn that the mower can traverse (paving
stone paths or similar)
Lay the boundary wire under the paving stones or in the joint between
the paving stones.
Never run the mower over gravel, mulch, or similar material that can
damage the blades.
Fixed obstacles ± 1 cm high Lay the boundary wire 10 cm from the obstacle.
Fixed obstacles 1—5 cm high (small ditches, flower beds, or low
kerbstones)
Lay the boundary wire 30 cm from the obstacle.
Fixed obstacles 5 cm or higher (fences or walls) Lay the boundary wire 35 cm from the obstacle.
Fixed obstacles taller than 15 cm that can withstand a collision (trees
or shrubs)
No measures required; the mower will turn around when it collides
with this type of obstacle.
Fixed obstacles that slope slightly such as stones or large trees with
raised roots
Lay the boundary wire 30 cm from or remove obstacle.
Fixed obstacles that cannot withstand a collision Lay the boundary wire 30 cm from and around the obstacle and then
return it back along the same route.
Long and narrow passages and areas narrower than 1.5 m Install a guide wire.
Borders on a slope, road, precipice, or water Supplement the boundary wire with a physical barrier at least
15 cm high.
Slope up to 35% within operating area No measures required; the mower can operate up to a 35% as long
as the slope is not at the boundary of the operating area.
Slope less than 15% at operating area edge Lay boundary wire as normal.
Slope greater than 15% at operating area edge Do not lay boundary wire unless a fixed obstacle (fence or wall)
exists to prevent the mower from leaving the operating area.
When a part of the operating area outer edge slopes more than
15%; lay the boundary wire 20 cm in on the flat ground before the
beginning of the slope.
NOTE: Slope gradient is defined in percentage units (%). The slope as a percentage unit is calculated as the difference in elevation in centimetres
for every metre. If, for example, the difference in elevation is 10 cm, the slope gradient is 10%.
Installation

GREENWORKSTOOLS.EU
13
EN
0cm
Installation
Temporarily secure the end of the loop wire to a peg or other object at
the charging station.
Lay out the loop wire in a counter-clockwise direction alone the planned
boundary of the operating area taking into consideration the rules in
Table 1 until you return to the charging station.
If you are going to install a guide wire, create an eyelet with about 20
cm of extra boundary wire at the point where the guide wire will later
be connected.
See Installing a Guide Wire on page 15 for more information.
If the boundary wire is too short, use provided splice and guide wire
connectors to splice additional boundary wire as follows:
1 Insert both ends of the boundary wire into the splice and guide
wire connector. Check that the wires are fully inserted into the
splice and guide wire connector so that the ends are visible
through the splice and guide wire connector.
2 Squeeze down the button on top of the splice and guide wire
connector fully using a polygrip until you hear a click.
Lay down the loop wire reel at the charging station.
Go back around the boundary of the operating area and secure the
boundary wire either using pegs or buried in the ground. Pegs are
recommended since this allows for adjustment during the first few
weeks of operation.
When securing the boundary wire with pegs:
• Cut the grass very low with a standard lawnmower or a trimmer
where the wire is to be laid.
• Lay the boundary wire on the ground and secure with pegs
close together.
• Push or hammer the pegs into the ground.
Do not push the pegs so far into the ground so that they strain the
boundary wire.
When burying the boundary wire:
• Bury the boundary wire 1—20 cm into the ground.
When the boundary wire is completely laid out and secured, install end
loop wire connectors as follows:
1 Open the loop wire connector and place the wire in the loop wire
connector grip.
2 Press the loop wire connectors together using a polygrip until you
hear a click.
Cut off any surplus boundary wire 1-2 cm above each connector.

GREENWORKSTOOLS.EU
14
EN
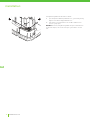
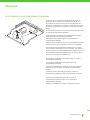
Connect the boundary wire to the charging station as follows:
1 Remove the protective cover on the charging station and thread
the wire behind the tabs into the channel at the rear of the
charging station.
2 Press the connector onto the metal pins on the charging station
(marked with left and right arrows).
NOTE: Make sure the boundary wire to the right of the charging station
is connected to the arrow pointing right and the same for the left side.
Installation

GREENWORKSTOOLS.EU
15
EN
Do not lay the guide wire closer than 30 cm from the boundary wire.
Do not lay the guide wire across the boundary wire.
Run the guide wire straight under the charging plate and then at least 2
m straight out from the front edge of the plate.
Leave as much space as possible to the left of the guide wire (as seen
when facing the charging station).
Use the same cable roll for both the boundary wire and the guide wire.
The guide wire, like the boundary wire, must be secured to the ground
with pegs or buried.
When installing the guide wire on a steep slope, lay the wire at an
angle to the slope so it is easier for the mower to follow the guide wire
on the slope.
Do not lay the guide wire at sharp angles or the mower will have
difficulty following it.
INSTALLING A GUIDE WIRE
The mower uses the optional guide wire to find its way back to the
charging station, but also find hard-to reach areas of the operating area.
For example, the guide wire is laid between the charging station and a
remote part of the working area or through a narrow passage.
For narrow passages (less than 3 m) or to shorten search times, a guide
wire is recommended.
Plan the location of the guide wire before laying out the boundary wire.
Run the guide wire to the loop on the boundary wire where the guide
wire is to be connected.
Cut the boundary wire using the combination pliers.
Installation

GREENWORKSTOOLS.EU
16
EN
Installation
Insert both ends of the boundary wire as well as the end of the guide
wire into the splice and guide wire connector. Check that the wires are
fully inserted into the splice and guide wire connector so that the ends
are visible through the splice and guide wire connector.
Squeeze down the button on top of the splice and guide wire connector
fully using a polygrip until you hear a click.
Secure the splice and the boundary and guide wires either using pegs
or by burying.
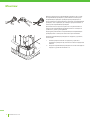
Connect the guide wire to the charging station as follows:
1 Remove the protective cover on the charging station and thread
the guide wire behind the tabs into the channel leading to the
terminals.
2 Connect the guide wire to the contact pin on the charging station
that is labelled G.
G

GREENWORKSTOOLS.EU
17
EN
Pair the mower with Mobile App as instructed in Pairing Mobile App
to Mower on page 19.
Installation
Check the LED indicator on the charging station:
• LED indicator lights up continuously green, if the output voltage
of the power supply is available and the boundary wire is not
interrupted.
The LED indicator does not light up when the output voltage of the
power supply is not available.
If the indicator LED does not show a solid or green light, see Indicator
LEDs on the Charging Station on page 24 for troubleshooting.
CALIBRATING AND INITIAL START UP
Secure the charging station to the ground using the five supplied fixing
screws using a 6 mm hex key.
NOTE: Do not make new holes in the charging station base plate. Only
the existing holes may be used to secure the base plate to the ground.
NOTE: Do not step or walk on the charging station base plate.

GREENWORKSTOOLS.EU
18
EN
Operation
STARTING AND STOPPING THE MOWER
To start the mower:
1 Insert the safety key and rotate counter clockwise to position ”1”.
2 Slide the START button latch backwards.
3 Press down the START button.
To stop the mower:
Press the STOP button on the mower.
SWITCHING OFF THE MOWER
Press the STOP button on the mower and remove the safety key.
WARNING! Always remove the safety key when performing
maintenance or if the mower must be moved.
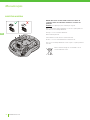
ADJUSTING CUTTING HEIGHT
For the first few weeks of mowing, set the cutting height to 60 mm to
avoid cutting the boundary wire and guide wire. Lower the setting one
step each week thereafter until the desired cutting height is reached.
Turn the cutting height adjustment knob to the required setting. The
selected setting is the marking on the body that aligns with the arrow
on the knob.
Turn clockwise to increase the cutting height.
Turn anti-clockwise to decrease the cutting height.
The cutting height for the mower can be adjusted between 20 mm and
60 mm.
MAX
60
20
MIN
Start Stop
a
b
a
b

GREENWORKSTOOLS.EU
19
EN
PAIRING MOBILE APP TO MOWER
Download Greenworks GreenGuide from App Store/Google Play and follow the on-screen instructions for how
to pair the mower. Have the unique pairing code (found on the quick guide manual) and the mower at hand.
LIFTING AND CARRYING THE MOWER
Press the STOP button and remove the safety key before lifting.
Always lift the mower using the carrying handle.
Operation

GREENWORKSTOOLS.EU
20
EN
WARNING! Wear protective gloves when handling or working near the sharp blades.
WARNING! Before working on the mower itself, remove the safety key.
WARNING! Before working on the charging station or power supply, remove the plug from
the mains.
• Periodically visually inspect the mower and replace worn or damaged parts for safety.
• Inspect that the blades rotate freely
• Keep all nuts, bolts, and screws tight to be sure that the mower is in safe working condition.
• The normal operating life of the blades is 2 to 6 weeks when used at maximum area capacity and longer
for smaller areas.
CAUTION: Dull blades result in the grass being cut poorly; requiring more energy and shorter time between
battery loadings.
• Clean the mower regularly for best function.
Maintenance
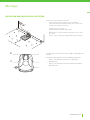
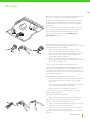
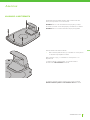
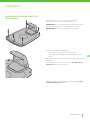
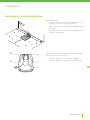
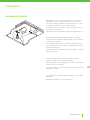
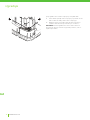
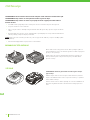
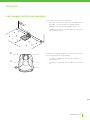
REMOVING THE BODY FROM CHASSIS
Hold down the mower with one hand and lift firmly at one of the
corners of the body and repeat for all four corners, until the body pops
loose from the chassis.
Replace the body by aligning the body onto the chassis and press down
firmly until you hear the click. Check that the body is firmly attached to
the chassis.
CLEANING
WARNING! Press the STOP button and remove the safety
key before cleaning.
Clean the exterior of the mower thoroughly using a soft brush, damp
cloth, and low pressure water hose, if necessary. Remove the body
from the chassis.
Turn the mower on its side and clean the blade area and wheels with a
stiff brush or scraper to remove compacted grass clippings.
Page is loading ...
Page is loading ...
Page is loading ...
Page is loading ...
Page is loading ...
Page is loading ...
Page is loading ...
Page is loading ...
Page is loading ...
Page is loading ...
Page is loading ...
Page is loading ...
Page is loading ...
Page is loading ...
Page is loading ...
Page is loading ...
Page is loading ...
Page is loading ...
Page is loading ...
Page is loading ...
Page is loading ...
Page is loading ...
Page is loading ...
Page is loading ...
Page is loading ...
Page is loading ...
Page is loading ...
Page is loading ...
Page is loading ...
Page is loading ...
Page is loading ...
Page is loading ...
Page is loading ...
Page is loading ...
Page is loading ...
Page is loading ...
Page is loading ...
Page is loading ...
Page is loading ...
Page is loading ...
Page is loading ...
Page is loading ...
Page is loading ...
Page is loading ...
Page is loading ...
Page is loading ...
Page is loading ...
Page is loading ...
Page is loading ...
Page is loading ...
Page is loading ...
Page is loading ...
Page is loading ...
Page is loading ...
Page is loading ...
Page is loading ...
Page is loading ...
Page is loading ...
Page is loading ...
Page is loading ...
Page is loading ...
Page is loading ...
Page is loading ...
Page is loading ...
Page is loading ...
Page is loading ...
Page is loading ...
Page is loading ...
Page is loading ...
Page is loading ...
Page is loading ...
Page is loading ...
Page is loading ...
Page is loading ...
Page is loading ...
Page is loading ...
Page is loading ...
Page is loading ...
Page is loading ...
Page is loading ...
Page is loading ...
Page is loading ...
Page is loading ...
Page is loading ...
Page is loading ...
Page is loading ...
Page is loading ...
Page is loading ...
Page is loading ...
Page is loading ...
Page is loading ...
Page is loading ...
Page is loading ...
Page is loading ...
Page is loading ...
Page is loading ...
Page is loading ...
Page is loading ...
Page is loading ...
Page is loading ...
Page is loading ...
Page is loading ...
Page is loading ...
Page is loading ...
Page is loading ...
Page is loading ...
Page is loading ...
Page is loading ...
Page is loading ...
Page is loading ...
Page is loading ...
Page is loading ...
Page is loading ...
Page is loading ...
Page is loading ...
Page is loading ...
Page is loading ...
Page is loading ...
Page is loading ...
Page is loading ...
Page is loading ...
Page is loading ...
Page is loading ...
Page is loading ...
Page is loading ...
Page is loading ...
Page is loading ...
Page is loading ...
Page is loading ...
Page is loading ...
Page is loading ...
Page is loading ...
Page is loading ...
Page is loading ...
Page is loading ...
Page is loading ...
Page is loading ...
Page is loading ...
Page is loading ...
Page is loading ...
Page is loading ...
Page is loading ...
Page is loading ...
Page is loading ...
Page is loading ...
Page is loading ...
Page is loading ...
Page is loading ...
Page is loading ...
Page is loading ...
Page is loading ...
Page is loading ...
Page is loading ...
Page is loading ...
Page is loading ...
Page is loading ...
Page is loading ...
Page is loading ...
Page is loading ...
Page is loading ...
Page is loading ...
Page is loading ...
Page is loading ...
Page is loading ...
Page is loading ...
Page is loading ...
Page is loading ...
Page is loading ...
Page is loading ...
Page is loading ...
Page is loading ...
Page is loading ...
Page is loading ...
Page is loading ...
Page is loading ...
Page is loading ...
Page is loading ...
Page is loading ...
Page is loading ...
Page is loading ...
Page is loading ...
Page is loading ...
Page is loading ...
Page is loading ...
Page is loading ...
Page is loading ...
Page is loading ...
Page is loading ...
Page is loading ...
Page is loading ...
Page is loading ...
Page is loading ...
Page is loading ...
Page is loading ...
Page is loading ...
Page is loading ...
Page is loading ...
Page is loading ...
Page is loading ...
Page is loading ...
Page is loading ...
Page is loading ...
Page is loading ...
Page is loading ...
Page is loading ...
Page is loading ...
Page is loading ...
Page is loading ...
Page is loading ...
Page is loading ...
Page is loading ...
Page is loading ...
Page is loading ...
Page is loading ...
Page is loading ...
Page is loading ...
Page is loading ...
Page is loading ...
Page is loading ...
Page is loading ...
Page is loading ...
Page is loading ...
Page is loading ...
Page is loading ...
Page is loading ...
Page is loading ...
Page is loading ...
Page is loading ...
Page is loading ...
Page is loading ...
Page is loading ...
Page is loading ...
Page is loading ...
Page is loading ...
Page is loading ...
Page is loading ...
Page is loading ...
Page is loading ...
Page is loading ...
Page is loading ...
Page is loading ...
Page is loading ...
Page is loading ...
Page is loading ...
Page is loading ...
Page is loading ...
Page is loading ...
Page is loading ...
Page is loading ...
Page is loading ...
Page is loading ...
Page is loading ...
Page is loading ...
Page is loading ...
Page is loading ...
Page is loading ...
Page is loading ...
Page is loading ...
Page is loading ...
Page is loading ...
Page is loading ...
Page is loading ...
Page is loading ...
Page is loading ...
Page is loading ...
Page is loading ...
Page is loading ...
Page is loading ...
Page is loading ...
Page is loading ...
Page is loading ...
Page is loading ...
Page is loading ...
Page is loading ...
Page is loading ...
Page is loading ...
Page is loading ...
Page is loading ...
Page is loading ...
Page is loading ...
Page is loading ...
Page is loading ...
Page is loading ...
Page is loading ...
Page is loading ...
Page is loading ...
Page is loading ...
Page is loading ...
Page is loading ...
Page is loading ...
Page is loading ...
Page is loading ...
Page is loading ...
Page is loading ...
Page is loading ...
Page is loading ...
Page is loading ...
Page is loading ...
Page is loading ...
Page is loading ...
Page is loading ...
Page is loading ...
Page is loading ...
Page is loading ...
Page is loading ...
Page is loading ...
Page is loading ...
Page is loading ...
Page is loading ...
Page is loading ...
Page is loading ...
Page is loading ...
Page is loading ...
Page is loading ...
Page is loading ...
Page is loading ...
Page is loading ...
Page is loading ...
Page is loading ...
Page is loading ...
Page is loading ...
Page is loading ...
Page is loading ...
Page is loading ...
Page is loading ...
Page is loading ...
Page is loading ...
Page is loading ...
Page is loading ...
Page is loading ...
Page is loading ...
Page is loading ...
Page is loading ...
Page is loading ...
Page is loading ...
Page is loading ...
Page is loading ...
Page is loading ...
Page is loading ...
Page is loading ...
Page is loading ...
Page is loading ...
Page is loading ...
Page is loading ...
Page is loading ...
Page is loading ...
Page is loading ...
Page is loading ...
Page is loading ...
Page is loading ...
Page is loading ...
Page is loading ...
Page is loading ...
Page is loading ...
Page is loading ...
Page is loading ...
Page is loading ...
Page is loading ...
Page is loading ...
Page is loading ...
Page is loading ...
Page is loading ...
Page is loading ...
Page is loading ...
Page is loading ...
Page is loading ...
Page is loading ...
Page is loading ...
Page is loading ...
Page is loading ...
Page is loading ...
Page is loading ...
Page is loading ...
Page is loading ...
Page is loading ...
Page is loading ...
Page is loading ...
Page is loading ...
Page is loading ...
Page is loading ...
Page is loading ...
Page is loading ...
Page is loading ...
Page is loading ...
Page is loading ...
Page is loading ...
Page is loading ...
Page is loading ...
Page is loading ...
Page is loading ...
Page is loading ...
Page is loading ...
Page is loading ...
Page is loading ...
Page is loading ...
Page is loading ...
Page is loading ...
Page is loading ...
Page is loading ...
Page is loading ...
Page is loading ...
Page is loading ...
Page is loading ...
Page is loading ...
Page is loading ...
Page is loading ...
Page is loading ...
Page is loading ...
Page is loading ...
Page is loading ...
Page is loading ...
Page is loading ...
Page is loading ...
Page is loading ...
Page is loading ...
Page is loading ...
Page is loading ...
Page is loading ...
Page is loading ...
Page is loading ...
Page is loading ...
Page is loading ...
Page is loading ...
Page is loading ...
Page is loading ...
Page is loading ...
Page is loading ...
Page is loading ...
Page is loading ...
Page is loading ...
Page is loading ...
Page is loading ...
Page is loading ...
Page is loading ...
Page is loading ...
Page is loading ...
Page is loading ...
Page is loading ...
Page is loading ...
Page is loading ...
Page is loading ...
Page is loading ...
Page is loading ...
Page is loading ...
Page is loading ...
Page is loading ...
Page is loading ...
Page is loading ...
Page is loading ...
Page is loading ...
Page is loading ...
Page is loading ...
Page is loading ...
Page is loading ...
Page is loading ...
Page is loading ...
Page is loading ...
Page is loading ...
Page is loading ...
Page is loading ...
Page is loading ...
Page is loading ...
Page is loading ...
Page is loading ...
Page is loading ...
Page is loading ...
Page is loading ...
Page is loading ...
Page is loading ...
Page is loading ...
Page is loading ...
Page is loading ...
Page is loading ...
Page is loading ...
Page is loading ...
Page is loading ...
Page is loading ...
Page is loading ...
Page is loading ...
Page is loading ...
Page is loading ...
Page is loading ...
Page is loading ...
Page is loading ...
Page is loading ...
Page is loading ...
Page is loading ...
Page is loading ...
Page is loading ...
Page is loading ...
Page is loading ...
Page is loading ...
Page is loading ...
Page is loading ...
Page is loading ...
Page is loading ...
Page is loading ...
Page is loading ...
Page is loading ...
Page is loading ...
Page is loading ...
Page is loading ...
Page is loading ...
Page is loading ...
Page is loading ...
Page is loading ...
Page is loading ...
Page is loading ...
Page is loading ...
Page is loading ...
Page is loading ...
Page is loading ...
Page is loading ...
Page is loading ...
Page is loading ...
Page is loading ...
Page is loading ...
Page is loading ...
Page is loading ...
Page is loading ...
Page is loading ...
Page is loading ...
Page is loading ...
Page is loading ...
Page is loading ...
Page is loading ...
Page is loading ...
Page is loading ...
Page is loading ...
Page is loading ...
Page is loading ...
Page is loading ...
Page is loading ...
Page is loading ...
Page is loading ...
Page is loading ...
Page is loading ...
Page is loading ...
Page is loading ...
Page is loading ...
Page is loading ...
Page is loading ...
-
 1
1
-
 2
2
-
 3
3
-
 4
4
-
 5
5
-
 6
6
-
 7
7
-
 8
8
-
 9
9
-
 10
10
-
 11
11
-
 12
12
-
 13
13
-
 14
14
-
 15
15
-
 16
16
-
 17
17
-
 18
18
-
 19
19
-
 20
20
-
 21
21
-
 22
22
-
 23
23
-
 24
24
-
 25
25
-
 26
26
-
 27
27
-
 28
28
-
 29
29
-
 30
30
-
 31
31
-
 32
32
-
 33
33
-
 34
34
-
 35
35
-
 36
36
-
 37
37
-
 38
38
-
 39
39
-
 40
40
-
 41
41
-
 42
42
-
 43
43
-
 44
44
-
 45
45
-
 46
46
-
 47
47
-
 48
48
-
 49
49
-
 50
50
-
 51
51
-
 52
52
-
 53
53
-
 54
54
-
 55
55
-
 56
56
-
 57
57
-
 58
58
-
 59
59
-
 60
60
-
 61
61
-
 62
62
-
 63
63
-
 64
64
-
 65
65
-
 66
66
-
 67
67
-
 68
68
-
 69
69
-
 70
70
-
 71
71
-
 72
72
-
 73
73
-
 74
74
-
 75
75
-
 76
76
-
 77
77
-
 78
78
-
 79
79
-
 80
80
-
 81
81
-
 82
82
-
 83
83
-
 84
84
-
 85
85
-
 86
86
-
 87
87
-
 88
88
-
 89
89
-
 90
90
-
 91
91
-
 92
92
-
 93
93
-
 94
94
-
 95
95
-
 96
96
-
 97
97
-
 98
98
-
 99
99
-
 100
100
-
 101
101
-
 102
102
-
 103
103
-
 104
104
-
 105
105
-
 106
106
-
 107
107
-
 108
108
-
 109
109
-
 110
110
-
 111
111
-
 112
112
-
 113
113
-
 114
114
-
 115
115
-
 116
116
-
 117
117
-
 118
118
-
 119
119
-
 120
120
-
 121
121
-
 122
122
-
 123
123
-
 124
124
-
 125
125
-
 126
126
-
 127
127
-
 128
128
-
 129
129
-
 130
130
-
 131
131
-
 132
132
-
 133
133
-
 134
134
-
 135
135
-
 136
136
-
 137
137
-
 138
138
-
 139
139
-
 140
140
-
 141
141
-
 142
142
-
 143
143
-
 144
144
-
 145
145
-
 146
146
-
 147
147
-
 148
148
-
 149
149
-
 150
150
-
 151
151
-
 152
152
-
 153
153
-
 154
154
-
 155
155
-
 156
156
-
 157
157
-
 158
158
-
 159
159
-
 160
160
-
 161
161
-
 162
162
-
 163
163
-
 164
164
-
 165
165
-
 166
166
-
 167
167
-
 168
168
-
 169
169
-
 170
170
-
 171
171
-
 172
172
-
 173
173
-
 174
174
-
 175
175
-
 176
176
-
 177
177
-
 178
178
-
 179
179
-
 180
180
-
 181
181
-
 182
182
-
 183
183
-
 184
184
-
 185
185
-
 186
186
-
 187
187
-
 188
188
-
 189
189
-
 190
190
-
 191
191
-
 192
192
-
 193
193
-
 194
194
-
 195
195
-
 196
196
-
 197
197
-
 198
198
-
 199
199
-
 200
200
-
 201
201
-
 202
202
-
 203
203
-
 204
204
-
 205
205
-
 206
206
-
 207
207
-
 208
208
-
 209
209
-
 210
210
-
 211
211
-
 212
212
-
 213
213
-
 214
214
-
 215
215
-
 216
216
-
 217
217
-
 218
218
-
 219
219
-
 220
220
-
 221
221
-
 222
222
-
 223
223
-
 224
224
-
 225
225
-
 226
226
-
 227
227
-
 228
228
-
 229
229
-
 230
230
-
 231
231
-
 232
232
-
 233
233
-
 234
234
-
 235
235
-
 236
236
-
 237
237
-
 238
238
-
 239
239
-
 240
240
-
 241
241
-
 242
242
-
 243
243
-
 244
244
-
 245
245
-
 246
246
-
 247
247
-
 248
248
-
 249
249
-
 250
250
-
 251
251
-
 252
252
-
 253
253
-
 254
254
-
 255
255
-
 256
256
-
 257
257
-
 258
258
-
 259
259
-
 260
260
-
 261
261
-
 262
262
-
 263
263
-
 264
264
-
 265
265
-
 266
266
-
 267
267
-
 268
268
-
 269
269
-
 270
270
-
 271
271
-
 272
272
-
 273
273
-
 274
274
-
 275
275
-
 276
276
-
 277
277
-
 278
278
-
 279
279
-
 280
280
-
 281
281
-
 282
282
-
 283
283
-
 284
284
-
 285
285
-
 286
286
-
 287
287
-
 288
288
-
 289
289
-
 290
290
-
 291
291
-
 292
292
-
 293
293
-
 294
294
-
 295
295
-
 296
296
-
 297
297
-
 298
298
-
 299
299
-
 300
300
-
 301
301
-
 302
302
-
 303
303
-
 304
304
-
 305
305
-
 306
306
-
 307
307
-
 308
308
-
 309
309
-
 310
310
-
 311
311
-
 312
312
-
 313
313
-
 314
314
-
 315
315
-
 316
316
-
 317
317
-
 318
318
-
 319
319
-
 320
320
-
 321
321
-
 322
322
-
 323
323
-
 324
324
-
 325
325
-
 326
326
-
 327
327
-
 328
328
-
 329
329
-
 330
330
-
 331
331
-
 332
332
-
 333
333
-
 334
334
-
 335
335
-
 336
336
-
 337
337
-
 338
338
-
 339
339
-
 340
340
-
 341
341
-
 342
342
-
 343
343
-
 344
344
-
 345
345
-
 346
346
-
 347
347
-
 348
348
-
 349
349
-
 350
350
-
 351
351
-
 352
352
-
 353
353
-
 354
354
-
 355
355
-
 356
356
-
 357
357
-
 358
358
-
 359
359
-
 360
360
-
 361
361
-
 362
362
-
 363
363
-
 364
364
-
 365
365
-
 366
366
-
 367
367
-
 368
368
-
 369
369
-
 370
370
-
 371
371
-
 372
372
-
 373
373
-
 374
374
-
 375
375
-
 376
376
-
 377
377
-
 378
378
-
 379
379
-
 380
380
-
 381
381
-
 382
382
-
 383
383
-
 384
384
-
 385
385
-
 386
386
-
 387
387
-
 388
388
-
 389
389
-
 390
390
-
 391
391
-
 392
392
-
 393
393
-
 394
394
-
 395
395
-
 396
396
-
 397
397
-
 398
398
-
 399
399
-
 400
400
-
 401
401
-
 402
402
-
 403
403
-
 404
404
-
 405
405
-
 406
406
-
 407
407
-
 408
408
-
 409
409
-
 410
410
-
 411
411
-
 412
412
-
 413
413
-
 414
414
-
 415
415
-
 416
416
-
 417
417
-
 418
418
-
 419
419
-
 420
420
-
 421
421
-
 422
422
-
 423
423
-
 424
424
-
 425
425
-
 426
426
-
 427
427
-
 428
428
-
 429
429
-
 430
430
-
 431
431
-
 432
432
-
 433
433
-
 434
434
-
 435
435
-
 436
436
-
 437
437
-
 438
438
-
 439
439
-
 440
440
-
 441
441
-
 442
442
-
 443
443
-
 444
444
-
 445
445
-
 446
446
-
 447
447
-
 448
448
-
 449
449
-
 450
450
-
 451
451
-
 452
452
-
 453
453
-
 454
454
-
 455
455
-
 456
456
-
 457
457
-
 458
458
-
 459
459
-
 460
460
-
 461
461
-
 462
462
-
 463
463
-
 464
464
-
 465
465
-
 466
466
-
 467
467
-
 468
468
-
 469
469
-
 470
470
-
 471
471
-
 472
472
-
 473
473
-
 474
474
-
 475
475
-
 476
476
-
 477
477
-
 478
478
-
 479
479
-
 480
480
-
 481
481
-
 482
482
-
 483
483
-
 484
484
-
 485
485
-
 486
486
-
 487
487
-
 488
488
-
 489
489
-
 490
490
-
 491
491
-
 492
492
-
 493
493
-
 494
494
-
 495
495
-
 496
496
-
 497
497
-
 498
498
-
 499
499
-
 500
500
-
 501
501
-
 502
502
-
 503
503
-
 504
504
-
 505
505
-
 506
506
-
 507
507
-
 508
508
-
 509
509
-
 510
510
-
 511
511
-
 512
512
-
 513
513
-
 514
514
-
 515
515
-
 516
516
-
 517
517
-
 518
518
-
 519
519
-
 520
520
-
 521
521
-
 522
522
-
 523
523
-
 524
524
-
 525
525
-
 526
526
-
 527
527
-
 528
528
-
 529
529
-
 530
530
-
 531
531
-
 532
532
-
 533
533
-
 534
534
-
 535
535
-
 536
536
-
 537
537
-
 538
538
-
 539
539
-
 540
540
-
 541
541
-
 542
542
-
 543
543
-
 544
544
-
 545
545
-
 546
546
-
 547
547
-
 548
548
-
 549
549
-
 550
550
-
 551
551
-
 552
552
-
 553
553
-
 554
554
-
 555
555
-
 556
556
-
 557
557
-
 558
558
-
 559
559
-
 560
560
-
 561
561
-
 562
562


Greenworks OPTIMOW Owner's manual
- Type
- Owner's manual
- This manual is also suitable for
Ask a question and I''ll find the answer in the document
Finding information in a document is now easier with AI
in other languages
- italiano: Greenworks OPTIMOW Manuale del proprietario
- français: Greenworks OPTIMOW Le manuel du propriétaire
- español: Greenworks OPTIMOW El manual del propietario
- Deutsch: Greenworks OPTIMOW Bedienungsanleitung
- русский: Greenworks OPTIMOW Инструкция по применению
- Nederlands: Greenworks OPTIMOW de handleiding
- português: Greenworks OPTIMOW Manual do proprietário
- slovenčina: Greenworks OPTIMOW Návod na obsluhu
- dansk: Greenworks OPTIMOW Brugervejledning
- polski: Greenworks OPTIMOW Instrukcja obsługi
- čeština: Greenworks OPTIMOW Návod k obsluze
- svenska: Greenworks OPTIMOW Bruksanvisning
- suomi: Greenworks OPTIMOW Omistajan opas
- română: Greenworks OPTIMOW Manualul proprietarului
Other documents
-
Samsung RF56M9540SR User manual
-
-
Flymo 1200R Owner's manual
-
Gardena R45Li User manual
-
McCulloch 967059805 Installation guide
-
-
Husqvarna AUTOMOWER 310 Owner's manual
-
-
Samsung RS68N8941SL User manual
-
Yard Force SA500ECO Quick start guide