
Quick Guide
Read this manual carefully before you use the product and keep it handy for future reference. For safe and correct use, please be
sure to read “Safety Information” before using the machine.
Place the original back side
down and top to the machine
rear on the exposure glass, and
then press the {Start} key again.
Scanning an ID Card
You can scan both sides of an ID card and transmit
the scanned image to an e-mail address or a folder.
This function requires the DDST unit.
This function is available only when the
original is set on the exposure glass, not
when it is set in the ADF.
When using the ID Card Scan function, you
must fi rst register the destination in the
Address Book using Web Image Monitor.
For details, see “Registering Scan
Destinations”, Operating Instructions
.
Press the {Scanner} key.
Place the original front side
down and top to the machine
rear on the exposure glass.
Press [ID Scan].
Press the {Start} key.
Enter the length using number
keys, and then press the {OK}
key.
To enter a decimal point, press the [ ]
key.
Press the {User Tools} key to
return to the initial screen.
Copying an ID Card
You can copy the front and back sides of an ID
card or other small documents onto one side of
a sheet of paper.
This function is available only when the
original is set on the exposure glass, not
when it is set in the ADF.
To use this function, the paper size used for
printing copies must be set to A4, A5, A6,
Letter, or Half Letter.
CES165
Press the { ID Card Copy} key.
Place the original face down on
the exposure glass. Align the
original to the rear left corner.
DJC030
Press the {Start} key.
Specifying the Paper Size
This section explains how to specify the paper
size and paper type using the control panel.
You can specify the size of the paper that is
loaded in the paper tray.
Specifying the Standard Paper Size
❖
Press the {User Tools} key.
Select [System Settings].
Select [Tray Paper Settings],
and then press the {OK} key.
Select the paper size setting
for the desired tray, and then
press the {OK} key.
Select the desired paper size,
and then press the {OK} key.
Press the {User Tools}
key to
return to the initial screen.
Specifying a Custom Paper Size
❖
Press the {User Tools} key.
Select [System Settings].
Select [Tray Paper Settings],
and then press the {OK} key.
Select the paper size setting
for the desired tray, and then
press the {OK} key.
Select [Custom Size], and then
press the {OK} key.
Select [mm] or [inch], and then
press the {OK} key.
Enter the width using number
keys, and then press the {OK} key.
To enter a decimal point, press the [ ] key.
Placing Originals
This section describes the procedure for placing
originals on the exposure glass and in the ADF.
Place the originals.
Exposure Glass (Face down)
DJC019
Auto Document Feeder (Face up)
DJC021
If necessary, confi gure advanced
photocopy settings.
For details, see “Specifying the Scan
Settings”, Operating Instructions
.
Using Folder Print
Up to 3 documents can be stored on the machine.
The stored documents can be accessed and
printed with a single keystroke.This function is
called “Folder Print”.
For details about deleting documents, see
“Storing Scanned Documents”, Operating
Instructions
.
Storing Documents
❖
Access the Copy settings and
then press [Folder Print].
Select [Store].
Select an ‟Empty” document.
Press the {OK} key.
Press the {Start} key.
Enter a Name.
Press the {OK} key.
Printing Documents
❖
Access the Copy settings and
then press [Folder Print].
Select [Print].
Select a document to print.
Press the {OK} key.
Press the {Start} key.
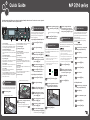
Pressing the [▲][▼] keys allows you to scroll the
screen and select items on the menus.
7. {Clear/Stop} key
8. {Energy Saver} key
9. {User Tools} key
Press to display the menu for configuring the
machine's system settings.
10. {Start} key
Press to start copying or scanning.
11. Number keys
Use to enter numerical values when specifying
settings such as copy quantities or enter letters
when specifying names.
12. {OK} key
Press to confirm settings or enter the next level of
the menu tree.
13. {Escape} key
Press to cancel the last operation or exit to the
previous level of the menu tree.
14. Selection keys
1. Short cut keys
Assign a frequently used setting to a key so you
can access it with a single keystroke. For details,
see “Assigning a Setting to the Short Cut Keys”.
2. {Duplex/Combine} key
Press to make two-sided copies or combined
copies. Some machines can only make combined
copies.
3. {ID Card Copy} key
Press to enter ID card copy mode for the current job.
4. {Scanner} key
Press to switch to scanner mode. The key stays lit
while the machine is in scanner mode.
5. {Copy} key
Press to switch to copier mode. The key stays lit
while the machine is in copier mode.
6. Scroll keys
Press to move the cursor in the directions
indicated by each scroll key.
Pressing the [◀][▶] keys while the machine is in
standby mode will display the menu for configuring
the settings of the machine's current operation
mode (copier or scanner).
DJC101
2 31 5 6 7 8
14
13 12
11
4
910

Quick Guide 2/2
Making Copies
This section describes the basic procedure for
making copies.
Use paper and originals that are the same size.
Specify a scaling ratio if the original is not the
same size as the paper. For details, see
“Specifying Reduce/Enlarge”.
Press the {Copy} key.
Place the original on the
exposure glass or in the ADF.
To place the original, see “Placing
Originals”.
To make multiple copies, enter
the number of copies using the
number keys.
Press the {Start} key.
Specifying Reduce/Enlarge
There are two ways to set the scaling ratio.
Preset ratio
❖
DAC578
Press the {Copy} key.
Press [Scale].
Press [Reduce] or [Enlarge].
Press the {▲} or {▼} key to select the
desired ratio.
Press the {OK} key.
Copying 2-Sided Originals with
2-Sided and Combined Printing
This section explains how to make 2-sided
copies of 2-sided originals, or copy two original
pages to one sheet, or copy four original pages
to one sheet with two pages per side.
This function is only available when the
original is set in the ADF, not when it is set
on the exposure glass.
2S→1S (NoCom)
●
Copies one 2-sided original to two sheets
(1-sided printing).
2S→1S Comb (2Orig)
●
Copies one 2-sided original to one side of a sheet.
2S→1S Comb (4Orig)
●
Copies two 2-sided originals to one side of a sheet.
2S→2S (NoCom)
●
Makes 2-sided copies of 2-sided originals.
2S→2S Comb (2Orig)
●
Copies both sides of one 2-sided original to
one side of a sheet, and both sides of another
2-sided original to the other side of the sheet.
2S→2S Comb (4Orig)
●
Copies four 2-sided originals to one sheet
with four pages per side.
Press the {Duplex/Combine}
key.
Select the desired copy mode,
and then press the {OK} key.
Select paper orientation and
page order, and then press the
{OK} key.
Press the {Escape} key.
Place all 2-sided originals into the
ADF with their fronts facing up.
Select a paper tray.
Press the {Start} key.
Using Scan to E-mail/Folder
This section describes the basic operation for
sending scanned fi les via e-mail or to a computer.
To send scanned fi les to an e-mail address (Scan
to E-mail) or a shared folder on a network
computer (Scan to Folder), you must fi rst register
the destination in the Address Book using Web
Image Monitor. See "Registering Scan
Destinations", Operating Instructions
.
This function requires the DDST unit.
Custom ratio
❖
CES106
Press the {Copy} key.
Press [Scale].
Press [Zoom].
Specify the desired ratio using the
number keys.
Press the {OK} key.
Copying Single-Sided Originals with
2-Sided and Combined Printing
This section explains how to combine and print
a multiple pages (two or four pages) on one
side or both sides of paper.
1S→2S (NoComb)
●
Copies two 1-sided pages on one 2-sided page.
Combine 1S (2Orig)
●
Combine 1S (4Orig)
●
In this mode, a two or four-page original is
combined and printed on one side of paper.
Comb 2S (2Orig)
●
Comb 2S(4Orig)
●
In this mode, a multiple-page original is
combined and printed on both sides of paper.
Press the {Duplex/Combine} key.
Select the desired copy mode,
and then press the {OK} key.
Select paper orientation and page
order, and then press the {OK} key.
Press the {Escape} key.
Place the original on the
exposure glass or in the ADF.
To place the original, see “Placing Originals”
Press the {Scanner} key.
Press [Addr].
Select [Search By Name] or [Search
By ID] and then press the {OK} key.
Scroll the Address Book and
then press the {OK} key.
Search for the desired destination
and then press the {OK} key.
Press the {Start} key.
Depending on the machine’s settings, you
may see the following screen on the display
when scanning from the exposure glass.
Start Scanning Next?
If you see this screen, proceed to the next step.
If you have more originals to
scan, place the next original on
the exposure glass, and then
press [Yes]. Repeat this step
until all originals are scanned.
When all originals have been
scanned, press [No] to start
sending the scanned fi le.
Updating the Printer Driver
You can download the most recent version of
the driver from the manufacturer's Web site.
Download the latest driver, and then perform
the following procedure.
Open the printer window.
Windows Server 2003:
On the [Start] menu, select [Printers
and Faxes].
Windows Vista, Windows Server 2008:
On the [Start] menu, select [Control
Panel], and then click [Printers] in
[Hardware and Sound] category.
Windows 7, Windows Server 2008 R2:
On the [Start] menu, select [Devices
and Printers].
Windows 8/8.1, Windows Server
2012/2012 R2:
On the desktop, point to the bottom-right
corner, click [Settings], [Control Panel],
and then [View devices and printers].
Open the printer properties
dialog box.
Windows Vista, Windows Server
2003/2008:
Right-click the machine’s icon, and
then click [Properties].
Windows 7/8/8.1, Windows Server
2008 R2/2012/2012 R2:
Right-click the machine’s icon, and
then click [Printer properties].
Click the [Advanced] tab.
Click [New Driver...], and then
click [Next].
Click [Have Disk...].
Click [Browse...], and then
select the driver location.
Click [OK].
Select the machine model, and
then click [Next].
The driver update starts.
Click [Finish].
Click [OK] to close the printer
properties window.
Restart the computer.
Assigning a Setting to the
Short Cut Keys
You can access a frequently-used setting with
a single keystroke by assigning the setting to
the Short cut keys.
You can confi gure settings for the following
seven function:
Folder Print
A3 to A4
A4 to A3
Diazo Copy
Voucher Copy
ID Card Scan
Scan Addr
Assigning a Setting Using the Control
❖
Panel
Press the {User Tools} key.
Select [Admin. Tools], and then
press the {OK} key.
If you are requested to enter a
password, enter the password
using the number keys, and then
press the {OK} key.
Select [Shortcut to Function],
and then press the {OK} key.
Select the setting you want to
confi gure, and then press the
{OK} key.
Press the {User Tools} key to
return to the initial screen.
Assigning a Setting Using Web Image
❖
Monitor
Start the Web browser, and
enter “http://(the machine’s IP
address or host name)/” in the
address bar.
Click [System Settings].
Click the [Shortcut to Function]
tab.
Specify the setting you want to
confi gure from [Shortcut to
Function].
Enter the administrator
password.
Click [OK].
Close the Web browser.
© 2015
EN GB EN US EN AU D245-7011
-
 1
1
-
 2
2


Ricoh MP 2014AD Quick start guide
- Category
- Multifunctionals
- Type
- Quick start guide
Ask a question and I''ll find the answer in the document
Finding information in a document is now easier with AI