Page is loading ...

M
AN
U
A
L
www.
dal
i.
dk

udiophile oudspeaker
n
dustrie
s
DALI is renowned among music lovers throughout the world for its
DALI is renowne
d
among music
l
overs t
h
roug
h
out t
h
e wor
ld
f
or its
u
ni
q
ue s
p
eakers and cables, all constructed and build for uncom
p
ro-
m
ising design and sound requirements. Our ultra-modern
f
actory
i
n Denmark is full
y
equipped with facilities for development and
p
roduction o
f
qualit
y
speakers.
Dali's principal competence is development and optimisation o
f
k
nown and new technology in the fi eld of audio and acoustics.
The result is continuous development and optimisation o
f
new and
existing mo
d
e
l
s.
We always keep our goal
fi
rmly in view
f
or each and every DALI
s
pea
k
er: To recreate soun
d
experiences in
y
our
h
ome t
h
at wi
ll
carr
y
y
ou awa
y
, makin
g
y
ou
f
or
g
et time and place...
I
t is important to us that
y
our new DALI speakers are set up and con-
n
ected optimally. This manual contains our recommendations for
s
etu
p
, connection and maintenance.
E
n
j
o
y!
DALI A/S
2
English

3
English
C
A
UTI
O
N
:
TO
REDU
C
E THE RI
S
K
O
F ELR
C
TRI
C
S
H
OC
K
,
D
O
N
O
T REM
O
VE THE BA
C
K PANEL. N
O
U
S
ER-
S
ER-
VI
C
EABLE PART
S
IN
S
IDE. REFER
S
ERVI
C
IN
G
T
O
Q
UALIFIED PER
SO
NNEL
.
1. Read Instructions - All the safety and operating instructions should be read before the appliance is operated
.
2. Retain Instructions - The sa
f
ety and operating instructions should be retained
f
or
f
uture re
f
erence
.
3
. Heed Warnin
g
s - All warnin
g
s on the appliance and in the operatin
g
instructions should be adhered to
.
4. Follow Instructions - All operating and use instructions should be
f
ollowed.
5
. Water and Moisture - The appliance should not be used near water -
f
or example, near a bathtub, washbowl, kitchen sink
,
laundry tub, in a wet basement, or near a swimming pool and the like. Do not place anything containing liquids on the appliance
.
6. Carts and Stands - The appliance should be used only with a cart or stand i
f
recommended by the manu
f
acturer
.
7. Wall or Ceilin
g
Mountin
g
- The appliance should be mounted to a wall or ceilin
g
onl
y
as recommended b
y
the manufacturer
.
8. Ventilation - The appliance should be situated so that its location or position does not inter
f
ere with proper ventilation. For
example, the appliance should not be situated on a bed, sofa, ru
g
, or similar surface that ma
y
block the ventilation openin
g
s;
or placed in a built-in installation, such as a bookcase or cabinet, that mayimpede the
fl
ow o
f
air through the ventilation
openin
g
s. Do not close or block an
y
ventilation holes. Maintain
f
ree space between ventilation holes and wall.
9
. Heat - The appliance should be situated away
f
rom heat sources such as radiators, heat registers, stoves, or other
appliances that produce heat. Do not place candles or other open
fl
ame on the appliance.
10. Power Sources - The appliance should be connected to a power supply only o
f
the type described in the operating instructions
or as marked on the appliance
.
11. Power Cor
d
Protection - Power-supp
l
y cor
d
s s
h
ou
ld
b
e route
d
so t
h
at t
h
ey are not
l
i
k
e
l
y to
b
e wa
lk
e
d
on or pinc
h
e
d
b
y
items placed on or a
g
ainst them, pa
y
in
g
particular attention to cords at plu
g
s, convenience receptacles and the point
where the
y
exit from appliance
.
12. Cleanin
g
- Do not use an
y
liquid cleaners. Use onl
y
a dr
y
cloth to wipe off dust and
g
rease.
13. Non-use Periods - The power cord o
f
the appliance should be unplugged
f
rom the outlet when le
f
t unused
f
or a long
period of time
.
14. Object and Liguid Entry - Care should be taken so that objects do not
f
all and liquids are not spilled into the enclosure
throu
g
h openin
g
s
.
15. Damage Requiring Service - The appliance should be serviced by quali
fi
ed personnel when
:
a. The power-supply cord or the plug has been damaged; or
b. Ob
j
ects have fallen, or liquid has been spilled into the appliance; or
c. T
h
e app
l
iance
h
as
b
een expose
d
to rain; or
d. The appliance does not appear to operate normally, or exhibits a marked change in per
f
ormance; o
r
e. The appliance has been dropped, or the enclosure dama
g
ed.
16. Servicing - The user should not attempt to service the appliance beyond that described in the operating instructions.
All other servicin
g
should be referred to qualifi ed service personnel.
T
he li
g
htnin
g
fl ash within an equilateral
t
riang
l
e is inten
d
e
d
to a
l
ert you to t
h
e pres
-
ence o
f
uninsulated „dangerous voltage“
w
ithin the product’s enclosure that ma
y
be o
f
su
ffi
cient magnitude to constitute an
e
l
ectric s
h
oc
k
to persons
.
The exclamation
p
oint within an e
q
uila
-
tera
l
triang
l
e is inten
d
e
d
to a
l
ert you to
the presence o
f
important operating and
maintenance (servicin
g
) instructions in the
l
iterature accompanying t
h
e app
l
iance.
Safety
yy
CAUTION
RISK OF ELECTRIC SHOCK
DO NOT OPEN
Maintain free space between ventilation holes and wall.

4
English
C
on
g
ratulations on the purchase of
y
our new DALI Conce
p
t s
p
eakers
.
In
t
his manual, you can read about set-up, adjustment and maintenance of
t
he
C
oncept series speakers
.
Manua
l
F
ree news letter
f
rom DALI
S
i
g
n up for the free e-mail news letter at www.dali.dk
Sta
n
da
r
d
accesso
ri
es
F
loor-standing DALI Concept speakers comes with 4 spikes
f
or
fi
tting
beneath the speaker. It is extremel
y
important that these spikes are fi tted
c
orrect
l
y to ensure spea
k
er sta
b
i
l
ity. Remem
b
er to tig
h
ten t
h
e
l
oc
k
nut
w
ell once
y
ou have ad
j
usted the hei
g
ht of the four spikes.
B
ookshel
f
and center speakers are supplied with sel
f
-adhesive rubber
f
eet
to ensure a stable and vibration-free set-u
p
.
Clean the cabinets with a soft, dr
y
cloth. If the cabinets are dirt
y
, wipe with
a
so
f
t cloth dipped in all-purpose cleaner and then well wrung out. Be
v
ery careful when wiping the speaker membranes, as they are very fragile.
F
abric
f
rameworks can be vacuumed and wiped with a well-wrun
g
, lint-
f
ree cloth and mild all-
p
ur
p
ose cleane
r
Maintenance
Use the enclosed spikes or rubber feet for a stable set-up.

5
English
Always switch off your amplifi er before adjusting any of the cables!
F
ig
. 1. Stereo connect
i
o
n
Running-in
gg
Li
k
e any ot
h
er mec
h
anica
l
system, a spea
k
er nee
d
s to
b
e "run in", so you
c
an look
f
orward to a
g
radual improvement in sound qualit
y
over the ini
-
tia
l
perio
d
. Un
l
i
k
e ot
h
er mec
h
anica
l
systems, a DALI spea
k
er
d
oes not wear
out - in fact, re
g
ular use will extend its lifetime
.
Connect
i
on
T
he connection to your amplifi er is extremely important for your sound
experience.
Alwa
y
s turn o
ff
y
our ampli
fi
er be
f
ore connectin
g
an
y
cables or alterin
g
any connections.
A
lways use cables o
f
the same type and length
f
or le
f
t and right speak
-
ers. We recommend usin
g
special speaker cables from DALI, available from
your dealer
.
F
or the per
f
ect sound experience, the ri
g
ht speaker must be connected to
the output terminal marked "R" or "Right" on your amplifi er and the left
speaker to the terminal marked "L" or "Le
f
t".
A
detail that is often overlooked is connection in the correct phase, i.e. the
red terminal (+) on the ampli
fi
er should be connected to the red terminal
(
+
)
on the s
p
eaker, and the black terminal
(
-) on the ampli
fi
er should be connected
t
o the black terminal
(
-
)
on the s
p
eaker.
(
Fi
g
. 1) I
f
j
ust one speaker in a stereo or
s
urroun
d
soun
d
system is not connecte
d
in
p
hase, the bass will be weak and the over
-
a
ll
sou
n
d
will
be
d
iff
use.

6
English
DALI recommends DALI White Wave cables for Concept series
T
he same guidelines apply irrespective of the number of speakers in your
sound s
y
stem: speakers positioned to the ri
g
ht must be connected to the
ampli
fi
er output terminal marked "R" or "Right", and any to the le
f
t must
be
co
nn
ected
to
"L"
o
r "L
e
f
t
".
You
m
ust
e
n
su
r
e
that
the
cable
e
n
ds
a
r
e
fi
rml
y
pushed into the terminals, and
t
h
at t
h
ere are no
l
oose wires, w
h
ic
h
c
ould cause a short circuit and dama
g
e
the amplifi er. (Fig. 2)
F
i
g
. 2. Terminal connection
Once
y
ou have connected
y
our new DALI Concept speakers,
y
ou need to
begin the process of searching for the perfect location for the speakers in
relation to
y
our listenin
g
position - and ad
j
ustin
g
the surround amplifi er,
if
applicable. It is worth spending a little time experimenting, as the cor-
rect set-up and tunin
g
will provide a si
g
nifi cantl
y
better sound experience.
H
ere are some use
f
ul pieces o
f
advice:
Avoid placin
g
ob
j
ects between the speakers and
y
our listenin
g
position, as
obst
r
uct
i
o
n
s
ca
n
cause
in
co
rr
ect
to
n
al
bala
n
ce
.
Try to ensure that the distance between the left and right speakers is equal
t
o the distance
f
rom your listening position to the speakers (Fig. 3). I
f
you
have surround sound, the distance between all the speakers should be s
y
m-
m
etrica
ll
y i
d
entica
l.
Fi
g. 3. Stereo pos
i
t
i
on
i
n
g
Positioning
gg

7
English
Even small changes in the listening room can affect the sound.
D
ALI Concept speakers has been desi
g
ned usin
g
the Linear Directivit
y
prin
-
c
iple, which means that the tonal balance will be per
f
ect, even i
f
y
our lis
-
tening position is not quite centra
l
. It is not recommen
d
a
bl
e to ang
l
e t
h
e
f
ront speakers towards
y
our listenin
g
position, unless the
f
ront speakers
a
re very far apart.
Surroun
d
F
i
g
. 4. Surround setu
p
T
he Concept Center center channel loudspeaker is specially designed for
placement close to the lar
g
e sur
f
ace o
f
a TV screen and can be placed
a
bove or below the screen, to suit your needs. For both o
f
these positions,
w
e recommend that the speaker’s front ed
g
e be on a line with the TV
screen. Attachment o
f
the enclosed rubber
f
eet is recommended to ensure
stable, non-resonant o
p
eration.
A
ll DALI Concept models may be used as rear-channel loudspeakers. If
y
ou wish to wall-mount
y
our rear speakers, DALI Concept 1 is an excellent
c
hoice, as it is factory-fi tted with mounting hardware.
F
or the ultimate surround ex
p
eri
-
e
nce, a central listening position
i
s recommen
d
e
d
,
b
ut, natura
ll
y,
y
ou can also en
j
o
y
fi
ne surround,
wh
en not seate
d
exact
l
y in t
h
e
i
deal “sweet spot”
(
Fi
g
. 4
)
.

8
English
T
he DALI Conce
p
t series is also well-suited to a 7.1-channel surround set-
up, as shown in Fi
g
. 5.
F
ig. 5. 7.1 - c
h
anne
l
surroun
d
setup
C
oncept 1 is par ticularly suited to wall-mounting, a useful feature, for instance,
when emplo
y
ed as rear loudspeakers in a surround s
y
stem. Be
f
ore wall-mount-
ing, it is important to attach the enclosed rubber
f
eet to the rear panel o
f
the
louds
p
eaker as shown below. The rubber feet ensure stable contact with the
wall and create space
f
or the loudspeaker cable
.
Wall-Mounting Concept 1
gg
Remember to attach the rubber feet when wall mounting Concept 1

9
English
DALI Concept speakers are well suited for 5.1 or 7.1 surround systems.
Connecting Concept SUB
gpgp
When
y
ou complement
y
our stereo or surround sound s
y
stem with the
Suite series subwoo
f
er, Concept SUB, with active crossover network and
amplifi er, you have two different connection options: connection to a sur-
r
ound ampli
fi
er subwoo
f
er output terminal, or to a stereo ampli
fi
er line
out
p
ut termina
l
.
Connection to surround am
p
lifi er with
separate subwoo
f
er output terminal (Fig. 6)
If
you want to use Concept SUB
f
or reproduction o
f
the special subwoo
f
er
s
ignal from a surround amplifi er with separate subwoofer output termi-
n
al, connect this to the LFE input terminal on Concept SUB
.
If
the LFE input terminal is selected, the crossover network in Concept SUB
i
s not active. The LFE input terminal should therefore only be used together
with a special subwoofer output terminal in which the si
g
nal has alread
y
b
een
fi
ltered, so the subwoo
f
er only receives the lowest
f
requencies.
F
ig.
6

10
English
If in doubt: Ask your DALI dealer for advice.
C
onnection to a stereo pre-amplifi er (Fi
g
. 7
)
If
y
ou want to use Concept SUB to supplement the bass reproduction of
a
stereo s
y
stem, connect the subwoo
f
er "Line in, Le
f
t/Ri
g
ht" to a stereo
signal on the pre-amplifi er with full frequency content. The built-in cros
-
sover network in Concept SUB then ensures that the subwoo
f
er onl
y
repro
-
d
uces the lowest frequencies (see section on adjustments on page 11).
In most cases you wi
ll
ac
h
ieve exce
ll
ent resu
l
ts wit
h
one Concept SUB. It is
possible as a no-compromise stereo solution, or
f
or reproduction o
f
ver
y
powerful sound pressure in a surround set-up in large rooms, to use two
Concept SUB. This solution is connected in the same wa
y
, but for stereo
you should only connect the le
f
t-hand channel to one input terminal on
the left-hand Concept SUB and the ri
g
ht-hand channel to one input termi
-
nal on the right-hand Concept SUB. For a surround set-up, parallel the LFE
-
i
n
p
uts of the two Conce
p
t SUB. In all other res
p
ects, follow the instructions
a
bove - but use separate channels. You ma
y
wish to consult
y
our dealer.
Note: When usin
g
two Concept SUB, the best results are normall
y
achie
-
v
ed by positioning the two subwoofers relatively close to each other (1 - 2
metres
).
Fi
g
.
7

11
English
Placing Concept SUB in a corner will increase the bass level considerably.
Tuning of Concept SUB
gpgp
O
nce
y
ou have chosen the set-up and connection
y
ou are
g
oin
g
to use, and
h
ave positioned the subwoofer in the desired spot, you can begin the task
o
f
tunin
g
the s
y
stem. Please note that the actual location o
f
the subwoo
f
er
greatly affects its contribution to the total acoustic image. For example,
i
f
y
ou put Concept SUB in a corner, the bass will be considerabl
y
stron
g
er
t
han if it had been placed midway between two corners.
You can use t
h
e proce
d
ure
b
e
l
ow to ac
h
ieve exce
ll
ent resu
l
ts. Use a piece
of music
y
ou know well, preferabl
y
containin
g
rh
y
thmic bass tones such as
b
ass drum
,
electric bass or similar.
Be
g
in b
y
settin
g
"Volume" and "Crossover" to the middle position ("12
o’clock"
)
. Place the "Phase" switch in the 180°
p
osition, and set both
"
Auto" and "Power" to the "ON" position.
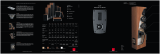
1. Mains
l
ea
d
2
. Power
,
on/o
ff
switc
h
3
.
O
n
/o
ff in
d
i
cato
r
4. Auto Stand-b
y
5
. F
use
6
. Volume
,
volume contro
l
7. Phase, 0
˚
og 180
˚
phase switc
h
8. Crossover
f
requency
9. Heat sink, DO NOT COVER
!
10. LFE inpu
t
11. Stereo Line level, Line si
g
na
l
1
2
3
4
4
5
6
7
8
9
9
1
0
11
Settin
g
level
A
d
just t
h
e vo
l
ume on your Concept SUB so t
h
e
b
ass soun
d
matc
h
es t
h
e
l
eve
l
from the front speakers. Adjust it so that you can hear the sound contribution

12
English
Take your time adjusting Concept SUB - it is well worth the effort.
f
rom Concept SUB - but without the bass being too dominant. The bass should
be
fi
rm and precise, so that the subwoo
f
er provides the bass that is present in
t
h
e music/soun
d
trac
k
- neit
h
er more nor
l
ess. W
h
en connecting to a surroun
d
sound system it may be an advantage to select a
fi
xed setting
f
or Concept SUB
a
nd only adjust the level via the surround ampli
fi
er’s separate adjustment o
f
the subwoo
f
er output level. I
f
you over-modulate the subwoo
f
er, your total
sound experience may be disturbed by distortion. Remember that the location
o
f Concept SUB has a major effect on the sound pressure you experience.
C
hoice of crossover frequency (with connection via "Line In, Left/Right"
)
Once the volume level is set
y
ou can tackle the equall
y
important ad
j
ustment
of
the crossover between the
f
ront speakers and Concept SUB. You do this
b
y
ad
j
ustin
g
"Crossover" up and down until
y
ou can hear the bass is smooth
a
nd without "holes". You ma
y
need to read
j
ust the volume sli
g
htl
y
f
or this
a
d
j
ustment
.
Phase settin
g
Use the trial-and-error method
f
or both settings - and you may also want to
try readjusting volume and crossover
f
requency. In all cases it is a good idea
to listen to the system
f
or a couple o
f
days and then readjust as required. The
same setting will not always be ideal
f
or both surround and 2-channel stereo.
It is there
f
ore always use
f
ul to make a note o
f
your pre
f
erred settings
f
or each
a
pp
l
ication
.
T
he "Auto"
f
unction sets Concept SUB to stand-by mode a
f
ter approximately
1
5 minutes wit
h
no signa
l
to t
h
e input termina
l
. W
h
en Concept SUB receives a
signa
l
again, t
h
e system wi
ll
switc
h
on automatica
ll
y.
T
he "Power" button is the main switch for the s
y
stem. It is best to switch the
system o
ff
completely when it is not going to be in use
f
or long periods. When
ma
k
ing or c
h
anging connections, a
l
ways s
h
ut t
h
e system
d
own comp
l
ete
l
y.
O
verloadin
g
I
f
Concept SUB is intensel
y
overloaded, the built-in sa
f
et
y
circuit ma
y
com
-
pletely disconnect the subwoofer. If this happens, turn down the volume
a
nd turn o
ff
SUB
f
or a moment be
f
ore turnin
g
it on a
g
ain
.

13
English
You can infl uence the acoustics of your listening room in many ways.
E
very room has its own distinctive acoustics, which infl uence the way we
experience the sound from a speaker. In actual fact, it's a matter of how
the room accommodates the sound and then dampens it. You can in
fl
u
-
ence the acoustics of
y
our listenin
g
room in various wa
y
s.
S
ome of the sound you hear comes not from the actual speakers but from
re
fl
ections
f
rom
fl
oor, ceilin
g
and walls. These re
fl
ections are dampened
by objects such as furniture, plants and carpets. If the sound is bright, soft
i
tems such as curtains and carpets can help. I
f
the room has lar
g
e window
panes, drawing the curtains will prevent refl ections from the glass sur
-
f
aces.
B
oth the amount and qualit
y
of the deep bass depend on the size and
shape o
f
the room, and the position o
f
the speakers. I
f
positioned near
a si
d
e or
b
ac
k
wa
ll
, t
h
is wi
ll
accentuate t
h
e
b
ass. A corner
l
ocation wi
ll
accentuate it even more
,
but will also increase the re
fl
ections. The decision
i
s yours, so experiment with different positions to fi nd which provides the
i
deal sound
f
or
y
ou.
A
s a basic rule, tr
y
to avoid lar
g
e, hard and refl ective areas in the imme
-
diate vicinity o
f
your loudspeakers. In the same way that a mirror re
fl
ects
l
i
g
ht, the
y
will refl ect sound from the speakers in almost full stren
g
th but
w
ith a slight delay due to the relatively low speed o
f
sound. This will dis
-
turb the precision and spacial effect of sound reproduction. Try hanging a
so
f
t textile sur
f
ace behind the speaker, place a ru
g
in
f
ront o
f
it, or place
a large plant to the side and experience the surprisingly large effect doing
so will have on the qualit
y
and precision o
f
the sound
.
Once
y
ou are happ
y
with the positionin
g
of
y
our speakers, it is important
to ensure that they are completely stable. For
fl
oor models it is essential
that
y
ou use the accompan
y
in
g
spikes.
The listening room
gg

14
English
DALI recommends that the tone controls are set to neutral position.
Power and acoustic pressure
How loud a speaker is able to pla
y
and still sound
g
ood is completel
y
d
epen
d
ent on t
h
e signa
l
it
h
as to repro
d
uce. So, in practice, you cannot
d
e
fi
ne an unequivocal level
f
or use in comparin
g
di
ff
erent speakers.
Obviously, lots of pure, undistorted output
f
rom a lar
g
e amplifi er is better than a distorted
signal
f
rom a small ampli
fi
er stretched beyond
its capacit
y
. The si
g
nal from a distortin
g
(clip-
ping) ampli
fi
er contains much more high-
f
requency information than an undistorted
si
g
nal, and there
f
ore puts a heav
y
strain on
t
h
e tweeter. Consequent
l
y, spea
k
ers are most
of
ten dama
g
ed b
y
small ampli
fi
ers havin
g
to
w
or
k
too
h
ar
d
- an
d
very rare
l
y
b
y
l
arge amp
l
i-
fi
ers, which are practicall
y
runnin
g
idle.
It is worth notin
g
that when the tone controls
a
re turned above the neutral setting this signi
-
fi
cantly burdens both speakers and amplifi er.
On a
g
ood sound s
y
stem tone controls should
o
nly be used to compensate for poor recor
-
d
in
g
s and not to permanentl
y
compensate
f
or
w
ea
k
nesses e
l
sew
h
ere in t
h
e system. So, DALI
recommends that the tone controls
g
enerall
y
b
e set to t
h
e neutra
l
position, an
d
you ac
h
ieve
y
our desired sound ima
g
e throu
g
h correct
positioning o
f
the speakers.
Ensurin
g
that
y
ou keep the volume low enou
g
h so the sound remains clear
a
nd undistorted will minimise the strain on both s
p
eakers and am
p
lifi er
.

Enjoy your new DALI speakers!
15
English
DALI - more than meets the eye
Your DALI speakers have been desi
g
ned on the basis of a lon
g
succession
o
f
technical solutions based on many years' intensive development work.
Most of this is not seen - but it can be heard and experienced, includin
g:
An even frequency response ensures t
h
at your DALI spea
k
ers repro
d
uce
all tones and kinds o
f
music
f
aith
f
ull
y
and without emphasis.
S
ound distribution and correct timin
g
a
re amon
g
DALI's specialities, as
all DALI speakers are designed for optimum performance in a real home
environment and not
j
ust in a speciall
y
-constructed listenin
g
room. The
p
er
f
ect timing in the sound reproduction ensures that a light beat on a
s
nare drum, for example, is reproduced as the li
g
ht, sharp tap that it reall
y
i
s - without the drums
fi
lling and muddying the sound image
.
Low loss in movable parts
m
eans that the speakers can reproduce ver
y
fi ne details, even at low sound levels.
I
n
te
rn
al
cables
a
n
d
c
r
osso
v
e
r n
et
w
o
r
ks
are an important but frequently
-
overlooked point. The internal cables and crossover networks in
y
our DALI
s
pea
k
ers are -
l
i
k
e every component -
h
ig
h
qua
l
ity
.
T
he loudspeaker units in your DALI speakers have been developed based
on our u
l
timate soun
d
re
q
uirements. T
h
is ensures t
h
at t
h
e most
d
e
l
icate
details, such as a harp strin
g
or a pu
ff
o
f
air, will be reproduced
j
ust as
convincingly as the powerful sound of a car door slamming etc.
A
t
DALI
the
cab
in
et
is both a
p
iece of furniture and the s
p
eaker's sound
b
ase, and is therefore constructed from acousticall
y
-correct materials.
As with all the other components, the cabinets undergo a rigorous
fi
nal
i
nspection,
g
uaranteein
g
that onl
y
perfect speakers are labeled with the
DALI
name.

16
English
Specifi cations
pp
T
here are countless methods measurin
g
speakers. However, none o
f
them
a
ctua
ll
y represent
h
ow a spea
k
er rea
ll
y soun
d
s. On
l
y
b
y
l
istening it is pos-
sible to determine whether one speaker sounds better than another. So
w
e only give you the specifi cations that are of real value to you. The DALI
Concept ran
g
e has been desi
g
ned to reproduce music as honestl
y
as pos-
si
bl
e - an
d
we
k
now we
h
ave succee
d
e
d
. Enjoy your new spea
k
ers!
C
oncept
1C
oncept
1
Concept
2
Concept
2
C
oncept
6C
oncept
6
C
oncept 8
C
oncept 8
C
oncept 10
C
oncept 10
C
oncept Cente
rC
oncept Cente
r
F
requenc
y
Response
[
Hz
]
6
2.
5
-22
500
4
3
-2
5000
4
1-2
5000
4
1-2
5000
35
-2
5000
7
2-22
500
C
rossover Frequency
[
Hz
]
3000
3000
3000
6
1
0
/
3500
600
/
3200
2500
S
ensitivity (2,83V/1m.) [dB
]
87
87
9
1
90
91
9
1
N
ominal Im
p
edance [Ohm]
8
8
8
6
6
8
M
aximum SPL
[
dB
]
106
1
08
11
0
1
1
2
114
1
09
R
ecommended Amp. Power
(
8 Ohm
)
[
Watt
]
25
-1
00
4
0
-1
20
30
-1
50
4
0
-1
60
50
-
200
25
-1
20
H
ig
h
Frequency Driver
1x1"
1x1"
1x1"
1x1"
1x1"
1x1"
M
idran
g
e Drive
r
-
-
-
1 x 5" 1 x 6
½
"
-
L
ow Frequenc
y
Dr
i
ve
r
1
x
5"
1
x 6
½
"
2
x 6
½"
2 x
8
" 2 x 1
0
"
2
x
5"
B
ass Refl ex S
y
stem Resonanse [Hz
]
58
.
5
4
2.
5
38
.
0
36
.
5
29
.
5
55
.
0
D
imensions (H x W x D) [cm]
D
imensions
(
H x W x D
)
[
inch
]
3
1x17x1
9
1
2.2x
6
.7x7.
5
39
x
20
x
26
1
5
.4x7.
9
x1
0
.
2
93
x
20
x
26
36
.
5
x7.
9
x1
0
.1
1
03
x
25
x
36
4
0
.
5
x
9
.
8
x14.
0
11
3
x
30
x4
2
44.4x11.
8
x1
6
.
3
1
6
x
50
x
23
6
.
3
x1
9
.7x
8
.
9
W
ei
g
ht
[
k
g]
/
[
lb.
]
4
/
8
.
8
6
.
3
/
1
3
.
9
1
4.2
/
3
12
5
/
55
3
4
/
7
5
6
.
6
/
14.
5
Wave
DALI cables for DALI speakers.
C
oncept
S
U
BC
oncept
S
U
B
D
esign Princip
l
eActive, built-in am
p
li
fi
er and crossover, sealed enclosur
e
L
ow Frequenc
y
Dr
i
ve
r
1 x 12" air-dried
p
ul
p
con
e
A
mplifi er 1
60
W
att
RM
S
I
nputs
S
tereo
l
ine signa
l
input RCA, input impe
d
ance 20
k
LFE Line si
g
nal input RCA, input impedance 35 k
Co
n
t
r
o
l
s
Volume level, lowpass crossover 50 - 170 Hz, phase ( 0 or 180˚
)
F
requency
R
esponse
29
-17
0
Hz
M
ax
i
mum SPL 110
dB
P
ower Consum
p
t
i
o
n
115/230 VAC, 50 - 60 Hz, 330 Wat
t
D
imensions
(
H x W x D
)
[
cm
]
D
imensions
(
H x W x D
)
[
inch
]
41x
38
x4
2
1
6
.
2
x15.
0
x1
6
.
6
W
ei
g
ht [k
g
]/[lb.]
2
1.2/46.7
/