Maytag LAT9520 User manual
- Category
- Washing machines
- Type
- User manual
This manual is also suitable for
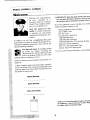
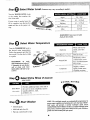
Maytag LAT9520 is a washing machine with a variety of features to help you get the best clean for your clothes. It has cycles for different fabrics, including delicates, regular, and easy care/permanent press. You can also select the water level and temperature to suit your needs. The bleach dispenser automatically dilutes liquid chlorine bleach before it reaches your wash load, preventing damage to your clothes.
Maytag LAT9520 is a washing machine with a variety of features to help you get the best clean for your clothes. It has cycles for different fabrics, including delicates, regular, and easy care/permanent press. You can also select the water level and temperature to suit your needs. The bleach dispenser automatically dilutes liquid chlorine bleach before it reaches your wash load, preventing damage to your clothes.


-
 1
1
-
 2
2
-
 3
3
-
 4
4
-
 5
5
-
 6
6
-
 7
7
-
 8
8
-
 9
9
-
 10
10
-
 11
11


Maytag LAT9520 User manual
- Category
- Washing machines
- Type
- User manual
- This manual is also suitable for
Maytag LAT9520 is a washing machine with a variety of features to help you get the best clean for your clothes. It has cycles for different fabrics, including delicates, regular, and easy care/permanent press. You can also select the water level and temperature to suit your needs. The bleach dispenser automatically dilutes liquid chlorine bleach before it reaches your wash load, preventing damage to your clothes.
Ask a question and I''ll find the answer in the document
Finding information in a document is now easier with AI
Related papers
Other documents
-
Whirlpool Maytag LAT9416 User guide
-
Admiral LNC6766A00 Owner's manual
-
NEC SAV-4 HD User manual
-
Amana HV303 Warranty & Service
-
Haier HLP21E User manual
-
Allen + Roth 1789VA-48-310 Dimensions Guide
-
 Style Selections 1678VM-49-292 Dimensions Guide
-
-
-
 ED Ellen DeGeneres 1656FC-24-241 Dimensions Guide

