VERT 24x80x4FM45/90WSCR Operating instructions

Type
Operating instructions
Installation Manual V2.0
© 2019 VERT.design
IMPORTANT:
The installation of pre-hung interior doors must be performed by a professional.
If you have any problems or questions regarding the installation process, please email
us at: [email protected]
We appreciate your comments and feedback regarding our products and this manual.
Thank you,
VERT.design team
Installation
Manual
V2.0
Installation manual summary:
1. Check rough openings: 3
2. Check Swing Direction (Left or Right) 4
3. Unpack the product 5
4. Follow instructions for the EZ-Hang system 6
5. Install casings 11
6. Install knobs following manufacturer's instructions 14
Product content:
Pre-hung door (Jambs and Slabs). The slab is already installed in the jambs,
using chrome hinges.
Casings (4 legs (long), 2 tops (short))
EZ-Hang Brackets (7 units, Manual)
2
Installation
Manual
V2.0
1. Check rough openings:
Common
size (in)
Actual slab
size (in)
Actual kit
size (in)
Rough
Opening (in)
Tolerance
(in)
W
H
W
H
W
H
W
H
W
H
36
80
35.4
79.1
37.8
80.6
38.5
81
0.37
0.41
32
80
31.5
79.1
33.8
80.6
34.5
81
0.34
0.41
30
80
29.1
79.1
31.5
80.6
32.5
81
0.52
0.41
2. Check Swing Direction (Left or Right)
Left-hand door swing
Open the door and stand with your back to the
swinging door hinges. If the door swings open to
your left, it is a left-hand door.
Right-hand door
Open the door and stand with your back to the
swinging door hinges. If the door swings open to
your right, it is a right-hand door.
3
Installation
Manual
V2.0
3. Unpack the product
The package contains:
Pre-hung interior door: slab and jambs
Casings: 4 legs and 2 tops
EZ-Hang bracket system: 1 package
1. Remove the plastic film
2. Remove the EZ-Hang Brackets package
3. Remove the casings
4. Lay down the pre-hung door on the floor, using the cardboard as protection
5. Remove the wooden supports from the pre-hung
door. Make sure you don’t damage the white
polyester coating.
4
Installation
Manual
V2.0
4. Follow instructions for the EZ-Hang system
EZ-Hang is the quickest and easiest method available for interior door installation.
https://ezhangdoor.com
https://ezhangdoor.com/interior-door-installation-instructions/
Installation Video
With EZ-Hang, there’s no need for shims, which dramatically reduces the time needed
for interior door installation, while simultaneously increasing accuracy, ensuring a
perfect fit every time. Below, you will find a step-by-step guide for installing an interior
door, along with a video demonstration.
What you need: interior door installation
EZ-Hang Kit
Level
Pencil
Drill or screwdriver
5
Installation
Manual
V2.0
Step 1: Using a level, draw a vertical plumb line on the drywall 1/2 in from therough
opening. This line must be on the hinge side and in the room the door swings in to.
The line does not have to be exactly 1/2 from the rough opening, but it’s
important that it’s plumb. This line, if drawn properly, will allow you to only have
to use your level once, instead of constantly having to check the door for plumb
and level.

Make sure the bubble is directly in the center of the lines on the level. Once the
line is drawn on the wall, it will give a representation if the wall is not plumb or
yourrough opening is not correctly sized.
6
Installation
Manual
V2.0
Step 2: Screw brackets to the back of the door frame using the 1/2 screws provided.
Install brackets below each hinge and even with the edge of the door frame. Repeat on
the knob side of the door, starting 12 down from the top, 2 above the latch hole
and 6-8 up from the bottom. 
The final bracket is for the top. It is a pivotal bracket that accomplishes two things:
1. First, it allows the installer to easily remove any
bow in the top jamb. These jambs are almost
always crowned up due to the weight of the
door resting on the side jambs from factory to
jobsite.
2. Secondly, it adds structural strength to the
installation itself by inhibiting the side jambs
from moving side to side. This is particularly
important as the weight of the door is
constantly “pulling” on the top hinge.
The door is now ready to insert into the rough opening. Always measure the opening
prior to setting the door to verify that the height and width will allow the door to fit,
along with some adjustment space.
7
Installation
Manual
V2.0
Carpet or unfinished floor
Add 3/8 or 1/2 blocks under the
door if you will be installing carpeting on
the floor. This will allow space for the
carpet to be tucked under the jambs. It
will also provide some adjustment room
if the floor is not perfectly level.
Step 3: Starting at the top hinge, match one of the lines of the bracket with the level
line drawn in step one. Screw the door to the wall using the drywall screws provided.
Work your way down the hinge side of the door, making sure to use the same
reference line for each of the three hinge brackets.There are two lines on the brackets,
so be sure to use the same line for all the brackets on the hinge side.
8
Installation
Manual
V2.0
Next, check the clearance between the frame and the door on the top and knob side.
Take care to make sure they are equal.
Starting at the top again, continue working your way down the door. Be sure to
look at both upper corners where the door meets the jambs. These should be
equal. If not, and you are sure the door is perfectly plumb, you may need to
raise or lower one side of the jambs to adjust for the discrepancy.

Keep the clearance between the frame and door equal, as you screw the door to
the wall with the drywall screws.
For added door stability, we recommend replacing the central screws of the hinges
with a 3” screw, and add a 3” screw in the strike, as shown in the picture.
If the floor is not finished, you may need to add the proper space required for the
flooring (carpet, etc.) In that case, IT IS MANDATORY to replace the central screws of
the hinges with 4” ones, and add a 4” screw in the strike, as shown in the picture.
9
Installation
Manual
V2.0
5. Install casings
VERT Pre-hung interior doors consist of the slab, jambs and casings. The
slab comes installed in the jambs with chrome hinges. The casings should
be installed on site and require a precise measurement and cut. 
This should be performed by a professional.
The casings should be installed using a 90 degree
angle, as shown in the picture.
The kits contain four (4) legs (long) and two (2) tops (short). Tops are
thinner, so the cut is hidden and it’s easier to perform the installation.
Hinge side (outside):
Two legs, standard L-casing
One top, standard L-casing
Inside (adjustable casing):
Two legs, adjustable L-casing
One top, adjustable L-casing
The casings are installed inserting the tenon of the casings in the mortise of the jambs.
10
Installation
Manual
V2.0
1. Start with the hinge side, using the standard L-casings.
Measure the legs: lean the leg on the floor, vertically (where the casing will be installed). Two
marks should be made, as shown in the picture. You can use the top width to make a precise
measurement. Temporarily place the top casing in the frame to help you measure it.
2. Make two marks: one at the top end of the casing, and one below the slab.
3. Cut the top casing as detailed in the picture:
Repeat the procedure for all the leg casings (total 4).
Install the 4 leg casings.
The casings are installed by inserting the tenon of the casing in the mortise of the jamb.
Start with the lower side, inserting the corner of the tenon of the casing in the mortise of the
jamb. With the help of a rubber hammer, gently insert the rest of the casing in the mortise.
11
Installation
Manual
V2.0
4. Measure the Tops:
After installing the legs, measure the distance between both legs. This is the measure to which
the tops should be cut. Mark and cut it.
5. Install the casings by inserting the tenon of the top casing in the mortise of the jamb.
6. Install knobs following manufacturer’s instructions
Knobs are not provided.
Please follow manufacturer’s instructions.
IMPORTANT: please note that the slabs have a plastic edge, and casings have a polyester
coating.
12
Installation
Manual
V2.0
Installed product:
13
Installation
Manual
V2.0
VERT – technical info
VERT pre-hung KITS are finished products, ready to install (the customer can optionally request a PRIMED
version, to be finished on site).
They can be installed in minutes, instead of hours as with traditional methods. A trained team can install
VERT doors 10 times faster than traditional doors. Not only does this save labor costs, it shortens the total
time of door installation. This is particularly valuable for projects that get delayed, as time saved in the final
stages helps expedite their completion.
It’s recommended that door installation be done in the last stage of a construction project, when the walls
are finished and painted.
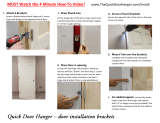
Installation is done using expandable polyurethane foam on six points of the frame. No additional measures
are required, or tools since nails and screws are not used.
The only requirement to take into account regarding architectural design is the use of the "drawer frame"
system.
For protection the door slab is covered with shrink wrap, and the rubber seals of the frame with blue
plastic. This can be removed by the client after furnishing, to prevent the doors from being damaged.
Door slab:
- Wood construction
- 35mm, 40mm and 45mm slab thickness
- HDF laminate on both faces, 3mm (e=35mm slabs) / 6mm (e=40mm slabs)
- Taeda Pine wood (Finger Joint), kiln dried, 30x30mm
- Recycled cardboard honeycomb core or MDP solid core
- For honeycomb core doors: Lock reinforcement with kiln-dried Taeda pine wood
- PVC edgebanding, 0.4mm, in WHITE or WOOD COLOR
- Bater-resistant sealant at Bottom edge
Jambs:
- Made of clear finger-jointed Taeda Pine wood
- Polyester coating
- Rubber seal
- Anchoring: EZ-hanger
Jambs Casings:
- Adjustable (2cm, 25/32 in)
- Made of moisture-resistant MDF and HDF
- Polyester coating
Finishes:
Primer
- Surface: Water-based white (for painting).
- Sides: PVC sheet; Water-based white (for painting).
- Bottom: Water-resistant Hot Melt Seal.
- Frame and Jambs: Water-based white (for painting).

White UV
- Surface: 7 coats of white UV paint.
14
Installation
Manual
V2.0
- Sides: PVC sheet.
- Bottom: water-resistant Hot Melt Seal.
- Frame and Jambs: Coated in white polyester.
Color finish: Tanganica / Freijo / Ipê
- Surface: UV paint.
- Sides: PVC sheet.
- Bottom: Water-resistant Hot Melt Seal.
- Frame and Jambs: Coated in wood-colored polyester.
Other important features:
- ISO certified
- FSC environmental certification
15
  • Page 1 1
  • Page 2 2
  • Page 3 3
  • Page 4 4
  • Page 5 5
  • Page 6 6
  • Page 7 7
  • Page 8 8
  • Page 9 9
  • Page 10 10
  • Page 11 11
  • Page 12 12
  • Page 13 13
  • Page 14 14
  • Page 15 15

VERT 24x80x4FM45/90WSCR Operating instructions

Type
Operating instructions

Ask a question and I''ll find the answer in the document

Finding information in a document is now easier with AI