Page is loading ...

The specifications of this product may vary from this photo and are subject to change without notice.
IRONMAN, IRONMAN TRIATHLON and M-DOT are registered trademarks of World Triathlon Corporation.
This product is licensed by the World Triathlon Corporation.
OWNER’S MANUAL
Model 6152
Ironman X- Class 410
Recumbent Bike with Bluetooth

6152.02-011216

SERVICE ------------------------------------------------------------------------ 2
LABEL PLACEMENT --------------------------------------------------------- 3
PRODUCT SAFETY ---------------------------------------------------------- 4
OVERVIEW DRAWING ------------------------------------------------------ 5
HARDWARE AND TOOLS LIST ------------------------------------------- 6
PART LIST ---------------------------------------------------------------------- 7
ASSEMBLY ---------------------------------------------------------------------10
SEAT AND BACKREST ADJUSTMENTS-------------------------------19
COMPUTER --------------------------------------------------------------------21
TROUBLESHOOTING & MAINTENANCE ----------------------------- 29
WARM UP ---------------------------------------------------------------------- 30
WARRANTY ------------------------------------------------------------------- 31
PART REQUEST FORM --------------------------------------------------- 32
1
TABLEOFCONTENT

2
SERVICE
IMPORTANT: FOR NORTH AMERICA ONLY
For damaged, defective products, questions, replacement parts, or any
other service support, please contact our customer service department
(8:00 AM - 5:00 PM Pacific Standard Time, Daily) by the below methods:
For Best Service, please Email:
Service@paradigmhw.com
Response Time: 1-2 Business Days
Website:
www.paradigmhw.com
Toll-Free:
1-844-641-7922
Response time may vary.
Please have the following information ready when requesting for service:
Your name
Phone number
Model number
Serial number
Part number
Proof of Purchase
For damaged or defective products please contact our customer service
before returning to the store.
Paradigm Health & Wellness, Inc.
1189 Jellick Ave.
City of Industry, CA 91748, USA

ALL NEW MATERIAL
CONSISTING OF
POLYURETHANE FOAM PAD_100%
Certication is made by the
manufacturer that the materials
in this article are described in
accordance with law.
Paradigm Health and Wellness, Inc.
1189 Jellick Ave.
City of Industry, CA 91748 USA
REGISTRY NO.
VA25302 (CN)
Under Penalty of law this tag not to
be removed except by the consumer
NOTICE
This article does not meet
the ammability require-
ments of California Bureau of
Home Furnishings technical
bulletin. 117 Care should be
exercised near open ame or
with burning cigaretts.
SOUS PEINE DE SANCTION LÉGALE,
CETTE ÉTIQUETTE NE PEUT ÊTRE
ENLEVÉE PAR UNE PERSONNE AUTRE
QUE LE CONSOMMATEUR
ENTIÈREMENT FABRIQUÉ DE
MATÉRIAUX NEUFS
REMBOURRAGE DE MOUSSE DE
POLYURÉTHANE 100%
NO D’ENREGISTREMENT
VA25302 (CN)
Cette étiquette est apposée
Conformément aux lois Canadiennes.
Paradigm Health and Wellness, Inc.
1189 Jellick Ave.
City of Industry, CA 91748 USA
Ce produit ne satisfait pas
aux critères d’inammabilité
spéciés à l’article 117 du
devis technique duCalifor-
nia Bureau of Home
Furnishings. Ne pas utiliser
près d’une source de
chaleur ou d’une amme
nue (cigarettes, etc.)
AVIS
AVERTISSEMENT
Le poids maximum pout ce produit
est 159 kgs.
Maximum weight capacity is 350 lbs.
CAUTION (Model 6152)
ATTENTION (N° 6152)
(0-2) Into the
(0-1) Into the
Pedal
(0-1)
(0-2)
MADE IN CHINA / FABRIQUÉ EN CHINE
3
LABELPLACEMENT

Basic precautions should always be followed, including the following safety
instructions when using this equipment. Read all instructions before using
this equipment.
1. Read all the instructions in this manual and do warm up exercises before
using this equipment.
2. Before exercising and to avoid injuring your muscles, perform warm-up
exercise for each muscle group is highly recommended. Please refer to
Warm Up section of the Owner’s Manual.
3. Please make sure all components are not damaged and in working order
before use. This equipment should be placed on a flat surface while in use.
Using a mat or other material on the ground is recommended.
4. Please wear proper clothes and shoes when using this equipment; do not
wear clothes that might catch in any part of the equipment.
5. Do not attempt any maintenance or adjustments other than those described
in this manual. Should any problems arise, discontinue use and consult
with customer service at Paradigm.
6. Caution should be taken when getting on or off the equipment. To get on,
make sure the left foot pedal is at the lowest position. Grab the stationary
handlebar firmly with both hands then place your left foot onto the left foot
pedal. Once your left foot is secured, place your right foot onto the right
foot pedal. To begin exercising, push/pull on the handrails first and then
follow with leg motion. To get off, come to a complete stop and do the
above in reverse.
7. Keep dry - do not operate in wet or moist condition.
8. Do not use the equipment outdoors.
9. This equipment is for household use only.
10. Only one person should be on the equipment at any time.
11. Keep children and pets away from the product while in use.
12. This machine is designed for adults only.
13. This product requires a minimum of 6 feet of space for safe operation.
14. If you feel any chest pains, nausea, dizziness, or short of breath, you
should stop exercising immediately and consult your physician before
continuing.
15. The maximum weight capacity for this product is 350 lbs /159 kgs.
WARNING: Before beginning any exercise program consult your
phy
sician. This is especially important for the people who are over 35 years
old or who have pre-existing health problems. Read all instructions before
using any fitness equipment.
CAUTION: Read all instructions carefully before operating this
product.
Retain this Owner’s Manual for future reference.
4
PRODUCTSAFETY

s
H-4
H-2
H-1
N-9
N-10
H-5
H-6
H-7
F-1
F-2
U-2
N-6
N-8
C-5
C-1
C-3
C-4
G-1
N-11
N-5
L-3
L-2
L-7
L-4
L-6
L-5
L-10
L-11
L-9
L-1
L-8
C-2
R
D-1
J-11
J-7
J-8
D-2
D-6
D-3
D-4
D-5
A-1
B-4
B-5
B-8
A-2
B-2
B-7
B-9
B-3
B-6
Q
O-2
B-10
J-3
J-4
J-9
E-2
E-1
E-9
N-1
E-6
E-7
E-5
E-3
E-8
E-4
N-4
N-3
N-2
K-7
P
N-4
N-6
N-3
I-2 I-1
T
D-7
D-8
D-9
D-10
D-11
D-12
D-13
D-14 D-15
D-16
D-17
J-6
I-6
I-5
I-4
I-3
J-10
J-4
J-3
O-1
J-5
J-12
K-11
K-10
K-9
K-8 K-2
K-12
K-6
K-3
K-4
K-5
K-1
G-3
G-13
G-9
N-7
U-1
G-6
G-4
G-5
G-14
G-12
G-8
G-7
N-5
H-3
H-10
H-9
H-11
H-12
H-8
G-10
G-11
G-2
A-3
M-4
M-11
M-7
M-1
M-13
M-8
M-5 M-12
M-3
M-6
M-10
M-2
M-9
B-1
C-1
E-9
J-1
J-2
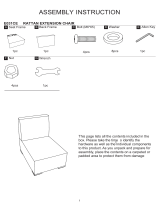
OVERVIEWDRAWING
5

N-15 Allen Wrench 5mm 1pc
N-14 Allen Wrench 4mm 1pc
N-13 Open Wrench 13,15mn 1pc
N-12 Allen Wrench with Phillips Screwdriver 6mm 1pc
N-3 D13.2 4PCS
N-2 M8*15L 4PCS
N-4 D16 4PCS
N-5 M6*15L 1PC
N-1 M8*60L 4PCS
N-6 M8*50L 4PCS
N-3 D13.2 4PCS
N-4 D16 4PCS
N-7 M6*10L 2PCS
N-6 M8*50L 2PCS
N-8 D22 2PCS
N-5 M6*15L 4PCS
3
2
7A
Step 7B
Step 7C
HARDWARE&TOOLSLIST
6

No. Description Q’ty No. Description Q’ty
A
Computer set
1 D-11
Electric cable
1
A-1
Computer
1 D-12
Bolt M5x0.8x12L
1
A-2
Computer Screw M5*0.8*10L
4 D-13
Sensor cable
1
A-3
Audio cable
1 D-14
Lower computer cable
1
B
Handlebar post set
1 D-15
Tension cable
1
B-1
Handlebar post
1 D-16
Lower hand pulse cable
2
B-2
Fixing plate of computer
1 D-17
Upper hand pulse cable
1
B-3
Computer bracket
1 E
Front stabilizer set
1
B-4
Upper hand pulse cable
1 E-1
Front stabilizer
1
B-5
Upper computer cable
1 E-2
End cap
2
B-6
Allen bolt M8*1.25*45L
1 E-3
Round moveable wheel
2
B-7
Nylon nut M8*1.25*8T
1 E-4
Allen bolt M8x1.25x40L
2
B-8
Bushing D8xD12.7x23
1 E-5
Domed nut M8x1.25x15L
2
B-9
Cross screw ST4.2x1.4x15L
2 E-6
Bushing D22.2xD8.2x7T
4
B-10
Bolt M5*0.8x15L
2 E-7
Spring washer D15.4xD8.2x2T
2
C
Handlebar set
1 E-8
Flat washer D16xD8.5x1.2T
6
C-1
Handlebar
1 E-9
Adjustable Levers
4
C-2
Hand pulse cable
2 F
Rear stabilizer set
1
C-3
Cross screw ST4x1.41x25L
2 F-1
Rear stabilizer
1
C-4
Hand pulse cable
2 F-2
End cap
2
C-5
Cable plug 1
G
Seat post set
1
D
Main frame set
1 G-1
Seat adjustment bracket
1
D-1
Main frame
1 G-2
Bushing
2
D-2
Bearing M8x1.25x15L
2 G-3
C-clip
2
D-3
Sliding beam
1 G-4
Bushing D29xD11.9x9T
2
D-4
Buffer
4 G-5
Eccentric shaft
1
D-5
Allen bolt M8x1.25x15L
4 G-6
Link stopper
1
D-6
Nylon nut M8*1.25*8T
4 G-7
Nut
1
D-7
Fixing clip
1 G-8
Hex bolt M8x1.25x15L
1
D-8
Cross screw ST4.2x1.4x15L
2 G-9
Spring D1.8xD14x70L
1
D-9
Motor
1 G-10
Bolt M5x0.8x10L
2
D-10
Cable plug
2
G-11 Protective cover 1
PARTLIST
7

No. Description Q’ty No. Description Q’ty
G-12 Bushing 1 J-8 C-clip D22.5xD18.5x1.2T 2
G-13 Adjustable pole 1 J-9 Waved washer D27xD21x0.3T 1
G-14 Cross screw ST4x1.41x12L 1 J-10 Nylon nut M6x1.0x6T 4
H Bracket adjustable tube set 1 J-11 Hex bolt M6x1.0x15L 4
H-1 Backrest bracket 1 J-12 Multiple-groove belt 1
H-2 Pin 1 K Fly-wheel set 1
H-3 Swing shaft 1 K-1 Fly-wheel 1
H-4 End cap 1 K-2 Little fly-wheel 1
H-5 Spring D1.0x131.9 1 K-3 Bearing 1
H-6 Nut M18x1.5x14 1 K-4 Bearing D35x16 1
H-7 Backrest Adjustment Knob 1 K-5 Bearing 2
H-8 Hex bolt M8x1.25x15L 2 K-6 C-clip D15.5xD10.8x1T 2
H-9 Flat washer D25xD8.5x2T 2 K-7 Nylon nut 3/8"-26UNFx6.5T 2
H-10 Bushing D29xD12.1x9T 2 K-8 Bearing 1
H-11 Spring washer D15.4 xD8.2x2T 2 K-9 Fixing ring 1
H-12 screw cover D28x14(M8) 2 K-10 Flywheel axle 1
I chain cover set 1 K-11 Nut D9.5x8T(3/8"-26UNFx8T) 1
I-1 Left chain cover 1 K-12 Washer D36.8xD31.5x1T 1
I-2 Right chain cover 1 L Fixing plate for magnet set 1
I-3 Pin 3 L-1 Fixing plate for magnet 1
I-4 Cross screw ST4.2x1.4x20L 19 L-2 Hex bolt M6x60L 1
I-5 Left chain cover 1 L-3 Nut M6x1x6T 1
I-6 Right chain cover 1 L-4 Nylon washer D6xD19x1.5T 1
J Crank set 1 L-5 Flat washer D13xD6.5x1.0T 1
J-1 Left crank 1 L-6 Nylon nut M6x1x6T 1
J-2 Right crank 1 L-7 Spring D1.0x55L 1
J-3 screw cover D26x11L 2 L-8 Hex bolt M8x52L 1
J-4 Anti-loosen nut M10x1.25x10T 2 L-9 Nylon nut M8x1.25x8T 1
J-5 Belt wheel 1 L-10 Magnet cell 8
J-6 Round magnet 1 L-11 Magnet 9
J-7 Crank axle set 1 M Idle wheel set 1
PARTLIST
8

No. Description Q’ty No. Description Q’ty
M-1 Fixing plate for idle wheel 1 N-8 Curved washer D22xD8.5x1.5T 2
M-2 Bearing 2 N-9 Screw 1/4"x20x40L, 4
M-3 Spring D2.2xD14x55L 1 N-10 screw cover 4
M-4 Nylon nut M8x1.25x8T 1 N-11 Flat washer D14xD6.5x0.8T 4
M-5 Plastic washer D50xD10x1.0T 1 N-12
Allen Wrench with Philips
Screwdriver 6mm
1
M-6 Flat washer D30xD8.2x6T 1 N-13 Open Wrench 13,15mm 1
M-7
Plastic flat washer
D10xD24x0.4T
1 N-14 Allen Wrench 4mm 1
M-8 Allen bolt M8x1.25x30L 1 N-15 Allen Wrench 5mm 1
M-9 C-clip 1 O Pedal set 1
M-10 Waved washer D21xD16.2x0.3T 1 O-1 Right Pedal 1
M-11 Flat washer D24xD16x1.5T 1 O-2 Left Pedal 1
M-12 Sleeve D3x30L 2 P Upper protective cover 1
M-13 Spacer D17.8xD8.2x5.2 1 Q Bottle holder 1
N Screw set 1 R Seat 1
N-1 Carriage bolt M8x1.25x60L 4 S Air backrest 1
N-2 Cap nut M8x1.25x15L 4 T Adaptor 1
N-3 Spring washer D13.2xD8.2x2T 8 T1 A/C Plug 1
N-4 Flat washer D16xD8.5x1.2T 8 U Adjustable pole set 1
N-5 Allen Screw M6x1x15L 5 U-1 Adjustable pole(II) 1
N-6 Allen bolt M8x1.25x50L 6 U-2 Foam 1
N-7 Screw M6x1x10L 2
PARTLIST
9

D-1
E-9
E-9
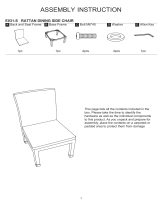
1.Front and Rear Stabilizer Installation
1.1 Front Stabilizer Installation.
Lift up the main frame (D-1) from the front, and then align the Front Stabilizer (E-1) onto the
front curve of the Main Frame (D-1). Insert 2 Square Neck Screws (N-1) from the bottom,
followed by 2 Flat Washers (N-4), 2 Spring Washers (N-3) and 2 Cap Nuts (N-2). Hold the
Front Stabilizer (E-1) to the Main Frame (D-1) then tighten by using the open wrench 13, 15mm
(N-13) provided.
1.2 Rear Stabilizer Installation.
Repeat the above step to install the REAR stabilizer (F-1).
1.3 Adjustable Levelers
Turn the Adjustable Levelers (E-9) to the desired height and make sure the bike is stable on the
floor after the adjustment. Proper leveling will reduce wobbling and squeaking.
N-1 Carriage Bolt
M8x1.25x60L
4PCS
N-2 Cap Nut
M8x1.25x15L
4PCS
N-3 Spring washer
D13.2xD8.2x2T
4PCS
N-4 Flat washer
D16xD8.5x1.2T
4PCS
ASSEMBLY
10
Hardware:
Tool:
N-13 Open Wrench
13,15mm 1PC

A
B
2.Backrest Adjustable tube fixed
Pull out the Backrest Adjustment Knob (H-7), see diagram A, then adjust the Backrest bracket
(H-1) into any of the 3 adjustment holes. Then, install the Allen Screw (N-5) into the Backrest
bracket (H-1) by using the 5mm Allen Wrench (N-15) provided as shown in diagram B.
N-5 Allen Screw M6*1*15L
1PC
ASSEMBLY
ASSEMBLY
N-15 Allen Wrench
5mm 1PC
Tool:
11
Hardware:

AB
c
B-1
B-1
D-1
3. Handlebar Post Installation
Slide the Upper protective cover (P) onto the Handlebar Post (B-1) see Pic. A. Pull out the Upper
pulse cable (B-4) from the Handlebar Post (B-1) as shown in Pic. B. Then connect it with the Lower
hand pulse cable (D-16) from the Main Frame (D-1). Connect the Computer cable (B-5) from the
Handlebar Post (B-1) to the Lower computer cable (D-14) from the Main Frame (D-1) as shown in
Pic. C.
CAUTION: To prevent damage, ensure that the wires are not excessively folded or pinched during
installation. Wires must stay connected for the computer to function properly.
CAREFULLY insert the Handlebar Post (B-1) into the Main Frame (D-1) and attach it using four
Allen Bolts (N-6), four Spring Washers (N-3) and four Washers (N-4). Tighten the Handlebar Post
(B-1) to the Main Frame (D-1) using the 6mm Allen Wrench (N-12) provided.
N-3 Spring washer
D13.2xD8.2x2T
4PCS
N-4 Flat washer
D16xD8.5x1.2T
4PCS
N-6 Allen Bolt
M8x1.25x50L
4PCS
Hardware:
12
ASSEMBLY
Tool:
N-12 Allen Wrench with
Phillips Screwdriver
6mm 1PC

D-1
4. Computer Installation
Remove the four Screws (A-2) from the back of the Computer (A-1)
Connect the upper pulse cable (B-4) to the console (B-4) pulse cable.
Connect the computer cable (B-5) to the 9 pin WHITE socket in the back of the computer.
Install the Computer onto the computer plate (B-2)
on the front post and tighten the four Screws (A-2)
with the Allen Wrench (N-14).
ASSEMBLY
Tool:
N-14 Allen Wrench
4mm 1PC
13

D-1
J-1
J-2
5. Foot Pedals Installation
Put the pedal strap onto the Left and Right pedal first.
The Cranks and Foot Pedals are marked “R” for Right and “L” for Left.
Insert the pedal shaft of the Left Foot Pedal (O-2) into the threaded hole of the Left Crank (J-1).
Turn the pedal shaft by hand in the COUNTER-CLOCKWISE direction until snug.
Note: DO NOT turn the Left pedal shaft in the clockwise direction, doing so will
strip the
threads.
Tighten the pedal shaft of the Left Foot Pedal (O-2) with the Open Wrench (N-13) provided.
Insert pedal shaft of the Right Foot Pedal (O-1) into the threaded hole of the Right Crank (J-2).
Turn the pedal shaft by hand in the CLOCKWISE direction until snug. Tighten the pedal shaft of
the
Right Foot Pedal with the Open Wrench (N-13) provided.
14
ASSEMBLY
Tool:
N-13 Open Wrench
13,15mm 1PC

B-1
6. Bottle Holder Installation
Remove the two pre-installed Screws (B-10) from the Handlebar Post (B-1) using the 6mm Allen
Wrench with Phillips screwdriver (N-12). Attach the Bottle Holder (Q) onto the handlebar and tighten
with the same screws.
ASSEMBLY
15
Tool:
N-12 Allen Wrench with
Phillips Screwdriver
6mm 1PC

D-17
D-17
C-2
A-2
A-2-1
C-5
A-3
A-1
U-1
N-7
D-17
C-5
C-2
C
N-6
N-8
D-17
C-5
C-2
N-7
7A. Seat Handlebar installation
Attach the Seat Handlebar (C) with two Allen bolts (N-6) and two Curved Washers (N-8) tighten
using the 6mm Allen Wrench (N-12). Slide the Hand Pulse cable (C-2) UNDER the Seat
Adjustment bracket (G-1), then connect Hand Pulse Cable (C-2) and Upper hand pulse cable
(D-17) see Pic (A-1).
Gently rotate the attached cable so it fits through the slot (see Pic. A-2-1) then insert the Cable
Plug (C-5) into the hole, (see Pic. A-3.)
Assemble Adjustable handle (U-1) with two Screws (N-7) using the 5mm Allen Wrench (N-15).
N-7 Screw
M6x1x10L
2PCS
N-8 Curved Washer
D22xD8.5x1.5T
2PCS
N-6 Allen Bolt
M8x1.25x50L
2PCS
16
ASSEMBLY
Hardware:
Tool:
N-12 Allen Wrench with
Phillips Screwdriver
6mm 1PC
N-15 Allen Wrench
5mm 1PC

N-9 Hex Flange Bolt
1/4”-20x40L
4PCS
N-10 Screw Cover
D28x17xM6
4PCS
N-5 Allen Screw
M6*1*15L
4PCS
N-11 Flat Washer
4PCS
7B. Seat Installation
Attach the Seat (R) to the Seat adjustment bracket (G-1). Tighten with four Allen Screws (N-5)
and four Flat Washers (N-11) using the 5mm Allen Wrench provided (N-15).
7C. Backrest installation
Align and hold the Backrest (S) onto the Backrest bracket (H-1),use 4mm Allen Wrench (N-14)
to
tighten four Bolts (N-9) then place 4 screw covers (N-10), over the bolt heads.
Hardware:
17
ASSEMBLY
Hardware:
N-14 Allen Wrench
4mm 1PC
Tool:
N-15 Allen Wrench
5mm 1PC
Tool:

T-1
I-1
8. Adaptor Installation
Plug one end of the Adaptor (T) into the power jack (T-1) of the power supply cable on the front of
the Left Chain Cover (I-1).Before plugging in, make sure to carefully check the specifications on
the Adaptor. Plug the other end of the Adaptor (T) to the electrical wall outlet.
ASSEMBLY
18
/