Page is loading ...

Instruction Manual
SUNBEAM
®
OSKAR
®
FOOD PROCESSOR
Manuel d’Instructions
ROBOT DE CUISINE SUNBEAM
®
OSKAR
®
Manual de Instrucciones
PROCESADOR DE ALIMENTOS SUNBEAM
®
OSKAR
®
Manual de Instruções
PROCESSADOR DE ALIMENTOS SUNBEAM
®
OSKAR
®
■
■
■
MODEL/MODELO
MODÈLE/MODELO
4817-8
MODEL/MODELO
MODÈLE/MODELO
4817-8
®

2
When using electrical appliances, basic safety instructions should always be followed
including the following:
1.READ ALL INSTRUCTIONS BEFORE USING THE FOOD PROCESSOR.
2.To protect against risk of electrical shock, do not put food processor in water
or other liquid. This may cause personal injury or damage to the product.
3.Close supervision is necessary when any appliance is used by, or near, children
or incapacitated persons.
4.Unplug from outlet when not in use, before putting on or taking off parts and
before cleaning.
5.Do not contact moving parts. Keep hands, hair, clothing and other utensils away from
chopping blade during operation to reduce the risk of injury to persons and/or
damage to the Food Processor.
6.Do not operate Food Processor with a damaged cord or plug or after the appliance
malfunctions, or is dropped or damaged in any manner. Return appliance to the
nearest authorized Sunbeam Appliance Company service facility for examination,
repair or electrical or mechanical adjustment.
7.The use of attachments not recommended or sold by Sunbeam Appliance Company
may cause fire, electrical shock or injury.
8.Do not let cord touch hot surfaces or hang over table edges or counters.
9.Do not use outdoors or for commercial purposes.
10. Blade and Processing Disk are sharp. Handle carefully.
11. To reduce the risk of injury to persons, never place Cutting Blade on Base
without first putting Container properly in place.
12. Be certain Container Cover is securely locked in place while operating appliance.
13. Never feed food by hand. Always use Food Pusher.
14. Do not attempt to defeat the cover interlock mechanism.
This Unit for Household Use Only
NOTE: The maximum current rating is based on the attachment for this product
that draws the greatest current. Other accessories may draw less current.
FOR PRODUCTS PURCHASED IN THE US. AND CANADA ONLY:
This appliance is equipped with a polarized plug (one blade is wider than the other).
As a safety feature, this plug will fit in a polarized outlet only one way. If the plug
does not fit fully in the outlet, reverse the plug. If it still does not fit, contact a
qualified electrician. Do not attempt to defeat this safety feature.
IMPORTANT SAFEGUARDS
SAVE THESE INSTRUCTIONS

3
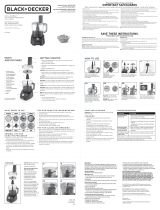
Food Pusher
Feed Tube
Processing Container
Motor Base
Cutting/
Processing Blade
Ejector Disc
Reversible Slicing/
Shredding Disc
Cover
Parts of Your Oskar
®
Food Processor
As you unpack your new food processor, take a moment to identify each of the various
parts as shown in these illustrations. BE SURE TO HANDLE THE BLADE AND DISK
CAREFULLY, AS THEY ARE VERY SHARP.
By following the simple, step-by-step instructions in this booklet, you will learn how
things go together, which blade or disc to use for each job and how wonderfully
convenient your new food processor really is to use.

4
Assembling Your Oskar
®
Food Processor
Using Clear Container and Cover:
Before you begin, PLEASE BE SURE THAT THE ELECTRIC CORD IS UNPLUGGED.
Set up the motor base facing you on a dry,
level surface with the tallest side of the
motor housing to the rear.
NOTE: Located on the top, back of the motor
base is an arrow and the words “LOCK-ON”
to the left and “UNLOCK-OFF” to the right.
Turn the clear bowl in the direction indicated
to turn the food processor ON or OFF.
Place the clear Processing Container over the
drive shaft on the motor base and rotate the
container until it drops down evenly on the base.
Now turn the Container until it locks firmly
into position.
NOTE: Each time you re-assemble your food
processor, be sure to attach the Container first
and lock it into position. Then, attach the Cover.
Place the cutting/processing blade over the drive
shaft, rotating it slightly until it drops into place.
If you plan to process with blade, now is the time
to add ingredients. THE BLADE IS EXTREMELY
SHARP. USE CAUTION HANDLING THIS BLADE.
To attach the cover, place the Cover on the
Container so that the large locking tab of the
cover is to the right-hand side near the
horizontal slot at the back of the motor base.
When turned counterclockwise, the tab will
engage the automatic switch and the OSKAR
®
Food Processor will turn ON. By moving the
cover in the opposite direction, it will turn OFF.
NOTE: The stainless steel cutting/processing
blade
can only be used in the OSKAR
®
Food Processor's
clear processing container for in-bowl chopping,
mixing or puréeing functions; NEVER with
continuous flow cover on top of the clear bowl.

5
Assembling Your Oskar
®
Food Processor
Using Continuous Flow Cover:
Set up the motor base facing you on a dry,
level surface with the tallest side of the
motor housing to the rear.
Place the clear Processing Container over the
drive shaft on the motor base. Lock into place
.
Place the ejector disc into the container by
holding the stem and placing the disc over
the drive shaft. Allow it to drop into place.
For slicing, hold the slicer/shredder disc with
the raised, curved slicing edge facing upwards.
Place the disc over the ejector disc and allow it
to drop into position.
For shredding, turn the disc over so that
shredding notches are facing upwards.
Place the disc over the ejector disc and
allow it to drop into position.
To attach the cover, place it onto the container
so that the pin in the cover fits into the hole at
the top of the ejector disc. The large locking tab
on the lid is to the right-hand side, near the
horizontal slot on the motor housing: when
turned counterclockwise, the tab will engage
the automatic switch and the OSKAR
®
Food
Processor will turn ON. Turn the cover in the
opposite direction to turn it OFF.
Note: Keep fingers away from the Continuous
Flow Chute when the OSKAR
®
Food Processor
is operating.

6
For more control over slicing and shredding,
load the Feed Tube with ingredients first, before
turning the OSKAR
®
Food Processor ON. Always
use the Food Pusher to yield more evenly sliced
or shredded foods – NEVER YOURFINGERS.
Note: The OSKAR
®
Blade and Cutting Disc are
extremely sharp! Use caution when handling, and
storing them safely in their respective containers.
Rest the Food Pusher in the Tube. Now, holding
the Food Pusher with one hand, and Feed Tube
in the other, rotate the cover to the ON position
while pushing gently down on the food pusher.
Turn the OSKAR
®
Food Processor OFF.
Food Processing Techniques – Using the Blade
Pulsing Techniques:
The OSKAR
®
Food Processor processes food
very quickly; in most cases, in seconds!
Therefore, foods can easily become over
processed if you don’t watch carefully. We
suggest that when using the Steel Blade in the
Clear Processing Container, you process foods
no more than a few seconds at a time, turning the
OSKAR
®
Food Processor ON and OFF frequently
until the desired results are obtained. To use this
“Pulsing Technique”, simply rotate the cover
so that the Locking Tab moves in and out of the
Automatic Switch Slot. Pulsing ensures excellent
results every time.
NOTE: Please be sure that the Steel Blade
has stopped spinning completely before
removing the Cover.

7
Placing Food Into the Container:
For the best, most consistent results, you should try to process pieces of food that are of
about equal size. When you cut, break or tear foods into uniform pieces before you begin
processing, the finished results will be more uniform, too.
You will get faster, more consistent processing results if you do not overload the container.
When using the cutting/processing blade, fill the container with only 3/4 to 1 cup of
ingredients at a time.
NOTE: When processing a heavy load, check to be sure the OSKAR
®
Food Processor is
sitting firmly on the counter or table top. DO NOT WALK AWAY FROM THE OSKAR
®
FOOD PROCESSOR WHILE PROCESSING.
Chopping Meats:
Pre-cut meats into pieces about 3/4 inch square.
Place the pieces in the container, replace the
cover and process using the pulse technique
for 5 to 7 seconds. never process more than
1 cup of meat cubes at one time.
Chopping Vegetables:
When processing vegetables such as onions,
peel and quarter; cut large onions into eighths.
Place 3/4 cup of the pieces into the container,
turning the OSKAR
®
Food Processor ON and OFF
1 to 2 times to coarsely chop, 3 to 4 times more
to finely chop. Scrape sides of container once
or twice during processing, if necessary.
Adding Dry Ingredients:
When various recipes call for dry ingredients
such as flour, add them directly into the
container before processing.
Adding Liquid Ingredients:
Liquid ingredients may be added while the
processor is operating by pouring them through
the pouring hole in the cover.
Note: When processing sauces or semi-liquid
ingredients, stop the OSKAR
®
Food Processor
and scrape down the container sides and cover.

Mincing:
Now you can mince garlic, parsley and spices
in seconds! Simply drop halved garlic cloves
or parsley sprigs into the container and process.
Minced foods that cling to the container are
easily swept out with a spatula.
Removing the Blade:
When you have finished processing, unplug the
electrical cord from the outlet. Remove the cover.
Remove the cutting/processing Blade with food
clinging to it before removing any food from the
container. THE BLADE IS EXTREMELY SHARP.
USE CAUTION WHEN REMOVING THIS BLADE.
Clean the Blade with a scraper over the bowl.
Note: Always wait for the blade or disc to stop
moving completely before removing the cover.
Removing the Container:
Place the cover on the Container. Use the
OSKAR
®
Food Processor's cover to help remove
the Container. Rotate the cover clockwise
180 degrees until the two tabs on the cover
meet the two Container tabs. Continue to turn
the cover, using firm pressure, with our thumb
against the tabs until the Container is released.
Empty the remaining food from the Container.
8

9
Packing the Food Tube
One of the most important procedures for successful slicing and shredding with
your new Sunbeam OSKAR
®
Food Processor is the way in which you place or pack food
in the Feed Tube.
When slicing or shredding, cut all ingredients first to a size that fits comfortably into the
OSKAR
®
Feed Tube. Pack the Feed Tube. While holding food steady and upright with the
Food Pusher, press down consistently until all ingredients are sliced or shredded evenly.
The more firmly you push, the thicker the slices or shreds.
For best results, the Feed Tube should always be packed somewhat firmly.
Foods positioned horizontally in the tube will produce long slices or shreds.
For better results, when shredding softer cheeses, such as American, Cheddar,
Mozzarella or Swiss, the cheese should be well chilled before processing.
Harder cheeses such as Parmesan or Romano should be at room temperature
before processing, and grated with the cutting/processing blade.
Preparing the Food:
Long, narrow foods such as carrots or
celery should be cut into even lengths,
about 3 or 4 inches long. Pack the
food into the Feed Tube.
Making shorter slices or shreds:
Pack food items vertically in the
Feed Tube.
Making longer slices or shreds:
Pack food items horizontally in the
Feed Tube.

10
Cleaning, Storing and Caring for Your Oskar
®
Food Processor
When you have finished processing, unplug the OSKAR
®
Food Processor from the
electrical outlet and remove the cover, slicing/shredding disc or cutting/processing blade
and the container from the motor base.
Wipe the base of your unit a damp cloth, then polish it lightly with a dry one.
NEVER IMMERSE THE MOTOR BASE IN ANY LIQUID.
The processing container, covers, cutting/processing blade, slicing/shredding disc,
ejector disc and food pusher are all dishwasher safe. These parts may be cleaned
on the top rack of a dishwasher.
REMEMBER TO USE EXTREME CAUTION WHEN HANDLING THE
CUTTING/PROCESSING BLADE AND SLICING/SHREDDING DISC.
THEY ARE VERY SHARP!
Cleaning the internal shaft of your cutting/processing blade is most important.
We suggest the use of a small percolator or baby bottle brush to remove any food
particles, then wash and dry the shaft thoroughly.
Sunbeam suggests that you store the OSKAR
®
Food Processor on a dry counter or table
top in your kitchen, where it will always be ready for immediate use. Store the
cutting/processing blade in the clear container. Store the slicing/shredding disc in a safe
location (OUT OF THE REACH OF CHILDREN). The OSKAR
®
blades are EXTREMELY
sharp! Use caution when handling the blades.
After washing and drying the Container, you may wish to apply a small amount of
vegetable oil to the rim of the Cover and Container. This lubrication allows the cover
to move freely when in contact with the Container.
ALWAYS STORE DISC ANDBLADE OUT OF THE REACH OF CHILDREN!
A Few Things To Remember:
1. Use the OSKAR
®
Food Processor only on a dry, level surface – never outdoors,
on a damp surface or on a table edge.
2. Never remove the Cover or the Processor until the Blade or Disc has come
to a complete stop and the unit has been unplugged from an electrical outlet.
3. The motor of your OSKAR
®
Food Processor has been permanently lubricated at the
factory and requires no further attention. Other than recommended cleaning,
no further user maintenance should be necessary. Return your Food Processor
to the nearest Sunbeam authorized independent service center if servicing or repairs
become necessary.

11
Food Processing Suggestions
• Check the food you are processing!
• Over processing is easily done, because the Food Processor works so fast.
Don’t hesitate to stop the unit and check the food you are processing. You can
always process the food a little longer if the food isn’t fine enough. For greater control,
you may with to process the food using a pulsing technique.
• When slicing or shredding, always use the Food Pusher. NEVER use your fingers
or other objects to push the food into the Feed Tube.
• Be careful not to drop spoons, spatulas or other utensils into the Feed Tube.
• If any items should become caught between the blade and the side of the container,
turn OFF the Food Processor and wait until the blade stops turning. Then, unplug
the unit, remove the cover and lift the blade to free the food item.
• Do not overload the machine. The OSKAR
®
Food Processor processes ingredients
so quickly that even large quantities can be prepared in seconds if common sense
is used about the quantity of food put into the container at any time.
• We recommend processing no more then 3/4 to 1 cup of ingredients at a time.
• Never attempt to process hard ingredients that cannot be cut by a normal kitchen knife.
Things like coffee beans and ice will dull the blade and scratch the container;
shredding or slicing something very hard may damage the disc.
• Keep the Food Processor out of the reach of children.
• The Food Processor is not intended to be used as a blender.
• The Container should not be put in the microwave.
• Processing food such as carrots, may temporarily discolor parts of the Food Processor.
To remove discoloration, wash and dry parts thoroughly and allow to air dry overnight.

12
Food Processing Guide
PROCESSING RECOMMENDED GENERAL
TASK BLADE OR DISC PROCESSING INSTRUCTIONS SUGGESTED FOODS
Blend Steel Blade Place all ingredients into Dips, flavored butters,
processing container. (You may salad dressings, sauces
wish to add liquid ingredients and spreads
through the pouring hole.)
Process until smooth.
Chop Steel Blade Foods, such as meat, should be Apples, cabbage, cooked
pre-cut into 3/4-inch cubes. fish, ham, meat or poultry,
Do not process more than 1 cup corn chips, hard cooked eggs,
of meat cubes at a time. Place all mushrooms, nuts, olives,
ingredients into processing onions, parsley, pickles,
container. Process using the pimento, raw meat, scallions,
PULSE technique until the desired tomatoes, herbs, garlic,
consistency is reached. crackers, cookies
Grate Steel Blade Food should be cut into 3/4-inch Hard cheeses such as
cubes. (Hard cheeses should be Parmesan or Romano
at room temperature.) Place all
ingredients into processing
container. Process using the
PULSE technique until the desired
consistency is reached.
Mix Steel Blade Place all ingredients into Pastry, pizza dough
processing container.
(You may wish to add liquid
ingredients through the pouring
hole.) Process a few seconds.
Use the Pulsing technique
to finish processing.
DO NOT OVERPROCESS.

13
PROCESSING RECOMMENDED GENERAL
TASK BLADE OR DISC PROCESSING INSTRUCTIONS SUGGESTED FOODS
Purée Steel Blade Place all ingredients into Fresh, cooked or canned fruits
processing container. (such as apples, bananas,
Process until smooth. peaches, pears, strawberries).
Fresh, cooked or canned
vegetables (such as beans,
carrots, corn, peas, potatoes,
or tomatoes), peanut butter
Shred Shredding Disc Pack food into the feed tube. American cheese, carrots,
(Cheese such as American, Mozzarella cheese, onions,
Cheddar, Mozzarella and Swiss, potatoes, Swiss cheese,
should be well chilled before zucchini
processing.)
Note: For shorter shreds, pack
food vertically into feed tube.
For longer shreds pack food
horizontally into feed tube.
Slice Slicing Disc Large food should be cut Fruits (such as apples,
to fit Feed Tube. Pack food into bananas, lemons, limes,
Feed Tube. (Poultry and cheese, melons, oranges, peaches,
such as American, Cheddar or pears, pineapples,
Swiss should be well chilled strawberries); vegetables,
before processing.) such as beets, cabbage,
Note: Use light pressure on Food carrots, celery, cucumber,
Pusher for thinner slices. Use eggplant, lettuce, mushrooms,
firm pressure for thicker slices. onions, parsnips, potatoes,
For longer slices, pack food tomatoes, zucchini); nuts,
horizontally into Feed Tube. pickles or poultry
For shorter slices, pack food
vertically into Feed Tube.

14
Trouble Shooting Guide
PROBLEM SOLUTION
1. Food is being unevenly processed or the 1. You are overloading the container. Next time,
OSKAR
®
Food Processor moves across process this amount in two or more batches.
the work surface.
2. The Food Processor vibrates unnaturally 2. The blade or disc has not been assembled
or there are signs of the blade or disc properly. Stop the OSKAR
®
Food Processor
hitting against either the processing immediately and refit the cutting tool properly.
Container or Cover while the OSKAR
®
Food Processor is operating.
3. Liquid leaks out of the bowl and down 3. The OSKAR
®
Food Processor liquid capacity
sides of the Processing Container. is not great; therefore, it is not recommended
for mixing beverages and other foods high
in liquid content.
4. After processing, pieces of food are left 4. Small pieces of food left on top of a disc
on top of the slicing/shredding disc. is a normal occurrence.
5. Cover does not move freely when attached 5. Use a small amount of vegetable oil to lubricate
to the container. the edges of the processing container and cover.
6. Food falls over in the food tube 6. Pack the feed tube snugly and apply even
during slicing. pressure to the food being sliced.

2 Year Limited Warranty
Sunbeam Products Inc. warrants to the original purchaser, subject to the limitations and exclusions
set forth below, that this product shall be free, in all material respects, of mechanical and electrical
defects in material and workmanship from the date of purchase for two years. This warranty does
not cover normal wear of parts or damage resulting from any of the following: negligent use or
misuse of the product, use on improper voltage or current, use contrary to operating instructions
or disassembly, repair or alteration by any person other than an authorized service center.
Our obligation hereunder is limited to repair or replacement, at manufacturer's option, of the
product during the warranty period, provided that the product, along with the model number
and original dated proof of purchase, is sent postage prepaid, directly to the following address:
For products purchased in the United States:
SUNBEAM APPLIANCE SERVICE STATION
117 Central Industrial Row
Purvis, MS 39475
For products purchased in Canada:
SUNBEAM APPLIANCE SERVICE STATION (KND)
Please call 1-800-663-8623 or email us
Do not return this product to the place of purchase or to the manufacturer; doing so may delay the
processing of your warranty claim.
Answers to questions regarding this warranty or for your nearest authorized service location may
be obtained by calling toll-free 1-800-597-5978 or by writing to Sunbeam – Consumer Affairs, at
P.O. Box 948389, Maitland, FL 32794-8389. Answers to questions regarding this warranty or for
your nearest Canadian authorized service location may be obtained by calling toll-free in Canada
1-800-667-8623. For warranty information or for an authorized service location outside of the
United States and Canada, please see the warranty service card inserted in the product packaging.
DISCLAIMER
Product repair or replacement as provided under this warranty is your exclusive remedy.
SUNBEAM PRODUCTS, INC. SHALL NOT BE LIABLE FOR ANY INCIDENTAL
OR CONSEQUENTIAL DAMAGES FOR BREACH OF ANY EXPRESS OR IMPLIED
WARRANTY ON THIS PRODUCT OR ANY PART THEREOF. EXCEPT TO THE EXTENT
PROHIBITED BY APPLICABLE LAW, SUNBEAM PRODUCTS, INC. DISCLAIMS ANY
IMPLIED WARRANTY OF MERCHANTABILITY OR FITNESS FOR A PARTICULAR
PURPOSE OF THIS PRODUCT OR ANY PART THEREOF. Some states and provinces do not
allow the exclusion or limitation of incidental or consequential damages, or allow limitations on
how long an implied warranty lasts, so the above limitations or exclusions may not apply to you.
This warranty gives you specific legal rights, and you may also have other rights, which vary
from State to State or Province to Province.

16
Il est important d'observer un certain nombre de règles de sécurité élémentaires pendant
l'utilisation de tout appareil électrique:
1. LISEZ TOUTES LES DIRECTIVES AVANT D'UTILISER LE ROBOT CULINAIRE.
2. Pour vous protéger des risques d'électrocution, ne plongez jamais le robot culinaire
dans l'eau ou tout autre liquide.
3. Faites particulièrement attention lorsque l'appareil est utilisé par, ou en présence d'enfants.
4. Débrancher l'appareil lorsqu'il n'est pas utilisé, avant d'y placer ou y retirer des pièces
et avant de le nettoyer.
5. Éviter tout contact avec les parties mobiles.
6. Ne pas faire fonctionner le robot culinaire dont le fil ou la fiche est endommagé ou après
que l'appareil ait mal fonctionné, qu'il ait été échappé ou endommagé d'une façon
quelconque. Retourner l'appareil au Centre de Service Autorisé Sunbeam le plus près
aux fins d'inspection, de réparation, de réglage électrique ou mécanique.
7. L'utilisation d'accessoires non conseillés ou vendus par Sunbeam Appliance Company
présente des risques d'incendie, d'électrocution ou de blessure.
8. Ne pas l'utiliser à l'extérieur.

17
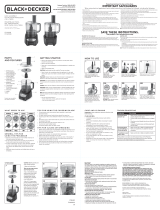
Poussoir
Trémie
Contenant de Transformation
Base du Moteur
Lame pour
Transformer/Couper
Disque Rejeter
Disque Réversible
Éminceur/Déchiqueteur
Couvercle
Les Pièces de Votre Robot Culinaire Oskar®
Au cours du déballage de votre nouveau robot culinaire, veuillez prendre un moment pour
bien identifier chacune des pièces montrées ci-dessous. S'ASSURER DE MANIPULER
LA LAME ET LE DISQUE AVEC SOIN PUISQU'ILS SONT TRÈS TRANCHANTES.
En suivant les simples instructions, étape par étape, vous apprendrez comment les articles
vont ensemble, quelle lame ou quel disque utiliser pour chaque tâche et comment votre
nouveau robot culinaire est merveilleusement pratique à utiliser.

18
Assemblage de Votre Robot Culinaire Oskar
®
Utilisation du Contenant et du Couvercle Transparents:
Avant de commencer, s'assurer QUE LE CORDON
ÉLECTRIQUE EST DÉBRANCHÉ.
Placer la base du moteur en face de vous, sur une
surface sèche et de niveau, avec le côté le plus haut
du logement du moteur vers l'arrière.
REMARQUE: Sur la partie supérieure arrière de la base
du moteur, une flèche avec les mots LOCK-ON
(VERROUILLÉ) à gauche et UNLOCK-OFF
(DÉVERROUILLÉ) à droite. Tourner le bol transparent
dans la direction indiquée pour mettre le robot culinaire
en position de marche (ON) ou d'arrêt (OFF).
Placer le contenant transparent sur l'arbre d'entraînement
de la base du moteur et faire tourner le contenant jusqu'à
ce qu'il descende uniformément sur la base. Tourner
maintenant le contenant jusqu'à ce qu'il se verrouille
fermement en place.
REMARQUE: À chaque ré-assemblage de votre robot
culinaire, s'assurer d'attacher d'abord le contenant et de
le verrouiller en place. Attacher ensuite le couvercle.
Placer la lame pour transformer/couper sur l'arbre
d'entraînement en la tournant légèrement jusqu'à ce
qu'elle descende en place. Si vous avez l'intention de
transformer avec la lame, il est maintenant temps
d'ajouter les ingrédients. LA LAME EST EXTRÊMEMENT
TRANCHANTE. IL FAUT LA MANIPULER AVEC
PRUDENCE.
Pour attacher le couvercle, placer le couvercle sur le
contenant de façon à ce que la grande patte de sûreté du
couvercle soit sur le côté droit près de la fente
horizontale à l'arrière de la base du moteur. Lorsque
tournée dans le sens antihoraire, la patte engagera le
commutateur automatique et mettra le robot culinaire
OSKAR
®
en marche. Déplacer le couvercle dans la
direction opposée pour mettre en position d'arrêt.
REMARQUE: La lame pour transformer/couper, en acier
inoxydable, peut être utilisée uniquement dans le
contenant transparent pour transformer en mélange,
purée ou hachage dans le bol; JAMAIS avec le couvercle
à débit continu sur le dessus du bol transparent.

19
Assemblage de Votre Robot Culinaire Oskar
®
Utilisation du Couvercle à
Débit Continu:
Installer la base du moteur en face de vous sur
une surface sèche et de niveau avec le côté le
plus haut du logement du moteur vers l'arrière.
Placer le contenant transparent sur l'arbre
d'entraînement de la base du moteur.
Verrouiller en place.
Placer le disque éjecteur dans le contenant en
tenant la tige et en mettant le disque sur l'arbre
d'entraînement. Le laisser descendre en place.
Pour émincer, tenir le disque éminceur/
déchiqueteur avec le bord à émincer courbé et
en relief vers le haut. Placer le disque sur le
disque éjecteur et le laisser descendre en place.
Pour déchiqueter, tourner le disque de bord de
façon à ce que les encoches pour déchiqueter
soient vers le haut. Placer le disque sur le
disque éjecteur et le laisser descendre en place.
Pour fixer le couvercle, le placer sur le contenant
de sorte que la goupille dans le couvercle entre
dans le trou au haut du disque éjecteur.
La grande patte de verrouillage de sûreté sur
le couvercle est sur le côté droit près de la fente
horizontale sur le logement du moteur;
tourner dans le sens antihoraire pour faire
engager le commutateur automatique et mettre
le robot culinaire OSKAR
®
en marche (ON).
Tourner le couvercle en direction opposée
pour mettre le robot en position d'arrêt (OFF).
REMARQUE: Se garder les doigts loin du
dispositif de déjection immédiate continue
lorsque le robot culinaire OSKAR
®
est en marche.

20
Pour pouvoir mieux émincer et déchiqueter,
remplir d'abord la trémie avec les ingrédients
avant de mettre le robot culinaire OSKAR
®
en
marche. Toujours se servir du poussoir pour
obtenir des aliments tranchés ou déchiquetés
plus uniformes – NE JAMAIS SE SERVIR DE
VOS DOIGTS.
REMARQUE: La lame et le disque de coupe
sont extrêmement tranchants! Se servir de
prudence lors de leur manipulation et de leur
rangement dans leurs contenants respectifs.
Reposer le poussoir dans la trémie. En tenant le
poussoir avec une main et la trémie avec l'autre
main, faire pivoter le couvercle en position de
marche tout en appuyant doucement sur le
poussoir. Tourner le robot culinaire OSKAR
®
en position d'arrêt.
Techniques de Transformation des Aliments – Utilisant la Lame
Techniques à Pulsation:
Le robot culinaire OSKAR
®
transforme les aliments très rapidement, la plupart du temps,
en quelques secondes! Il peut, par conséquent, se produire une surtransformation des
aliments si l'on ne fait pas attention. Lors de l'utilisation de la lame en acier dans le contenant
transparent de transformation, nous suggérons
de procéder à la transformation des aliments
pas plus que quelques secondes à la fois,
en mettant fréquemment le robot culinaire
OSKAR
®
en position de marche et d'arrêt
jusqu'à ce que l'on obtienne les résultats désirés.
Pour utiliser cette «technique à pulsation»,
faire pivoter tout simplement le couvercle de
sorte que la patte de verrouillage entre et sorte
de la fente du commutateur automatique.
La technique de pulsation assure d'excellents
résultats à chaque fois.
REMARQUE: S'assurer que la lame en acier
a complètement fini de tourner avant d'enlever
le couvercle.
/