Metabo STEB 70 Quick Operating instructions
- Category
- Power tools
- Type
- Operating instructions
This manual is also suitable for

使用说明 ..................................... 5
使用說明 ................................... 10
Operating Instructions .............. 15
STEB 70 Quick
STEB 80 Quick
170 26 9230 - 0216
IP3187_STEB 70 Quick and STE 90 1 1IP3187_STEB 70 Quick and STE 90 1 1 2013-5-27 10:10:19

2
I - III
0 - III
0 - III
0 - II
I - II
0
0 - I
0 - I
0
.
.
C
V
P
I
XELP
O
R
YT
S
ULA
.
.R
O
P
..
CVP
IXE
LP
OR
Y
TS
U
LA
.
.
RO
P
-
-
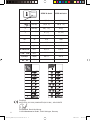
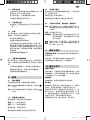
STEB 70 Quick STEB 80 Quick
M Nm (inlbs) 6 (53.1) 6 (53.1)
T
1
mm (in)
70 (2
3
/
4
) 80 (3
5
/
32
)
T
2
mm (in)
20 (
25
/
32
)
25 (1)
T
3
mm (in)
6 (
1
/
4
)8 (
5
/
16
)
n
0
/min (rpm)
P
1
W 570 590
P
2
W 335 350
m kg (lbs) 2,0 (4.4) 2,0 (4.4)
a
h,CM
/K
h,CM
m/s
2
8,5 / 2 8,5 / 2
a
h,CW
/K
h,CW
m/s
2
12 / 2 12 / 2
L
pA
/K
pA
dB(A) 89 / 3 89 / 3
L
WA
/K
WA
dB(A) 100 / 3 100 / 3
14
EN 60745
98/37/EG (
✟
28.12.09), 2006/42/EG (29.12.09
✟
), 2004/108/EG
Erhard Krauß, Geschäftsführung
© 2009 Metabowerke GmbH, 72622 Nürtingen, Germany
1500-3200 1500-3200
IP3187_STEB 70 Quick and STE 90 2 2IP3187_STEB 70 Quick and STE 90 2 2 2013-5-27 10:10:192013-5-27 10:10:19

3
1
2
3
4
5
6
7
8
9
11
10
12
13
14
15 17
30 mm
16
IP3187_STEB 70 Quick and STE 90 3 3IP3187_STEB 70 Quick and STE 90 3 3 2013-5-27 10:10:202013-5-27 10:10:20

4
a
b
5
d
c
e
E
G
H
I
J
K
L
M
F
D
C
B
A
etc.
6.31208
6.23689
0910064304
0910064401
6.23443
6.31938
6.31592
6.31340
6.23664
6.31249
6.31213
6.31211
6.31031
IP3187_STEB 70 Quick and STE 90 4 4IP3187_STEB 70 Quick and STE 90 4 4 2013-5-27 10:10:202013-5-27 10:10:20

5
目录
1 一致性声明
2 规定用途
3 一般安全规则
4 特殊安全规则
5 概述
6 产品特性
7 调试
8 使用
9 清洁与维护
10 提示与技巧
11 配件
12 修理
13 环境保护
14 技术规格
1 一致性声明
作为唯一责任人,我们特此声明,本产品符合第
2页所列指令和标准。
2 规定用途
本曲线锯适用于锯切有色金属、钢板、木质类材料
及塑料类材料。请勿用于其它用途。
因使用不当造成的损坏由用户承担全部责任。
必须遵守通用事故预防规章和随附的安全资料。
3 一般安全规则
为确保自身安全以及电动工具的安全使
用,请务必注意文中标有该警告符号的文
字部分!
警告—仔细阅读该使用说明可减少损伤危
险。
警告!阅读所有安全警告和说明。不遵循
这些警告和说明会导致电击、火灾和/或严
重伤害。
保存好所有警告和说明以备查阅。
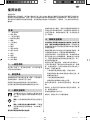
使用说明
亲爱的用户:
感谢您对本公司的信任,购买麦太保电动工具!每一台麦太保电动工具都已经过麦太保质保部门详细的检
验测试及严格的质量控制。然而,电动工具的使用寿命与您如何来使用它是息息相关的。因此请您务必注
意本说明书及随附文件所提供的信息。当您使用麦太保电动工具时越细心、越得法,它为您效力的时间也
就越长。
在使用本电动工具前,请先仔细通读和熟悉附带的
所有安全资料和使用说明。妥善保管所有附带文件
以备日后参考,如需转交电动工具,必须将这些文
件一同转交。
4 特殊安全规则
在切削附件可能触及暗线或其自身软线之处进行操
作时,要通过绝缘握持面来握持工具。切削附件碰
到带电导线会使工具外露的金属零件带电从而使操
作者受到电击。
确保您要使用本工具的地方没有铺设电源电缆,煤
气管道或水管(例如:可使用金属探测器检测)。
含铅的涂漆材料、特定品种的木材、矿物材料和金
属产生的粉尘对人体健康有害。接触或吸入此类粉
尘,可能导致操作者或旁观者发生过敏反应,和/
或引起呼吸道疾病。
某些粉尘属于致癌物质,如橡木和山毛榉粉尘,
尤其当混合使用了处理木材的添加剂时(如:铬酸
盐、木材防腐剂)。含有石棉的材料必须由专业人
员使用,严禁擅自处理。
- 工作场所若能安装吸尘装置,请务必安装。
- 配合使用保护盖(9)和合适的麦太保吸尘器,能
够更有效地除尘。
- 工作区域需保持良好通风。
- 推荐使用过滤等级P2的防尘口罩。
您所处理的材料,如有相关国家规定,请务必遵
循。
操作时,必须将工具平放并加以固定以防移动,例
如,使用夹具固定。
请勿尝试锯切极小的工件。
锯切时,底板必须与工件紧密接触。
IP3187_STEB 70 Quick and STE 90 5 5IP3187_STEB 70 Quick and STE 90 5 5 2013-5-27 下午 4:23:412013-5-27 下午 4:23:41

6
当由于某些原因而需要中断切割时,应松开触发开
关并稳稳握住曲线锯不动,直至锯片完全停止。
切勿在锯片运作时,试图将曲线锯从工件上移开,
否则可能发生反冲。
锯片与工件仍有接触时,请勿启动曲线锯。等待锯
片的转速达到全速后再进行切割操作。
重新启动位于工作部件内的锯片时,应使锯片对准
切口中心,并检查锯齿,确保其未与材料接触。如
果锯片被工作部件卡住,重新启动时锯片可能发生
反冲。
请保持您的双手远离切割区和锯片。切勿将手伸到
工件的底部。
只有在曲线锯静止不动时,方可清理碎屑和类似废
弃材料。
调试、更换或维修工具时,请将主电源拔下。
曲线锯锯片十分锋利,务必小心操作,以免割伤。
停止工作后,锯片的高温会持续一段时间。请戴防
护手套!
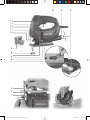
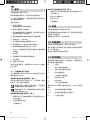
5 概述
参见第3页(请展开)。
1 锯片紧固柄
2 锯片支撑轮
3 锯片
4 底板调整螺丝
5 底板
6 锯末清除器开关按钮
7 锯片往复运动调整杆
8 防碎片底板嵌片
9 保护盖
10 锯片固定夹具
11 避免意外接触锯片的保护杆
12 速度调整设定轮
13 触发开关
14 持续启动锁定按钮
15 六角扳手
16 吸尘器连接口
17 可显示当前切割角度的曲面支撑板
6 产品特性
· 麦太保无栓式快拆锯片
7 调试
在接上电源前,请查看额定主电压及主频率
(标明在额定值标签上)是否与供应电源相吻
合。
安装锯片前,切勿操作工具。
7.1 安装防碎片底板嵌片
曲线锯锯片十分锋利,务必小心操作,以免
割伤。安装防碎片底板嵌片(8)前,请先取下
锯片。
将曲线锯倒置,使底板朝上。从前往后安装防碎片
底板嵌片,并确保:
• 嵌片的光滑面朝上。
• 嵌片的狭槽朝后(朝向电源线)。
若您想在操作期间装上保护板(参见第11章“配
件”),请将防碎片底板嵌片插入保护板内。
7.2 安装锯片
曲线锯锯片十分锋利,务必小心操作,以免
割伤。停止工作后,锯片的高温会持续一段
时间。请戴防护手套!
使用的锯片应适合所锯材料。
- 将锯片紧固柄(1)向前推到底后松开(锯片紧固柄
保持打开)。
- 插入锯片(3)并推到底。确保锯齿朝前,锯片正
确安装于锯片支撑轮(2)上的凹槽中。
- 将锯片紧固柄(1)推回原来位置(此时锯片牢牢地
固定于正确位置)。
7.3 安装/取下保护盖
安装:从前面按下保护盖(9)直至其接合。
取下: 握住保护盖(9)两侧并稍微抬起,然后向前拉
出保护盖。
IP3187_STEB 70 Quick and STE 90 6 6IP3187_STEB 70 Quick and STE 90 6 6 2013-5-27 下午 4:23:412013-5-27 下午 4:23:41

7
7.4 使用吸尘器
- 将合适的吸尘设备连接到吸尘器连接口(16)。请
使用直径为30 mm的吸引软管。
- 装上保护盖(9),以获得最佳除尘效果。
- 关闭锯末清除器(参见章节8.1)。
7.5 不使用吸尘器
- 操作期间,请将保护盖(9)取下(参见章节7.3
“取下”)
7.6 斜锯
取下保护盖(9)、防碎片底板嵌片(8)和吸尘软管。
斜锯时,不可使用上述零部件。
- 松开底板调整螺丝(4)。
- 将底板(5)略向前滑动并转动。
- 然后再将底板(5)向前或向后滑动,使其与任一
棘爪接合(通过底板(5)后面半圆形的开口,可以
看见棘爪)。底板上的曲面支撑板(17)可显示底
板的当前角度。使用曲面支撑板上的角规调整
所需角度。
- 重新旋紧底板调整螺丝(4)。
7.7 在靠墙处使用曲线锯
取下保护盖(9)、防碎片底板嵌片(8)、圆切和平行
导轨。在靠墙处使用曲线锯时不可使用上述零部
件。
- 松开底板调整螺丝(4),使底板(5)可略微抬起。
- 略微抬起底板(5)后,使其向后滑到最底端。
- 重新旋紧底板调整螺丝(4)。
8 使用
8.1 锯末清除器
可选用锯末清除器,以便清楚看见切割线。
启动: 按下曲线锯右侧的开关按钮(6) (请寻找
标记)。
关闭: 按下曲线锯左侧的开关按钮(6) (请寻找
标记)。
8.2 调整锯片往复运动
使用调整杆(7)设定往复运动的幅度。
位置“0”=关闭往复运动
位置“Ⅲ”=最大往复运动
推荐设定值,请参见第2页。
获得理想设定的最好方式是进行实际试用。
8.3 设定最大速度
通过设定轮(12)设置曲线锯最大速度。工具运行期
间,也可进行设定。
推荐设定值,请参见第2页。
获得理想设定的最好方式是进行实际试用。
8.4 开启和关闭电源,调整速度,连续操作
启动: 按下触发开关(13)。继续按压触发开关,以
增加速度(直至达到预设最大速度,请参见
8.3章)。
关闭: 松开触发开关(13)。
连续操作: 通过锁定按钮(14)锁定触发开关(13)可
进行连续操作。再次按触发开关(13)即
可停止操作。
连续工作中,如工具脱手,它会仍然处于运
作状态。因此,双手必须始终握住工具的手
柄,站稳,专心工作。
9 清洁与维护
定期清洁本机器。同时也包括用吸尘器清洁电机上
的通风叶片。
如有必要,可清洁锯片支撑轮(2)后面的空间。
可定期在锯片支撑轮(2)滴上一滴润滑油。
10 提示与技巧
切割不同材料
切割金属时,可使用麦太保润滑棒润滑锯片。切割
树脂玻璃时,先用水将切割线打湿。请在木质底板
上切割厚度小于1 mm的金属板。
曲线切割
切割曲线时,推荐使用特别设计的窄锯片。
插入锯片
曲线锯锯片可插入薄、软材料制成的工件,无需事
先钻孔。仅可使用短锯片。角度仅可设定为0
o
。
请参见第3页图示。将调整杆(7)设为位置“0”(往
复运动关闭)。将曲线锯与底板前缘放置于工件
上。稳稳握住曲线锯,然后缓缓向下刺入。一旦锯
片刺穿工件后,即可启动锯片往复运动。
切割较厚的工件时,置入锯片前,请先钻孔。
IP3187_STEB 70 Quick and STE 90 7 7IP3187_STEB 70 Quick and STE 90 7 7 2013-5-27 下午 4:23:412013-5-27 下午 4:23:41

8
11 配件
只能使用麦太保原厂配件。
如果您需要任何配件,请与您的经销商协商。
为了购买正确的配件,请告知经销商您所拥有的电
动工具的准确型号。
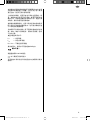
请参见第4页。
A 单把刀柄锯片。
使用的锯片应适合所锯材料。
B 防碎片底板嵌片(替换用)
C 装于曲线锯底板上的保护板。保护板可防止表
面易受伤害的工件被刮伤。
D 使用曲线锯和导轨时所需的导引固定装置
E 导轨(全长:1500 mm)
F 用于连接2组导轨的连接器6.31213
G 将导轨固定于工件或工作台的固定夹
H 带夹具的曲线锯台可固定于工作台
I Flexo 500通用桌便于固定式使用麦太保曲线锯
等装置。
J 延长桌
K 润滑棒用于切割金属时润滑锯片。
L 吸尘软管
M 圆切与平行导轨
如需了解全部配件,请登录www.metabo.com或参
见主目录。
11.1 安装圆切与平行导轨
用于切割圆形(直径100至360 mm)和边缘平行的切
割线(最大210 mm)。
安装固定夹组件(请参见第4页,图Ⅰ)
将固定夹组件(a)置于底板(5)上,开口朝前,螺丝
孔朝上。由下面旋入螺丝(b)。
使用完毕后,请取下固定夹组件,否则进行
斜锯时可能损坏固定夹具(10)。
斜锯角度45
o
时,将曲线锯向右倾斜会损坏
锯片固定夹具(10)。
安装圆切导轨(请参见第4页,图Ⅱ)
- 将圆切与平行导轨由侧面滑入固定夹组件(a) (中
心点(c)朝下)。
- 设定所需要半径(d)。
- 上紧螺丝(b)。
安装平行导轨(请参见第4页,图Ⅲ)
- 将圆切与平行导轨由侧面滑入固定夹组件(a) (中
心点(c)朝上)。
- 旋开中心点螺丝(c)。
- 设定尺寸(e)
- 上紧螺丝(b)。
12 修理
只能由合格的电工修理电动工具!
任何需要修理的麦太保电动工具,都可送到备用零
件清单上列的地址。
请随电动工具附上一份故障说明。
13 环境保护
所有麦太保的包装材料,皆可100%回收。
损坏的电动工具和配件含有大量有价值的材料和塑
胶,可回收再生。
本说明书使用无氯再生纸印刷。
14 技术规格
解释性说明信息在第2页上的规格中,保留因技术
发展而进行变更的权利。
M = 扭矩
T
1
= 最大木质材料厚度
T
2
= 最大有色金属材料厚度
T
3
= 最大钢板厚度
n
0
= 空转时的往复速度
P
1
= 额定输入功率
P
2
= 输出功率
m = 不含主电缆的重量
依照EN 60745规定的振动总值(三个方向上的矢量
和):
a
h,CM
= 振动排放值(锯切金属板)
a
h,CW
= 振动排放值(锯切木质材料)
K
h,…
= 不确定(振动)
IP3187_STEB 70 Quick and STE 90 8 8IP3187_STEB 70 Quick and STE 90 8 8 2013-5-27 下午 4:23:422013-5-27 下午 4:23:42

9
本信息单中所指的振动排放值已经根据 EN 60745 规
定的标准化测试进行了测量,且可以用于在工具间
进行比较。也可用于估计振动负载。
上述的振动等级,适用于电动工具的主要用途。但
是,如果将本工具用于其它用途,使用不同配件或
维护不当,则振动排放值可能有所不同。在整个操
作期间,振动负载可能大幅增加。
估算振动暴露等级时,应把工具关闭和在运转但实
际上没有工作的时间考虑在内。这可能大幅减少整
个工作时间的暴露等级。
应该采取可以保护操作人员不受振动影响的安全措
施,例如:维护工具和配件、保持双手温暖、组织
工作方式等。
典型A荷重声音水平:
L
pA
= 声压等级
L
WA
= 声压功率等级
K
pA
, K
WA
= 不确定(噪音等级)
操作过程中,噪音水平可能超过85 dB(A)。
戴护耳器!
测量值依照EN 60745确定。
本工具属于保护等级Ⅱ
引用的技术资料皆含有公差值在内(依照相关有效
标准)。
IP3187_STEB 70 Quick and STE 90 9 9IP3187_STEB 70 Quick and STE 90 9 9 2013-5-27 下午 4:23:422013-5-27 下午 4:23:42

10
內容
1 一致性聲明
2 指定用途
3 一般安全說明
4 特殊安全說明
5 概觀
6 產品特點
7 試運轉
8 使用
9 清潔、保養
10 技巧與訣竅
11 配件
12 維修
13 環保
14 技術規格
1 一致性聲明
作為唯一責任人,我們特此聲明,本產品符合第2
頁所列之標準與規範。
2 指定用途
本曲線鋸適用於切割非鐵金屬與鋼片、木質類材
料、塑膠類材料等,禁止其他用途。
使用者應自行承擔因使用不當所致之損害責任。
請瞭解並遵守一般事故防範條例,以及隨附的安全
資訊。
3 一般安全說明
警告–閱讀使用說明將能降低受傷的風
險。
警告–請閱讀所有安全警告和說明。如未
遵守所有安全警告與說明,可能導致觸
電、起火和/或嚴重受傷。
請妥善保存所有安全說明與資訊,以供將來參考。
使用電動工具之前,應先仔細閱讀並熟悉隨附的所
有安全資訊和使用說明。請妥善保存所有隨附的文
件以供將來參考;本文件必須連同電動工具一併轉
交。
4 特殊安全說明
為了您的安全與保護您的電動工具,請
特別注意有此警示標誌的地方!
如果工作時使用的切割配件有可能接觸隱藏電線或
工具本身的電線時,一定要握著絕緣手柄操作工
具。切割配件若接觸到「帶電」的電線時,可能導
致電動工具的金屬部位也「帶電」,造成操作者因
此觸電。
請先確認:施工的位置沒有埋設電線、瓦斯管線或
水管(可使用如金屬探測器的設備偵測)。
某些材料(如含鉛油漆、特定品種之木材、礦物、
金屬等)的粉塵,可能有害人體。接觸或吸入此類
粉塵,可能導致操作人員或旁觀者產生過敏反應,
及/或呼吸道疾病。
某些種類的粉塵屬於致癌物質,例如橡木及山毛櫸
粉塵,若混入處理木材的添加物(鉻酸鹽、木材防
腐劑),尤其危險。含有石綿的材料,應由專家負
責,嚴禁私自處理。
- 工作場所若能安裝吸塵裝置,請務必安裝。
- 為使粉塵排除更有效率,使用本工具期
間,可一併使用保護蓋(9)及合適的麥太保
(Metabo)吸塵器。
- 工作場所必須通風良好。
- 建議使用過濾等級P2的防塵口罩。
您所處理的材料,若有相關的國家規定,務必全程
遵守。
工作期間,務必將工具平放,並使用如夾具固定以
避免移動。
請勿嘗試鋸開極小的工作部件。
使用說明
親愛的客戶:
感謝您對本公司的信任,購買麥太保電動工具!麥太保所生產的每一台電動工具都經過麥太保品管部門的
嚴格品管測試。然而,電動工具的使用壽命和使用者息息相關。因此,請注意相關說明書與隨附文件所提
供的資訊。您操作愈小心,麥太保電動工具的使用壽命就愈長。
IP3187_STEB 70 Quick and STE 90 章节1:10 章节1:10IP3187_STEB 70 Quick and STE 90 章节1:10 章节1:10 2010-7-29 9:14:062010-7-29 9:14:06

11
操作曲線鋸的時候,底板必須與工作部件緊密接
觸。
不論原因為何,若有需要中斷切割,應釋放觸發開
關,並穩穩握住曲線鋸不動,直至鋸片完全停止。
切勿在鋸片動作期間,嘗試將曲線鋸從工作部件移
開,以免反衝傷人。
鋸片與工作部件仍有接觸時,禁止啟動曲線鋸。切
割前,應等待鋸片運動達到全速。
重新啟動位於工作部件內的鋸片時,應將鋸片對正
切口中心,並檢查鋸齒,確定未與材料接觸。鋸片
一旦卡住工作部件,若直接重新啟動,恐將反衝傷
人。
請保持您的雙手遠離切割區與鋸片,不要伸到工作
部件的底部。
除非曲線鋸已經靜止不動,否則不宜移除、清掃木
屑與類似廢棄物。
調整、轉換或維修機器前,必須先將插頭拔離插
座。
曲線鋸鋸片相當銳利,務必小心使用,避免受傷,
停止工作之後,鋸片的高溫會持續一段時間,請穿
戴防護手套。
5 概觀
詳見第3頁(請展開)。
1 鋸片固定夾桿
2 鋸片支撐輪
3 鋸片
4 底板調整螺絲
5 底板
6 木屑清除器開關按鈕
7 鋸片往復運動調整桿
8 防碎片底板嵌片
9 保護蓋
10 鋸片固定夾具
11 防止意外接觸鋸片之保護桿
12 速度調整設定輪
13 觸發開關
14 持續啟動鎖定鈕
15 六角螺絲扳手
16 吸塵器連接口
17 可顯示目前切割角度的曲面支撐板
6 產品特點
• 麥太保(Metabo)無栓式快拆鋸片
7 試運轉
在插上插頭之前,請先檢查產品評鑑標章上
的額定電壓及頻率,確認是否與您的電源供
應相符。
鋸片安裝之前,切勿使用曲線鋸。
7.1 安裝防碎片底板嵌片
曲線鋸鋸片相當銳利,請小心使用,避免受
傷,安裝防碎片底板嵌片(8)前,請先移除鋸
片。
將曲線鋸倒置,使底板朝上。自前方安裝防碎片底
板嵌片,同時確保:
• 嵌片的平滑面朝上。
• 嵌片的狹槽朝後(朝向主電纜)。
若想在工作期間裝上保護板(請參閱第11章「配
件」),請將防碎片底板嵌片插入保護板內。
7.2 裝入鋸片
曲線鋸鋸片相當銳利,請小心使用,避免受
傷,停止工作之後,鋸片的高溫會持續一段
時間,請穿戴防護手套。
鋸片應使用於適合的材料。
- 將鋸片固定夾桿(1)向前推到底後放開(鋸片固定
夾桿保持打開)。
- 置入鋸片(3)並推到底。請確認鋸齒朝前,鋸片
正確安裝在鋸片支撐輪(2)的溝槽上。
- 將鋸片固定夾桿(1)推回原位,此時鋸片即固定
於正確位置。
7.3 安裝/移除保護蓋
安裝:自前方按下保護蓋(9)直至接合。
移除: 握住保護蓋(9)兩側並稍微抬起,接著向前拉
出保護蓋。
IP3187_STEB 70 Quick and STE 90 章节1:11 章节1:11IP3187_STEB 70 Quick and STE 90 章节1:11 章节1:11 2010-7-29 9:14:072010-7-29 9:14:07

12
7.4 接上吸塵器
- 將適合的吸塵器接上吸塵器連接口(16),使用
接頭直徑30公釐的吸引軟管。
- 裝上保護蓋(9),除塵效果最佳。
- 關閉木屑清除器(請參閱8.1章)。
7.5 不使用吸塵器
- 工作期間,請將保護蓋(9)移除(請參閱7.3章
「移除」)。
7.6 斜鋸
請將保護蓋(9)、防碎片底板嵌片(8)、吸塵軟管移
除。斜鋸的時候,不可使用上述零件。
- 鬆開底板調整螺絲(4)。
- 將底板(5)略向前滑動並轉動。
- 接著再將底板(5)朝前或朝後滑動,與任一棘爪
接合(透過底板(5)後方的半圓型開口,就能看見
棘爪)。底板上的曲面支撐板(17),能顯示底板
的目前角度,請利用曲面支撐板上的角規,調
整所需角度。
- 重新上緊底板調整螺絲(4)。
7.7 於靠牆處使用曲線鋸
移除保護蓋(9)、防碎片底板嵌片(8)、圓切與平行
導規。若在靠牆處使用曲線鋸,則不得使用上述零
件。
- 鬆開底板調整螺絲(4),使底板(5)可略為抬起。
- 底板(5)略為抬起之後,使其向後滑到最末端。
- 重新上緊底板調整螺絲(4)。
8 使用
8.1 木屑清除器
可選用木屑清除器,以便清楚看見切割線。
啟動: 按下曲線鋸右側的開關按鈕(6) (請尋找
標記)。
關閉: 按下曲線鋸左側的開關按鈕(6) (請尋找
標記)。
8.2 調整鋸片往復運動
利用調整桿(7),設定往復運動的幅度。
位置「0」=關閉往復運動
位置「Ⅲ」=最大往復運動
建議設定值,請參閱第2頁。
透過實際試用,最能獲得理想的設定。
8.3 設定最大速度
以設定輪(12)設定曲線鋸最大速度。操作期間亦可
進行設定。
建議設定值,請參閱第2頁。
透過實際試用,最能獲得理想的設定。
8.4 開啟與關閉電源,調整速度,連續操作
啟動: 按下觸發開關(13)。繼續按壓觸發開關,以
增加速度(至預設最大速度,請參閱8.3章)。
關閉:放開觸發開關(13)。
連續操作: 欲連續操作時,可使用鎖定鈕(14)鎖住
已按下的觸發開關(13)。欲停止曲線鋸
時,再按下觸發開關(13)即可。
連續操作時,如果您的雙手未能掌握機器,
它將會繼續運轉。因此,您必須隨時使用雙
手握緊機器的手柄,站穩,並保持全神貫
注。
9 清潔、保養
定期清潔曲線鋸。同時包括用吸塵器清潔馬達上的
通風葉片。
如有必要,可清潔鋸片支撐輪(2)後方的空間。
可定期在鋸片支撐輪(2)滴上一滴潤滑油。
10 技巧與訣竅
切割不同材料
切鋸金屬,可使用麥太保(Metabo)潤滑棒潤滑鋸
片。如遇切割塑膠玻璃,先用水將切割線打濕。請
在木質底板上,切鋸厚度小於1公釐的金屬板。
曲線裁切
裁切曲線時,建議使用特別設計的窄鋸片。
IP3187_STEB 70 Quick and STE 90 章节1:12 章节1:12IP3187_STEB 70 Quick and STE 90 章节1:12 章节1:12 2010-7-29 9:14:072010-7-29 9:14:07

13
插入曲線鋸片
曲線鋸鋸片可插入薄、軟材料製成的工作部件,事
前無需鑽孔。僅可使用短鋸片。角度僅可設為0°。
請參見第3頁插圖。將調整桿(7)設為位置「0」(關
閉往復運動)。將曲線鋸與底板(5)前緣置於工作部
件上。緊握曲線鋸,並緩緩向下刺入。一旦鋸片刺
穿工作部件後,即可啟動往復運動。
切割較厚的工作部件時,請事先完成鑽孔,以便置
入鋸片。
11 配件
限使用麥太保原廠配件。
如果您需要任何配件,請洽詢您的經銷商。
為了協助經銷商挑選正確的配件,請告訴他們您的
電動工具的確實型號。
請參閱第4頁。
A 單把刀柄鋸片。鋸片應使用於適合的材料。
B 防碎片底板嵌片(替換用)
C 裝於曲線鋸底板的保護板。保護板可避免表面
易受傷害的工作部件遭刮傷。
D 使用曲線鋸及導軌時所需的導規固定器
E 導軌(全長:1500公釐)
F 便於接合2組導軌的連接器6.31213
G 將導軌固定於工作部件或工作臺的固定夾
H 附夾具曲線鋸台,可固定於工作臺
I Flexo 500萬用桌,便於固定式使用麥太保
(Metabo)曲線鋸等設備。
J 加長桌
K 潤滑棒,於鋸斷金屬時潤滑鋸片。
L 吸塵軟管
M 圓切與平行導規
如需查詢完整的配件系列,請登錄www.metabo.
com或參閱主目錄。
11.1 安裝圓切與平行導規
用於切鋸圓形(直徑100至360公釐)以及與邊緣平行
的切割線(最大210公釐)。
安裝固定夾組件(請參閱第4頁,圖Ⅰ)
將固定夾組件(a)置於底板(5)上,開口朝前,螺絲
孔朝上。由下方栓入螺絲(b)。
使用完畢後,應移除固定夾組件,否則一旦
進行斜鋸,將令鋸片固定夾具(10)損壞。
斜鋸角45°時,將曲線鋸向右傾斜,會損壞
鋸片固定夾具(10)。
安裝圓切導規(請參閱第4頁,圖Ⅱ)
- 將圓切與平行導規由側面滑入固定夾組件(a)
(中心點(c)朝下)。
- 設定所需半徑(d)。
- 上緊螺絲(b)。
安裝平行導規(請參閱第4頁,圖Ⅲ)
- 將圓切與平行導規由側面滑入固定夾組件(a)
(中心點(c)朝上)。
- 旋鬆中心點螺絲(c)。
- 設定尺寸(e)。
- 上緊螺絲(b)。
12 維修
電動工具的維修工作只能交由合格的電工處理!
任何需要維修的麥太保電動工具,都可送至備用零
件清單上載列的地址。
請提供一份電動工具的故障說明。
13 環保
所有麥太保的包材均可100%回收。
毀損的電動工具和配件含有大量的有價資源與塑
膠,皆可回收再生。
本說明書採用無氯再生紙印刷。
14 技術規格
相關規格註解,請見第2頁。本公司保留相關權利,
可依技術發展而變更相關內容。
M = 力矩
T
1
= 最大木質材料厚度
T
2
= 最大非鐵金屬材料厚度
T
3
= 最大鋼片材料厚度
n
0
= 怠速時之往復速度
P
1
= 額定輸入功率
P
2
= 輸出功率
m = 不含主電纜的重量
IP3187_STEB 70 Quick and STE 90 章节1:13 章节1:13IP3187_STEB 70 Quick and STE 90 章节1:13 章节1:13 2010-7-29 9:14:082010-7-29 9:14:08

14
整體振動總值(三個方向的向量總和)依據EN 60745
標準確認:
a
h,CM
= 震動散發值(切鋸金屬片)
a
h,CW
= 震動散發值(切鋸木質材料)
K
h,...
= 不確定(震動)
本資訊頁中所提供的震動散發等級,是依據EN
60745所提供的標準化測試進行測量,因此可以用
來比較不同工具之間的差異,亦可用來概估震動負
載。
上述的震動等級,係以電動工具的主要用途為主,
但是,若以本工具從事其他用途、使用不同的配
件,或維護不當,則震動散發等級可能不同。並在
整個施工期間,可大幅增加震動負載。
在關閉工具的電源,或工具雖然在運轉,但實際上
並未進行任何工作時的震動暴露等級估計值,也應
列入考慮。此等做法可能在整個工作期間,大幅降
低暴露等級。
足以保護操作人員不受震動影響的其他安全措施,
均應宣導、認識,例如:維護工具和配件、讓雙手
保持溫暖、組織工作型態等。
典型A有效察知聲音水平:
L
pA
= 聲壓水平
L
WA
= 聲音功率水平
K
pA
,K
WA
= 不確定(噪音等級)
操作時噪音水平可能超過85dB(A)。
請佩戴防護耳罩!
測量依據EN 60745標準確認。
保護等級Ⅱ機械
上述技術規格皆含有公差在內(符合相關的有效標
準)。
IP3187_STEB 70 Quick and STE 90 章节1:14 章节1:14IP3187_STEB 70 Quick and STE 90 章节1:14 章节1:14 2010-7-29 9:14:082010-7-29 9:14:08

15
1 Conformity Declaration
2 Specified Use
3 General Safety Instructions
4 Special Safety Instructions
5Overview
6 Special Product Features
7 Commissioning
8Use
9 Cleaning, Maintenance
10 Tips and Tricks
11 Accessories
12 Repairs
13 Environmental Protection
14 Technical Specifications
We, being solely responsible, hereby declare that
this product conforms to the standards and direc-
tives specified on page 2.
The machine is suitable for sawing non-ferrous
metals and sheet steel, wood and similar mate-
rials, plastics and similar materials. Any other use
is not permitted.
The user bears sole responsibility for damage
caused by improper use.
Generally accepted accident prevention regula-
tions and the enclosed safety information must be
observed.
WARNING
– Reading the operating
instructions will reduce the risk of injury.
WARNING Read all safety warnings and
instructions.
Failure to follow all safety warn-
ings and instructions may result in electric shock,
fire and/or serious injury.
Keep all safety instructions and information for
future reference.
Before using the power tool, carefully read through
and familiarise yourself with all the enclosed safety
information and the Operating Instructions. Keep
all enclosed documentation for future reference,
and pass on your power tool only together with this
documentation.
For your own protection and for the
protection of your power tool pay atten-
tion to all parts of the text that are
marked with this symbol!
Hold power tool by insulated gripping surfaces,
when performing an operation where the
cutting accessory may contact hidden wiring.
Cutting accessory contacting a "live" wire may
make exposed metal parts of the power tool "live"
and could give the operator an electric shock.
Ensure that the spot where you wish to work is free
of power cables, gas lines or water pipes (e.g.
using a metal detector).
Dust from material such as paint containing lead,
some wood species, minerals and metal may be
harmful. Contact with or inhalation of the dust may
cause allergic reactions and/or respiratory
diseases to the operator or bystanders.
Certain kinds of dust are classified as carcinogenic
such as oak and beech dust especially in conjunc-
tion with additives for wood conditioning (chro-
mate, wood preservative). Material containing
asbestos must only be treated by specialists.
- Where the use of a dust extraction device is
possible it shall be used.
- To extract dust more efficiently, use the protec-
tive cap (9) and a suitable Metabo vacuum
cleaner together with this tool.
- The work place must be well ventilated.
- The use of a dust mask of filter class P2 is
recommended.
Follow national requirements for the materials you
want to work with.
During work, the tool must lay flat and be secured
against moving, e.g. using clamps.
Do not try to saw extremely small workpieces.
Original instructions
Dear Customer,
Thank you for the trust you have placed in us by buying a Metabo power tool. Each Metabo power tool
is carefully tested and subject to strict quality controls by Metabo's quality assurance. Nevertheless, the
service life of a power tool depends to a great extent on you. Please observe the information contained
in these instructions and the enclosed documentation. The more carefully you treat your Metabo power
tool, the longer it will provide dependable service.
Contents
1 Conformity Declaration
2 Specified Use
3 General Safety Instructions
4 Special Safety Instructions
IP3187_STEB 70 Quick and STE 90 15 15IP3187_STEB 70 Quick and STE 90 15 15 2010-7-29 9:10:462010-7-29 9:10:46

16
When sawing, the footplate must make secure
contact with the workpiece.
When interrupting a cut for any reason, release
the trigger and hold the saw motionless in the
material until the saw blade comes to a complete
stop. Never attempt to remove the saw from the
workpiece while the saw blade is in motion or
kickback may occur.
Do not switch the machine on while the saw blade
is touching the workpiece. Let the saw blade reach
full speed before making a cut.
When restarting a saw in the workpiece, centre
the saw blade in the kerf and check that saw teeth
are not engaged into the material. If the saw blade
seizes, it may kickback from the workpiece when
the saw is restarted.
Keep hands well away from the sawing area
and the saw blade. Do not reach underneath the
workpiece.
Remove chips and similar material only with the
machine at standstill.
Pull the plug out of the plug socket before
any adjustments, conversions or servicing are
performed.
Danger of injury due to the sharp jigsaw blade.
After stopping work, the jigsaw blade may still be
hot. Wear protective gloves.
5 Overview
See page 3 (please unfold).
1 Clamping lever for securing the saw blade
2 Saw blade support roller
3 Saw blade
4 Screw for adjusting the footplate
5 Footplate
6 Switch button on the chip blower
7 Adjustment lever for pendulum motion
8 Anti-splintering footplate insert
9 Protective cap
10 Saw blade clamping fi xture
11 Protective rod for preventing unintentional
contact with the saw blade
12 Setting wheel for speed adjustment
13 Trigger
14 Lock button for continuous activation
15 Hexagon spanner
16 Extractor connection piece
17 Curved support plate indicating preset cutting
angle
6 Special Product Features
•
Metabo quick-release saw blade without key
7 Commissioning
Before plugging in, check to see that the
rated mains voltage and mains frequency,
as stated on the rating label, match your power
supply.
Never operate the machine without a saw
blade.
7.1 Fitting the anti-splintering footplate
insert
Danger of injury due to the sharp jigsaw
blade. Remove the saw blade before fi tting
(8) the anti-splintering footplate insert.
Turn the machine over so that the footplate faces
upwards. Insert the anti-splintering footplate from
the front, ensuring the following:
• The smooth side of the footplate faces upwards.
• The slot is facing to the rear (towards the mains
cable).
If you wish to work with the protective plate
attached (see chapter Accessories 11), fi t the anti-
splintering footplate insert in the protective plate.
7.2 Inserting the saw blade
Danger of injury due to the sharp jigsaw
blade. After stopping work, the jigsaw blade
may still be hot. Wear protective gloves.
Use a saw blade that is suitable for the material
being sawn.
IP3187_STEB 70 Quick and STE 90 16 16IP3187_STEB 70 Quick and STE 90 16 16 2010-7-29 9:10:472010-7-29 9:10:47

17
- Push the clamping lever (1) forwards up to the
stop and release (the clamping lever remains
open).
- Insert the saw blade (3) up to the stop. Ensure
that the saw teeth are facing forwards and the
blade is seated correctly in the groove on the
saw blade support roller (2).
- Push back the clamping lever (1) to its original
position (the saw blade is now clamped securely
in position).
7.3 Attaching / Removing the protective
cap
Attachment:
Push on the protective cap (9) from
the front until it engages
Removal:
Grip both sides of the protective cap (9),
lift slightly, then pull forwards and remove.
7.4 Sawing with dust extraction
- Connect a suitable extraction device to the
extractor connection piece (16). Use a suction
hose with a 30 mm connector diameter.
- Attach the protective cap (9) for maximum
extraction efficiency.
- Switch off the chip blower (see chapter 8.1).
7.5 Sawing without dust extraction
- Work with the protective cap (9) removed (see
Removal chapter 7.3).
7.6 Diagonal cuts
Remove the protective cap (9), anti-splintering
footplate insert (8) and extraction hose. These
parts cannot be used for diagonal cuts.
- Slacken the screw (4).
- Slid the footplate (5) forwards slightly and turn.
- Then slide the footplate (5) forwards or back-
wards and engage in one of the detents (the
detents can be viewed through the semicircular
opening at the rear of the footplate (5).) The
preset angle is indicated on the curved support
plate (17) on the footplate. Adjust to different
angles using an angle gage.
- Tighten the screw (4) again.
7.7 Sawing close to the wall
Remove the protective cap (9), anti-splintering
footplate insert (8), circular-cutting and parallel
guide. These parts cannot be used when sawing
close to the wall.
- Slacken the screw (4) until the footplate (5) can
be raised slightly.
- Raise the footplate (5) slightly and slide back-
wards up to the stop.
- Tighten the screw (4) again.
8.1 Chip blower
Optional blower for a clear view of the cutting line.
On
: press in the switch button (6) on the right side
of the machine. (look for the symbol).
Off:
press in the switch button (6) on the left side
of the machine. (look for the symbol).
8.2 Adjusting the pendulum motion
Set the required pendulum motion using the
adjustment lever (7).
Position "0"
= pendulum motion is switched off
. . .
Position "III"
= maximum pendulum motion
See page 2 for recommend setting values.
The best way to determine the ideal setting is
through a practical trial.
8.3 Setting maximum speed
Set the machine to maximum speed using the
setting wheel (12). This is also possible during
operation.
See page 2 for recommend setting values.
The best way to determine the ideal setting is
through a practical trial.
8.4 Switching on and off, adjusting the
speed, continuous operation
On:
press the trigger (13). Press the trigger more
to increase the speed (up to preset maximum
speed, see chapter 8.3).
Off:
release the trigger (13).
Continuous operation:
For continuous operation,
the pressed trigger (13) can be locked using
the lock button (14). To stop the machine,
press the trigger (13) again.
In continuous operation, the machine
continues running if it is forced out of your
hands. Therefore always hold the machine with
both hands using the handle provided, stand
securely and concentrate.
8Use
IP3187_STEB 70 Quick and STE 90 17 17IP3187_STEB 70 Quick and STE 90 17 17 2010-7-29 9:10:472010-7-29 9:10:47

18
Clean the machine regularly.
This includes
vacuum cleaning the ventilation louvres on the
motor.
If necessary, clean the openings behind the saw
blade support roller (2).
Apply a drop of oil to the saw blade support roller
(2) from time to time.
Sawing different materials
When sawing metal, lubricate the saw blade with a
Metabo lubricating stick. Wet the cutting line with
water when sawing plexiglas. Saw metal sheets
less than 1 mm thick on a wooden base.
Curved cuts
When making curved cuts, we recommend using
narrow, specially designed saw blades.
Plunging
The jigsaw blade can plunge into workpieces
made from thin, soft materials without the neces-
sity of drilling a hole beforehand. Only use short
saw blades. Only at 0° angle setting.
See illustration on page 3. Set the adjustment lever
(7) to position "0" (pendulum motion is switched
off). Position the jigsaw with the front edge of the
footplate (5) on the workpiece. Hold the operating
jigsaw firmly and guide slowly downwards. Once
the saw blade has penetrated the workpiece, the
pendulum motion can be activated.
In thicker workpieces, a hole for inserting the saw
blade must be drilled first.
Use only genuine Metabo accessories.
If you need any accessories, check with your
dealer.
For dealers to select the correct accessory, they
need to know the exact model designation of your
power tool.
See page 4.
A Saw blades with single lug bayonet shank.
Use a saw blade that is suitable for the mate-
rial being sawn.
B Anti-splintering footplate insert (replacement)
C Protective plate for attaching to the jigsaw
footplate. The protective plate prevents work-
pieces with sensitive surfaces from becoming
scratched.
D Guide fixture for using the jigsaw with the
guide rail
E Guide rail (overall length: 1500 mm)
F Connector for easy joining of 2 guide rails
6.31213
G Clamps for securing the guide rail to the work-
piece or work bench
H Jigsaw bench with clamp for securing to the
work bench
I Flexo 500 universal table for stationary use of
Metabo jigsaws, etc.
J Table extension
K Lubricating stick for lubricating the saw blades
when sawing metal.
L Extraction hose
M Circular-cutting and parallel guide
For complete range of accessories, visit
www.metabo.com or refer to the main catalogue.
11.1 Attaching the circular-cutting and par-
allel guide
For sawing circles (dia. 100 - 360 mm) and making
cuts parallel with edges (max. 210 mm).
Attaching clamping elements (page 4, Fig. I)
Place the clamping elements (a) on the footplate
(5) with the opening facing forwards and the
threaded hole facing up. Insert the screws (b) from
underneath.
Remove the clamping elements after use
otherwise the saw blade clamping fixture
(10) may be damaged when diagonal cuts are
made.
At a 45° diagonal cut angle, tilting the jigsaw
to the right will damage the saw blade
clamping fixture (10).
Attaching the circular-cutting guide (page 4,
Fig. II)
- Slide the rod on the circular-cutting and parallel
guide sideways into the clamping elements (a)
(centre point (c) faces downwards).
- Set the desired radius (d).
- Tighten the screws (b).
Attaching the parallel guide (page 4, Fig. III)
- Slide the rod on the circular-cutting and parallel
guide sideways into the clamping elements (a)
(centre point (c) faces upwards).
- Unscrew the centre point (c).
- Set the dimension (e)
- Tighten the screws (b).
Repairs to electrical tools must be carried out by
qualified electricians ONLY!
9 Cleaning, Maintenance
10 Tips and Tricks
11 Accessories
12 Repairs
IP3187_STEB 70 Quick and STE 90 18 18IP3187_STEB 70 Quick and STE 90 18 18 2010-7-29 9:10:472010-7-29 9:10:47

19
Any Metabo power tool in need of repair can be
sent to one of the addresses listed in the spare
parts list.
Please enclose a description of the fault with the
power tool.
Metabo's packaging can be 100% recycled.
Scrap power tools and accessories contain large
amounts of valuable resources and plastics that
can be recycled.
These instructions are printed on chlorine-free
bleached paper.
Only for EU countries: Never dispose of
power tools in your household waste! In
accordance with European Guideline 2002/
96/EC on used electronic and electric equipment
and its implementation in national legal systems,
used power tools must be collected separately
and handed in for environmentally compatible
recycling.
Explanatory notes on the specifications on page 2.
Changes due to technological progress reserved.
M = Torque
T
1
= Maximum material thickness in wood
T
2
= Maximum material thickness in non-
ferrous metals
T
3
= Maximum material thickness in sheet
steel
n
0
= Stroke rate at idle speed
P
1
= Nominal power input
P
2
= Power output
m = Weight without mains cable
Vibration total value (vector sum of three direc-
tions) determined in accordance with EN 60745:
a
h,CM
= Vibration emission value (sawing sheet
metal)
a
h,CW
= Vibration emission value (sawing wood)
K
h,...
= Uncertainty (vibration)
The vibration emission level given in this informa-
tion sheet has been measured in accordance with
a standardised test given in EN 60745 and may be
used to compare one tool with another. It is also
suitable for a provisional estimate of the vibratory
load.
The specified vibration level applies to the main
applications of the power tool. However if the tool
is used for different applications, with different
accessories or poorly maintained, the vibration
emission may differ. This can considerably
increase the vibratory load over the entire working
period.
An estimation of the level of exposure to vibration
should also take into account the times when the
tool is switched off or when it is running but not
actually doing the job. This may significantly
reduce the exposure level over the total working
period.
Identify additional safety measures to protect the
operator from the effects of vibration such as:
maintain the tool and the accessories, keep the
hands warm, organisation of work patterns.
Typical Aeffective perceived sound levels:
L
pA
= Sound pressure level
L
WA
= Acoustic power level
K
pA
, K
WA
= Uncertainty (noise level)
During operation the noise level can exceed 85
dB(A).
Wear ear protectors!
Measured values determined in conformity with
EN 60745.
Machine in protection class II
The technical specifications quoted are subject to
tolerances (in compliance with the relevant valid
standards).
13 Environmental Protection
14 Technical Specifications
IP3187_STEB 70 Quick and STE 90 19 19IP3187_STEB 70 Quick and STE 90 19 19 2010-7-29 9:10:482010-7-29 9:10:48

麦太保电动工具(中国)有限公司
上海市闵行区浦江工业园区三鲁路3585号7幢
www.metabo.com
IP3187_STEB 70 Quick and STE 90 5 5IP3187_STEB 70 Quick and STE 90 5 5 2013-5-27 10:10:202013-5-27 10:10:20
-
 1
1
-
 2
2
-
 3
3
-
 4
4
-
 5
5
-
 6
6
-
 7
7
-
 8
8
-
 9
9
-
 10
10
-
 11
11
-
 12
12
-
 13
13
-
 14
14
-
 15
15
-
 16
16
-
 17
17
-
 18
18
-
 19
19
-
 20
20


Metabo STEB 70 Quick Operating instructions
- Category
- Power tools
- Type
- Operating instructions
- This manual is also suitable for
Ask a question and I''ll find the answer in the document
Finding information in a document is now easier with AI
Related papers
-
Metabo STE 100 User manual
-
Metabo STEB 140 Operating instructions
-
-
-
Metabo STE 140 User manual
-
-
Metabo STEB 140 Owner's manual
-
Metabo STEB 140 IK Operating instructions
-
Metabo STE 100 SCS Operating instructions
-
Other documents
-
Bosch GSA18V-125K14 User manual
-
Bosch Power Tools 1591EVS User manual
-
-
Black & Decker JS10-RU User manual
-
Ferm CSM1035 User manual
-
-
-
Ferm jsv 650 p Owner's manual
-
-