Page is loading ...

120/220/240 VOLTS AC and 12/24 VOLTS
DC DUAL VOLTAGE REFRIGERATORS
INSTALLATION AND OWNER’S
MANUAL
12/24 VDC only 120 VAC and 220/240 VAC and
12/24 VDC 12/24 VDC
DC0788B DE0788B EV0788B
DC0788S DE0788S EV0788S
DCF788B DEF788B EVF788B
DCF788S DEF788S EVF788S
DCR788B DER788B EVR788B
DCR788S DER788S EVR788S
Service Information
If service or parts are required, contact the nearest Norcold Service Center. To
nd an authorized Norcold Service Center near you, please telephone the Norcold
Customer Support Dept. at 800-543-1219 (option-1) or visit our web site at www.
norcold.com.
Norcold Customer Support Dept.
Telephone : 800-543-1219
Fax : 937-497-3183
Web Site: www.norcold.com
Serial No.
03/01/2013
Part No. 632329C
#5490 176 5010

2
NORCOLD AC/DC Models - Two Year Limited Warranty
Norcold, Inc. warrants for a period of two (2) years from the date of purchase that
Norcold, Inc. will repair or replace its AC/DC refrigerators.
Limitations of Warranty
1. This warranty is the only warranty for Norcold AC/DC refrigerators. This warranty
does not cover glassware, electric light bulbs or replaceable fuses.
2. This warranty does not apply to refrigerators or component parts that have been
subjected to misuse, improper installation, abnormal service, transit damage,
recharging of cooling unit system, accident, re, improper repair, tampering or
abuse.
3. The duration of any implied warranty is limited to two (2) years.
4. Some states do not allow limitations on how long an implied warranty lasts, so the
above limitation may not apply to you.
Limitations of Remedy
1. The responsibility of Norcold under this or any warranty is limited to the repair or
replacement (at Norcold’s option) of any defective refrigerator or component part.
2. In no event and under no circumstances shall Norcold be responsible for
any other charge whatsoever, including but not limited to charges or claims
for labor, lost business, lost time, lost prots, loss of use, or any kind of
incidental or consequential damages, however denominated or described.
3. Some states do not allow for the exclusion or limitation of incidental or
consequential damages, so the above exclusion may not apply to you.
To obtain warranty service, contact Norcold Customer Service at (800) 543-1219 or
visit our website at www.norcold.com.
Legal Rights
This warranty gives you specic legal rights, and you may have other legal rights which
vary from state to state.

3
Safety Awareness
Read this manual carefully and understand the contents before you install the
refrigerator.
Be aware of possible safety hazards when you see the safety alert symbol on the
refrigerator and in this manual. A signal word follows the safety alert symbol and
identies the danger of the hazard. Carefully read the descriptions of these signal
words to fully know their meanings. They are for your safety.
This signal word means a hazard, which if ignored, can cause
dangerous personal injury, death, or much property damage.
This signal word means a hazard, which if ignored, can cause
small personal injury or much property damage.
Model No. and Serial No.
The model and serial number are on a label which is inside the refrigerator on the
left side and on the cover of this manual.
Operation
This refrigerator is made for refrigerating purposes and operates on 120/220/240
VAC or 12/24 VDC power when installed as written in this manual. The correct
supply voltage(s) is located on the serial plate.
AC is the primary power source. When an AC source is not available, a built-in relay
automatically switches the refrigerator operation to the DC power source. If the
refrigerator is operating on the DC power source and AC power becomes available,
the relay switches the refrigerator operation to the AC power source.
Never store combustible materials near the refrigerator.
Storing combustible materials near the refrigerator creates a
safety hazard and also decreases the ventilation of the cooling
system which decreases the refrigerator performance.
Do not touch the evaporator or other metal parts inside the
refrigerator cabinet with wet hands because they can freeze to
the refrigerator.
Always disconnect all power sources from the refrigerator
when doing routine maintenance. Have service work done only
by a qualied service technician.
WARNING
!
CAUTION
!
CAUTION
!

4
The refrigerator temperature is controlled by a thermostat, located in the
refrigerator. A light, located on the panel comes on when the refrigerator is “ON”.
Number “1” is the warmest and number “5” is the coldest thermostat position. For
efcient operation, change the thermostat according to the types of food stored and
the ambient temperature.
If you are not going to use the refrigerator for an extended period of time, put the thermostat
to the “OFF” position (full counterclockwise position).
Protection System
Your refrigerator has an over current protection system in the electronic circuit to
prevent damage to the inverter which may occur due to a reverse polarity connection.
If the refrigerator does not operate and the interior light does not come on, check
the fuse, which is located on the side of the inverter case, and the polarity of the DC
power supply. If the refrigerator still does not operate, another problem can exist in the
inverter. Have an authorized Norcold Service Center check the refrigerator.
Cleaning and Defrosting
Defrosting
It is normal for frost to collect on the freezer plate inside the refrigerator. Excess frost
decreases the cooling performance of the refrigerator. Defrost the refrigerator as
necessary.
Do not use sharp objects, a hair dryer, a heat gun, etc.
to defrost the refrigerator. Damage to the interior of the
refrigerator can occur.
- Turn the thermostat to “OFF”.
- Remove all food from the refrigerator.
Defrosting the refrigerator makes excess water inside the refrigerator.
- Put dry towels (etc.) inside the refrigerator to absorb the excess water.
- Put trays of hot water in the freezer until the frost is melted.
- Empty the drip tray.
- Remove the wet towels (etc.) and dry the inside of the refrigerator
CAUTION
!
NOTICE

5
Cleaning
- Turn the thermostat to the desired setting.
- Put the drip tray and all food in the refrigerator.
A good time to clean the refrigerator is just after you defrost it.
Clean the inside of the refrigerator as often as necessary to avoid food odors:
- Remove all food from the refrigerator.
Do not use abrasive cleaners, chemicals, or scouring pads because
they can damage the inside of the refrigerator.
- Wash the inside of the refrigerator and the door gasket with a solution of liquid dish
detergent and warm water.
- Rinse with clean water and dry.
- After cleaning, put a thin coating of petroleum jelly on the hinge side of the gasket to
keep it soft and to prevent it from rolling.
Battery Maintenance
Over cooling drains your battery
When the ambient temperature is between 70° and 90° F, keep the thermostat at the “3“
position to avoid an excessive drain of the battery. When making ice, or storing frozen
foods, turn the thermostat to the coldest setting “5“.
Maintain the battery
If the charge of your battery is not sufcient, the cooling performance of your refrigerator
decreases.
Only use a “quick charger” on the battery if the thermostat is
turned to “OFF”.
CAUTION
!
NOTICE

6
Check the Battery charge Level
A fully charged battery will have a specic gravity reading of between 1.260 and 1.280.
The battery voltage is best indicated when the refrigerator is “ON” and the battery
charging system is “OFF”. Charge the battery when the specic gravity reading is less
than 1.200.
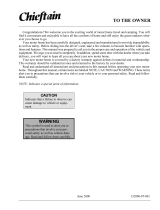
For your reference
The wiring diagram shown below is recommended for dual battery hookup (See
Art01516)
.
*Recommended source:
Sure Power Industries, Inc.
1-800-845-6269
www.Surepower.com
Disposal
To prevent the risk of child entrapment, before you discard
your old refrigerator:
- Remove the doors from the refrigerator.
- Let the shelves stay in position so that a child may not easily climb inside the
refrigerator.
WARNING
!

7
Installation
The refrigerator must be located and secured on a solid surface in the vehicle or
watercraft.
Before installing the refrigerator into the opening, make sure the DC supply is
properly connected.
Measure the opening to determine if you have proper clearance for installation.
Additional insulation space around the refrigerator is not necessary.
Be sure the refrigerator is not in direct sunlight or near a gas stove, a heater, or other
heat-generating appliances. Avoid installing your refrigerator close to warm water lines
or warm air ducts.
Your refrigerator was thoroughly cleaned before shipment from the factory. It is
advisable, however, to clean the interior once more before using. Wipe the interior with
a cloth and warm water. Then wipe with a dry cloth.
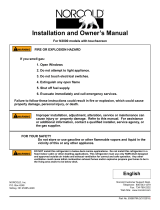
Ventilation
Sufcient ventilation (airow)
over the rear mounted
condenser of the refrigerator is
necessary for the refrigerator
to operate correctly. Use any
of the following combinations
of vent openings: A-D, A-I, A-J,
B-C, B-F, B-H, C-D, C-I, C-J,
D-F, D-H, F-I, F-J, G-I, G-J, H-I,
H-J (See Art01129 - for 0788
models only).
For the minimum required
ventilation, each individual vent
opening should be no less than
50 square inches. However,
the vent openings should
be larger, to allow as much
ventilation as possible. The
more air that circulates over
the refrigerator condenser, the
more efciently the refrigerator
will operate.
A
B
C
D
E
F
G
H
I
J
Art01129

8
Do not remove the bottom
rails from the refrigerator
cabinet. The rails supply
space under the refrigerator
that is necessary for correct
ventilation.
If you do not make sure that
the ventilation is correct, a
shortened refrigerator life
expectancy, poor refrigeration,
continuous operation,
accelerated battery discharge
and a void warranty will result.
If the refrigerator is installed in an unvented enclosure,
separate the intake air and the exhaust air by a bafe.
You may construct a foam bafe from 0.5 inch foam
(See Art01982 - for R788 and F788 models only).
Installation Options
Install a decorative door panel
The decorative door panel must be 4
mm or less in thickness.
1. Remove the door from the refrigerator by removing the two (2) bolts that attach the
door hinge to the top of the refrigerator (See Art01983).
Door hinge
Bolts
Art01983
Art01982
foam baffle
0.5 inch max.
0.5 inch min.
Panel retainer
Art01985
Door panel
CAUTION
!
NOTICE

9
2. Lift the door off the bottom hinge.
3. Remove the panel retainer by prying the retainer
out of the slot (See Art01985).
4. Gently pull the door panel out of the door.
5. Push a new door panel into the door slot.
6. Put the panel retainer in the original location and
press the retainer back into the slot.
7. Put the door in the original location and tighten
the two (2) bolts.
Reverse the door swing:
1. Remove the door from the refrigerator by
removing the two (2) bolts that attach the door
hinge to the bottom of the refrigerator (See
Art01986).
2. Remove the two (2) bolts that attach the upper
hinge.
3. Remove the bolt that attaches the door latch plate to
the top of the refrigerator (See Art01987).
4. Remove the upper hinge and the door latch plate
from the refrigerator.
5. Attach the upper hinge and the door latch plate to the
opposite sides of the refrigerator.
6. Move the latch to the opposite side of the door (See
Art01988):
- Remove the screw that attaches the latch handle
and the latch pin.
- Remove the latch handle pin and the coil spring
from the door.
- Move the set screw to opposite side of the latch
pin.
- Assemble the coil spring and the latch pin into the
opposite side of the door.
Art01986
Bolts
Bolts
Door hinge
Door hinge
Door latch plate
Bolts
Art01987
Art01988
Screw
Latch handle
Latch pin
Coil spring
Set screw
Door

10
- Attach the handle to the latch pin.
- Make sure that the angled end of the latch pin is up.
7. Put the door onto the refrigerator and make sure that the gasket seals correctly.
8. Install and tighten the two (2) screws that attach the door hinge to the bottom of the
refrigerator.
Connect the 120/220/240 volts AC supply
Connect the AC power cord(s) only to a grounded three-prong
receptacle. Do not remove the round ground prong from any
of the AC power cords. Do not use a two prong adapter or an
extension cord with any of the AC power cords. Operation of
the refrigerator without correct ground can cause dangerous
electrical shock or death if you are touching the metal parts of
the refrigerator.
Put the AC power cord into a grounded three-prong receptacle.
Connect the 12/24 volts DC supply
Only connect the refrigerator directly to the battery. Because
they often generate high voltage pulses and cause transistor
defects in the inverter, no other switches, lead wires, or
electrical equipment should share the wiring between the
refrigerator and battery.
Art01521
Refrigerator Refrigerator
Refrigerator
Refrigerator
INCORRECT
INCORRECT
CORRECT CORRECT
Battery charger or
AC/DC converter etc.
Battery charger or
AC/DC converter etc.
Transistorized
DC power supply
Transistorized
DC power supply
WARNING
!
CAUTION
!

11
When using either a converter or a battery charger, make sure that they are connected
in parallel between the battery and the refrigerator. Do not use a converter or battery
charger to supply the DC power directly to the refrigerator because these two devices
do not supply ltered DC power (See Art01521).
As the distance from the vehicle battery to the refrigerator increases, the correct AWG
wire size also increases. If he wire size is too small for the distance, a voltage drop
occurs. The voltage drop decreases the cooling performance of the refrigerator.
1. Norcold recommends that you use the following wire and fuse sizes:
- Measure the distance from the vehicle battery to the refrigerator:
- If the distance is less than 12 feet, use 16 AWG wire and a 10 Amp fuse.
- If the distance is between 12 and 20 feet, use 14 AWG wire and a 10 Amp fuse.
- If the distance is more than 20 feet, use 12 AWG wire and a 10 Amp fuse.
- Twist the lead wires to reduce the radio interference and induction of a high voltage
surge from the outside (See Art01518A).
Art01518A
Electrical equipment
INCORRECT CORRECT
Battery
Battery
Refrigerator Refrigerator
Twist lead wires

12
2. Connect the DC power supply wires:
If the DC power supply leads are attached incorrectly, damage
to the refrigerator power supply will occur.
- Connect the positive (+) DC power supply lead to the red wire of the refrigerator.
- Connect the negative (-) DC power supply lead to the black wire of the refrigerator.
- Make sure that:
- Each DC power supply lead is attached to the correct polarity wire of the refrig-
erator power supply.
- The chassis or the vehicle frame is not used as one of the conductors.
- The DC power supply wires including the fuses are routed directly from the bat-
tery to the refrigerator.
- The wire connections must be clean, tight and free of corrosion. If any of these
items are not correct:
- A voltage drop to the refrigerator will occur.
- The voltage drop will decrease the cooling performance of the refrigerator.
Disconnect the positive (+) DC power supply wire from the
battery before you do a “fast charge” of the battery. Failure to
disconnect the positive (+) power supply wire from the battery
during a “fast charge” can cause damage to the refrigerator or
other DC appliances.
CAUTION
!
CAUTION
!

RÉFRIGÉRATEURS BITENSION
120/220/240 VOLTS C.A. et 12/24 VOLTS
C.C.
MANUEL D’INSTALLATION ET
GUIDE DU PROPRIÉTAIRE
12/24 VCC 120 VCA et 220/240 VCA et
seulement 12/24 VCC 12/24 VCC
DC0788B DE0788B EV0788B
DC0788S DE0788S EV0788S
DCF788B DEF788B EVF788B
DCF788S DEF788S EVF788S
DCR788B DER788B EVR788B
DCR788S DER788S EVR788S
Au sujet du service
En cas de besoin d’entretien ou de pièces de rechange, entrer en contact avec le
Centre d’entretien Norcold le plus près. Pour trouver un Centre d’entretien agréé
près de chez vous, téléphonez au Service après-vente de Norcold au 800-543-
1219 ou visitez le site Internet à www.norcold.com
Service après-vente Norcold
Téléphone : 800-543-1219
Télécopieur : 937-497-3183
Site web : www.norcold.com
03/01/2013
No de pièce 632329C
#5490 176 5010

2
Modèles C.A./C.C. NORCOLD - Garantie limitée de deux ans
Norcold, Inc. offre une garantie de réparation ou de remplacement sur ses réfrigérateurs
c.a/c.c. pendant une période de deux (2) ans à compter de la date d’achat.
Restrictions de la garantie
1. La présente garantie est la seule applicable aux réfrigérateurs c.a./c.c. Norcold. Elle
ne couvre pas la verrerie, les ampoules électriques et les fusibles remplaçables.
2. La présente garantie ne s’applique pas aux réfrigérateurs ou composants qui ont fait
l’objet d’une mauvaise utilisation, d’une installation incorrecte, d’un entretien décient,
de dommages de transport, de recharge de l’unité frigorique, d’un accident, d’un
incendie, d’une réparation inappropriée, d’une intervention intempestive ou d’un
usage abusif.
3. Aucune garantie tacite ne peut s’étendre au-delà de deux (2) ans.
4. La restriction de la durée d’une garantie tacite n’étant pas autorisée dans toutes
les circonscriptions, la clause restrictive ci-dessus ne s’applique pas à tous les
utilisateurs.
Restrictions sur le recours
1. La responsabilité de Norcold en vertu de la présente garantie ou de toute autre
garantie se limite à la réparation ou au remplacement (au gré de Norcold) du
réfrigérateur ou du composant présentant le défaut.
2. Norcold décline toute responsabilité aucune pour ce qui est des autres frais y
compris, mais sans s’y limiter, frais ou demandes d’indemnité au titre de main-
d’oeuvre, perte d’exploitation, temps mort, manque à gagner, perte d’emploi ou
tous dommages accessoires ou indirects, quelle qu’en soit l’appellation ou la
description.
3. L’exclusion ou la restriction des dommages accessoires ou indirects n’étant pas
autorisée dans toutes les circonscriptions, les clauses restrictives ci-dessus ne
s’appliquent pas à tous les utilisateurs.
Pour obtenir des prestations de garantie, appeler le Service à la clientèle de Norcold
au (800) 543-1219, ou rendre visite à notre site Web www.norcold.com.
Droits juridiques
La présente garantie confère des droits juridiques particuliers auxquels peuvent
s’ajouter d’autres droits variant selon les circonscriptions.

3
Sens de la prudence
Lire ce manuel dans le détail et bien comprendre les instructions avant d’installer le
réfrigérateur.
Être à l’affût de toute situation potentiellement dangereuse lorsque vous apercevez les
symboles d’alerte à la sécurité sur le réfrigérateur et dans le manuel. Un mot suit le
symbole et indique le niveau d’alerte. Lire attentivement la dénition de ces symboles
pour bien comprendre leur signication. Ils sont là pour votre sécurité.
Ce symbole indique un risque, qui, si ignoré, peut
entraîner des blessures sérieuses, voire la mort ou
des dégâts matériels importants.
Ce symbole indique un risque, qui, si ignoré, peut entraîner
des blessures ou des dégâts matériels.
No de modèle et no de série
Les numéros de modèle et de série sont indiqués sur une étiquette située à l’intérieur
du réfrigérateur du côté gauche et sur la couverture de ce manuel.
Utilisation
Ce réfrigérateur est conçu à des ns de réfrigération et fonctionne sur source
d’alimentation c.a. 120/220/240 V ou c.c.12/24 V à condition d’être installé
conformément aux consignes de ce manuel. La tension d’alimentation correcte est
située sur le plat périodique.
Le c.a. est la source d’alimentation principale. Si une source de c.a. n’est pas
disponible, un relais intégré fait automatiquement passer le réfrigérateur à une
source d’alimentation en c.c. Si le réfrigérateur fonctionne avec une source
d’alimentation en c.c. u et qu’une alimentation en c.a.devient disponible, le relais fait
passer le réfrigérateur à la source de c.a.
Ne jamais entreposer de matière combustible près du
réfrigérateur. Le non respect de cette mise en garde crée
un risque et de plus diminue la circulation d’air autour du
système de refroidissement, ce qui diminue la performance
de l’appareil.
Ne pas toucher à l’évaporateur ni à d’autres parties
métalliques à l’intérieur de l’armoire du réfrigérateur avec
des mains humides car elles peuvent coller aux pièces.
Toujours couper l’alimentation électrique avant d’effectuer
toute opération d’entretien courant sur l’appareil. Toujours
utiliser les services d’un technicien qualié.
La température du réfrigérateur est contrôlée par un thermostat, qui se trouve à
l’intérieur. Un voyant s’allume sur le panneau lorsque le réfrigérateur est allumé.
La position «1» correspond à la température la moins froide et la position «5» à
la température la plus froide. Pour une meilleure efcacité, changer la position du
thermostat suivant le type de nourriture dans l’appareil et la température ambiante.
Si le réfrigérateur n’est pas utilisé pendant une longue période, placer le thermostat à la
position «OFF» (position à fond vers la gauche).
AVERTISSEMENT
!
ATTENTION
!
ATTENTION
!

4
Dispositif de protection
Le réfrigérateur est muni d’un dispositif de protection de surintensité pour éviter
l’endommagement du convertisseur en cas d’inversion de polarité.
Si le réfrigérateur ne fonctionne pas et que le voyant intérieur ne s’allume pas, vérier
le fusible situé sur le côté du boîtier de l’onduleur ainsi que la polarité de l’alimentation
en c.c. Si le problème persiste, il provient peut-être de l’onduleur. Faire réviser le
réfrigérateur par un centre de service après-vente agréé Norcold.
Nettoyage et dégivrage
Dégivrage
Il est tout à fait normal que du givre se forme à la surface de la plaque de réfrigération à
l’intérieur du réfrigérateur. L’accumulation du givre diminu la capacité de refroidissement
du réfrigérateur. Dégivrer le réfrigérateur suivant besoin.
Ne vous servez pas les objets pointus, d’un séchoir à
cheveux, d’un pistolet à air chaud, etc. pour dégivrer le
réfrigérateur. Vous risquez d’endommager l’intérieur de
l’appareil.
- Placer le thermostat sur «OFF».
- Sortir toutes les denrées alimentaires du réfrigérateur.
Le dégivrage du réfrigérateur augmente la quantité d’eau à l’intérieur de
l’appareil.
- Placer des chiffons secs à l’intérieur pour absorber l’eau en excès.
- Placer des bacs d’eau chaude à l’intérieur du compartiment de congélation jusqu’à
ce que le givre disparaisse.
- Vider l’égouttoir.
- Sortir les chiffons mouillés et sécher l’intérieur du réfrigérateur.
- Placer le thermostat à la position désirée.
- Remettre l’égouttoir en place et toutes les denrées alimentaires à l’intérieur du
réfrigérateur.
ATTENTION
!
AVIS

5
Nettoyage
Il est suggéré de nettoyer le réfrigérateur après l’avoir dégivré.
Nettoyer l’intérieur du réfrigérateur à chaque fois que cela est nécessaire pour éviter les
odeurs.
- Sortir toutes les denrées alimentaires du réfrigérateur.
Ne pas utiliser de produits de nettoyage abrasifs ni de tampon à récurer
car ils peuvent endommager l’intérieur du réfrigérateur.
- Nettoyer l’intérieur du réfrigérateur et le joint de porte avec une solution d’eau tiède
et de produit à vaisselle liquide.
- Rincer à l’eau claire et sécher.
- Une fois le nettoyage terminé, enduire le côté articulation du joint d’une légère
couche de pétrolatum pour conserver la souplesse du joint et éviter le décollement.
Entretien des batteries
Un refroidissement trop fort vide les batteries
Lorsque la température ambiante est entre 70 et 90°F, laisser le thermostat à la position
«3» pour éviter de vider la batterie. Placer le thermostat sur «5» (le plus froid) pour faire
des cubes de glace ou conserver des surgelés.
Entretien des batteries
La capacité de refroidissement du réfrigérateur diminuera si la batterie n’est pas
sufsamment chargée.
N’utiliser de «chargeur rapide» que lorsque le thermostat est
placé sur «OFF».
AVIS
ATTENTION
!

6
Vérier la charge de la batterie
La densité d’une batterie à pleine charge est comprise entre 1,260 et 1,280. La lecture
la plus juste est lorsque le réfrigérateur est «ON» et que le chargeur de batterie est
«OFF». Charger la batterie lorsque la densitie de l’electrolyte est inferiure a 1200.
Schéma de câblage
Le schéma de câblage ci-dessous correspond au câblage recommandé pour le
branchement d’une batterie double (schéma Art01516).
Refrigareteur
Prise exterieureTension c.a.
Disjoncteur
vehicule
ou grope
electrogene
Cordon exterieure
Alimentation c.a du vehicule
Champ
Alt
ou
Gene
Cablage d'origine. Debrancher
et rebrancher au sectionneur
(borne).
Allumage
Batterie 12 V
moteur vehicule.
Alternative suggeree:
2 batteries de voiturette
de golf 6 V en serie
Vers refrigerateur
Sectionneur Modele 702
intensitemaxi 70A
avec pole negatif relie
a la masse*
Nouveau fil calibre 8 rouge
Convertisseur ou
charger de batterie
Circuit APP
Circuit de charge de batterie
Batterie RV 12/24 V
90 A/h mini
Commun avec masse c.a.
* Fournisseur recommanda
Sure Power Industries, Inc.
1-800-845-6269
www.Surepower.com
Art01516-FR
Mise au rebut
Procéder comme suit avant de jeter un réfrigérateur
usagé pour empêcher qu’un enfant ne puisse
s’enfermer dedans :
- Retirer les portes du réfrigérateur.
- Laisser les clayettes en place, de telle sorte qu’il soit plus difcile pour les enfants
de grimper à l’intérieur du réfrigérateur.
AVERTISSEMENT
!

7
Installation
Le réfrigérateur doit être positionné et xé de façon sécuritaire sur une surface rigide dans
le véhicule ou navire.
S’assurer que l’alimentation c.c. est raccordée correctement avant de placer le réfrigérateur
dans l’ouverture.
Mesurer l’ouverture pour s’assurer qu’il y a des dégagements sufsants pour installer le
réfrigérateur. Il n’est pas nécessaire d’avoir de l’espace supplémentaire d’isolation autour
du réfrigérateur.
S’assurer que le réfrigérateur n’est pas exposé directement aux rayons de soleil ni près
d’un radiateur, cuisinière ou autre appareil ménager dégageant de la chaleur. Éviter
d’installer le réfrigérateur à proximité de canalisations d’eau chaude ou de conduites
d’air chaud.
Le réfrigérateur a été nettoyé à fond avant expédition de l’usine. Il est toutefois
recommandé de nettoyer l’intérieur avant de s’en servir. Nettoyer l’intérieur avec un
chiffon et de l’eau tiède, puis sécher avec un chiffon sec.
Ventilation
Il et nécessaire d’avoir
une ventilation (circulation
d’air) sufsante autour du
condenseur (situé à l’arrière)
pour que le réfrigérateur
fonctionne de façon
satisfaisante. Utiliser l’une des
combinaisons suivantes pour
les orices d’aération : A-D, A-
I, A-J, B-C, B-F, B-H, C-D, C-I,
C-J, D-F, D-H, F-I, F-J, G-I, G-
J, H-I, H-J (VoirArt01129 - pour
0788 modeles seulement).
Pour obtenir l’aération
minimum requise, chaque
orice d’aération doit être d’au
moins 50 pouces carrés. Ces
orices devraient cependant
être plus grands pour obtenir
la meilleure aération possible.
En effet, plus le volume d’air
circulant sur le condensateur
du réfrigérateur est important,
plus le fonctionnement du réfrigérateur est efcace.
A
B
C
D
E
F
G
H
I
J
Art01129

8
Ne pas enlever les rails situés à
la partie inférieure de l’armoire
du réfrigérateur. Ces rails fournissent
l’espace nécessaire pour la circulation de
l’air sous le réfrigérateur.
Assurez-vous que la circulation d’air
autour du réfrigérateur est sufsante,
car dans le cas contraire, cela peut
affecter la durée de vie de l’appareil, peut
entraîner un refroidissement insufsant,
un fonctionnement ininterrompu de
l’appareil, une décharge accélérée
des batteries et c’est un motif valable
d’annulation de la garantie.
Si le réfrigérateur est installé dans un endroit
non aéré, séparer l’air entrant et l’air évacué à
l’aide d’un déecteur. Il est possible de fabriquer
un déecteur à l’aide de mousse de 0,5 pouce
d’épaisseur (Voir Art01982 - pour R788 et F788
modeles seulement).
Options
Installation d’un panneau décoratif de
porte
L’épaisseur du panneau décoratif ne doit pas dépasser 4 mm.
1. Retirer la porte du réfrigérateur en enlevant les deux (2) boulons qui xent la
charnière de porte au haut du réfrigérateur (voir Art01983).
Art01982
déflecteur en mousse
0,5 po max.
0,5 po min.
charnière de porte
boulons
Art01983
retenue du panneau
Art01985
panneau de porte
ATTENTION
!
AVIS
/