Weslo 330i Treadmill User manual
- Category
- Treadmills
- Type
- User manual
This manual is also suitable for
Weslo 330i Treadmill is designed to make your workouts at home more enjoyable and effective. It requires less than half the floor space of other treadmills when folded up, and includes an array of features to help you reach your fitness goals. This treadmill is capable of high speeds and has a pulse sensor to help you monitor your heart rate. It also has a variety of built-in workout programs to keep your workouts fresh and challenging. With its durable construction and user-friendly design, the Weslo 330i Treadmill is a great choice for anyone looking to improve their fitness.
Weslo 330i Treadmill is designed to make your workouts at home more enjoyable and effective. It requires less than half the floor space of other treadmills when folded up, and includes an array of features to help you reach your fitness goals. This treadmill is capable of high speeds and has a pulse sensor to help you monitor your heart rate. It also has a variety of built-in workout programs to keep your workouts fresh and challenging. With its durable construction and user-friendly design, the Weslo 330i Treadmill is a great choice for anyone looking to improve their fitness.


-
 1
1
-
 2
2
-
 3
3
-
 4
4
-
 5
5
-
 6
6
-
 7
7
-
 8
8
-
 9
9
-
 10
10
-
 11
11
-
 12
12
-
 13
13
-
 14
14
-
 15
15
-
 16
16
-
 17
17
-
 18
18
-
 19
19
-
 20
20
-
 21
21
-
 22
22
-
 23
23
-
 24
24


Weslo 330i Treadmill User manual
- Category
- Treadmills
- Type
- User manual
- This manual is also suitable for
Weslo 330i Treadmill is designed to make your workouts at home more enjoyable and effective. It requires less than half the floor space of other treadmills when folded up, and includes an array of features to help you reach your fitness goals. This treadmill is capable of high speeds and has a pulse sensor to help you monitor your heart rate. It also has a variety of built-in workout programs to keep your workouts fresh and challenging. With its durable construction and user-friendly design, the Weslo 330i Treadmill is a great choice for anyone looking to improve their fitness.
Ask a question and I''ll find the answer in the document
Finding information in a document is now easier with AI
Related papers
-
Weslo 445i Treadmill User manual
-
-
-
Weslo WCTL25320 User manual
-
-
-
-
-
-
Other documents
-
ProForm PFTL31304.0 User manual
-
Pro-Form CROSSWALK si User manual
-
-
-
HealthRider HRTL20001 User manual
-
-
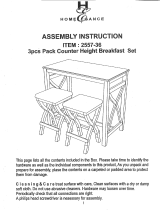 HomeSullivan 402557-36(3A) Installation guide
-
Sharper Image Portable Home Gym Owner's manual
-
Walker CMWF42-2 User manual
-
 PRO ELEC PEL01915-EU Operating instructions

