Page is loading ...

Datalogic S.r.l.
Via San Vitalino 13
40012 Calderara di Reno (BO)
Italy
Tel. +39 051 3147011
Fax +39 051 3147205
©2020 Datalogic S.p.A. and/or its affiliates
All rights reserved. Without limiting the rights under copyri-
ght, no part of this documentation may be reproduced, sto-
red in or introduced into a retrieval system, or transmitted
in any form or by any means, or for any purpose, without
the express written permission of Datalogic S.p.A. and/or its
affiliates.
Owners of Datalogic products are hereby granted a
non-exclusive, revocable license to reproduce and transmit
this documentation for the purchaser's own internal busi-
ness purposes. Purchaser shall not remove or alter any pro-
prietary notices, including copyright notices, contained in this
documentation and shall ensure that all notices appear on
any reproductions of the documentation.
Electronic versions of this document may be downloaded
from the Datalogic website (www.datalogic.com). If you visit
our website and would like to make comments or sugge-
stions about this or other Datalogic publications, please let
us know via the "Contact" page.
Disclaimer
Datalogic has taken reasonable measures to provide infor-
mation in this manual that is complete and accurate, howe-
ver, Datalogic shall not be liable for technical or editorial
errors or omissions contained herein, nor for incidental or
consequential damages resulting from the use of this mate-
rial. Datalogic reserves the right to change any specification
at any time without prior notice.
Trademarks
Datalogic and the Datalogic logo are registered trademarks
of Datalogic S.p.A. in many countries, including the U.S.A.
and the E.U.
HandScanner and Memor are trademarks of Datalogic S.p.A.
and/or its affiliates. Google, Google Play and other marks are
trademarks of Google LLC.
All other brand and product names may be trademarks of
their respective owners.
Support Through the Website
Datalogic provides several services as well as techni-
cal support through its website.
Log on to www.datalogic.com.
For quick access, from the home page click on the
search icon , and type in the name of the pro-
duct you’re looking for. This allows you access to
download Data Sheets, Manuals, Soware & Utilities,
and Drawings.
Hover over the Support & Service menu for access to
Services and Technical Support.
HANDSCANNER
USER MANUAL
Standard and Mid Range
HandScanner
©2020 Datalogic S.p.A. and/or its affiliates
• All rights reserved • Without limiting the rights under copyright,
no part of this documentation may be reproduced, stored in or
introduced into a retrieval system, or transmitted in any form or
by any means, or for any purpose, without the express written
permission of Datalogic S.p.A. and/or its affiliates • Datalogic and
the Datalogic logo are registered trademarks of Datalogic S.p.A. in
many countries, including the U.S. and the E.U.
www.datalogic.com
820118400 (Rev. A) September 2020
Warranty
Datalogic warrants that the Products shall be free from defects in
materials and workmanship under normal and proper use during
the Warranty Period. Products are sold on the basis of specifications
applicable at the time of manufacture and Datalogic has no obliga-
tion to modify or update Products once sold. The Warranty Period
shall be one year from the date of shipment by Datalogic, unless
otherwise agreed in an applicable writing by Datalogic.
Datalogic will not be liable under the warranty if the Product has
been exposed or subjected to any: (1) maintenance, repair, installa-
tion, handling, packaging, transportation, storage, operation or use
that is improper or otherwise not in compliance with Datalogic’s
instruction; (2) Product alteration, modification or repair by anyone
other than Datalogic or those specifically authorized by Datalogic;
(3) accident, contamination, foreign object damage, abuse, neglect
or negligence aer shipment to Buyer; (4) damage caused by fai-
lure of a Datalogic-supplied product not under warranty or by any
hardware or soware not supplied by Datalogic; (5)any device on
which the warranty void seal has been altered, tampered with, or
is missing; (6) any defect or damage caused by natural or man-
made disaster such as but not limited to fire, water damage, floods,
other natural disasters, vandalism or abusive events that would
cause internal and external component damage or destruction of
the whole unit, consumable items; (7) use of counterfeit or repla-
cement parts that are neither manufactured nor approved by Data-
logic for use in Datalogic-manufactured Products; (8) any damage
or malfunctioning caused by non-restoring action as for example
firmware or soware upgrades, soware or hardware reconfigura-
tions etc.; (9) loss of data; (10) any consumable or equivalent (e.g.
cables, power supply, batteries, etc.); or (11) any device on which
the serial number is missing or not recognizable.
THE DATALOGIC WARRANTIES ARE EXCLUSIVE AND IN LIEU
OF ALL OTHER WARRANTIES, WHETHER WRITTEN, EXPRESS,
IMPLIED, STATUTORY OR OTHERWISE, INCLUDING, BUT NOT LIMI-
TED TO, THE IMPLIED WARRANTIES OF MERCHANTABILITY AND
FITNESS FOR PARTICULAR PURPOSE. DATALOGIC SHALL NOT
BE LIABLE FOR ANY DAMAGES SUSTAINED BY BUYER ARISING
FROM DELAYS IN THE REPLACEMENT OR REPAIR OF PRODUCTS
UNDER THE ABOVE. THE REMEDY SET FORTH IN THE WARRANTY
STATEMENT IS THE BUYER’S SOLE AND EXCLUSIVE REMEDY FOR
WARRANTY CLAIMS. NO EXTENSION OF THIS WARRANTY WILL BE
BINDING UPON DATALOGIC UNLESS SET FORTH IN WRITING AND
SIGNED BY DATALOGIC’S AUTHORIZED REPRESENTATIVE. DATA-
LOGIC’S LIABILITY FOR DAMAGES ON ACCOUNT OF A CLAIMED
DEFECT IN ANY PRODUCT DELIVERED BY DATALOGIC SHALL IN
NO EVENT EXCEED THE PURCHASE PRICE OF THE PRODUCT ON
WHICH THE CLAIM IS BASED. DATALOGIC SHALL NOT BE LIABLE
FOR DAMAGES RELATING TO ANY INSTRUMENT, EQUIPMENT,
OR APPARATUS WITH WHICH THE PRODUCT SOLD UNDER THIS
AGREEMENT IS USED. Further details on warranty coverage, rights
and conditions are addressed under and regulated by the Terms and
Conditions of Sales of Datalogic available at https://www.datalogic.
com/terms_conditions_sales.

2
Table of Contents
Support Through the Website ..................................... 1
Warranty ..................................................... 1
ABOUT THESE OPERATING INSTRUCTIONS .....................4
EXPLANATION OF SYMBOLS .................................4
SAFETY INSTRUCTIONS .....................................4
Hardware ..................................................... 4
Wearables .................................................... 4
SCOPE OF DELIVERY ........................................5
HANDSCANNER ............................................6
HandScanner Overview .......................................... 6
HandScanner Technical Data ..................................... 6
CONNECTIVITY DEVICE ......................................7
Gateway Overview. . . . . . . . . . . . . . . . . . . . . . . . . . . . . . . . . . . . . . . . . . . . . . 7
Gateway Technical Data ......................................... 7
CHARGING STATION ........................................8
Charging Station Overview ....................................... 8
Charging Station Technical Data ................................... 8
WEARABLE ................................................9
Hand Trigger Overview .......................................... 9
Hand Trigger Properties ......................................... 9
APPLICATION OF HANDSCANNER SYSTEM ....................10
1
st
Step: Charge HandScanner .................................... 10
2
nd
Step: Connect the Gateway .................................... 10
3
rd
Step: Switch on the HandScanner ............................... 11
4
th
Step: Connect the HandScanner ................................ 11
4
th
Step: Connect the HandScanner (BLE) ........................... 11
5
th
Step: Scan. . . . . . . . . . . . . . . . . . . . . . . . . . . . . . . . . . . . . . . . . . . . . . . . . . 13
6
th
Step: Disconnect HandScanner ................................. 14
6
th
Step: Disconnect HandScanner (BLE HID) ......................... 15
7
th
Step: Release HandScanner from Wearable ....................... 16
CONFIGURATION TOOL REGISTRATION AND LOGIN ..............17
CONFIGURE DEVICES AND FIRMWARE UPDATES ...............17
1
st
Step: Opening Configurations ................................... 17
2
nd
Step: Create a New Configuration ............................... 18
3
rd
Step: Connectivity Configuration ................................ 18
4
th
Step: Device Settings ......................................... 18
5
th
Step: Symbology Settings ..................................... 18
6
th
Step: Workflow Rules ......................................... 18
7
th
Step: Configure Devices and Gateway Firmware Update ............. 18
SIGNAL TABLES ...........................................20
General HandScanner ........................................... 20
HandScanner Connection via BLE. . . . . . . . . . . . . . . . . . . . . . . . . . . . . . . . . . 20
Gateway ...................................................... 20
COMPATIBILITY WITH DATALOGIC MOBILE TERMINALS ..........21

3
STORAGE AND CLEANING ..................................22
Storage ...................................................... 22
Cleaning ..................................................... 22
TROUBLESHOOTING .......................................22
HandScanner .................................................. 22
BLE - Data Transfer ............................................ 23
Gateway ...................................................... 23
Gateway - Data Transfer ......................................... 23
Charging Station ............................................... 23
DISPOSAL ................................................23
DIRECTIVES & CERTIFICATION ...............................24
European Directives ............................................ 24
Declaration of Conformity ........................................ 24
APPENDIX CONFIGURATION BARCODES .....................25
Pairing Barcode ................................................ 25
Gateway Mass Storage ON ....................................... 25
Gateway Mass Storage OFF ...................................... 25
Scanner Factory Reset .......................................... 25
Gateway Factory Reset .......................................... 25

4
ABOUT THESE OPERATING INSTRUCTIONS
This user manual contains a system overview, technical data about the Hardware and Wearables, detailed step-by-step
instructions for using HandScanner system and information about configuration settings and troubleshooting.
It is intended for process planners, configurators and maintenance technicians who are using HandScanner system for
the first time. It is designed so that HandScanner system can be used safely without prior knowledge.
Read carefully before use and keep for future reference.
EXPLANATION OF SYMBOLS
A warning notice is used in these instructions. Always read and observe this warning notice. The warning notice is
introduced with the word CAUTION and means the following:
CAUTION
Slight bodily injury or danger of physical damage to HandScanner system is possible.
In addition, other symbols are used with the following meanings:
NOTE
Additional notices provide more information about the respective chapter.
TIP
Additional tips facilitate the implementation of a certain procedure.
RESULT
The result will show the outcome of the prior action.
SAFETY INSTRUCTIONS
CAUTION
Keep all cables and wires away from high voltage sources! This may otherwise lead to damage or faults due
to overvoltage, line noise, electrostatic discharge or other irregularities.
Hardware
CAUTION
Do not use damaged cables! Otherwise the safe functioning of HandScanner system cannot be ensured.
CAUTION
Do not unscrew the Hardware housing! This may otherwise lead to HandScanner system not functioning pro-
perly.
CAUTION
Do not replace the battery of the HandScanner! This may otherwise lead to HandScanner not functioning
properly.
CAUTION
Do not modify HandScanner system! This may otherwise lead to HandScanner system not functioning pro-
perly.
CAUTION
Do not stare directly into beam! Use of controls, adjustments or performance of procedures other than those
specified herein may result in hazardous laser light exposure. Class 2 laser HandScanners use a low power,
visible light diode. As with any very bright light source, such as the sun, the user should avoid staring directly
into the light beam. Momentary exposure to a Class 2 laser is not known to be harmful.
Wearables
CAUTION
Keep Wearables away from moving machine parts and do not use without a HandScanner! Otherwise the
Wearables may get stuck on objects.
CAUTION
Use Wearables in the right size! Otherwise this may cause pain or pressure points on your hand.

5
SCOPE OF DELIVERY
CAUTION
Do not use any damaged Hardware or Wearables! Check whether Hardware and Wearables are properly
packaged and undamaged.
HandScanner
Standard range Mid range
Wearables
Hand Trigger
Connectivity device
Datalogic Gateway with USB cable
Charging station
Datalogic Charging Station with power cable
(USB-C) and power supply

6
HANDSCANNER
HandScanner Overview
Aer scanning a barcode, the HandScanner returns feedback signals: haptically by vibrations, acoustically by audio
signals and optically by LEDs. The serial number on the rear label indicates whether it is a standard or mid range device.
y Standard range serial number: D1SR ...
y Mid range serial number: D1MR ...
Standard range: 4 - 31 in (10 - 80 cm)
Mid range: 12 - 59 in (30 - 150 cm)
HandScanner (standard range)
Connection
symbol
LEDs
Battery
symbol
Standard
range
HandScanner (mid range)
Connection
symbol
LEDs
Battery
symbol
Mid
range
HandScanner Technical Data
Mechanical properties
Dimensions 50 x 45 x 16 mm (1.96 x 1.77 x 0.63 in)
Weight 40 g (1.41 oz)
Electrical properties
Battery type 670 mAh, Lithium polymer (rechargeable)
Charge time 2 hours with Datalogic Charging Station
Number of scans up to 10,000 scans (depending on application and environmental conditions)
Decoding capability
1D Auto discriminates all standard 1D codes including GS1 DataBar™ linear codes.
2D PDF417, MicroPDF417, Data Matrix, QR Code, Micro QR Code, Aztec, MaxiCode
Postal US PostNet, US Planet, UK Postal, Australia Postal, Japan Postal, Dutch Postal (KIX)
LED classication
Standard range Excluded risk group LED product according to IEC/EN 62471
Mid range CDRH Class 2 / IEC 825 Laser Class 2 Device
NOTE
Further technical specifications are available at datalogic.com/support.
Safety & Regulatory
Agency approvals Compliant to EU and NA applicable standards
Environmental compliance Compliant to EU RoHS and REACH regulations.
Environmental properties
Drop resistance Resists multiple drops from 2 m (6.5 ft) onto concrete
Tumbles 2000 at 0.5 m (1.6 ft)
Impact resistance IEC60068-2-75, IK06(1J)
Particulate and water sealing Resistant to dust and water
Temperature
Operating temperature: 0 to 50 °C (32 to 122 °F)
Charging temperature: 5 to 40 °C (41 to 104 °F)
Storage temperature: -20 to 60 °C (-4 to 140 °F)
Interfaces
Interfaces
Bluetooth: HID Proles
Android: HID, App/SDK
iOS: HID, iOS SDK
USB: Datalogic Gateway, USB HID (keyboard input on host), USB CDC (virtual com port)

7
CONNECTIVITY DEVICE
Gateway Overview
The Gateway receives the scanned barcode data from the HandScanner via BLE. This barcode data is transmitted to
the end device via USB cable. In the USB HID mode, the Gateway simulates a computer keyboard. A serial connection
is emulated in the USB CDC mode. In order to use the USB CDC mode, the device must be set to “USB CDC” in the Con-
figuration Tool https://www.datalogic.com/handscanner/config under “Connectivity Configuration - Integration path”.
Also multipairing is possible. The Gateway can be connected with up to 5 HandScanners simultaneously. See “Con-
nection with USB cable in USB CDC mode” on page 10.
Gateway
Pairing
Barcode
LED 1 (UBS LED)
LED 2 (Scanner LED)
LED 3 (Cloud LED)
Micro USB
socket
Gateway Technical Data
Mechanical properties
Dimensions
3.74 x 2.06 x 0.94 in
(95 x 52.3 x 23.8 mm)
Weight
1.5 oz
(42.5 g)
Electrical properties
Power supply of Gateway via USB
cable
5 VDC (0.5 A) via host computer
Utilities and accessories
Conguration Tool https://www.datalogic.com/handscanner/cong
Connection options
USB
USB HID (keyboard input on host)
USB CDC (virtual com port)
NOTE
Further technical specifications are available at datalogic.com/support.

8
CHARGING STATION
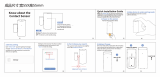
Charging Station Overview
The Charging Station consists of two charging trays that charge two HandScanners at the same time. The charging sta-
tus is indicated by the LEDs of the HandScanner. The LEDs pulse red while in charging mode. When the battery is fully
charged, the LEDs pulse green constantly. It takes about 2 hours to charge a HandScanner. The Charging Station can be
attached to work stations, for example, through the attachment openings (with M5 screws or cable ties).
Charging Station
Attachment
opening for
M5 screws
Charging tray
Attachment opening for
cables ties
Charging Station Technical Data
Mechanical properties
Dimensions
5.5 x 2.2 x 0.75 in
(140 x 56 x 19 mm)
Weight
3.88 oz
(110 g)
Electrical properties
Power supply 5 VDC (1.2 A) via power supply PS-MCHS7500
Charging time 2 hours
NOTE
Further technical specifications are available at datalogic.com/support.
Pins
Label with serial number
USB-C

9
WEARABLE
Hand Trigger Overview
The Textile Trigger is located on the index finger and is attached to the right or le glove, depending on the design. The
Hand Trigger can be used in applications where free fingertips are needed or can be worn over other gloves. The Hand
Trigger is a consumable which must be changed regularly aer use.
Hand Trigger
Textile trigger
Label with size
indication
Hand Trigger Properties
General
Packaging unit 10 pieces per package
Available sizes S, M, L
Safety & Certication
Standards
EN388 (2131)
EN420
Certication
RoHS
CE mark
NOTE
Further technical specifications are available at datalogic.com/support.
Fastening rail for
HandScanner
Variable velcro
connection

10
APPLICATION OF HANDSCANNER SYSTEM
1
st
Step: Charge HandScanner
CAUTION
Only use HandScanner in a dry Charging Station and only touch with dry hands! This may otherwise lead to the
Charging Station not functioning properly.
NOTE
The LEDs pulse red while in charging mode. When the battery is fully charged, the LEDs pulse green. It takes
about 2 hours to charge a HandScanner.
RESULT
HandScanner pulses red and charges in the Charging Station.
The pins face down.
Insert HandScanner in the Charging Station.
2
nd
Step: Connect the Gateway
CAUTION
Only touch the Gateway with dry hands! This may otherwise lead to the Gateway not functioning properly.
NOTE
The following steps are only needed when connecting via Gateway.
Connection with USB cable in USB HID mode
1. Connect the USB cable with the end device.
2. Plug the other end of the USB cable into the Micro USB socket of the Gateway.
A clear clicking sound confirms the correct fastening.
RESULT
The LED of the Gateway lights up green. The boot up of the Gateway takes around 2min until the LED 1 lights
up green. The Gateway is connected to the end device.
Connection with USB cable in USB CDC mode
Follow the previous step 1 and step 2 for “Connetion with USB Cable in USB HID Mode”. Continue with the following
steps:
. n the configuration tool https://www.datalogic.com/handscanner/con-
fig under “Connectivity Configuration > Integration Path” select USB CDC.
More detailed information about this can be found in “Configure Devices and
Gateway Firmware Update” on page 17
4. Connect with the COM port on the end device.
RESULT
The LED of the Gateway lights up green. The boot up of the Gateway takes around 2min until the LED 1 lights
up green. The Gateway is connected to the end device.

11
3
rd
Step: Switch on the HandScanner
1. Position HandScanner on the fastening rail of the wearable. The pins face
down.
2. Push HandScanner down. A clear clicking sound confirms the correct faste-
ning.
3. Press the textile trigger on the wearable for about 2 seconds.
RESULT
HandScanner lights up with all LEDs. You can hear a beeping sound and feel a short vibration. HandScanner
is switched on.
NOTE
HandScanner switches off automatically aer 15 minutes without being used.
4
th
Step: Connect the HandScanner
Connect via Gateway
1. Press the textile trigger on the wearable in order to activate the red cros-
shairs.
2. Aim HandScanner crosshairs on the Gateway and scan the pairing barcode
on the Gateway.
RESULT
HandScanner lights up twice. You can hear a beeping sound and feel a short vibration.
HandScanner is connected to the Gateway.
4
th
Step: Connect the HandScanner (BLE)
Connect via Insight Mobile
You can connect the HandScanner to the Insight Mobile App. Please always download the latest version of Insight
Mobile from https://www.datalogic.com/handscanner/config, “Downloads” section.
Information on how to use the soware can be found at https://www.datalogic.com/handscanner/developer.
Connect via BLE HID to and end device
The HandScanner can be used to establish a connection via Bluetooth Low Energy Human Interface Device (BLE HID) to
an end device. Possible operating systems are: Apple iOS, Google Android, Microso Windows.
The individual steps for connecting to the respective operating systems for the first time can be found in the following.
Prerequisites:
y The end device supports at least Bluetooth 4.0 standard
y No interference or physical obstacles (e.g. metal shelves) interfere with the connection between the HandScanner
and the end device
y The range between the HandScanner and the end device is < 33 (10m)
TIP 1
Visually label the connected devices (HandScanner with the end device) , e.g. using numbering or a color code.
This will allow the user to find the right devices faster.
TIP 2
Adhere the pairing barcode to the end device. In this way, the user can find it quickly and easily.
On a battery-operated end device, the power-saving mode can lock the end device and HandScanner simultaneously.
Permanently disable the power-saving mode of the end device.
The last 5 digits of the serial number attached to the back side identify the HandScanner among the available Bluetooth
devices.
Read the serial number of the HandScanner.
RESULT
Example serial number: DLHS - 00000.
To make the HandScanner visible for the end device, the HandScanner must be put into pairing mode:
1. Press the textile trigger on the wearable in order to activate the
red crosshairs.
2. Aim the HandScanner crosshairs at the pairing barcode and
scan.
RESULT
HandScanner pulses blue and beeping sounds can be heard.
HandScanner is searching for an end device in pairing mode.

12
Connect with Apple iOS 11 or higher Connect with Google Android 4.4 or higher
01 02
03
RESULT
DLHS - 00000
DLHS - 00000
Under “Settings - Bluetooth,” activate the
Bluetooth option.
Select “DLHS - 00000”.
Confirm the “Bluetooth Pairing Request”.
The HandScanner will flash blue twice and you will
hear two beeps. The HandScanner will be shown as
connected under “My devices” and is ready for use.
01 02
03
RESULT
DLHS - 00000
Under “Settings - Connected devices,” switch
on the Bluetooth option.
Tap “Bluetooth” and select “Pair new device”.
Select “DLHS - 00000”. The HandScanner will flash blue twice and you will hear
two beeps. The HandScanner will be shown as con-
nected under “Paired devices” and is ready for use.
DLHS - 00000

13
Connect with Microso Windows 10
01 02
03
Under “Bluetooth & other devices,” click on
“Add Bluetooth and other devices”.
Select the option “Bluetooth: Mouses, keybo-
ards and other types”.
Select “DLHS - 00000”.
RESULT
DLHS - 00000
The HandScanner will flash blue twice and you will
hear two beeps. The HandScanner will be shown as
connected under “Bluetooth & other devices,” and is
ready for use.
04
Click “Done”.
DLHS - 00000
DLHS - 00000
5
th
Step: Scan
CAUTION
For mid range scanning range: do not look directly into the crosshairs! Otherwise this can lead to temporary
blinding effects.
The HandScanner is an omnidirectional scanner. HandScanner can thus scan barcodes from different angles. For a
standard range device (serial number: D1SR…), the scanning range is between 4 - 31 in (10-80 cm) per application case
and barcode size. For a mid range device (serial number: D1MR…), the scanning range is 12 - 52 in (30-150 cm) per
application case and barcode size.

14
1. Press the textile trigger on the wearable in order to activate the red cros-
shairs.
2. Aim HandScanner crosshairs on the barcode and scan.
Example Barcode
Content: “Datalogic”
RESULT
HandScanner lights up green. You can hear a beeping sound and feel a short vibration. HandScanner has
scanned the example barcode and transmitted it to the end device.
6
th
Step: Disconnect HandScanner
Disconnect HandScanner from the Gateway
Place HandScanner in the Charging Station.
RESULT
HandScanner is disconnected from the Gateway and can be connected to a new one.
Disconnect the Connection Cable from the Gateway
Disconnect the connection cable out of the Micro USB socket.
RESULT
The LED of the Gateway no longer lights up green. The connection cable is disconnected from the Gateway.
NOTE
This will cause ALL paired devices to disconnect from the Gateway.

15
6
th
Step: Disconnect HandScanner (BLE HID)
Disconnect from Apple iOS
NOTE
Only disconnect HandScanner if this is to be newly connected to another end device.
01 02
03
RESULT
DLHS - 00000
Under “Settings - Bluetooth,” tap on the infor-
mation symbol.
Tap on “Forget This Device”.
Confirm “Forget Device”.
The HandScanner will flash red three times and you will hear three beeps.
HandScanner will no longer be shown as connected under “My devices.”
DLHS - 00000
DLHS - 00000
Disconnect from Google Android
01 02
RESULT
In the Bluetooth option under “Paired devi-
ces,” tap on the gear wheel symbol of “DLHS
- 00000.”
Select “Forget”.
The HandScanner will flash red three times
and you will hear three beeps. HandScanner
will no longer be shown as connected under
“Paired devices.”
DLHS - 00000
DLHS - 00000

16
Disconnect from Microso Windows
01 02
RESULT
Under “Bluetooth & other devices,” select
“DLHS - 00000.”
Click “Remove device.”
The HandScanner will flash red three times
and you will hear three beeps. HandScanner
will no longer be shown as connected under
“Bluetooth & other devices.”
DLHS - 00000
DLHS - 00000
7
th
Step: Release HandScanner from Wearable
CAUTION
Do not rub over the pins of the wearable with the HandScanner!
This may otherwise lead to bended pins.
1. Use your fingers to press between HandScanner and the fastening
rail of the wearable.
2. Press HandScanner up slightly and push it forward.

17
CONFIGURATION TOOL REGISTRATION AND LOGIN
The first time you access the Configuration Tool (https://www.datalogic.com/handscanner/config), you will be reque-
sted to register in order to obtain the following credentials:
y Customer ID: an identifier shared by all the users inside your organization
y Email: your personal email
y Password: your password
CONFIGURE DEVICES AND FIRMWARE UPDATES
The configuration tool under https://www.datalogic.com/handscanner/config can be used to individually set the Hand-
Scanner system and improve scanning processes.
y To update the firmware proceed with “7th Step: Configure Devices and Gateway Firmware Update” on page 18.
y To create a new configuration proceed with “1st Step: Opening Configurations” on page 17.
1
st
Step: Opening Configurations
1. Go to Configurations in the Insight navigation.
2. Select a saved configuration or create a new one.
NOTE
To install a saved configuration, proceed with “7th Step: Configure Devices and Gateway Firmware Update” on
page 18.
NOTE
The registration needs to be validated before your first access. Follow this procedure to request your creden-
tials:
1. Go to https://www.datalogic.com/handscanner/config and click the “Register now” button.
2. Fill in the Registration form with the required information, then click the “Register an Account” button.
3. Your request will be verified and your credentials will be transmitted to the specified email address. The verification
process may take up to two days.
4. Follow the instructions in the confirmation email to access the Configuration Tool.
5. For subsequent access to the Configuration Tool, go to https://www.datalogic.com/handscanner/config and fill in
the “Sign in” form to continue:

18
3
rd
Step: Connectivity Configuration
Here it is possible to configure the connectivity settings according to the end device selected previously.
For example, if you selected “Gateway” you can choose HID or CDC mode. It is also possible to adjust the maximum
number of HandScanners that can connect to the Gateway (multipairing - up to 5 devices).
If you selected “Insight Mobile”, you can choose the type of Integration Path (Soware Keyboard, Intent, SDK).
Choose the preferred settings.
Information on the different connectivity options can be found at https://www.datalogic.com/handscanner/developer.
5
th
Step: Symbology Settings
The Symbology Settings can be used to switch the barcode types (including inverse barcodes) on or off and to set bar-
code lengths, edge tolerances as well as check digits.
y Switch off unused barcode types.
y Switch on inverse barcode types if needed.
6
th
Step: Workflow Rules
The Workflow Rules can be used to manipulate the barcode data. These can be used to change barcode data through
rules with conditions and actions. These are then in an IF-THEN relationship with each other, which means that:
IF a condition is true, THEN an action is executed.
An action is also carried out without a condition.
7
th
Step: Configure Devices and Gateway Firmware Update
For the configuration of the device:
y Click on Save. Assign a name and download the configuration file. Then follow the procedure below to apply the
configuration with Insight Mobile or the Gateway.
For a firmware update:
y To upgrade the HandScanner firmware, download the latest version of Insight Mobile App from https://www.data-
logic.com/handscanner/config, “Download” section. The App will upgrade the firmware of the paired HandScanner
if an update is available.
y To upgrade the Gateway, download the latest Gateway firmware version at https://www.datalogic.com/handscan-
ner/config, “Downloads” section. Then follow the procedure below for the Gateway.
4
th
Step: Device Settings
The Device Settings can be used to optimize the HandScanner for certain use cases.
The Engine Settings allow to improve the readability of barcodes:
y activate Fuzzy 1D processing for hard to read 1D barcodes
y activate Display mode for barcodes on screens or foils
y activate Picklist mode to enable a more accurate aiming with the scanning field
The Feedback profiles allow to customize the HandScanners feedback.
The Sleep Mode determines the duration of inactivity aer which the HandScanner turns off.
Application example:
Insert the prefix “Datalogic” for the following barcode:
Condition: Barcode matches “Glove”
Action: Add prefix “Datalogic”
Outcome: “DatalogicGlove”
Create the condition “Barcode Matches: Gloves” and the action “Add Prefix Datalogic.”
1. Set condition (IF) 2. Set action (THEN)
To configure Insight Mobile:
Copy the downloaded configuration file in the following folder on your mobile device:
(/sdcard)/Android/data/de.proglove.connect/files
RESULT
The configuration file will be deployed automatically on the mobile phone.
2
nd
Step: Create a New Configuration
Choose which connectivtiy option is used and need to be configurated.

19
To configure the Gateway:
RESULT
The upload of the configuration takes about 5 seconds / the upload of the fir-
mware takes about 2 minutes and is finished when the USB LED shows constant
green light. The Gateway is now configurated / updated and can be connected to
a HandScanner.
1. Connect the Gateway with the computer. The Gateway boots up. This
takes about 2 min and is finished when the USB LED shows constant
green light.
2. Scan the Pairing Barcode on the Gateway.
3. Scan this barcode to enable the Gateway as a mass storage device
on the computer.
4. Copy the downloaded configuration file or the firmware file into the
mass storage device Gateway.
5. Eject the Gateway mass storage from your File Explorer (e.g. on Windows, right-click on the Gateway and click on
Eject).
CAUTION
Do not disconnect the Gateway from the computer during the upload!
NOTE
The configuration will be applied to the HandScanner and the Gateway directly.
HandScanners that get connected to the Gateway later will receive the same configuration!

20
SIGNAL TABLES
Description LED Connection symbol Battery symbol Audio signal Vibration
Barcode data could be
transferred
Short green
flashing
Short positive
beep
Short vibration
Barcode data could not be
transferred
Red flashing 3
times briefly
Long negative
beep
Long vibration
Battery charge under 10% Slow red flashing
Battery charge under 7% Red flashing 3
times briefly
Switch on HandScanner
with battery charge under
5%
Red flashing 3
times briefly
Battery charge under 95% Pulsating red
Battery charge over 95% Constantly green
General HandScanner
HandScanner Connection via BLE
Description LED Connection symbol Battery symbol Audio signal Vibration
HandScanner searches
for an end device
Blue pulsating Blue pulsating Continuously
rising beep
HandScanner is con-
nected to an end device
Blue flashing 2
times briefly
Blue flashing 2 times
briefly
Short rising
positive beep
Short vibration
HandScanner cannot con-
nect to the end device
Red flashing 3
times briefly
Negative beep
briefly 3 times
Long vibration
HandScanner is discon-
nected from the end
device
Red flashing 3
times briefly
Negative beep
briefly 3 times
Long vibration
Gateway
Description LED 1 (USB - LED) LED 2 (Scanner - LED) LED 3 (Cloud - LED)
Gateway boots up
1
Le to right run through all LEDs alternating Blue / Green until start
Gateway is connected to the
end device via USB
Constantly green
Gateway is not connected to
the end device via USB
No feedback
Gateway searches for a
HandScanner
Pulsing blue
Gateway is connected to the
HandScanner via BLE
Constantly green
Firmware Update: Gateway is
in dowload mode
Constantly yellow Constantly yellow Constantly yellow
Firmware Update: Hand-
Scanner is flashing / Gateway
deploys
Constantly purple Constantly purple Constantly purple
Firmware Update: Gateway is
flashing
le to right run through all LEDs alternating purple until done
Firmware Update: successful Long green flashing Long green flashing Long green flashing
Gateway is connected to a
HandScanner and is searching
for more HandScanners
Constantly green
Gateway cannot connect to
another HandScanner
Constantly red
Gateway cannot connect to
another HandScanner but
another HandScanner is trying
to connect
Red flahsing 3 times briefly
1 It take approx. 2 minutes to boot up.
/