Powerplus POWAIR0312 Owner's manual

Category
Nail Gun
Type
Owner's manual

Powerplus POWAIR0312 is a versatile 2-in-1 pneumatic combi nailer that combines the functionality of a nailer and a stapler in one compact tool. Ideal for a wide range of applications, from DIY projects to professional carpentry, this tool offers precise and efficient fastening solutions. With its quick-loading magazine, depth adjustment knob, and safety features, the POWAIR0312 ensures accurate and secure fastening.

Powerplus POWAIR0312 is a versatile 2-in-1 pneumatic combi nailer that combines the functionality of a nailer and a stapler in one compact tool. Ideal for a wide range of applications, from DIY projects to professional carpentry, this tool offers precise and efficient fastening solutions. With its quick-loading magazine, depth adjustment knob, and safety features, the POWAIR0312 ensures accurate and secure fastening.

POWAIR0312 EN
Copyright © 2021 VARO P a g e | 1 www.varo.com
1 APPLIANCE ....................................................................................................2
2 DESCRIPTION (FIG. A) ...................................................................................2
3 PACKAGE CONTENT LIST ............................................................................2
4 SAFETY RULES (FIG. B) ................................................................................2
5 TOOL USE .......................................................................................................3
6 LUBRICATION ................................................................................................4
6.1 Depth adjustment (fig. 1) ...............................................................................5
7 IMPORTANT!!! ................................................................................................5
8 MAINTENANCE...............................................................................................5
9 TECHNICAL DATA .........................................................................................6
10 TROUBLESHOOTING .....................................................................................6
11 ENVIRONMENT...............................................................................................7
POWAIR0312 EN
Copyright © 2021 VARO P a g e | 2 www.varo.com
PNEUMATIC 2 IN 1 COMBI NAILER
POWAIR0312
1 APPLIANCE
Use for almost any finish, furniture, cabinetry, paneling, trim, or craft application
Warning Read this manual and general safety instructions carefully before
using the appliance, for your own safety.
2 DESCRIPTION (FIG. A)
1. Trigger exhaust vent
2. ¼” coupler
3. Magazine lock
4. Magazine
5. Nailer nose
6. Grease shaft lock
7. Trigger
8. Depth adjustment knob
3 PACKAGE CONTENT LIST
Remove all packaging materials.
Remove remaining packaging and packing inserts (if included).
Check that the package contents are complete.
Check the appliance, the power cord, the power plug and all accessories for
transportation damage.
Keep the packaging materials as far as possible until the end of the warranty period.
Then take it to your local waste disposal system.
WARNING Packaging materials are not toys! Children must not play with
plastic bags! There is a danger of suffocation!
1 x 2 in 1 combi nailer
2 x keys
500 x 25mm nails
500 x 50mm nails
500 x 40mm staples
500 x 25mm staples
1 x empty bottle
1 x BMC
1 x Manual
If any parts are missing or damaged, please contact your dealer.
4 SAFETY RULES (FIG. B)
Use only following fixing devices:
Ga. 18 nail & staple
Nails length: 15-50mm
Staple crown: 5.7mm
Staple length: 16-50mm
Tools with an inverted triangle can only be used with security elements: this
stapler/nailer is equipped with a safety yoke.
POWAIR0312 EN
Copyright © 2021 VARO P a g e | 3 www.varo.com
To prevent injuries to yourself and bystanders, refer to tool use, maintenance and
troubleshooting sections for additional information (fig 1)
To prevent eye injuries, always wear safety glasses with hard plastic side shields. Be
sure everyone in your work area is wearing the same type of safety glasses (fig 2)
Always wear hearing protection and hard hat. (fig 3)
Never use hydrogen oxygen, carbon dioxide or any other bottled gas as a power
source for this tool, the tool will explode and cause serious injury. (fig4)
Remove finger from trigger when not driving fasteners. Never carry tool with finger on
trigger, tool will eject fastener If safety is bumped. (fig5)
Never conned tool to an air hose with pressure exceeds 200 psi or 13.7 BAR (fig6)
Air compressors must comply with requirement ANSI B19.3 1981 (U.S.), "Safety
Standard For Compressors For Process Industries." (fig 7)
Air hose minimum working pressure rating of 150 psi (10.3 BAR) or 150% of the
maximum pressure produced in the system is absolutely necessary. (fig 8)
The tool and air supply hose must have a hose coupling such that all pressure is
removed from the tool when the coupling Joint is disconnected. (fig 9)
Use only compressed air coming through 3 pieces set. (fig 10)
Never load fastener before tool connected to air supply (fig 11)
Never use tool if safety element, trigger or springs have become inoperative, missing or
damaged, It is hazardous to remove safety element, trigger or spring. (fig 12)
Before using this tool, make sure trigger, screw and cap are securely tightened. (fig 13)
Do not modify tool without authorization. (fig 14)
Disconnect tool from air whenever the tool stops working (fig15)
Keep the tool pointed away from yourself and others. (fig 16)
Fire fasteners into work surface only, never into materials too hard to penetrate. (fig 17)
Do not drive fasteners on top of other fasteners. Tool fired in an inclined angle is also
forbidden. (fig 18)
Do not push safety element on work surface until a second fastener is desired (fig 19)
Do not drive fasteners close to the edge of the work surface. The work piece is likely to
split and the fastener could fly free and hit someone. (fig 20)
Do not load fasteners with trigger or safety element depressed. (fig 21)
Do not use tool without Danger label on tool. (fig 22)
Never use a tool that leaks air or needs repair. (fig 23)
Be sure you are in a balanced position when using or handling the tool (fig 24)
Operate tool at recommended pressure of 4-7 bar
5 TOOL USE
1. Read "Safety Warnings" before using tool
2. Push magazine lock lever and slide upper magazine to
open magazine.
POWAIR0312 EN
Copyright © 2021 VARO P a g e | 4 www.varo.com
3. Place strip of nails or staples into the magazine with
the point resting on the fastener guide. Do not load
with trigger depressed.
4. Push upper magazine back until magazine lock
latches.
5. Keep the nailer pointed away from yourself and others
and connect to the hose.
6. Position the nailer nose against work piece and pull the
trigger
7. Disconnect air supply in case a nail or stapler is
jammed
8. Pull the grease shaft and pull the upper part of the
nailer nose open the magazine in the front. Remove
jammed nails or staples and close the front cover.
9. Keep the tool pointed away from yourself and others
and connect back to the hose.
6 LUBRICATION
An automatic in-line filter-regulator-lubricator is recommended (Fig 1) as it increases tool life
and keeps the tool in sustained operation. The in-line lubricator should be regularly checked
and filled with air tool oil.
Proper adjustment of the in-line lubricator is performed by placing a sheet of paper next to
the exhaust ports and holding the throttle open approximately 30 seconds. The lubricator is
POWAIR0312 EN
Copyright © 2021 VARO P a g e | 5 www.varo.com
properly set when a light stain of oil collects on the paper. Excessive amounts of oil should
be avoided.
In the event that it becomes necessary to store the tool for an extended period of time
(overnight, weekend, etc.), it should receive a generous amount of lubrication at that time.
The tool should be run for approximately 30 seconds to ensure oil has been evenly
distributed throughout the tool. The tool should be stored in a clean and dry environment.
It is most important that the tool be properly lubricated by keeping the air line lubricator
filled and correctly adjusted. Without proper lubrication the tool will not work properly
and parts will wear prematurely.
Use the proper lubricant in the air line lubricator. The lubricator should be of low air flow
or changing air flow type, and should be kept filled to the correct level. Use only
recommended lubricants, specially made for pneumatic applications. Substitutes may
harm the rubber compounds in the tools, O-rings and other rubber parts.
6.1 Depth adjustment (fig. 1)
The depth to which a fastener is driven is controlled by the depth adjustment knob (8). The
depth of drive is factory adjusted to a nominal setting. Test fire a fastener and check depth.
If a change is desired, rotate the adjustment knob (8). Rotate the knob (8) clockwise to
increase the depth of drive, rotate the knob counter clockwise to decrease the depth of drive.
Test fire another fastener and check depth again. Repeat as necessary to achieve desired
results. The amount of air pressure required will vary depending on the size of the setting to
determine the lowest setting that will consistently perform the job at hand. Air pressure in
excess of that required can cause premature wear and/or damage to the tool.
7 IMPORTANT!!!
If no filter/ pressure regulator/ lubricator is installed in the compressed air system, then
pneumatic tools must be lubricated with 2 to 6 drops of oil at least once a day or after every
two hours of use. This must be done directly along the male coupler or the screw (OIL)
provided for the purpose on the side of the tool’s housing.
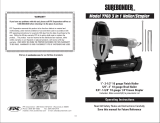
Fig. 2
1. Tool
2. Quick connector
3. Quick coupler
4. Air hose
5. Quick connector
6. Quick coupler
7. Lubricator
8. Regulator (0-8.3 bar)
9. Filter
10. Cut-off valve
11. Air compressor
8 MAINTENANCE
Disconnect the tool from the compressor before adjusting, clearing jams,
servicing &maintenance, relocating and during non operation.
Regular lubrication, if your tool without using the in-liner automatic oilier, place 2 or 6
drops of pneumatic tool oil into the air inlet before each work day or after 2 hours of
continuous use depending in the characteristic of work piece or type of fasteners.
Air-operated tools must be inspected periodically, and worn or broken parts must be
replaced to keep the tool operating safely and efficiently. Check and change all worn or
damaged O-ring, Seals, etc. Tight all the screws and caps in case personal injury.
POWAIR0312 EN
Copyright © 2021 VARO P a g e | 6 www.varo.com
Make regular inspection for free movement of trigger, Spring and safety mechanism to
assure safe system is complete and functional: no loose and missing parts, no building
or stocking parts.
Keep magazine and nose of tool clean and free of any dirt lint or abrasive particles.
When temperatures are below freezing, tools should be kept warm by any convenient,
safe method.
9 TECHNICAL DATA
Model
POWAIR0312
Activation mode
Single sequential action
Max. allowable pressure
120PSI(8.3 bar)
Operating pressure
60-100PSI(4-7bar)
Air inlet size
¼”
Avg. air consumption
51 l/min
Recommended lubricant
White mineral oil
Nail capacity
100pcs
10 TROUBLESHOOTING
SYMPTOM
PROBLEM
SOLUTIONS
Air leak
near top of tool or in
trigger area
O-ring in trigger valve is
damaged.
Check and replace O-ring.
Trigger valve head are
damage.
Check and replace.
Trigger valve stem, seal or
O-ring are damaged.
Check and replace trigger
valve stem, seal or O-ring
Air leak near bottom
of tool.
Loose screws.
Tighten screws.
Worn or damaged O-rings
or bumper.
Check and replace O-rings
or bumper.
Air leak between body
and cylinder cap.
Loose screws.
Tighten screw.
Worn or damaged O-rings
or seals.
Check and replace O-rings
or bumper.
Blade driving fastener
too deep.
Worn bumper.
Replace bumper.
Air pressure is too high.
Adjust the air pressure.
Tool does not operate
well: can not drive
fastener or operate
sluggishly.
Inadequate air supply.
Verify adequate air supply.
Inadequate lubrication.
Place 2 or 6 drops of oil into
air inlet.
Worn or damaged O-rings
or seals.
Check and replace O-rings
or seal.
Exhaust port in cylinder
head is blocked.
Replace damaged internal
parts.
Tool skips fasteners.
Worn bumper or damaged
spring.
Replace bumper or pusher
spring.
POWAIR0312 EN
Copyright © 2021 VARO P a g e | 7 www.varo.com
Dirt in front plate.
Clean drive channel on
front plate.
Dirt or damage prevents
fasteners from moving
freely in magazine.
Magazine needs to be
cleaned.
Worn or dry O-ring on
piston or lack of
Lubrication.
O-ring needs to be replaced
and lubricate.
Cylinder covers seal
leaking.
Replace Sealing washer.
Tool jams.
Incorrect or damaged
fasteners.
Change and use correct
fastener.
Damaged or worn driver
guide.
Check and replace the
driver.
Magazine or nose screw
loose.
Tighten the magazine.
Magazine is dirty.
Clean the magazine.
11 ENVIRONMENT
Should your appliance need replacement after extended use, do not discard it with the
household rubbish but dispose of it in an environmentally safe way.
  • Page 1 1
  • Page 2 2
  • Page 3 3
  • Page 4 4
  • Page 5 5
  • Page 6 6
  • Page 7 7

Powerplus POWAIR0312 Owner's manual

Category
Nail Gun
Type
Owner's manual

Powerplus POWAIR0312 is a versatile 2-in-1 pneumatic combi nailer that combines the functionality of a nailer and a stapler in one compact tool. Ideal for a wide range of applications, from DIY projects to professional carpentry, this tool offers precise and efficient fastening solutions. With its quick-loading magazine, depth adjustment knob, and safety features, the POWAIR0312 ensures accurate and secure fastening.

Ask a question and I''ll find the answer in the document

Finding information in a document is now easier with AI