Page is loading ...

DWE496
DWE497
Final Page size: A5 (148mm x 210mm)

B
Copyright DeWALT
English (original instructions) 3
Français (traduction de la notice d’instructions originale) 13
(
: 24

1
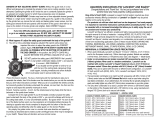
Figure B
B
Figure A
A
3
2
1
8
7
5
4
6
24
13
7
14
Figure C
C
15

2
Figure D
D
Figure E
E
Figure F
F
Figure G
G
4
10
9
11
1
2
11
11
4
4
17
16
10
17
16
10
4
12
7

ENGLISH
3
SAVE ALL WARNINGS AND INSTRUCTIONS
FOR FUTURE REFERENCE
The term “power tool” in the warnings refers to your mains-
operated (corded) power tool or battery-operated (cordless)
powertool.
1) Work area safety
a ) Keep work area clean and well lit. Cluttered or dark
areas inviteaccidents.
b ) Do not operate power tools in explosive
atmospheres, such as in the presence of flammable
liquids, gases or dust. Power tools create sparks which
may ignite the dust orfumes.
c ) Keep children and bystanders away while operating
a power tool. Distractions can cause you to losecontrol.
2) Electrical safety
a ) Power tool plugs must match the outlet. Never
modify the plug in any way. Do not use any adapter
plugs with earthed (grounded) power tools.
Unmodified plugs and matching outlets will reduce risk of
electricshock.
b ) Avoid body contact with earthed or grounded
surfaces such as pipes, radiators, ranges and
refrigerators. There is an increased risk of electric shock if
your body is earthed orgrounded.
c ) Do not expose power tools to rain or wet conditions.
Water entering a power tool will increase the risk of
electricshock.
d ) Do not abuse the cord. Never use the cord for
carrying, pulling or unplugging the power tool. Keep
cord away from heat, oil, sharp edges or moving
parts. Damaged or entangled cords increase the risk of
electricshock.
e ) When operating a power tool outdoors, use an
extension cord suitable for outdoor use. Use of a cord
suitable for outdoor use reduces the risk of electricshock.
f ) If operating a power tool in a damp location is
unavoidable, use a residual current device (RCD)
protected supply. Use of an RCD reduces the risk of
electricshock.
3) Personal safety
a ) Stay alert, watch what you are doing and use
common sense when operating a power tool. Do not
use a power tool while you are tired or under the
influence of drugs, alcohol or medication. A moment
of inattention while operating power tools may result in
serious personalinjury.
b ) Use personal protective equipment. Always wear
eye protection. Protective equipment such as dust mask,
non-skid safety shoes, hard hat, or hearing protection used
for appropriate conditions will reduce personalinjuries.
Congratulations!
You have chosen a DeWALT tool. Years of experience, thorough
product development and innovation make DeWALT one of the
most reliable partners for professional power toolusers.
Technical Data
DWE496 DWE497
Voltage V
AC
B5/IN 220-240 220-240
ZA 230 230
Type 1 1
Frequency Hz B5/IN 50/60 50/60
ZA 50 50
Power input W 2600 2600
No-load/rated speed min
-1
6500 8500
Wheel diameter mm 230 180
Spindle diameter M14 M14
Spindle length mm 19 19
Weight kg 5.4 5.4
Definitions: Safety Guidelines
The definitions below describe the level of severity for each
signal word. Please read the manual and pay attention to
thesesymbols.
DANGER: Indicates an imminently hazardous
situation which, if not avoided, will result in death or
seriousinjury.
WARNING: Indicates a potentially hazardous situation
which, if not avoided, could result in death or
seriousinjury.
CAUTION: Indicates a potentially hazardous situation
which, if not avoided, may result in minor or
moderateinjury.
NOTICE: Indicates a practice not related to
personal injury which, if not avoided, may result in
propertydamage.
Denotes risk of electricshock.
Denotes risk offire.
WARNING: To reduce the risk of injury, read the
instructionmanual.
General Power Tool Safety Warnings
WARNING: Read all safety warnings and all
instructions. Failure to follow the warnings and
instructions may result in electric shock, fire and/or
seriousinjury.
English (original instructions)
LARGE ANGLE GRINDER
DWE496, DWE497

4
ENGLISH
5) Service
a ) Have your power tool serviced by a qualified repair
person using only identical replacement parts. This
will ensure that the safety of the power tool ismaintained.
ADDITIONAL SPECIFIC SAFETY RULES FOR
LARGE ANGLE GRINDERS
Safety Instructions for All Operations
a ) This power tool is intended to function as a
grinder, sander, wire brush or cut-off tool. Read
all safety warnings, instructions, illustrations and
specifications provided with this power tool. Failure
to follow all instructions listed below may result in electric
shock, fire and/or seriousinjury.
b ) Operation such as polishing is not recommended to
be performed with this powertool.
Operations for which the power tool was not designed
may create a hazard and cause personalinjury.
c ) Do not use accessories which are not specifically
designed and recommended by the tool
manufacturer. Just because the accessory can
be attached to your power tool, it does not assure
safeoperation.
d ) The rated speed of the accessory must be at least
equal to the maximum speed marked on the power
tool. Accessories running faster than their rated speed can
break and flyapart.
e ) The outside diameter and the thickness of your
accessory must be within the capacity rating of
your power tool. Incorrectly sized accessories cannot be
adequately guarded orcontrolled.
f ) Threaded mounting of accessories must match the
grinder spindle thread. For accessories mounted by
flanges, the arbour hole of the accessory must fit the
locating diameter of the flange. Accessories that do
not match the mounting hardware of the power tool will
run out of balance, vibrate excessively and may cause loss
ofcontrol.
g ) Do not use a damaged accessory. Before each use
inspect the accessory such as abrasive wheel for
chips and cracks, backing pad for cracks, tear or
excess wear, wire brush for loose or cracked wires.
If power tool or accessory is dropped, inspect for
damage or install an undamaged accessory. After
inspecting and installing an accessory, position
yourself and bystanders away from the plane of
the rotating accessory and run the power tool at
maximum no-load speed for one minute. Damaged
accessories will normally break apart during this testtime.
h ) Wear personal protective equipment. Depending on
application, use face shield, safety goggles or safety
glasses. As appropriate, wear dust mask, hearing
protectors, gloves and workshop apron capable of
stopping small abrasive or workpiece fragments.
The eye protection must be capable of stopping flying
c ) Prevent unintentional starting. Ensure the switch
is in the off position before connecting to power
source and/or battery pack, picking up or carrying
the tool. Carrying power tools with your finger on the
switch or energising power tools that have the switch on
invitesaccidents.
d ) Remove any adjusting key or wrench before turning
the power tool on. A wrench or a key left attached
to a rotating part of the power tool may result in
personalinjury.
e ) Do not overreach. Keep proper footing and balance
at all times. This enables better control of the power tool
in unexpectedsituations.
f ) Dress properly. Do not wear loose clothing or
jewellery. Keep your hair, clothing and gloves away
from moving parts. Loose clothes, jewellery or long hair
can be caught in movingparts.
g ) If devices are provided for the connection of dust
extraction and collection facilities, ensure these are
connected and properly used. Use of dust collection
can reduce dust-relatedhazards.
4) Power tool use and care
a ) Do not force the power tool. Use the correct power
tool for your application. The correct power tool
will do the job better and safer at the rate for which it
wasdesigned.
b ) Do not use the power tool if the switch does not turn
it on and off. Any power tool that cannot be controlled
with the switch is dangerous and must berepaired.
c ) Disconnect the plug from the power source and/or
the battery pack from the power tool before making
any adjustments, changing accessories, or storing
power tools. Such preventive safety measures reduce the
risk of starting the power toolaccidentally.
d ) Store idle power tools out of the reach of children
and do not allow persons unfamiliar with the power
tool or these instructions to operate the power tool.
Power tools are dangerous in the hands of untrainedusers.
e ) Maintain power tools. Check for misalignment or
binding of moving parts, breakage of parts and any
other condition that may affect the power tool’s
operation. If damaged, have the power tool repaired
before use. Many accidents are caused by poorly
maintained powertools.
f ) Keep cutting tools sharp and clean. Properly
maintained cutting tools with sharp cutting edges are less
likely to bind and are easier tocontrol.
g ) Use the power tool, accessories and tool bits etc.,
in accordance with these instructions taking into
account the working conditions and the work to be
performed. Use of the power tool for operations different
from those intended could result in a hazardoussituation.

5
ENGLISH
debris generated by various operations. The dust mask or
respirator must be capable of filtrating particles generated
by your operation. Prolonged exposure to high intensity
noise may cause hearingloss.
i ) Keep bystanders a safe distance away from work
area. Anyone entering the work area must wear
personal protective equipment. Fragments of
workpiece or of a broken accessory may fly away and
cause injury beyond immediate area ofoperation.
j ) Hold power tool by insulated gripping surfaces only,
when performing an operation where the cutting
accessory may contact hidden wiring or its own
cord. Cutting accessory contacting a “live” wire may make
exposed metal parts of the power tool “live” and could give
the operator an electricalshock.
k ) Position the cord clear of the spinning accessory. If
you lose control, the cord may be cut or snagged and your
hand or arm may be pulled into the spinningaccessory.
l ) Never lay the power tool down until the accessory
has come to a complete stop. The spinning accessory
may grab the surface and pull the power tool out of
yourcontrol.
m ) Do not run the power tool while carrying it at your
side. Accidental contact with the spinning accessory
could snag your clothing, pulling the accessory into
yourbody.
n ) Regularly clean the power tool’s air vents. The
motor’s fan will draw the dust inside the housing and
excessive accumulation of powdered metal may cause
electricalhazards.
o ) Do not operate the power tool near flammable
materials. Sparks could ignite thesematerials.
p ) Do not use accessories that require liquid coolants.
Using water or other liquid coolants may result in
electrocution orshock.
FURTHER SAFETY INSTRUCTIONS FOR ALL
OPERATIONS
Causes and Operator Prevention
of Kickback
Kickback is a sudden reaction to a pinched or snagged rotating
wheel, backing pad, brush or any other accessory. Pinching or
snagging causes rapid stalling of the rotating accessory which
in turn causes the uncontrolled power tool to be forced in the
direction opposite of the accessory’s rotation at the point of
thebinding.
For example, if an abrasive wheel is snagged or pinched by the
workpiece, the edge of the wheel that is entering into the pinch
point can dig into the surface of the material causing the wheel
to climb out or kick out. The wheel may either jump toward or
away from the operator, depending on direction of the wheel’s
movement at the point of pinching. Abrasive wheels may also
break under theseconditions.
Kickback is the result of power tool misuse and/or incorrect
operating procedures or conditions and can be avoided by taking
proper precautions as given below:
a ) Maintain a firm grip on the power tool and position
your body and arm to allow you to resist kickback
forces. Always use auxiliary handle, if provided, for
maximum control over kickback or torque reaction
during start up. The operator can control torque reaction
or kickback forces, if proper precautions aretaken.
b ) Never place your hand near the rotating accessory.
Accessory may kickback over yourhand.
c ) Do not position your body in the area where power
tool will move if kickback occurs. Kickback will propel
the tool in direction opposite to the wheel’s movement at
the point ofsnagging.
d ) Use special care when working corners, sharp edges
etc. Avoid bouncing and snagging the accessory.
Corners, sharp edges or bouncing have a tendency to
snag the rotating accessory and cause loss of control
orkickback.
e ) Do not attach a saw chain woodcarving blade or
toothed saw blade. Such blades create frequent kickback
and loss ofcontrol.
Safety Warnings Specific for Grinding and
Abrasive Cutting-Off Operations
a ) Use only wheel types that are recommended for your
power tool and the specific guard designed for the
selected wheel. Wheels for which the power tool was not
designed cannot be adequately guarded and areunsafe.
b ) The grinding surface of centre depressed wheels
must be mounted below the plane of the guard lip.
An improperly mounted wheel that projects through the
plane of the guard lip cannot be adequatelyprotected.
c ) The guard must be securely attached to the power
tool and positioned for maximum safety, so the least
amount of wheel is exposed towards the operator.
The guard helps to protect the operator from broken wheel
fragments, accidental contact with wheel and sparks that
could igniteclothing.
d ) Wheels must be used only for recommended
applications. For example: do not grind with the side
of cut-off wheel. Abrasive cut-off wheels are intended
for peripheral grinding, side forces applied to these wheels
may cause them toshatter.
e ) Always use undamaged wheel flanges that are
of correct size and shape for your selected wheel.
Proper wheel flanges support the wheel thus
reducing the possibility of wheel breakage. Flanges
for cut-off wheels may be different from grinding
wheelflanges.
f ) Do not use worn down wheels from larger power
tools. Wheel intended for larger power tool is not suitable
for the higher speed of a smaller tool and mayburst.

6
ENGLISH
Additional Safety Warnings Specific for
Abrasive Cutting-Off Operations
a ) Do not “jam” the cut-off wheel or apply excessive
pressure. Do not attempt to make an excessive depth
of cut. Overstressing the wheel increases the loading and
susceptibility to twisting or binding of the wheel in the cut
and the possibility of kickback or wheelbreakage.
b ) Do not position your body in line with and behind
the rotating wheel. When the wheel, at the point of
operations, is moving away from your body, the possible
kickback may propel the spinning wheel and the power
tool directly atyou.
c ) When wheel is binding or when interrupting a cut
for any reason, switch off the power tool and hold
the power tool motionless until the wheel comes to
a complete stop. Never attempt to remove the cut-
off wheel from the cut while the wheel is in motion
otherwise kickback may occur. Investigate and take
corrective action to eliminate the cause of wheelbinding.
d ) Do not restart the cutting operation in the
workpiece. Let the wheel reach full speed and
carefully reenter the cut. The wheel may bind, walk up
or kickback if the power tool is restarted in theworkpiece.
e ) Support panels or any oversized workpiece to
minimize the risk of wheel pinching and kickback.
Large workpieces tend to sag under their own
weight. Supports must be placed under the workpiece
near the line of cut and near the edge of the workpiece on
both sides of thewheel.
f ) Use extra caution when making a “pocket cut” into
existing walls or other blind areas. The protruding
wheel may cut gas or water pipes, electrical wiring or
objects that can causekickback.
Safety Warnings Specific for Sanding
Operations
a ) Do not use excessively oversized sanding disc
paper. Follow manufacturer’s recommendations,
when selecting sanding paper. Larger sanding paper
extending beyond the sanding pad presents a laceration
hazard and may cause snagging, tearing of the disc
orkickback.
Safety Warnings Specific for Wire Brushing
Operations
a ) Be aware that wire bristles are thrown by the brush
even during ordinary operation. Do not overstress
the wires by applying excessive load to the brush.
The wire bristles can easily penetrate light clothing and/
orskin.
b ) If the use of a guard is recommended for wire
brushing, do not allow any interference of the
wire wheel or brush with the guard. Wire wheel or
brush may expand in diameter due to work load and
centrifugalforces.
Additional Safety Rules for Grinders
• Do not use Type 11 (flaring cup) wheels on this tool.
Using inappropriate accessories can result ininjury.
• Always use side handle. Tighten the handle securely. The
side handle should always be used to maintain control of the
tool at alltimes.
WARNING: We recommend the use of a residual current
device with a residual current rating of 30mA orless.
Residual Risks
In spite of the application of the relevant safety regulations
and the implementation of safety devices, certain residual risks
cannot be avoided. These are:
• Impairment ofhearing.
• Risk of personal injury due to flyingparticles.
• Risk of burns due to accessories becoming hot
duringoperation.
• Risk of personal injury due to prolongeduse.
Electrical Safety
The electric motor has been designed for one voltage only.
Always check that the power supply corresponds to the voltage
on the ratingplate.
Your DeWALT tool is double insulated in accordance
with EN60745; therefore no earth wire isrequired.
WARNING: 127V units have to be operated via a fail-safe
isolating transformer with an earth screen between the
primary and secondary winding.
If the supply cord is damaged, it must be replaced by a
specially prepared cord available through the
DeWALT
serviceorganisation.
Mains Plug Replacement
(Middle East and Africa)
If a new mains plug needs to be fitted:
• Safely dispose of the oldplug.
• Connect the brown lead to the live terminal in theplug.
• Connect the blue lead to the neutralterminal.
WARNING: No connection is to be made to the
earthterminal.
Follow the fitting instructions supplied with good quality plugs.
Recommended fuse: 13A.
Using an Extension Cable
An extension cord should not be used unless absolutely
necessary. If an extension cable is required, use an approved
3–core extension cable suitable for the power input of this tool
(see Technical Data). The minimum conductor size is 1.5 mm
2
;
the maximum length is30m.
When using a cable reel, always unwind the cablecompletely.
Package Contents
The package contains:
1 Angle grinder

7
ENGLISH
1 Guard
1 Side handle
1 Flange set
1 Two-pin spanner
1 Instruction manual
• Check for damage to the tool, parts or accessories which may
have occurred duringtransport.
• Take the time to thoroughly read and understand this manual
prior tooperation.
Markings on Tool
The following pictograms are shown on the tool:
Read instruction manual beforeuse.
Wear earprotection.
Wear eyeprotection.
Date Code Position (Fig. A)
The date code
24
, which also includes the year of manufacture,
is printed into thehousing.
Example:
2017 XX XX
Year of Manufacture
Description (Fig. A, D)
WARNING: Never modify the power tool or any part of it.
Damage or personal injury couldresult.
1
On/off trigger
2
Lock-off button (B5, ZA models only)
3
Spindle lock
4
Spindle
5
Guard
6
Guard screw
7
Side handle
8
Lock-on button
9
Two-pin spanner
10
Backing flange
11
Threaded clamp nut
Intended Use
Your heavy-duty angle grinder has been designed for
professional grinding, sanding, wire brush andcutting.
DO NOT use under wet conditions or in the presence of
flammable liquids orgases.
These heavy-duty angle grinders are professional powertools.
DO NOT let children come into contact with the tool.
Supervision is required when inexperienced operators use
thistool.
• This product is not intended for use by persons (including
children) suffering from diminished physical, sensory or
mental abilities; lack of experience, knowledge or skills
unless they are supervised by a person responsible for their
safety. Children should never be left alone with thisproduct.
ASSEMBLY AND ADJUSTMENTS
WARNING: To reduce the risk of serious personal
injury, turn tool off and disconnect tool from power
source before making any adjustments or removing/
installing attachments or accessories. An accidental
start-up can causeinjury.
Attaching Side Handle (Fig. B)
WARNING: Before using the tool, check that the handle is
tightenedsecurely.
WARNING: The side handle should always be used to
maintain control of the tool at alltimes.
Screw the side handle
7
tightly into one of the holes
13
on
either side of the gearcase.
Mounting and Removing a Keyed Guard
(Fig. A, C)
CAUTION: Guards must be used with thisgrinder.
When using the grinder for cutting metal or masonry a Type 1
guard MUST be used. Type 1 guards are available at extra cost
from
DeWALTdistributors.
DO NOT use cutting functioning without a proper Type 1 guard.
Misuse may result in serious injury.
NOTE: Please refer to the Grinding and Cutting Accessory
Chart at the end of this section to show other accessories that
can be used with thesegrinders.
1. Place the angle grinder on a table, spindle
4
up.
2. Align the lugs
14
with the notches
15
.
3. Press the guard
5
down and rotate it to the
requiredposition.
4. Securely tighten the screw
6
.
5. To remove the guard, slacken thescrew.
CAUTION: If the guard cannot be tightened by the
adjusting screw, do not use the tool. To reduce the risk of
personal injury, take the tool and guard to a service center
to repair or replace theguard.
Fitting and Removing a Grinding or Cutting
Disc (Fig. A, D, E)
WARNING: Do not use a damageddisc.
1. Place the tool on a table, guardup.
2. Fit the backing flange
10
correctly onto the spindle
4
(Fig.D).
3. Place the disc
17
on the backing flange
10
(Fig.E). When
fitting a disc with a raised centre, make sure that the raised
centre
16
is facing the backing flange
10
.
4. Screw the threaded clamp nut
11
onto the spindle
4
(Fig.E):

8
ENGLISH
a. The ring on the threaded clamp nut
11
must face
towards the disc when fitting a grinding disc (Fig. E1);
b. The ring on the threaded clamp nut
11
must face away
from the disc when fitting a cutting disc (Fig. E2).
5. Press the spindle lock button
3
and rotate the spindle
4
until it locks inposition.
6. Tighten the threaded clamp nut
11
with the two-pin
spannersupplied.
7. Release the spindlelock.
8. To remove the disc, loosen the threaded clamp nut
11
with
the two-pinspanner.
Fitting and Removing a Backing pad/
Sanding sheet (Fig. A, D, F)
1. Place the tool on a table or flat surface, with the guard
facingup.
2. Remove the backing flange
10
.
3. Place the rubber backing pad correctly onto the spindle
4
.
4. Place the sanding sheet on the rubber backingpad.
5. Screw the threaded sanding clamp nut
12
supplied with
the backing pad onto the spindle. The ring on the threaded
clamp nut must face towards the rubber backingpad.
6. Press the spindle lock button
3
and rotate the spindle
4
until it locks inposition.
7. Tighten the threaded sanding clamp nut
12
with the two-
pinspanner.
8. Release the spindlelock.
9. To remove the rubber backing pad, loosen the threaded
clamp nut
12
with the two-pinspanner.
Fitting a Wire Cup Brush
Screw the wire cup brush directly onto the spindle without the
use of the spacer and threadedflange.
Prior to Operation
• Install the guard and appropriate disc or wheel. Do not use
excessively worn discs orwheels.
• Be sure the inner and outer flange are mounted correctly.
Follow the instructions given in the Grinding and Cutting
AccessoryChart.
• Make sure the disc or wheel rotates in the direction of the
arrows on the accessory and thetool.
• Do not use a damaged accessory. Before each use inspect
the accessory such as abrasive wheels for chips and cracks,
backing pad for cracks, tear or excess wear, wire brush for
loose or cracked wires. If power tool or accessory is dropped,
inspect for damage or install an undamaged accessory. After
inspecting and installing an accessory, position yourself and
bystanders away from the plane of the rotating accessory
and run the power tool at maximum no-load speed for one
minute. Damaged accessories will normally break apart
during this testtime.
• Never use blotters together with bonded abrasiveproducts.
• Do not work with the grinding cup without a suitable guard
inplace.
• Do not strain the machine so heavily that it comes to
a standstill. After heavily straining the power tool,
continue to run it at no-load for several minutes to
cool down the accessory. Do not touch grinding and
cutting discs before they have cooled down. The discs
can become very hot whileworking.
• Do not use the power tool with a cut-offstand.
OPERATION
Instructions for Use
WARNING: Always observe the safety instructions and
applicableregulations.
WARNING: To reduce the risk of serious personal
injury, turn tool off and disconnect tool from power
source before making any adjustments or removing/
installing attachments or accessories. An accidental
start-up can causeinjury.
WARNING:
• Ensure all materials to be ground or cut are secured
inplace.
• Secure and support the workpiece. Use clamps or a
vice to hold and support the workpiece to a stable
platform. It is important to clamp and support the
workpiece securely to prevent movement of the
workpiece and loss of control. Movement of the
workpiece or loss of control may create a hazard and
cause personalinjury.
• Support panels or any oversized workpiece
to minimize the risk of wheel pinching and
kickback. Large workpieces tend to sag under their
own weight. Supports must be placed under the
workpiece near the line of cut and near the edge of the
workpiece on both sides of thewheel.
• Always wear regular working gloves while operating
thistool.
• Apply only a gentle pressure to the tool. Do not exert
side pressure on thedisc.
• Avoid overloading. Should the tool become hot, let it
run a few minutes under no load condition to cool the
accessory. Do not touch accessories before they have
cooled. The discs become very hot duringuse.
• Never work with the grinding cup without a suitable
protection guard inplace.
• Do not use the power tool with a cut-offstand.
• Never use blotters together with bonded
abrasiveproducts.
• Be aware, the wheel continues to rotate after the tools
is switchedoff.
• The tool is not designed to be used with a
grindingcup.
• Do not use separate reducing bushings or adapters to
adapt large hole abrasivewheels.

9
ENGLISH
Proper Hand Position (Fig. G)
WARNING: To reduce the risk of serious personal injury,
ALWAYS use proper hand position asshown.
WARNING: To reduce the risk of serious personal
injury, ALWAYS hold securely in anticipation of a
suddenreaction.
Proper hand position requires one hand on the side handle
7
, with the other hand on the body of the tool, as shown in
FigureG.
Switching On and Off (Fig. A)
B5, ZA models
The on/off switch is equipped with an unlockingswitch.
To run the tool, depress the lock-off button
2
and subsequently
operate the on/off trigger
1
.
Release the lock-off button
2
.To stop the tool, release
theswitch.
IN models
To run the tool, depress the on/off trigger switch
1
.
To stop the tool, release theon/off trigger switch.
Lock-on Button (Fig. A)
For continuous operation depress the lock-on button
8
and
release the on/off triggerswitch.
To stop the tool press the on/off switchagain.
The lock-on button can be permanently removed without
compromising compliance with regulatory agencies shown on
the tool’s nameplate. Removal of the lock pin must be done by a
DeWALT ServiceCentre.
Spindle Lock (Fig. A)
The spindle lock
3
is provided to prevent the spindle from
rotating when installing or removing wheels. Operate the
spindle lock only when the tool is turned off, unplugged from
the power supply, and has come to a completestop.
NOTICE: To reduce the risk of damage to the tool, do
not engage the spindle lock while the tool is operating.
Damage to the tool will result and attached accessory
may spin off possibly resulting ininjury.
To engage the lock, depress the spindle lock button and rotate
the spindle until you are unable to rotate the spindlefurther.
Metal Applications
When using the tool in metal applications, make sure that a
residual current device (RCD) has been inserted to avoid residual
risks caused by metalswarf.
If the power supply is shut off by the RCD, take the tool to
authorised D
eWALT repairagent.
WARNING: In extreme working conditions, conductive
dust can accumulate inside the machine housing when
working with metal. This can result in the protective
insulation inthe machine becoming degraded with a
potential risk of an electricalshock.
To avoid build-up of metal swarf inside the machine, we
recommend to clear the ventilation slots on a daily basis. Refer
toMaintenance.
Cutting Metal
For cutting with bonded abrasives, always use a
protection guard type1.
When cutting, work with moderate feed, adapted to the
material being cut. Do not exert pressure onto the cutting disc,
tilt or oscillate themachine.
Do not reduce the speed of running down cutting discs by
applying sidewardpressure.
The machine must always work in an upgrinding motion.
Otherwise, the danger exists of it being pushed uncontrolled
out of thecut.
When cutting profiles and square bar, it is best to start at the
smallest crosssection.
Rough Grinding
Never use a cutting disc forrough grinding.
Always use the guard type27.
The best roughing results are achieved when setting the
machine at an angle of 30° to 40°. Move the machine back and
forth with moderate pressure. In this manner, the workpiece
will not become too hot, does not discolour and no grooves
areformed.
Cutting Stone
The machine shall be used only for dry cutting. For cutting
stone, it is best to use a diamond cutting disc. Operate the
machine only with additional dust protectionmask.
Working Advice
Exercise caution when cutting slots in structuralwalls.
Slots in structural walls are subject to the country-specific
regulations. These regulations are to be observed under all
circumstances. Before beginning work, consult the responsible
structural engineer, architect or the constructionsupervisor.
Using Flap Discs
WARNING: Metal dust build-up. Extensive use of flap
discs in metal applications can result in the increased
potential for electric shock. To reduce this risk, insert an
RCD before use and clean the ventilation slots daily by
blowing dry compressed air into the ventilation slots
inaccordance with the below maintenanceinstructions.
MAINTENANCE
Your DeWALT power tool has been designed to operate
over a long period of time with a minimum of maintenance.
Continuous satisfactory operation depends upon proper tool
care and regularcleaning.
WARNING: To reduce the risk of serious personal
injury, turn tool off and disconnect tool from power
source before making any adjustments or removing/
installing attachments or accessories. An accidental
start-up can causeinjury.

10
ENGLISH
Lubrication
Your power tool requires no additionallubrication.
Cleaning
WARNING: Blow dirt and dust out of the main housing
with dry air as often as dirt is seen collecting in and around
the air vents. Wear approved eye protection and approved
dust mask when performing thisprocedure.
WARNING: Never use solvents or other harsh chemicals
for cleaning the non-metallic parts of the tool. These
chemicals may weaken the materials used in these parts.
Use a cloth dampened only with water and mild soap.
Never let any liquid get inside the tool; never immerse any
part of the tool into aliquid.
Optional Accessories
WARNING: Since accessories, other than those offered
by DeWALT, have not been tested with this product, use
of such accessories with this tool could be hazardous.
To reduce the risk of injury, only
DeWALT recommended
accessories should be used with thisproduct.
Consult your dealer for further information on the
appropriateaccessories.
Accessory Chart
Max.
[mm]
[mm]
Min.
Rotation
[min.
-1
]
Periphical
speed
[m/s]
Threaded hole
length
[mm]
D b d
d
D
b
230 6
22,23
6500 80 –
D
180 – – 8500 80 –
D
d
b
75 30 M14 8500 45 20.0
D
180 12 M14 8500 80 20.0
230 12 M14 8500 80 20.0
Protecting the Environment
Separate collection. Products and batteries marked
with this symbol must not be disposed of with normal
householdwaste.
Products and batteries contain materials that can
be recovered or recycled reducing the demand for raw
materials. Please recycle electrical products and batteries
according to local provisions. Further information is available at
www.2helpU.com.

11
ENGLISH
Grinding and Cutting Accessory Chart
Guard Type Accessory Description How to Fit Grinder
Type 27
Guard
Depressed centre
grinding disc
Type 27 guard
Backing flange
Type 27 depressed
centre wheel
Threaded clamp nut
Flap wheel
Wire wheels
Wire wheels with
threaded nut
Type 27 guard
Wire wheel
Wire cup with
threaded nut
Type 27 guard
Wire brush
Backing pad/
sanding sheet
Type 27 guard
Rubber backing pad
Sanding disc
Threaded clamp nut

12
ENGLISH
Grinding and Cutting Accessory Chart (cont.)
Guard Type Accessory Description How to Fit Grinder
Type 1
Guard
Masonry cutting
disc, bonded
Type 1 guard
Backing flange
Cutting wheel
Threaded clamp nut
Metal
cutting disc,
bonded
Type 1
Guard
OR
Type 27
Guard
Diamond cutting
wheels

13
FRANÇAIS
Consignes de sécurité générales propres aux
outils électriques
AVERTISSEMENT: lire toutes les directives et
consignes de sécurité. Tout manquement aux
directives et consignes ci-incluses comporte des risques
de décharges électriques, d’incendie et/ou de dommages
corporelsgraves.
CONSERVER TOUTES CES DIRECTIVES ET
CONSIGNES À TITRE DE RÉFÉRENCE
Le terme «outil électrique» mentionné dans les avertissements
ci-après se rapporte aux outils alimentés sur secteur (avec fil) ou
par piles (sans fil).
1) Sécurité – Aire de Travail
a ) Maintenir l’aire de travail propre et bien éclairée. Les
lieux sombres ou encombrés sont propices auxaccidents.
b ) Ne pas utiliser un outil électrique dans un milieu
déflagrant, comme en présence de liquides, gaz ou
poussières inflammables. Les outils électriques peuvent
produire des étincelles qui pourraient enflammer toute
émanation ou poussièreambiante.
c ) Maintenir à l’écart les enfants, ou toute autre
personne, lors de l’utilisation d’un outil électrique.
Toute distraction pourrait faire perdre la maîtrise de
l’appareil.
2) Sécurité – Électricité
a ) La fiche électrique de l’outil doit correspondre à la
prise murale. Ne modifier la fiche en aucune façon.
Ne pas utiliser de fiche d’adaptation avec un outil
électrique mis à la terre (masse). L’utilisation de fiches
d’origine et de prises appropriées réduira tout risque de
déchargesélectriques.
b ) Éviter tout contact corporel avec des éléments mis
à la terre comme: tuyaux, radiateurs, cuisinières
ou réfrigérateurs. Les risques de décharges électriques
augmentent lorsque le corps est mis à laterre.
c ) Ne pas exposer les outils électriques à la pluie ou à
l’humidité. Tout contact d’un outil électrique avec un
liquide augmente les risques de déchargesélectriques.
d ) Ne pas utiliser le cordon de façon abusive. Ne
jamais utiliser le cordon pour transporter, tirer
ou débrancher un outil électrique. Protéger le
cordon de toute source de chaleur, de l’huile, et de
tout bord tranchant ou pièce mobile. Les cordons
endommagés ou emmêlés augmentent les risques de
déchargesélectriques.
e ) En cas d’utilisation d’un outil électrique à l’extérieur,
utiliser systématiquement une rallonge conçue à cet
effet. Cela diminuera tout risque de déchargesélectriques.
Félicitations !
Vous avez choisi un outil DeWALT. Des années d’expertise dans
le développement et l’innovation de ses produits ont fait de
DeWALT, le partenaire privilégié des utilisateurs professionnels
d’outilsélectriques.
Fiche technique
DWE496 DWE497
Tension V
AC
B5/IN 220-240 220-240
ZA 230 230
Type 1 1
Fréquence Hz B5/IN 50/60 50/60
ZA 50 50
Entrée d'alimentation W 2600 2600
Vitesse à vide/nominale min
-1
6500 8500
Diamètre de meule mm 230 180
Diamètre de broche M14 M14
Longueur de broche mm 19 19
Poids kg 5,4 5,4
Définitions : consignes de sécurité
Les définitions ci-dessous décrivent le niveau de gravité de
chaque mot signalétique. Lisez le manuel de l’utilisateur et
soyez attentif à cessymboles.
DANGER : indique une situation dangereuse imminente
qui, si elle n’est pas évitée, entraînera des blessures
graves oumortelles.
AVERTISSEMENT : indique une situation dangereuse
potentielle qui, si elle n’est pas évitée, pourrait entraîner
des blessures graves oumortelles.
ATTENTION : indique une situation dangereuse
potentielle qui, si elle n’est pas évitée, pourrait entraîner
des blessures minimes oumodérées.
AVIS: indique une pratique ne posant aucun risque
de dommages corporels, mais qui par contre, si rien
n’est fait pour l’éviter, pourrait poser des risques de
dommagesmatériels.
Indique un risque d’électrocution.
Indique un risque d’incendie.
AVERTISSEMENT: afin de réduire le risque de blessure,
lisez le manuel d’instruction.
Français (traduction de la notice d’instructions originale)
GRANDE MEULEUSE ANGULAIRE
DWE496, DWE497

14
FRANÇAIS
d ) Après utilisation, ranger les outils électriques hors
de portée des enfants et ne permettre à aucune
personne non familière avec son fonctionnement (ou
sa notice d’instructions) de l’utiliser. Les outils peuvent
être dangereux entre des mainsinexpérimentées.
e ) Entretenir les outils électriques. Vérifier les pièces
mobiles pour s’assurer qu’elles sont bien alignées
et tournent librement, qu’elles sont en bon état et
ne sont affectées d’aucune condition susceptible de
nuire au bon fonctionnement de l’outil. En cas de
dommage, faire réparer l’outil électrique avant toute
nouvelle utilisation. De nombreux accidents sont causés
par des outils malentretenus.
f ) Maintenir tout organe de coupe propre et bien
affûté. Les outils de coupe bien entretenus et affûtés
sont moins susceptibles de se coincer et sont plus faciles
àcontrôler.
g ) Utiliser un outil électrique, ses accessoires, mèches,
etc., conformément aux présentes directives et
suivant la manière prévue pour ce type particulier
d’outil électrique, en tenant compte des conditions
de travail et de la tâche à effectuer. L’utilisation d’un
outil électrique à des fins autres que celles prévues est
potentiellementdangereuse.
5) Réparation
a ) Faire entretenir les outils électriques par un
réparateur qualifié en n’utilisant que des pièces
de rechange identiques. Cela permettra de préserver
l’intégrité de l’outil électrique et la sécurité de l’utilisateur.
CONSIGNES DE SÉCURITÉ SUPPLÉMENTAIRES
POUR LES GRANDES MEULEUSES ANGULAIRES
Consignes de sécurité pour toutes les
opérations
a ) Cet outil électrique a été conçu pour le meulage, le
ponçage, le brossage métallique ou le tronçonnage.
Veuillez lire tous les avertissements de sécurité,
toutes les instructions, illustrations et spécifications
fournies avec cet outil électrique. Le non-respect des
instructions listées ci-dessous peut conduire à des chocs
électriques, des incendies et/ou de gravesblessures.
b ) Les opérations telles que le polissage ne sont pas
recommandées avec cet outilélectrique.
Les opérations pour lesquelles l’outil électrique n’a pas été
conçu peuvent engendrer des risques et conduire à des
blessurescorporelles.
c ) Ne pas utiliser des accessoires qui n’ont pas été
spécifiquement conçus et recommandés par le
fabricant de l’outil. Le fait que l’accessoire puisse être
fixé à votre outil électrique ne veut pas forcément dire que
son utilisation est sansrisque.
d ) La vitesse nominale des accessoires doit être
équivalente ou supérieure à celle recommandée sur
l’étiquette d’avertissement de l’outil. Les accessoires
f ) Si on ne peut éviter d’utiliser un outil électrique en
milieu humide, utiliser un circuit protégé par un
dispositif de courant résiduel (RCD). Cela réduira tout
risque de déchargesélectriques.
3) Sécurité Individuelle
a ) Rester systématiquement vigilant et faire preuve de
jugement lorsqu’on utilise un outil électrique. Ne pas
utiliser d’outil électrique en cas de fatigue ou sous
l’influence de drogues, d’alcool ou de médicaments.
Tout moment d’inattention pendant l’utilisation d’un
outil électrique comporte des risques de dommages
corporelsgraves.
b ) Porter un équipement de protection individuel.
Porter systématiquement un dispositif de protection
oculaire. Le fait de porter un masque anti-poussières,
des chaussures antidérapantes, un casque de sécurité ou
un dispositif de protection auditive, lorsque la situation le
requiert, réduira les risques de dommagescorporels.
c ) Prévenir tout démarrage accidentel. S’assurer
que l’interrupteur est en position d’arrêt avant de
brancher l’outil sur le secteur et/ou à la batterie, ou
de le ramasser ou le transporter. Transporter un outil
le doigt sur l’interrupteur ou brancher un outil électrique
alors que l’interrupteur est en position de marche invite
lesaccidents.
d ) Retirer toute clé de réglage avant de démarrer
l’outil. Une clé laissée sur une pièce rotative d’un outil
électrique comporte des risques de dommagescorporels.
e ) Adopter une position stable. Maintenir les pieds
bien ancrés au sol et conserver son équilibre en
permanence. Cela permettra de mieux maîtriser l’outil
électrique en cas de situationsimprévues.
f ) Porter des vêtements appropriés. Ne porter aucun
vêtement ample ou bijou. Maintenir cheveux,
vêtements et gants à l’écart des pièces mobiles, car ils
pourraient s’y faireprendre.
g ) Lorsqu’un dispositif de connexion à un système de
dépoussiérage ou d’élimination est fourni, s’assurer
qu’il est branché et utilisé correctement. L’utilisation
de ces dispositifs peut réduire les risques engendrés par
lespoussières.
4) Utilisation et Entretien des Outils
Électriques
a ) Ne pas forcer un outil électrique. Utiliser l’outil
approprié au travail en cours. L’outil approprié
effectuera un meilleur travail, de façon plus sûre et à la
vitesse pour laquelle il a étéconçu.
b ) Ne pas utiliser un outil électrique dont l’interrupteur
est défectueux. Tout appareil dont l’interrupteur est
défectueux est dangereux et doit êtreréparé.
c ) Débrancher la fiche du secteur et/ou la batterie de
l’outil électrique avant d’effectuer tout réglage, de
changer tout accessoire, ou avant de le ranger. Ces
mesures préventives réduiront tout risque de démarrage
accidentel de l’appareil.

15
FRANÇAIS
exposées de l’outil sous tension et provoquer un choc
électrique à l’utilisateur.
k ) Maintenir le cordon électrique éloigné de la partie
rotative de l’outil. En cas de perte de contrôle, le cordon
peut être sectionné ou abîmé, et vos bras ou mains
peuvent entrer en contact avec l’accessoire enrotation.
l ) Attendre systématiquement l’arrêt complet de l’outil
avant de le déposer. L’accessoire en rotation pourrait
sinon accrocher la surface et vous faire perdre le contrôle
de l’outil.
m ) Ne pas laisser l’outil électrique en marche alors qu’il
est accroché à votre côté. Un contact accidentel avec
l’accessoire en rotation pourrait accrocher vos vêtements,
et attirer l’accessoire vers votrecorps.
n ) Nettoyer régulièrement les orifices d’aération de
l’outil. Le ventilateur du moteur attire la poussière à
l’intérieur du boîtier et une accumulation excessive
de poussières métalliques peut conduire à un
risqueélectrique.
o ) Ne pas utiliser l’outil électrique à proximité de
matériaux inflammables. Des étincelles pourraient
enflammer cesmatières.
p ) Ne pas utiliser d’accessoires nécessitant l’utilisation
d’un réfrigérant fluide. L’utilisation d’eau ou de tout
autre fluide de refroidissement peut provoquer une
électrocution ou un chocélectrique.
CONSIGNES DE SÉCURITÉ ADDITIONNELLES
POUR TOUTES LES OPÉRATIONS
Causes et prévention des rebonds
Les rebonds sont la conséquence du pincement ou du grippage
d’un disque, d’un tampon de soutien, d’une brosse ou de tout autre
accessoire en rotation. Le pincement ou le grippage provoque le
blocage rapide de l’accessoire rotatif forçant alors l’outil électrique
non contrôlé à se diriger dans la direction opposée par rapport à
son sens de rotation au niveau du point degrippage.
Par exemple, si un disque abrasif reste grippé ou pincé dans une
pièce à travailler, le bord du disque engagé au point de grippage
peut s’enfoncer dans la surface du matériau ce qui le fait tressauter
ou rebondir. Le disque peut alors rebondir vers ou à l’opposé de
l’utilisateur, selon le sens du mouvement du disque au point de
grippage. Dans ces conditions, il peut aussi arriver que les disques
abrasifs sebrisent.
Les rebonds proviennent d’une utilisation impropre de l’outil
électrique ou de conditions ou procédures d’exécution incorrectes,
et peuvent être évités en prenant les précautions adéquates
énoncées ci-dessous :
a ) Maintenez fermement l’outil électrique et placez
votre corps et votre bras de façon à pouvoir résister
à la force d’un rebond. Utilisez systématiquement
la poignée latérale, si fournie avec l’outil, pour un
contrôle maximal de l’outil en cas de rebonds ou
retour de couple au démarrage. L’utilisateur peut
contrôler les retours de couple ou la force des rebonds si
des précautions adéquates sontprises.
qui fonctionnent plus vite que leur vitesse nominale
peuvent rompre et voler enéclats.
e ) Le diamètre extérieur et l’épaisseur de votre
accessoire doivent correspondre à la capacité
nominale de votre outil électrique. Des accessoires mal
dimensionnés ne peuvent pas être correctement protégés
etcontrôlés.
f ) Le filetage d’installation des accessoires doit
correspondre à celui de l’axe de la meuleuse. Pour
les accessoires montés avec des brides, l’alésage
de l’accessoire doit correspondre au diamètre de
positionnement de la bride. Les accessoires qui ne
correspondent pas au dispositif de montage de l’outil
électrique ne tournent pas correctement, vibrent de façon
excessive et peuvent provoquer la perte de contrôle de
l’outil.
g ) N’utilisez pas d’accessoires endommagés. Avant
toute utilisation, vérifiez tous les accessoires, comme
par exemple l’absence d’ébréchures ou de fissures
sur les disques, l’absence de fissures ou d’usure
excessive sur les tampons de soutien ou que les
brosses métalliques ne comportent aucun élément
brisé ou lâche. Si l’outil électrique ou l’accessoire
tombent, vérifiez l’absence de dommages ou
installez un accessoire en bon état. Après avoir
inspecté et installé un accessoire, éloignez-vous
et toutes personnes présentes du plan de rotation
de l’accessoire et laissez tourner l’outil électrique
une minute à sa vitesse à vide maximale. En
général, c’est pendant ce délai de test que se brisent les
accessoiresendommagés.
h ) Porter un équipement de protection individuelle. En
fonction de l’intervention, utilisez un écran facial
ou des lunettes de sécurité. Si approprié, portez un
masque anti-poussières, une protection auditive,
des gants et un tablier d’atelier capables de stopper
tout fragment abrasif ou provenant de la pièce
à travailler. La protection oculaire doit être capable
d’arrêter les débris générés par les diverses opérations. Le
masque anti-poussières ou le respirateur doivent pouvoir
filtrer les particules générées par votre intervention. Les
expositions prolongées à un niveau de bruit élevé peuvent
provoquer une perte de l’acuitéauditive.
i ) Maintenir à distance toute personne étrangère au
travail en cours. Toute personne pénétrant dans
la zone de travail doit porter des équipements de
protection individuels. Des débris provenant de la
pièce à travailler ou d’un accessoire brisé peuvent être
éjectés et provoquer des blessures au-delà de la zone de
travailimmédiate.
j ) Ne tenez l’outil que par ses surfaces de préhension
isolées lorsque vous réalisez une opération pendant
laquelle l’accessoire de coupe peut entrer en contact
avec des câbles cachés ou son propre cordon
électrique. Tout contact de l’accessoire de coupe avec
un fil sous tension peut mettre les parties métalliques

16
FRANÇAIS
Consignes spécifiques de sécurité
additionnelles propres au tronçonnage
abrasif
a ) Ne coincez pas le disque à tronçonner et ne lui
appliquez pas une pression excessive. Ne tentez
pas de réaliser des découpes de trop grandes
profondeurs. Une pression excessive sur le disque
augmente la charge imposée à l’outil et les possibilités
de torsion ou de grippage du disque dans la coupe et par
conséquent les risques de rebonds ou deruptures.
b ) Ne placez pas votre corps dans l’alignement ou
derrière le disque en rotation. Lorsque le disque,
au point d’exécution, s’éloigne de votre corps, le
rebond possible peut le propulser avec l’outil électrique
directement versvous.
c ) En cas de grippage du disque ou si une coupe est
interrompue pour une quelconque raison, éteignez
l’outil électrique et maintenez-le immobile jusqu’à
l’arrêt complet du disque. Ne tentez jamais de retirer
un disque à tronçonner de la coupe alors qu’il est
en rotation, un rebond pourrait sinon se produire.
Cherchez la cause du grippage du disque et appliquez les
actions correctives afin de lasupprimer.
d ) Ne redémarrez pas les travaux de découpe dans la
pièce à découper. Laisser la meule tourner à plein
régime puis ré-entrer dans la coupe prudemment.
Le disque pourrait sinon se gripper, sortir de la coupe
ou rebondir si l’outil électrique était remis en marche à
l’intérieur de la pièce àdécouper.
e ) Soutenir les panneaux, ou toute pièce
surdimensionnée, pour minimiser tout risque de
grippage ou rebond de la meule. Les pièces de grande
taille ont tendance à s’affaisser sous leur propre poids. Des
supports doivent être placés sous la pièce à découper, près
de la ligne de découpe, des deux côtés dudisque.
f ) Prenez des précautions supplémentaires lors de
«coupes de cavités» dans des murs existants ou
dans toute zone à visibilité limitée. La saillie du disque
pourrait couper des canalisations de gaz ou d’eau, des fils
électriques ou des objets pouvant provoquer desrebonds.
Consignes spécifiques de sécurité propres au
ponçage
a ) N’utilisez pas des disques de papier abrasif de taille
excessive. Suivez les recommandations du fabricant
lorsque vous choisissez du papier à poncer. Les feuilles
de papier abrasif de grande taille, dépassant le tampon
ponceur, présentent un risque de lacération et peuvent
provoquer le grippage ou le déchirement du disque ou
desrebonds.
b ) Ne placez jamais vos mains près de l’accessoire en
rotation. L’accessoire pourrait rebondir sur vosmains.
c ) Ne positionnez pas votre corps dans l’espace que
pourrait occuper l’outil en cas de rebonds. Un rebond
propulse l’outil dans la direction opposée au mouvement
du disque au point degrippage.
d ) Prenez des précautions supplémentaires si vous
travaillez dans des coins, des bords acérés,etc.
Évitez de faire rebondir l’outil sur la matière et le
grippage de l’accessoire. Les coins, bords acérés ou les
rebondissements ont tendance à retenir l’accessoire en
rotation et à provoquer la perte de contrôle de l’outil ou
desrebonds.
e ) Ne fixez pas de lame à sculpter ou de lame dentée.
Ces lames provoquent de fréquents rebonds ou perte
decontrôle.
Consignes spécifiques de sécurité
propres aux opérations de meulage et de
tronçonnage
a ) N’utilisez que les types de disques recommandés
pour votre outil électrique ainsi que le carter
spécifiquement conçu pour le disque choisi. Les
disques non conçus pour l’outil électrique ne peuvent pas
être correctement protégés et ils sontdangereux.
b ) La surface de meulage des disques à moyeu déporté
doit être montée sous le plat de la lèvre du carter. Un
disque mal monté qui dépasse du plat de la lèvre du carter
ne peut pas être correctementprotégé.
c ) Le carter doit être soigneusement arrimé à l’outil
électrique et installé pour optimiser la sécurité, de
façon à ce que l’utilisateur soit le moins possible
exposé à la meule. Le carter doit protéger l’utilisateur
contre des fragments de disques cassés, le contact
accidentel avec ces derniers et des étincelles qui pourraient
enflammer lesvêtements.
d ) Les disques ne doivent être utilisés que pour les
applications recommandées. Par exemple: ne
pas meuler avec la partie latérale d’une meule à
tronçonner. Les disques abrasifs à tronçonner sont
prévus pour le meulage périphérique, toute force latérale
appliquée sur ces disques pourrait les faire voler enéclats.
e ) Utiliser systématiquement des brides de meules en
parfait état, de taille et forme adaptées à la meule
choisie. Les brides de disque servent de support aux
disques, réduisant ainsi les possibilités de rupture.
Les brides de disques à tronçonner peuvent différer des
brides de disques àmeuler.
f ) N’utilisez pas de disques usés provenant d’outils
électriques plus gros. Les disques conçus pour des outils
électriques plus gros ne sont pas adaptés pour les vitesses
plus rapides des outils plus petits, et ils peuvent voler
enéclats.

17
FRANÇAIS
Toujours utiliser la fiche prescrite lors du remplacement
du câble d’alimentation.
Type 11 pour la classe II
(Isolation double) – outils
Type 12 pour la classe I
(Conducteur de terre) – outils
En cas d’utilisation à l’extérieur, connecter les outils
portatifs à un disjoncteurFI.
Remplacement de la fiche d’alimentation
(Moyen-Orient et Afrique)
Si une nouvelle fiche d’alimentation doit être montée:
• Mettre soigneusement au rebut l’anciennefiche.
• Raccorder le fil marron à la borne de phase dans lafiche.
• Raccorder le fil bleu à la borne deneutre.
AVERTISSEMENT: aucun branchement ne doit être fait à
la borne deterre.
Suivez les instructions de montage fournies avec des fiches de
bonne qualité. Fusible recommandé: 13A.
Utilisation d’une rallonge
N’utilisez une rallonge que si c’est absolument nécessaire. Si une
rallonge est nécessaire, utilisez une rallonge à troisconducteurs
adaptée à la puissance absorbée de cet outil (voir Données
techniques). La taille minimum du conducteur doit être de
1,5mm
2
; la longueur maximum est de 30m.
En cas d’utilisation d’un dévidoir, dérouler systématiquement le
câble sur toute salongueur.
Contenu de l’emballage
Ce carton comprend:
1 Meuleuse angulaire
1 Carter de protection
1 Poignée latérale
1 Dispositif de bride
1 Clé de serrage à deux broches
1 Notice d’instructions
• Vérifier que l’appareil et ses pièces ou accessoires n’ont pas été
endommagés lors dutransport.
• Prendre le temps de lire attentivement et comprendre cette
notice d’instructions avant toute utilisation de l’appareil.
Étiquettes sur l’appareil
On trouve les diagrammes suivants sur l’outil:
Lire la notice d’instructions avant touteutilisation.
Porter un dispositif de protectionauditive.
Porter un dispositif de protectionoculaire.
Consignes spécifiques de sécurité propres au
brossage métallique
a ) Gardez à l’esprit que des fibres métalliques sont
éjectées par la brosse même pendant les opérations
ordinaires. Ne contraignez pas trop les fils
métalliques en appliquant une pression excessive
sur la brosse. Les fibres métalliques peuvent facilement
pénétrer les vêtements légers et/ou lapeau.
b ) Si l’utilisation d’un carter est recommandée pour le
brossage métallique, protégez le disque métallique
ou la brosse de toute interférence avec le carter. Le
diamètre des disques métalliques ou des brosses peut se
dilater pendant l’opération à cause de la charge ou de la
forcecentrifuge.
Consignes de sécurité supplémentaires pour
les meuleuses
• Ne pas utiliser les meules de type11 (à moyeu déporté)
sur cet outil. L’utilisation d’accessoires inappropriés peut
causer desblessures.
• Utilisez toujours la poignée latérale. Serrez fermement
la poignée. La poignée latérale doit toujours être utilisée pour
conserver le contrôle de l’outil enpermanence.
AVERTISSEMENT : nous recommandons l’utilisation d’un
disjoncteur différentiel avec un seuil de déclenchement de
30mA oumoins.
Risques résiduels
Malgré l’application de la réglementation de sécurité applicable
et la mise en œuvre des dispositifs de sécurité, certains risques
résiduels ne peuvent pas être évités. À savoir:
• Diminution de l’acuitéauditive.
• Risques de dommages corporels dus à la projection
departicules.
• Risques de brûlures provoquées par des accessoires chauffant
pendant leurutilisation.
• Risques de dommages corporels dus à un usageprolongé.
Sécurité électrique
Le moteur électrique a été conçu pour fonctionner sur une
tension unique. Vérifier systématiquement que la tension
du secteur correspond bien à la tension indiquée sur la
plaquesignalétique.
Votre outil DeWALT à double isolation est conforme
à la norme EN60745; un branchement à la terre
n’est donc pasnécessaire.
AVERTISSEMENT: les appareils à 120V doivent être
utilisés avec des transformateurs d’isolation à l’épreuve
des pannes doté d’un écran de terre entre l’enroulement
primaire etsecondaire.
Si le cordon fourni est endommagé, le remplacer par un cordon
spécialement conçu à cet effet, et disponible auprès du service
après-vente
DeWALT.

18
FRANÇAIS
AVERTISSEMENT : la poignée latérale doit toujours
être utilisée pour conserver le contrôle de l’outil
enpermanence.
Vissez la poignée latérale
7
fermement dans l’un des trous
13
situés de chaque côté du carter d’engrenage.
Installation et retrait du carter (Fig. A, C)
ATTENTION: Il est impératif d’utiliser des carters avec
cettemeuleuse.
Pour utiliser la meuleuse pour tronçonner le métal ou la
maçonnerie, un carter de type1 DOIT être installé. Les carters de
type1 sont vendus séparément chez votre distributeur
DeWALT.
N’UTILISEZ PAS la fonction Découpe sans un dispositive de
protection adapté de type 1. Toute utilisation incorrecte peut
conduire à la mort ou à de graves blessures.
REMARQUE : Veuillez vous reporter au Tableau d’accessoires
de meulage et de tronçonnage à la fin de cette section pour
obtenir la liste des autres accessoires pouvant être utilisés avec
cesmeuleuses.
1. Disposer la meuleuse angulaire sur une table, avec la broche
4
sur ledessus.
2. Alignez les pattes
14
sur les encoches
15
.
3. Poussez sur le carter
5
et tournez-le dans la
positionrequise.
4. Serrez soigneusement la vis
6
.
5. Pour retirer le carter, dévissez lavis.
ATTENTION: si le carter ne peut pas être resserré
correctement à l’aide de la vis, ne pas utiliser l’outil. Pour
réduire tout risque de dommages corporels, amener l’outil
et le carter dans un centre de réparation pour faire réparer
ou remplacer lecarter.
Installation et retrait d’un disque à meuler
ou à tronçonner (Fig. A, D, E)
AVERTISSEMENT : n’utilisez pas de disqueendommagé.
1. Placez l’outil sur une table, carter vers lehaut.
2. Installez correctement la contre bride
10
sur la broche
4
(Fig.D).
3. Placez le disque
17
sur la contre bride
10
(Fig.E). Lors de
l’installation d’un disque avec un centre en relief, assurez-
vous que ce centre en relief
16
soit positionné face à la
contre bride
10
.
4. Vissez l’écrou de blocage fileté
11
sur la broche
4
(Fig.E):
a. L’anneau sur l’écrou de blocage fileté
11
doit se trouver
contre le disque lorsqu’on utilise un disque de meulage
(Fig.E1);
b. L’anneau sur l’écrou de blocage fileté
11
doit se trouver
à l’opposé du disque lorsqu’on utilise un disque à
tronçonner (Fig.E2).
5. Appuyez sur le bouton de blocage de l’arbre
3
puis faites
pivoter la broche
4
jusqu’à ce qu’elle se verrouille enplace.
6. Resserrez l’écrou de blocage fileté
11
à l’aide de la clé à
deux brochesfournie.
7. Libérez le dispositif de verrouillage de l’axe.
Emplacement de la Date Codée de
Fabrication (Fig. A)
La date codée de fabrication
24
, qui comprend aussi l’année de
fabrication, est imprimée sur leboîtier.
Exemple:
2017 XX XX
Année de fabrication
Description (Fig. A, D)
AVERTISSEMENT: ne jamais modifier l’outil électrique
ni aucun de ses composants. Il y a risques de dommages
corporels oumatériels.
1
Gâchette marche/arrêt
2
Bouton de déblocage (B5, ZA modèles)
3
Verrou de l’axe
4
Arbre
5
Carter de protection
6
Vis du carter
7
Poignée latérale
8
Bouton de blocage
9
Clé de serrage à deux broches
10
Contre bride
11
Écrou de blocage fileté
Utilisation Prévue
Votre meuleuse angulaire a été conçue pour les applications
professionnelles de meulage, ponçage, brossage métallique
etdécoupe.
NE PAS les utiliser en milieu humide ou en présence de gaz ou
de liquidesinflammables.
Ces meuleuses angulaires industrielles sont des outils
électriques de professionnels.
NE PAS les laisser à la portée des enfants. Une supervision est
nécessaire auprès de tout utilisateur nonexpérimenté.
• Ce produit n’est pas prévu pour être utilisé par des
personnes (y compris les enfants) dont les capacité
physiques, sensorielles ou mentales sont réduites ou
qui manquent d’expérience ou d’aptitudes, sauf si ces
personnes sont surveillées par une autre personne
responsable de leur sécurité. Ne jamais laisser les enfants
seuls avec ceproduit.
MONTAGE ET RÉGLAGES
AVERTISSEMENT: pour réduire tout risque de
dommages corporels graves, arrêter et débrancher
l’outil avant tout réglage ou avant de retirer
ou installer toute pièce ou tout accessoire.
Tout démarrage accidentel pourrait causer des
dommagescorporels.
Installation de la poignée latérale (Fig. B)
AVERTISSEMENT : avant toute utilisation, vérifiez que la
poignée est fermementfixée.
/