Page is loading ...

2
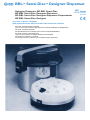
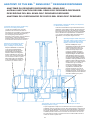
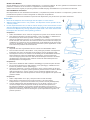
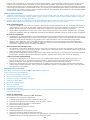
ANATOMY OF THE BBL
™
SENSI-DISC
™
DESIGNER DISPENSER
ANATOMIE DU DESIGNER DISPENSER BBL SENSI-DISC
AUFBAU UND FUNKTION DES BBL SENSI-DISC DESIGNER-DISPENSER
DESCRIZIONE DEL BBL SENSI-DISC DESIGNER-DISPENSER
ANATOMÍA DEL DISPENSADOR DE DISCOS BBL SENSI-DISC DESIGNER
Tamper latch prevents contamination of metal tamper rod when
cartridge position is empty.
Specially designed metal rods press
discs into uniform contact with surface
of media. This eliminates manual
tamping of each disc with forceps.
Nonbreakable cartridges fit directly into dispenser;
no attachments required
.
Lock latch with finger grips permits easy
movement of locking mechanism.
Hardened steel dispensing plate
does not bend as easily when
empty cartridge is encountered.
Loquet de verrouillage avec poignée
permettant des mouvements aisés du
mécanisme de verrouillage / Verschlußriegel
mit Grifflächen erleichtert die Betätigung
des Verriegelungsmechanismus /
Dispositivo di bloccaggio, facile da afferrare
e da spostare / Llave conmutadora
diseñada anatómicamente para facilitar el
accionamiento del mecanismo de cierre.
Plaque de distribution en acier durci
ne se plie pas aussi facilement
quand la cartouche est vide / Die
Abgabeplatte aus Hartstahl ist
bei leeren Kartuschen biegefest /
Piastra di distribuzione, di acciaio
indurito. Non si piega facilmente se
incontra cartucce vuote / La placa
dispensadora de acero templado
no se dobla fácilmente cuando se
encuentra con cartuchos vacíos.
Cartouches incassables se logent directement dans le
distributeur, pas de fixation requise / Die bruchsicheren
Kartuschen werden direkt in den Dispenser eingelegt;
keine Haltevorrichtung erforderlich / Cartucce infrangibili,
entrano direttamente e perfettamente nel distributore
/ Los cartuchos irrompibles calzan directamente en el
dispensador; no se requiere ningún accesorio.
Barreaux métalliques conçus
spécialement appliquent les disques
uniformément sur la surface du
milieu. Ceci élimine le tassement
manuel de chaque disque avec
une pince / Speziell entworfene
Metallstäbe drücken die Blättchen
mit gleichmäßigem Kontakt auf die
Agaroberfläche. Dadurch wird das
manuelle Aufdrücken der Blättchen
mit einer Pinzette hinfällig / Asticelle
metalliche create appositamente per
applicare i dischi sulla superficie del
terreno creando un contatto uniforme
ed eliminando ogni necessità di
pressione manuale sui dischi,
con le pinze / Varillas metálicas
especialmente diseñadas para
presionar los discos de modo de
lograr un contacto uniforme con la
superficie del medio. Así se elimina la
necesidad de apisonar manualmente
cada disco utilizando una pinza.
Loquet d’applicateur empêche la contamination du barreau applicateur
métallique quand la cartouche est vide / Eine Stempelsperre verhindert die
Kontamination der Metallstäbe bei leeren Kartuschenkanälen / Sistema di
bloccaggio dell’applicatore – per impedire la contaminazione dell’asticella
metallica quando la cartuccia non è inserita / El mecanismo de cierre de
los apisonadores impide la contaminación de la varilla metálica de éstos
cuando el cartucho queda vacío.
PANEL 1 INSIDE COVER; PANEL SIZE 5.5 X 8.5”
Page is loading ...
Page is loading ...
Page is loading ...

6
Dry Cycling
1. Lift the dispenser and place it over an empty Petri dish.
2. Depress the knob firmly until the sound of the tampers is heard. (If the dispenser
will not dry cycle, tap the side of the unit against the side of the work surface and
repeat the procedure.)
3. Allow the knob to return to the upper position.
4. Repeat steps 1, 2, and 3 several times to get the feel of the dispenser.
Cycle à blanc
1. Soulever le distributeur et le placer par dessus une boîte de pétri vide.
2. Enfoncer la manette jusqu’à ce que le bruit des applicateurs se fasse entendre. (Si le
distributeur ne fonctionne pas à blanc, tapoter le côté de l’unité contre la surface de
travail et répéter la procédure.)
3. Laisser la manette revenir dans la position supérieure.
4. Répéter les étapes 1, 2 et 3 plusieurs fois pour se familiariser avec le distributeur.
Leerdurchlauf
1. Dispenser anheben und über eine leere Petrischale stellen.
2. Fest auf den Andruckknopf drücken, bis die Andruckstempel zu hören sind. (Wenn der
Dispenser beim Leerdurchlauf nicht funktioniert, die Seite des Geräts leicht gegen die
Seite der Arbeitsfläche klopfen und den Durchlauf wiederholen.)
3. Warten, bis der Andruckknopf nach oben in die Ausgangsposition zurück gekehrt ist.
4. Schritte 1, 2 und 3 mehrere Male wiederholen, um sich mit der Bedienung des
Dispensers vertraut zu machen.
Ciclo di prova
1. Sollevare il distributore e posarlo su una piastra di Petri vuota.
2. Abbassare bene il pomello a stantuffo, fino ad avvertire il rumore degli applicatori. (Se
il distributore non effettua il ciclo di prova a vuoto, picchiettare il dispositivo sul lato,
contro il lato del piano di lavoro e ripetere la procedura.
3. Attendere fino a quando il pomello ritorna alla posizione iniziale.
4. Ripetere le operazioni 1, 2 e 3 parecchie volte per familiarizzarsi con il dispositivo.
Ciclo sin cartuchos
1. Levante el dispensador y colóquelo sobre una placa de Petri vacía.
2. Empuje la perilla firmemente hacia abajo hasta escuchar el sonido de los
apisonadores actuando. (Si el dispensador no realizara el ciclo sin cartuchos, golpee
suavemente el costado de la unidad contra el costado de la superficie de trabajo y
repita el procedimiento.)
3. Deje que la perilla regrese a la posición inicial (hacia arriba).
4. Repita varias veces los pasos 1, 2 y 3 para habituarse al funcionamiento
del dispensador.
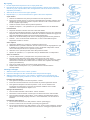
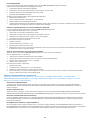
Inserting Cartridges
1. Slide the black button to the “Unlock” position.
2. Insert the cartridges into the numbered holes and press down lightly.
3. Slide the black button to the “Lock” position. If resistance is encountered, the
cartridges are not properly seated. To correct, steps 1 and 2 should be repeated.
Insertion des cartouches
1. Faire glisser l’interrupteur noir dans la position “Unlock”.
2. Insérer les cartouches dans les trous numérotés et presser légèrement dessus.
3. Faire glisser l’interrupteur noir dans la position “Lock”. Si une résistance est
rencontrée, les cartouches ne sont pas correctement installées. Pour rectifier
l’installation, il faut répéter les étapes 1 et 2.
Einlegen der Kartuschen
1. Den schwarzen Schalter in die Position “Unlock” schieben.
2. Kartuschen in die numerierten Löcher legen und diese leicht nach unten drücken.
3. Den schwarzen Schalter in die Position “Lock” schieben. Bei Widerstand sind die
Kartuschen nicht richtig eingelegt. Schritte 1 und 2 wiederholen, um den Fehler zu
beheben.
Inserimento delle cartucce
1. Far scorrere l’interruttore nero alla posizione “Unlock” (sbloccaggio).
2. Inserire le cartucce nei fori numerati e premerle giù leggermente.
3. Far scorrere l’interruttore nero alla posizione “Lock”. Se si incontra resistenza, significa
che le cartucce non sono state inserite nel modo dovuto. Correggere ripetendo le fasi
1 e 2.
1
2
3
1
2
Page is loading ...

8
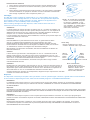
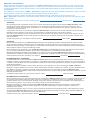
INSTRUCTIONS FOR DISPENSING DISCS
1. Lift dispenser and place over agar plate.
2. Depress knob firmly until the sound of the tampers is heard.
Note: Partial depression of the knob may cause discs to jam in the dispenser. (See
“CLEARING PROCEDURE.”)
3. Allow knob to return to the upper position and lift dispenser from agar plate.
4. Inspect the agar plate for the “X” on any of the dispensed discs.
5. Replace any empty cartridges.
INSTRUCTIONS POUR LA DISTRIBUTION DES DISQUES
1. Soulever le distributeur et le placer par dessus une boîte de pétri.
2. Enfoncer fermement La manette jusqu’à ce que le bruit des applicateurs se
fasse entendre.
Nota : enfoncer la manette seulement partiellement peut entraîner un coinçage des
disques dans le distributeur. (Voir PROCEDURE DE DEGAGEMENT.)
3. Laisser La manette revenir dans la position supérieure et retirer le distributeur de
dessus la boîte de pétri.
4. Examiner la boîte de pétri à la recherche d’un “X” sur l’un quelconque des
disques distribués.
5. Remplacer toute cartouche vide.
ANLEITUNGEN ZUR ABGABE VON BLÄTTCHEN
1. Den Dispenser hochheben und über eine Agarplatte stellen.
2. Kräftig auf den Andruckknopf drücken, bis die Andruckstempel zu hören sind.
Hinweis: Wenn der Knopf nur teilweise niedergedrückt wird, können sich die Blättchen
im Dispenser verklemmen. (Siehe BESEITIGEN EINER BLOCKIERUNG.)
3. Warten bis der Knopf nach oben in die Startposition zurückgekehrt ist, und Dispenser
von der Agarplatte heben.
4. Die Agarplatte auf mit “X” gekennzeichnete Blättchen prüfen.
5. Leere Kartuschen ersetzen.
ISTRUZIONI PER LA DISTRIBUZIONE DEI DISCHI
1. Sollevare il distributore e posarlo sopra alla piastra di agar.
2. Spingere giù con forza il pomello fino ad avvertire il rumore degli applicatori.
Nota: se il pomello non viene premuto fino in fondo, i dischi nel distributore si possono
incastrare. (Vedere PROCEDURA DI RIPRISTINO.)
3. Attendere che il pomello ritorni alla posizione iniziale, poi sollevare il distributore dalla
piastra di agar.
4. Controllare che nessuno dei dischi dispensati sulla piastra di agar sia contrassegnato
dalla “X”.
5. Sostituire eventuali cartucce vuote.
INSTRUCCIONES PARA DISPENSAR DISCOS
1. Levante el dispensador y colóquelo sobre la placa con agar.
2. Presione firmemente la perilla hacia abajo, hasta escuchar el sonido de los
apisonadores actuando.
Nota: Una presión incompleta sobre la perilla podría hacer que los discos se atascaran
en el dispensador. (Refiérase al PROCEDIMIENTO DE EVACUACIÓN.)
3. Deje que la perilla regrese a su posición inicial y levante el dispensador de la placa
con agar.
4. Inspeccione la placa de agar y observe si alguno de los discos dispensados tiene una “X”.
5. Reemplace los cartuchos vacíos.
Note: “X”
Nota: “X” / Hinweis: “X”
Notare: “X” / Nota: “X”
New cartridge
Nouvelle cartouche / Neue kartusche
Cartuccia nuova / Cartucho nuevo
1
2
3/4
5

9
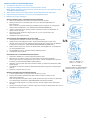
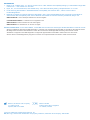
CLEARING PROCEDURE
1. Reversing the cartridge, slide the black button to the “Unlock” position. Remove all
the cartridges and reinsert into the dispenser upside down.
Place the black button in the “Lock” position.
Carefully inspect the end of each cartridge for the presence of a green plastic slug
or deformed discs. The green slug indicates that the cartridge is empty and must be
replaced. Deformed discs must be manually removed and discarded.
2. Dry Cycling the Dispenser
With the cartridges upside down in the dispenser, dry cycle the dispenser
several times to assure that it is operating freely. This completes the
“CLEARING PROCEDURE.”
Note: Occasionally, a disc will be delivered on edge and embedded in the agar;
immediately remove the upright disc from the medium with sterile forceps and lay
it flat on the plate centered over the point of initial contact. Horizontally embedded
discs may occasionally occur. This could affect the accurate measurement of the
zone area. Therefore, it is recommended that the test be repeated before accepting
a minimally intermediate or minimally susceptible result.
If a disc is embedded in the medium, decontamination of the tamper is
recommended. If no disc is delivered, or if a disc is delivered on edge, the
tamper may be contaminated; to determine if tamper contamination has
occurred, carefully examine the medium around the disc for tamper marks.
If any marks are noted, it must be assumed that the tamper has become
contaminated and the tamper should be decontaminated by following the
“CLEANING AND DECONTAMINATION PROCEDURE.”
PROCEDURE DE DEGAGEMENT
1. Inverser la cartouche.
Faire glisser l’interrupteur noir dans la position “Unlock”, retirer toutes les cartouches et
les réinsérer dans le distributeur à l’envers.
Ramener l’interrupteur noir à la position “Lock”.
Examiner soigneusement l’extrémité de chaque cartouche à la recherche du disque
en plastique vert ou de disques déformés. Le disque en plastique vert indique que la
cartouche est vide et doit être remplacée. Les disques déformés doivent être retirés
manuellement et jetés.
2. Faire exécuter un cycle à blanc au distributeur
Avec les cartouches à l’envers dans le distributeur, faire exécuter plusieurs cycles
à blanc au distributeur afin de s’assurer qu’il fonctionne librement. Ceci achève la
PROCEDURE DE DEGAGEMENT.
Nota : A l’occasion, un disque sera distribué sur le bord et enfoncé dans la gélose;
le retirer immédiatement du milieu avec une pince stérile et le poser à plat sur la boîte
de pétri en le centrant sur le point de contact initial. A l’occasion, les disques peuvent
être enfoncés horizontalement. Ceci pourrait affecter l’exactitude de la mesure de la
surface de la zone. Il est donc recommandé de répéter le test avant d’accepter un
résultat minimal intermédiaire ou sensible.
Si un disque est enfoncé dans le milieu, il est recommandé de décontaminer
l’applicateur. Si aucun disque n’est distribué ou si le disque est distribué sur le bord,
l’applicateur peut être contaminé ; pour déterminer si l’applicateur a été contaminé,
examiner soigneusement le milieu autour du disque à la recherche de traces laissées
par l’applicateur. Si une trace quelconque est observée, il faut faire l’hypothèse que
l’applicateur a été contaminé et il faut le décontaminer en utilisant la PROCEDURE
DE NETTOYAGE ET DECONTAMINATION.
BESEITIGEN EINER BLOCKIERUNG
1. Umdrehen der Kartuschen
Den schwarzen Schalter in die Position “Unlock” schieben, alle Kartuschen
herausnehmen und diese umgekehrt in den Dispenser einlegen.
Den schwarzen Schalter in die Position “Lock” schieben.
Das Ende jeder Kartusche sorgfältig auf eine grüne Kunststoffscheibe oder verformte
Blättchen prüfen. Die grüne Kunststoffscheibe zeigt an, daß die Kartusche leer
ist und ersetzt werden muß. Verformte Blättchen müssen manuell entfernt und
verworfen werden.
2. Durchführung eines Leerdurchlaufs
Dispenser mehrere Male mit umgekehrt eingelegten Kartuschen betätigen, um sicherzustellen, daß er
unbehindert funktioniert. Das Verfahren zur BESEITIGUNG EINER BLOCKIERUNG ist hiermit beendet.
Hinweis: Gelegentlich fällt ein Blättchen bei der Abgabe auf den Rand und wird hochkant in den
Agar eingedrückt; das hochstehende Blättchen unverzüglich mit einer sterilen Pinzette entfernen
und es über der ursprünglichen Kontaktstelle zentriert flach auf den Agar legen. Vereinzelt werden
Blättchen horizontal in den Agar eingedrückt. Dadurch kann die Meßgenauigkeit des Zonenbereichs beeinträchtigt
werden. Ein Test sollte daher wiederholt werden, bevor ein unklares oder schwach positives Testergebnis akzeptiert wird.
Wenn ein Blättchen in den Agar eingedrückt wurde, sollte der Andruckstempel dekontaminiert werden. Wenn kein Blättchen
oder ein Blättchen hochkant abgegeben wurde, ist der Andruckstempel möglicherweise kontaminiert; Medium um das
Bottom
of Cartridge
Dry Cycling
Cycle a blanc
Leerdurchaluf
Ciclo di prova
Ciclo sin cartucho
Fond de la cartouche
Unterseite der kartusche
Fonda della cartuccia
Fondo del cartucho
1
2

10
Blättchen sorgfältig auf Stempelabdrücke prüfen, um festzustellen, ob der Andruckstempel kontaminiert wurde. Wenn
Abdrücke zu sehen sind, muß angenommen werden, daß der Stempel kontaminiert wurde. Der Andruckstempel sollte in
diesem Fall nach den Anweisungen im Abschnitt REINIGUNG UND DEKONTAMINATION dekontaminiert werden.
PROCEDURA DI RIPRISTINO
1. Rovesciare la cartuccia
Far scorrere l’interruttore nero alla posizione “Unlock”, togliere tutte le cartucce e reinserirle nel distributore capovolte.
Riportare l’interruttore nero alla posizione “Lock”.
Controllare attentamente l’estremità di ogni cartuccia, in caso si veda il dischetto verde di plastica o qualche disco deformato.
Il dischetto verde di plastica indica che la cartuccia è vuota e deve essere sostituita, mentre i dischi deformati vanno tolti
manualmente e gettati via.
2. Far compiere al distributore un ciclo di prova
Con le cartucce inserite capovolte, far compiere al distributore alcuni cicli di prova per essere sicuri che funzioni senza inceppi.
La PROCEDURA DI RIPRISTINO è così completata.
Nota: può succedere che un disco venga applicato sul suo bordo e si conficchi nell’agar; in tal caso rimuovere
immediatamente dal terreno il disco applicato verticalmente, facendo uso di pinze sterili, e stenderlo piatto sulla piastra
centrando sul punto di contatto iniziale. Può succedere anche che un disco sprofondi orizzontalmente. Poiché ciò può
impedire una misurazione accurata della superficie della zona, si raccomanda di ripetere il test prima di accettare risultati
appena intermedi o debolmente sensibili.
Se un disco si conficca nel terreno, è opportuno decontaminare l’applicatore. Se i dischi non vengono applicati, o se un
disco è applicato sul bordo, può darsi che l’applicatore sia stato contaminato. Per verificare la contaminazione, esaminare
attentamente il terreno intorno al disco. Se si notano impronte, è chiaro che l’applicatore si è contaminato e ha perciò bisogno
di essere decontaminato seguendo la PROCEDURA DI PULIZIA E DECONTAMINAZIONE.
PROCEDIMIENTO DE EVACUACIÓN
1. Invierta los cartuchos.
Mueva la llave conmutadora negra hacia la posición “Unlock” (desbloqueado), quite todos los cartuchos y vuelva a
introducirlos en el dispensador con la parte de arriba abajo.
Coloque la llave conmutadora negra en la posición “Lock” (bloqueado).
Inspeccione cuidadosamente el extremo de cada cartucho y vea si hay un tope de plástico verde o si hay discos
deformados. El tope verde indica que el cartucho está vacío y deberá reemplazarse. Quite manualmente los discos
deformados y deséchelos.
2. Uso del dispensador en un ciclo sin cartuchos
Con los cartuchos en la posición invertida en el dispensador, efectúe varios ciclos de uso para asegurarse de que opera
libremente. Con esto se completa el PROCEDIMIENTO DE EVACUACIÓN.
Nota: En ciertas ocasiones, un disco podría quedar insertado con parte del borde adentro del agar; quítelo inmediatamente
del medio con una pinza estéril y deposítelo plano sobre la placa, centrado sobre el punto de contacto inicial. A veces, también
podría suceder que se introduzca un disco en forma horizontal. Esto podría afectar la precisión de la medida de la zona. Por
ello se recomienda repetir el análisis antes de aceptar un resultado mínimamente intermedio o mínimamente susceptible.
Si en el medio quedara insertado un disco, se recomienda descontaminar los apisonadores. Si no se depositara ningún
disco, o si un disco se depositara sobre su borde, el apisonador podría estar contaminado; para determinar si éste
se contaminó, examine atentamente el medio que rodea al disco y vea si hay marcas del apisonador. Si observara la
presencia de alguna marca, deberá asumirse que el apisonador se contaminó y que deberá descontaminarse mediante el
PROCEDIMIENTO DE LIMPIEZA Y DESCONTAMINACIÓN.
CLEANING AND DECONTAMINATION PROCEDURE
Each time that cartridges are changed, or if a tamper becomes contaminated during use by touching the inoculated agar
surface, clean and decontaminate the tamper(s) by the following procedure:
1. Remove all Sensi-Disc cartridges from the unit and replace the lock button in the “Lock” position.
2. Place a Sensi-Disc cartridge upside down in the dispenser in the position that is contaminated; or, for periodic cleaning,
place cartridges upside down in all positions.
3. Fill one empty 150 mm style Petri dish with 65 to 70 mL of a 3% solution of *Lysol.™
4. Fill one empty 150 mm style Petri dish with 65 to 70 mL of an 85% solution of isopropyl alcohol.
5. Fill two empty 150 mm style Petri dishes with 65 to 70 mL of sterile distilled water.
6. Place the dispenser over the dish containing Lysol solution.
7. Push the operating knob down until the tamper(s) are released. Hold the knob in the depressed condition for 30 seconds.
8. Repeat steps 6 and 7 with the isopropyl alcohol solution.
9. Repeat steps 6 and 7 with each of the dishes of distilled water. This will help ensure that the cleaning agents have been
completely removed.
The tampers have now been cleaned and decontaminated. Any remaining alcohol and water left on the tampers will
evaporate. The unit may be stored, or if testing has not been completed, dry the tampers by releasing them several times
(depressing the knob fully) while the unit is placed over a sterile towel, gauze pad, swab, or other sterile absorbent material.
The tampers can also be allowed to air dry, but this will require additional time, depending on the temperature and relative
humidity in the area in which the dispenser is being stored.
PROCEDURE DE NETTOYAGE ET DECONTAMINATION
A chaque fois que les cartouches sont changées, ou si un applicateur a été contaminé pendant l’utilisation du fait d’un contact avec
la surface de gélose inoculée, nettoyer et décontaminer le(s) applicateur(s) au moyen de la procédure suivante :
1. Retirer toutes les cartouches Sensi-Disc de l’unité et remettre l’interrupteur de verrouillage dans la position “Lock”.
2. Placer une cartouche Sensi-Disc à l’envers dans le distributeur dans la position qui est contaminée ou dans le cas d’un
nettoyage de routine, placer les cartouches à l’envers dans toutes les positions.
Page is loading ...
Page is loading ...

13
FEHLERBEHEBUNG
Lesen Sie bitte die gesamte Packungsbeilage, bevor Sie den BBL Sensi-Disc Dispenser bedienen.
Falls ein oder mehrere Blättchen nicht abgegeben werden:
1. Sicherstellen daß der Andruckknopf OBEN ist.
2. Sicherstellen, daß der schwarze Schalter auf der Position “Unlock” steht.
3. Dispenser auf leere oder beschädigte Kartuschen prüfen.
4. Dispenser auf lose Blättchen prüfen.
Anleitungen zur Beseitigung loser oder eingeklemmter Blättchen:
1. Kartuschen herausnehmen.
2. Den schwarzen Schalter in die Position “Lock” schieben.
3. Mehrere Male auf den Andruckknopf drücken.
4. Unterseite des Dispensers auf eingeklemmte Blättchen prüfen; falls vorhanden, Kartuschen umgekehrt in die entsprechenden
Kanäle einlegen, und Dispenser über einer sterilen Fläche betätigen.
GUIDA ALL’INDIVIDUAZIONE E ALLA SOLUZIONE DEI PROBLEMI
Leggere il foglio illustrativo prima di far funzionare il BBL Sensi-Disc Dispenser.
In caso di mancata distribuzione di uno o più dischi:
1. Assicurarsi che il pomello di distribuzione sia SU.
2. Assicurarsi che l’interruttore di bloccaggio sia in posizione “Unlock”.
3. Verificare l’eventuale presenza di cartucce vuote o danneggiate.
4. Verificare l’eventuale presenza di dischi fuori posto.
In caso di dischi fuori posto o incastrati:
1. Togliere le cartucce.
2. Portare l’interruttore in posizione “Lock”.
3. Spingere giù il pomello parecchie volte.
4. Esaminare il fondo in caso vi siano dischi intrappolati; in tal caso porre le cartucce capovolte nella posizione dovuta e azionare
il distributore sopra una superficie sterile.
GUÍA DE LOCALIZACIÓN Y SOLUCIÓN DE PROBLEMAS
Antes de operar el dispensador BBL Sensi-Disc Dispenser, lea las instrucciones adjuntas.
Si no se dispensara uno o más discos:
1. Verifique que la perilla accionadora esté hacia ARRIBA.
2. Verifique que la llave conmutadora esté en la posición “Unlock” (desbloqueado).
3. Observe si los cartuchos están vacíos o dañados.
4. Observe si hay discos flojos.
Para quitar discos flojos o atascados:
1. Quite los cartuchos.
2. Coloque la llave conmutadora en “Lock” (bloqueado).
3. Presione la perilla accionadora varias veces hacia abajo.
4. Examine el fondo y vea si hay discos atrapados; en ese caso, coloque los cartuchos invertidos en la posición apropiada y
accione el dispensador sobre una superficie estéril.
SERVICE AND MAINTENANCE INFORMATION
Should any malfunction occur that cannot be corrected by the “CLEARING PROCEDURE,” “CLEANING AND
DECONTAMINATION PROCEDURE,” or “TROUBLE SHOOTING GUIDE,” in the United States, telephone Technical
Services for instructions, (800) 638-8663.
ENTRETIEN ET MAINTENANCE
S’il arrive qu’un mauvais fonctionnement quelconque se produise qui ne puisse pas être corrigé par la PROCEDURE DE
DEGAGEMENT, la PROCEDURE DE NETTOYAGE ET DECONTAMINATION ou LE GUIDE DE DEPANNAGE, contacter le
service technique.
SERVICE UND WARTUNG
Sollte eine Störung vorliegen, die nicht anhand der Anleitungen in den Abschnitten BESEITIGEN EINER BLOCKIERUNG,
REINIGUNG UND DEKONTAMINATION oder FEHLERBEHEBUNG beseitigt werden kann Vertreter von Becton Dickinson anrufen.
SERVIZIO DI ASSISTENZA E MANUTENZIONE
In caso di problemi di funzionamento non risolvibili mediante la PROCEDURA DI RIPRISTINO, la PROCEDURA DI PULIZIA E
DECONTAMINAZIONE o la GUIDA ALL’INDIVIDUAZIONE E ALLA SOLUZIONE DEI PROBLEMI, rivolgersi al rappresentante
locale Becton Dickinson.
INFORMACIÓN DE SERVICIO Y MANTENIMIENTO
Si ocurriera algún tipo de malfuncionamiento que no pudiera corregirse mediante el PROCEDIMIENTO DE EVACUACIÓN, el
PROCEDIMIENTO DE LIMPIEZA Y DESCONTAMINACIÓN o siguiendo lo indicado en la GUÍA DE LOCALIZACIÓN Y SOLUCIÓN
DE PROBLEMAS, comuníquese con su representante local de Becton Dickinson para solicitar asistencia técnica.

14
WARRANTY INFORMATION
Becton Dickinson extends a two-year warranty for the BBL™ Sensi-Disc™ Dispenser from date of receipt. This warranty
entitles the holder to repair or replacement at no charge if found to be defective as a result of normal wear. To obtain repair
or replacement within the terms of this warranty, in the United States please telephone Technical Services for instructions
(800) 638-8663.
This warranty is null and void if the BBL™ Sensi-Disc™ Dispenser has been disassembled or subjected to misuse or abuse.
Becton Dickinson makes no warranty expressed or implied except as stated above.
To activate this warranty, please complete and mail the Business Reply Card within 10 days of receipt of your
BBL™ Sensi-Disc™ Dispenser. If the Business Reply Card is not returned, the warranty will expire two years after the date
of manufacture.
Complete this section for your records. Serial Number:
Purchase Date:
GARANTIE
Becton Dickinson offre une garantie de deux ans à compter de la date de réception pour le Dispenser BBL Sensi-Disc. Cette
garantie donne droit au détenteur à des réparations ou un remplacement gratuits si l’appareil est trouvé défectueux suite à
une utilisation normale. Pour bénéficier de réparations ou de remplacements au termes de cette garantie, contacter le service
technique pour des instructions.
Cette garantie est nulle et non avenue si le Dispenser BBL Sensi-Disc a été démonté ou soumis à des abus ou de mauvaises
utilisations. Becton Dickinson n’offre aucune garantie explicite ou implicite autre que celle décrite ci-dessus.
Pour activer cette garantie, prière de compléter et d’envoyer la carte réponse dans les 10 jours qui suivent la réception de votre
Dispenser BBL Sensi-Disc. Si cette carte réponse n’est pas renvoyée, la garantie expire au bout de deux ans à compter de la
date de fabrication.
Remplir cette section pour vos dossiers. Numéro de série :
Date d’achat :
GARANTIE
Becton Dickinson gewährt für den BBL Sensi-Disc Dispenser eine zweijährige Garantie ab Empfangsdatum. Sollte ein Gerät
infolge normaler Abnutzung schadhaft werden, ist der Besitzer unter dieser Garantie zu einer kostenlosen Reparatur oder zum
Ersatz des Geräts berechtigt. Für Informationen zur Anforderung einer Reparatur oder eines Ersatzgeräts unter den Bedingungen
dieser Garantie Vertreter von Becton Dickinson anrufen.
Diese Garantie ist null und nichtig, wenn der BBL Sensi-Disc Dispenser auseinandergenommen oder mißbraucht wurde. Außer
der o.g. Garantie erteilt Becton Dickinson keine weiteren vertraglichen oder gesetzlichen Gewährleistungen.
Beiliegende Antwortkarte ausfüllen und innerhalb von 10 Tagen nach dem Erhalt ihres BBL Sensi-Disc Dispenser einsenden, um
diese Garantie zu aktivieren. Wird die Antwortkarte nicht eingesendet, verfällt die Garantie zwei Jahre nach dem Herstellungsdatum.
Füllen Sie diesen Teil für Ihre Unterlagen aus. Seriennr.:
Kaufdatum:
INFORMAZIONI SULLA GARANZIA
La Becton Dickinson concede sul distributore BBL Sensi-Disc Dispenser una garanzia di due anni a decorrere dalla data della
consegna. Ai sensi di questa garanzia il concedente è responsabile di riparazioni o sostituzioni a proprio carico, in caso di difetti in
condizioni normali di utilizzo. Per ottenere riparazioni o sostituzioni entro i termini della presente garanzia, rivolgersi al distributore
locale Becton Dickinson.
Questa garanzia viene annullata in caso di danni derivati da un uso improprio e in caso di smontaggio del BBL Sensi-Disc
Dispenser. La Becton Dickinson non fornisce nessun’altra garanzia, espressa o implicita, ad eccezione di quanto dichiarato sopra.
Per validare la garanzia, compilare e spedire la cartolina di garanzia entro 10 giorni dalla consegna del BBL Sensi-Disc
Dispenser. La mancata spedizione della cartolina di garanzia determina la cessione della garanzia stessa allo scadere dei due anni
dalla data di fabbricazione.
Completare questa sezione per i propri archivi. Numero di serie:
Data di acquisto:
INFORMACIÓN DE LA GARANTÍA
Becton Dickinson ofrece una garantía de dos años para el dispensador BBL Sensi-Disc Dispenser, contados a partir de la fecha
de recepción. Esta garantía otorga a su titular el derecho a reparación o reemplazo sin cargo, si se constatara que la unidad
presenta defectos como consecuencia del desgaste normal. Para solicitar una reparación o el reemplazo de la unidad según los
términos de esta garantía, comuníquese con su representante local de Becton Dickinson.
Esta garantía perderá su validez si el dispensador BBL Sensi-Disc Dispenser hubiera sido desarmado o hubiera estado
sometido a uso indebido o a abusos. Becton Dickinson no extiende garantía alguna, expresa o implícita, excepto por lo
establecido anteriormente.
Para activar esta garantía, llene y envíe por correo la Tarjeta de Respuesta Comercial dentro de los 10 días siguientes al recibo
del dispensador BBL Sensi-Disc Dispenser. Si la Tarjeta de Respuesta Comercial no se enviara dentro del plazo establecido, la
garantía caducará dos años después de la fecha de fabricación.
Complete esta sección y archívela. Número de serie:
Fecha de compra:

REFERENCES
1. Bauer, A.W., W.M.M. Kirby, J.C. Sherris, and M. Turck. 1966. Antibiotic susceptibility testing by a standardized single disk
method. Am. J. Clin. Pathol. 45: 493-496.
2. Ryan, K.J., F.D. Schoenknecht, and W.M.M. Kirby. 1970. Disc sensitivity testing. Hospital Practice. 5: 91-100.
3. Food and Drug Administration. Standardized disc susceptibility test. Section 460.1, Title 21 of the Code of
Federal Regulations.
4. National Committee for Clinical Laboratory Standards. 1997. Approved Standard M2-A6, Performance standards for
antimicrobial disk susceptibility tests, 6th ed. National Committee for Clinical Laboratory Standards, Wayne. Pa.
BIBLIOGRAPHIE : Voir la rubrique “References” du texte anglais.
LITERATURNACHWEIS: S. “References” im englischen Text.
BIBLIOGRAFIA: Vedere “References” nel testo inglese.
BIBLIOGRAFIA: Ver “References” en el texto en inglés.
Technical Information: In the United States, contact BD Technical Service and Support at 800-638-8663 or www.bd.com/ds.
Service et assistance technique de BD Diagnostics : contacter votre représentant local de BD ou consulter le site www.bd.com/ds.
BD Diagnostics Technischer Kundendienst: setzen Sie sich mit Ihrer zuständigen BD-Vertretung oder www.bd.com/ds.
Assistenza e supporto tecnico BD Diagnostics: rivolgersi al rappresentante locale BD o visitare il sito www.bd.com/ds.
Servicio técnico de BD Diagnostics: póngase en contacto con el representante local de BD o visite www.bd.com/ds.
Becton, Dickinson and Company
7 Loveton Circle
Sparks, MD 21152 USA
Benex Limited
Pottery Road, Dun Laoghaire
Co. Dublin, Ireland
Lysol is a trademark of Reckitt and Colman, Inc.
BD, BD Logo, and all other trademarks are property of Becton, Dickinson and Company. ©2015 BD.
PANEL 2 INSIDE COVER; PANEL SIZE 5.5 X 8.5”

BBL
™
Sensi-Disc
™
Designer Dispenser
Certificate of Performance
Becton, Dickinson and Company
extends this certificate to
Name of Hospital/Laboratory
for the period of two (2) years commencing
Month Day Year
This certificate entitles the holder to the repair or replacement at no charge, for a period of two years, of the
BBL
™
Sensi-Disc
™
Designer Dispenser if found to be defective as a result of normal wear.
To obtain repair or replacement within the terms of this warranty, in the United States, telephone Becton
Dickinson Technical Services at 800-638-8663. During the call, arrangements will be made for repair/
replacement of the dispenser. When the dispenser is returned, a return address label (complete with Building,
Room, Person Responsible, Purchase Order Number, if needed, etc.) must be included with the dispenser.
The serial number in the center of the bottom of the dispenser should be recorded below.
This warranty is null and void if the BBL
™
Sensi-Disc
™
Designer Dispenser has been disassembled or
subjected to misuse or abuse. The company makes no warranty expressed or implied except as stated above.
To activate this Warranty the enclosed card must be completed and mailed within 10 days of receipt of your
BBL
™
Sensi-Disc
™
Designer Dispenser. Complete and retain this certificate for your records.
Becton, Dickinson and Company
7 Loveton Circle
Sparks, MD 21152
Serial No:
PANEL 3 INSIDE COVER; PANEL SIZE 5.25 X 8.5”
PERF
TRIM

BD Diagnostic Systems
7 Loveton Circle
Sparks, MD 21152 USA
BUSINESS REPLY MAIL
FIRST CLASS MAIL PERMIT NO. 25 SPARKS, MD 21152
POSTAGE WILL BE PAID BY ADDRESSEE
NO POSTAGE
NECESSARY
IF MAILED
IN THE
UNITED STATES
PERF
PANEL 4 INSIDE COVER; PANEL SIZE 5 X 8.5”
TRIM

PANEL 4 OUTSIDE COVER; PANEL SIZE 5 X 8.5”
BUSINESS REPLY CARD
The BBL™ Sensi-Disc™ Designer Dispenser has been purchased by the undersigned who hereby
requests a Warranty be placed on file for 2 years.
Signature
Hospital/Laboratory
Address
City, State, Zip
Telephone Number
Distributor
Date of Receipt
Serial No.
PERF
TRIM
Page is loading ...
Page is loading ...
-
 1
1
-
 2
2
-
 3
3
-
 4
4
-
 5
5
-
 6
6
-
 7
7
-
 8
8
-
 9
9
-
 10
10
-
 11
11
-
 12
12
-
 13
13
-
 14
14
-
 15
15
-
 16
16
-
 17
17
-
 18
18
-
 19
19
-
 20
20


BD BBL Sensi-Disc Designer Dispenser User manual
- Type
- User manual
- This manual is also suitable for
Ask a question and I''ll find the answer in the document
Finding information in a document is now easier with AI
in other languages
Other documents
-
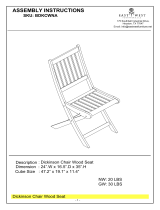 East West Furniture BDKCWNA Assembly Instructions
-
 Learning Resources LER2583 User manual
-
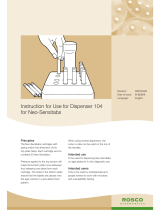 Rosco 104 Operating instructions
-
Hilti DX 9-ENP Operating instructions
-
Hilti DX 5 Operating instructions
-
Hilti DX 76 Operating instructions
-
Bontrager AIR RUSH REGULATOR Owner's manual
-
-
SecondWind SF102-998 User manual
-
COX A380HP/10-S3 Installation guide


