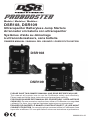
Schumacher Electric DSR ProBooster DSR108 Owner's manual
- Type
- Owner's manual

0099001661-00
Models / Modelos / Modèles :
DSR108, DSR109
Ultracapacitor Batteryless Jump Starters
Arrancador sin batería con ultracapacitor
Systèmes d’aide au démarrage
à ultracondensateurs, sans batterie
OWNERS MANUAL / MANUAL DEL USUARIO / GUIDE D’UTILISATION
PLEASE SAVE THIS OWNER’S MANUAL AND READ BEFORE EACH USE.
This manual will explain how to use the ProBooster safely and effectively.
Please read and follow these instructions and precautions carefully.
POR FAVOR GUARDE ESTE MANUAL DEL PROPIETARIO Y LEER ANTES DE
CADA USO. En este manual se explica cómo utilizar el ProBooster con seguridad
y ecacia. Por favor, lea y siga las siguientes instrucciones y precauciones.
ESSAYER DE GARDER LE MANUEL D’INSTRUCTIONS ET LE LIRE AVANT
CHAQUE UTILISATION. Ce manuel explique comment utiliser le ProBooster d’une
façon sûre et efcace. S’il vous plaît lisez et suivez ces instructions et précautions.
DSR108
DSR109
Page is loading ...

• 3 •
1. IMPORTANT SAFETY INSTRUCTIONS – SAVE THESE INSTRUCTIONS.
WARNING: Pursuant to California
Proposition 65, this product contains
chemicals known to the state of California
to cause cancer and birth defects or other
reproductive harm. Wash hands after
handling.
1.1 Working in the vicinity of a lead-
acid battery is dangerous. Batteries
generate explosive gases during
normal operation. It is important that
you follow these instructions each time
you use the ProBooster.
1.2 To reduce the risk of battery explosion,
follow these instructions and those
published by the battery manufacturer and
the manufacturer of any equipment you
intend to use in the vicinity of a battery.
Review cautionary marking on these
products and on the engine.
1.3 Keep out of reach of children.
1.4 Use only in a well-ventilated area.
1.5 Do not disassemble the ProBooster. Take it
to a qualied service professional if service
or repair is required. Incorrect assembly
may result in re or electrical shock.
1.6 Never operate the ProBooster if it is
damaged.
1.7 Do not set the ProBooster on ammable
materials, such as carpeting, upholstery,
paper, cardboard, etc.
1.8 Place the ProBooster as far away from
the battery being jumped as the cables
will permit.
1.9 Do not expose the ProBooster to rain
or snow.
1.10 Never place the ProBooster directly above
battery being jumped.
1.11 To prevent arcing, never allow the clamps
to touch together or to contact the same
piece of metal.
1.12 If someone else uses the ProBooster,
ensure they are well informed on how
to use it safely, and have read and
understood the operating instructions.
1.13 The ProBooster is NOT designed to be
installed as a replacement for a vehicle
battery.
1.14 Do not use for dry cell batteries that are
commonly used with home appliances.
1.15 Make sure your vehicle is in “park” and
the emergency brake is engaged.
1.16 Turn off ALL electronics in your vehicle
(air conditioner, heat, radio, lights,
chargers, etc.).
1.17 Make sure the key is in the “OFF”
position. For smart-key fobs (push-to-
start vehicles), make sure the vehicle is
completely OFF before jump starting.
2. PERSONAL SAFETY PRECAUTIONS
2.1 Wear complete eye protection and
protective clothing when working near
lead-acid batteries. Always have someone
nearby for help.
2.2 Have plenty of fresh water, soap and
baking soda nearby for use, in case
battery acid contacts your eyes, skin, or
clothing. Wash immediately with soap and
water and seek medical attention.
2.3 If battery acid comes in contact with eyes,
ush eyes immediately for a minimum 10
minutes and get medical attention.
2.4 Neutralize any acid spills thoroughly with
baking soda before attempting to clean up.
2.5 Remove all personal metal items from
your body, such as rings, bracelets,
necklaces and watches. A battery can
produce a short circuit current high
enough to weld a ring to metal, causing a
severe burn.
2.6 Never smoke or allow a spark or ame in
the vicinity of the battery or engine.
1. IMPORTANT SAFETY INSTRUCTIONS

• 4 •
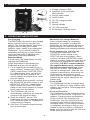
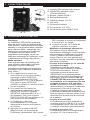
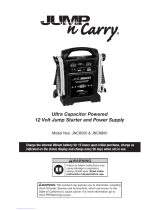
3. FEATURES
1. Voltage indicator LEDs
2. Condition (Override/Fault)
LED indicator
3. GLOW mode button
4. On/Off button
5. 12V DC charging cable
6. Wrench
7. Jumper clamps
8. 12V 10A Input port
9. 5V/2A Micro USB Input port
1
2
3
4
5
7
6
89
4. OPERATING INSTRUCTIONS
Pre-Charging
The DSR ProBooster must be pre-charged
before it can be used to jump start your
vehicle. The “Standard Mode” instructions
will guide you on using your current
vehicle’s “weak” battery to pre-charge the
ProBooster. If your vehicle’s battery is
completely discharged, or does not allow
you to pre-charge the ProBooster, see
“Alternative Pre-Charge Methods”.
Standard Mode
In most cases, the weak battery can fully
recharge the ProBooster.
Follow these steps to pre-charge your
ProBooster and get your car started:
1. For a negative-ground vehicle (as in
most vehicles), connect the POSITIVE
(RED) clamp to the POSITIVE (POS,
P, +) battery post. Next, connect the
NEGATIVE (BLACK) clamp to the
vehicle chassis or engine block, away
from the battery.
2. For a positive-ground vehicle, connect
the NEGATIVE (BLACK) clamp to the
NEGATIVE (NEG, N, -) battery post.
Next, connect the POSITIVE (RED)
clamp to the vehicle chassis or engine
block away from the battery.
3. The ProBooster will turn on
automatically. Indicators will show the
voltage of the vehicle’s battery.
4. Press the ON/OFF button. The
ProBooster will start to recharge itself.
LED indicators show the ProBooster’s
voltage during charging.
5. After the 14V indicator stops blinking,
turn on the engine.
Alternative Pre-charge Methods
If your vehicle’s battery is completely
discharged, or is unable to charge the
ProBooster, the Fault indicator will turn on
during charging. You can use one of the
following alternative pre-charging methods:
• From a battery (i.e, friend’s car)
Connect the ProBooster’s red
(POSITIVE) output clamp to the
POSITIVE post of the battery. Next,
connect the black (NEGATIVE) output
clamp to a heavy, unpainted metal part of
the chassis or engine block, away from
the battery. DO NOT connect clamp to
the negative battery post, carburetor,
fuel line or a sheet metal part. Press
the ON/OFF button. The ProBooster
will start to charge itself. After the 14V
indicator stops blinking, disconnect the
ProBooster by removing the output
clamp from the chassis or engine block,
followed by the output clamp from the
battery post.
• From a USB
The ProBooster can be recharged from
any 5V 2A USB port, using a Micro USB
adapter (not included). Recharging starts
automatically.
• From a 12V socket
The ProBooster can be recharged from
a donor car’s 12Vsocket. Plug in the 12V
adapter. Charging starts automatically.
Once you have fully charged your
ProBooster, you can continue with the
connection and starting instructions in
Standard Mode. If your vehicle’s battery
is completely discharged, and you are
unable to start the vehicle in Standard
Mode, you may need to use the Override
Mode starting instructions.

• 5 •
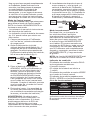
Override Mode
If the Standard mode fails, follow these
steps to use Override mode:
NOTE: The GLOW function will not operate
in this mode.
• Always read the vehicle manufacturer’s
instruction manual.
• An initial battery indication of below 12V
may suggest that there is an internal fault.
1. Pre-charge the ProBooster, using
one of the “Alternative Pre-Charge
Methods”.
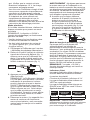
2. Remove the vehicle’s positive (red)
lead from the battery terminal (g. 1).
Ensure that the ProBooster is switched
off. Connect the ProBooster’s positive
clamp to the vehicle positive lead, NOT
the battery terminal (g.1).
3. Press the ON/OFF button. NOTE: the
ProBooster will switch off if not used
within 2 minutes; restart the process if
this happens. Press and hold the ON/
OFF button until the Override/Fault
indicator ashes green. This indicates
that Override mode is initializing. When
the Indicator shows a steady green,
the Override mode is active.
4. Start the engine. (The ability for an
engine to continue to run without a
battery connected will vary, depending
on the make and model of the vehicle).
WARNING: Do not leave the engine
running without the ProBooster or the
battery being connected. Failure to
comply could result in damage to the
vehicle ECU. The manufacturer will not
accept responsibility for any damage
caused by incorrect use of this product.
5. As soon as the engine starts, and
keeping the ProBooster clamp and
battery lead connected, attach the
positive lead to the positive battery
terminal and tighten the terminal clamp
(g. 2). After the positive lead has been
secured to the battery terminal switch
off the ProBooster and disconnect from
the battery.
Glow Mode:
In cold weather, the glow plugs in most
diesel vehicles will energize rst to heat
up the engine chamber before the engine
start, as indicated by the GLOW sign on
the dashboard. The process needs a
current of 40-60Amp and takes about 4-6
seconds. In this case, after the ProBooster
is fully recharged and connected, press the
GLOW button, and then turn on the ignition.
NOTE: GLOW is inactive under Override
Mode.
Condition Indicator
The condition indicator turns RED under
following conditions:
• Reverse connection
• Battery voltage is lower than 3 Volt
The Condition indicator turns GREEN under
Override Mode.
The Condition indicator blinks between
RED and GREEN under Glow mode.
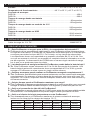
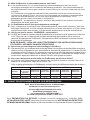
Working Cycle
MODEL
MAXIMUM
OPERATIONS
IN A ROW
MINIMUM INTERVAL
BETWEEN
SESSIONS
DSR108 5 times 15 minutes
DSR109 3 times 20 minutes
IMPORTANT: Allow sufcient cooling time
between two working sessions. Failure to do
so may cause damage to the ProBooster.

• 6 •
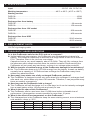
5. SPECIFICATIONS
Input ..........................................................................................12V DC 10A, 5V DC 2A
Working temperature ................................................... -40°C to 65°C (-40°F to 150°F)
Starting current
DSR108 .................................................................................................................. 450A
DSR109 .................................................................................................................. 800A
Recharge time from battery
DSR108 ........................................................................................................90 seconds
DSR109 ......................................................................................................150 seconds
Recharge time from 12V socket
DSR108 ......................................................................................................200 seconds
DSR109 ......................................................................................................400 seconds
Recharge time from USB
DSR108 ....................................................................................................20-40 minutes
DSR109 ....................................................................................................40-60 minutes
6. REPLACEMENT PARTS
12V DC cig charging cable ....................................................................... 3899003573Z
7. FREQUENTLY ASKED QUESTIONS
Q: Is this ProBooster safe for the ECU and car’s computer?
A: Unlike traditional jump starters, this ProBooster uses ultracapacitors instead of a
battery. The voltage of capacitors is restricted to a range which is safe for all kinds of
ECU. Therefore, there is no risk from overvoltage.
Capacitors have a very small capacity, about 0.2-0.4Ah. They will fully recharge from
the alternator within couple seconds once the vehicle is started. Disconnecting the
ProBooster will not cause any load dump, so there is no voltage spike produced.
Q. Will the transfer of residual energy to the ProBooster damage the weak battery?
A. No. This ProBooster draws only 0.2-0.4Ah energy from the battery. A weak car battery
normally has a capacity of 10-30Ah and can recharge the ProBooster many times
without any adverse effects.
Q. How many jump starts can a fully recharged ProBooster perform?
A. This ProBooster is designed to start only once when fully recharged. It recharges itself
after each use, which takes only about 100 seconds. Therefore, it can jump start many
times as needed, successively.
Q. How long can the ProBooster hold a charge?
A. This ProBooster will self-discharge to 0 in a few days, but it can be instantly recharged
from a weak battery within 100 seconds and ready for use.
Q. What is the life span of this ProBooster?
A. This ProBooster can be used more than 10,000 times before noticeable loss of
performance. Ultracapacitors remain operable for more than 10 years.
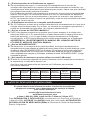
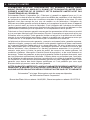
Q. What is the effect of low temperature on this ProBooster?
A. The ultracapacitors in the ProBooster keep the same starting current, even at extreme
cold weather—down to -30°C.
20°C 0°C -10°C -20°C -30°C -40°C
Lead-Acid 300Amp 180Amp 120Amp 100Amp 50Amp 30Amp
Lithium-Ion 300Amp 190Amp 120Amp 80Amp 60Amp 40Amp
Ultracapacitor 300Amp 300Amp 300Amp 300Amp 280Amp 250Amp

• 7 •
Q. Is my ultracapacitor ProBooster safe?
A. It is extremely safe. Ultracapacitor technology is one of the foremost advantages over
the battery-based jump starters. Ultracapacitors are specially designed to receive and
release a large electrical current of instant power.
This ProBooster is also equipped with short circuit/reverse polarity protection.
Therefore, short circuit due to unintended use will not damage the ultracpacitors. They
will not overheat and cause re or explosion.
NOTE: Reverse polarity and short circuit protection is disabled during Override Mode.
Q. Does the ProBooster need to be regularly recharged?
A. No. The ProBooster relies on the instant recharging of ultracapacitors rather than stored
electric energy. Therefore, it does not need regular recharge and can be stored for
years. It’s totally maintenance free!
Q. What is OVERRIDE mode?
A. The ECU of some cars does not allow engine to start if battery’s voltage is lower than 8V.
In this situation, the positive lead needs to be disconnected from the car battery, and
instead connected directly to the ProBooster. Then the ECU can detect the high voltage
provided by the ProBooster.
WARNING: CAREFULLY READ USER’S MANUAL BEFORE USING OVERRIDE MODE.
Q. What is GLOW?
A. In cold weather, the glow plugs in most diesel vehicles will energize rst to heat up
the engine chamber before the engine start, as indicated by the GLOW sign on the
dashboard. The process needs a current of 40-60Amp and takes about 4-6 seconds.
In this case, after the ProBooster is fully recharged and connected, press the GLOW
button, and then turn on the ignition.
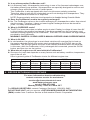
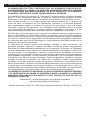
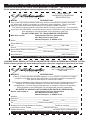
Q. What size of engines can be used with this ProBooster?
A. Success of a jump start depends on many factors such as battery condition, temperature,
age of the car, etc.
Here is general guide of ProBooster choice for different engine size:
GASOLINE DIESEL
Model
Cranking
Current
Warm
No Battery
Cold
No Battery
Warm
No Battery
Cold
Weak Battery
Cold
No Battery
DSR108 450Amp >6.0L >5.0L >3.0L >3.0L >1.6L
DSR109 800Amp >8.0L >6.0L >5.0L >4.0L >3.0L
8. BEFORE RETURNING FOR REPAIRS
For more information about troubleshooting,
contact customer service for assistance:
www.batterychargers.com
or call 1-800-621-5485
Monday-Friday 7:00am to 5:00pm CST
For REPAIR OR RETURN, contact Customer Service at 1-800-621-5485.
DO NOT SHIP UNIT until you receive a RETURN MERCHANDISE AUTHORIZATION
(RMA) number from Customer Service at Schumacher Electric Corporation.

• 8 •
9. LIMITED WARRANTY
SCHUMACHER ELECTRIC CORPORATION, 801 BUSINESS CENTER DRIVE,
MOUNT PROSPECT, IL 60056-2179, MAKES THIS LIMITED WARRANTY TO THE
ORIGINAL RETAIL PURCHASER OF THIS PRODUCT. THIS LIMITED WARRANTY
IS NOT TRANSFERABLE OR ASSIGNABLE.
Schumacher Electric Corporation (the “Manufacturer”) warrants this ProBooster for one
(1) year from the date of purchase at retail against defective material or workmanship that
may occur under normal use and care. If your unit is not free from defective material or
workmanship, Manufacturer’s obligation under this warranty is solely to repair or replace
your product, with a new or reconditioned unit, at the option of the Manufacturer. It is the
obligation of the purchaser to forward the unit, along with proof of purchase and mailing
charges prepaid to the Manufacturer or its authorized representatives in order for repair
or replacement to occur.
Manufacturer does not provide any warranty for any accessories used with this product
that are not manufactured by Schumacher Electric Corporation and approved for use with
this product. This Limited Warranty is void if the product is misused, subjected to careless
handling, repaired, or modied by anyone other than Manufacturer or if this unit is resold
through an unauthorized retailer.
Manufacturer makes no other warranties, including, but not limited to, express, implied or
statutory warranties, including without limitation, any implied warranty of merchantability or
implied warranty of tness for a particular purpose. Further, Manufacturer shall not be liable
for any incidental, special or consequential damage claims incurred by purchasers, users
or others associated with this product, including, but not limited to, lost prots, revenues,
anticipated sales, business opportunities, goodwill, business interruption and any other
injury or damage. Any and all such warranties, other than the limited warranty included
herein, are hereby expressly disclaimed and excluded. Some states do not allow the
exclusion or limitation of incidental or consequential damages or length of implied warranty,
so the above limitations or exclusions may not apply to you. This warranty gives you specic
legal rights and it is possible you may have other rights which vary from this warranty.
THIS LIMITED WARRANTY IS THE ONLY EXPRESS LIMITED WARRANTY AND THE
MANUFACTURER NEITHER ASSUMES OR AUTHORIZES ANYONE TO ASSUME
OR MAKE ANY OTHER OBLIGATION TOWARDS THE PRODUCT OTHER THAN
THIS WARRANTY.
Schumacher
®
and the Schumacher logo are registered trademarks
of Schumacher Electric Corporation.
US Patent Pending 14/443,021; European Patent Pending 15167725.9
Page is loading ...
Page is loading ...
Page is loading ...
Page is loading ...
Page is loading ...
Page is loading ...
Page is loading ...
Page is loading ...
Page is loading ...
Page is loading ...
Page is loading ...
Page is loading ...

• 21 •
1 YEAR LIMITED
WARRANTY PROGRAM
REGISTRATION
MODEL: _____________________ DESCRIPTION: ________________________
This is the only express limited warranty, and the manufacturer neither assumes
nor authorizes anyone to assume or make any other obligation. There is no other
warranty, other than what is described in the product owner’s manual.
The warranty card should be submitted within 30 days of purchase. The customer
must keep the ORIGINAL receipt because it will be required for any warranty claims.
This warranty is not transferable. Send warranty card only.
DO NOT SEND UNIT TO THIS ADDRESS FOR REPAIR.
Mail this card to: Schumacher Electric Corporation
801 Business Center Drive
Mount Prospect, IL 60056-2179
Name ______________________________________________________________
Street Address _______________________________________________________
City ________________________________State _________ Zip Code _________
Phone _____________________Email ___________________________________
Store Name Where Purchased ___________________ Date of Purchase _________
Store Location ____________________ UPC Number ________________________
Serial Number ______________________________________ (SEE PRODUCT)
For faster warranty activation, go to www.batterychargers.com to register your product online.
PROGRAMA DE REGISTRO
DE 1-AÑO DE GARANTÍA
LIMITADA
MODELO: ____________________ DESCRIPCIÓN: ________________________
Esta es la única garantía limitada expresa, y el productor no autoriza ni otorga
a alguien a realizar alguna otra obligación. No existe ninguna otra garantía
más que la descrita en el manual del dueño.
La tarjeta de garantía debe enviarse durante los primeros 30 días después de la
compra. El cliente debe mantener el recibo de compra ORIGINAL como
comprobante, el cual le otorga todo derecho a cualquier reclamo de garantía.
Esta garantía no es transferible. Envie tarjeta de garantía solamente.
NO ENVÍE LA UNIDAD A ESTA DIRECCIÓN PARA SU REPARACIÓN.
Enviar esta tarjeta a: Schumacher Electric Corporation
801 Business Center Drive
Mount Prospect, IL 60056-2179
Nombre ____________________________________________________________
Dirección ___________________________________________________________
Ciudad __________________________Estado ____________ C.P. _____________
Tel: ________________________ Correo electrónico _________________________
Nombre de la Tienda donde se Compró ____________ Fecha de compra _________
Localización de la Tienda ____________ Numero de Serie ____________________
Código de barras ___________________________ (CONSULTE EL PRODUCTO)
Para una activación más rápida, visite nuestra página de internet en www.batterychargers.com
¡AHORRE EN EL ENVÍO! ¡ACTIVE SU GARANTÍA EN LÍNEA-LA FORMA MAS RÁPIDA Y FÁCIL!
Visite nuestra página en www.batterychargers.com para registrar su producto en línea.
WARRANTY CARD / TARJETA DE GARANTÍA
SAVE ON POSTAGE! ACTIVATE YOUR WARRANTY ONLINE – THE QUICK AND EASY WAY!
Go to www.batterychargers.com to register your product online.
1. WARRANTY CARD
2. TARJETA DE GARANTÍA
Page is loading ...
-
 1
1
-
 2
2
-
 3
3
-
 4
4
-
 5
5
-
 6
6
-
 7
7
-
 8
8
-
 9
9
-
 10
10
-
 11
11
-
 12
12
-
 13
13
-
 14
14
-
 15
15
-
 16
16
-
 17
17
-
 18
18
-
 19
19
-
 20
20
-
 21
21
-
 22
22


Schumacher Electric DSR ProBooster DSR108 Owner's manual
- Type
- Owner's manual
Ask a question and I''ll find the answer in the document
Finding information in a document is now easier with AI
in other languages
Related papers
-
Schumacher DSR108 Operating instructions
-
-
Schumacher DSR132DSR132 Owner's manual
-
-
-
-
-
-
-
 DSR PRO SERIES DSR119 Owner's manual

Other documents
-
-
-
-
-
 Jump n Carry JNC8800 Owner's manual
-
Bahco BBH12-1200 User manual
-
-
 RedFuel SL1 Owner's manual
-
 RedFuel SL1 Owner's manual
-


