Page is loading ...

US
ERGOMETER RACER 600
USER MANUAL
US330400000012

Dear customer!
The manufacturer is constantly improving all types and models. Please understand
that changes to the delivered product in terms of form, features and technology are
thus possible at any time. Therefore no claims may be derived from the information,
illustrations and descriptions in this manual.
Reprint, duplication or translation, also of excerpts, is not permitted without the
written permission of the manufacturer.
All rights according to the law or to copyright law are expressly reserved by the
manufacturer.
Subject to alterations

INDEX
SAFETY INSTRUCTION 1
BEFORE YOU BEGIN 2
ASSEMBLY STEP 3
COMPUTER FUNCTION 9
CARE AND MAINTAINANCE 16
TROUBLE SHOOTING 16
DISPLAY OF APPLIANCE 16
WHO CAN WORK OUT? 17
TRAINING ORGANISATION 18
CONDITIONING GUIDELINES 19
WARM-UP AND COOL-DOWN 20
w ww.ultega.net
US

SAFETY INSTRUCTIONS
WARNING :
To reduce the risk of injuries be sure to read the safety Instructions before using the ULTEGA RACER 600.
1. Use the ULTEGA RACER 600 only on a level surface.
2. Keep children and pets away from this equipment at all times.
3. The ULTEGA RACER 600 should not be used by persons weighing more than 110 kg.
4. The ULTEGA RACER 600 should be used by only one person at a time.
5. Be careful to maintain your balance while using, mounting, dismounting, folding, unfolding or
assembling the ULTEGA RACER 600. Loss of balance may result in a fall and serious bodily injury.
6. Use the ULTEGA RACER 600 only as described in the manual.
7. Before engaging in any exercise, always do stretching exercises to properly warm up.
8. Always make sure all bolts and nuts are tightened prior to each use.
WARNING
Before starting any exercise or conditioning program you should consult your personal physician to see
if you require a complete physical exam. This is especially important if you are over the age of 35, have
never exercised before, are pregnant, or suer from any illness.
w ww.ultega.net
1
US

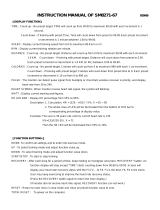
BEFORE YOU BEGIN
Handlebar
Chain Cover
Hand Pulse
Pedal (Right)
Saddle
Adjustable Knob
Computer
Rear Stabilizer
Thank you for choosing the ULTEGA RACER 600. We take great pride in producing this quality product
and hope it will provide many hours of quality exercise to make you feel better, look better and enjoy life
to its fullest.
Yes, it’s a proven fact that a regular exercise program can improve your physical and mental health.
Too often, our busy lifestyles limit our time and opportunity to exercise. ULTEGA RACER 600 provides a
convenient and simple method to begin your quest on getting your body in the best shape it can while
achieving a healthier lifestyle.
Before reading further, please review the drawing below and familiarize yourself with the parts that are
labeled.
• Read this manual carefully before using the ULTEGA RACER 600.
w ww.ultega.net
2
US

65
19
66
65
61
63
19
67
67
68
68
61
75
ASSEMBLY STEP
Step 1
• Attach Front Stabilizer (66) to Main Frame (61), using 2 sets x carriage bolt (65) and washer (19).
• Attach Rear Stabilizer (63) to Main Frame (61), using 2 sets x carriage bolt (65) and washer (19).
Step 2
• The Left Pedal (68L) and Right Pedal (68R) which are marked “L” and “R”. Attach them to their
appropriate Crank Arm (75).
• The right pedal is on the right hand side of the cycle as you sit on it.
• Important Note : The left pedal should be screwed on counter (anti) clockwise.
w ww.ultega.net
3
US

18
20
19
21
22
28
61
ASSEMBLY STEP
Step 1
• Remove 4sets x Hex Screw (20) and Flat Washer (19).
• Take Front Post (18) insert Protective Cover (22) and connect Extension Sensor Wire (21) with Sensor
Wire (22).
• Attach Front Post (18) to Main Frame (61) using 4 sets x Hex Screw (20) and Flat Washer (19).
w ww.ultega.net
4
US

9
21
18
8
4
6
12
13
14
15
17
16
10
11
13
18
Step 4
• Hold the middle of the handlebars in the brackets of the Cover (11). Screw Cover (11) with the
Bolt (13) to the upper handlebar post.
• Insert the Spring Ring (15) on the Thread (17) of the Handlebar Bolt (16). Then place the Flat
Washer (14) on the Thread (17). Refer to the photograph below.
• Place the Cover (12) against this – on the iddle of the handlebars.
• Rotate the handlebars to the required position and secure them with the Handlebar Bolt (16).
• Screw down Cover (12) with 1pc x Bolt (13).
• Then screw down the Covers (11) and (12) with 2pcs x Bolt (10).
• Insert the jack of the pulse measuring cable in the socket at the rear of the computer.
ASSEMBLY STEP
Adjusting the handlebars
The design of the handlebars enables
various grip positions. While exercising it is a
good idea to change your grip position from
time to time so that you can sit in a relaxed
manner.
1. Hold the handlebars and loosen the
handlebar bolt (16).
2. Tilt the handlebars to the required
position and then tighten the handlebar
bolt (16) again.
w ww.ultega.net
5
US

33
32
29
36
35
Step 5
• Unscrew the Saddle Securing Bolt (35), pull this out all the way to the stop and hold it in this
position.
• Insert the Saddle Post (33) in the opening.
• Let the Securing Bolt (35) slide into one of the holes of the Saddle Post (33). Check that the Saddle
Post (33) is secure by trying to move it in both directions. Then screw the Securing Bolt (35) tight.
• Insert the Saddle (36) on the Saddle Post (32).
• Adjust the saddle and then screw the Saddle Bolt (32) tight.
ASSEMBLY STEP
Adjusting the handlebars and saddle
• Adjusting the saddle height and position
• The height of the saddle can be adjusted
in phases of c. 3 cm and it can be freely
adjusted horizontally. Adjust the saddle
so that you can sit comfortably and
under no circumstances need to fully
extend your knee when the pedal is at its
lowest position.
1. Hold the saddle post (33).
2. Loosen the saddle securing bolt (35). Pull
out the black adjusting knob and hold it
in this position.
3. Push the saddle post (33) into the desired
position and let the securing bolt (35)
snap into one of the holes in the saddle
post. You will hear a clear “click”.
4. Check whether the saddle post (33) can
still be moved. If this is not the case, then
the securing bolt (35) is in its correct
position.
5. Now tighten the securing bolt (35).
Attention!
The saddle post must not be pulled out
further than the “max.” marking.
w ww.ultega.net
6
US

24
13
25
18
Step 6
• Screw the Pre-positioned Bolt (13) out of the Handlebar Post (18).
• Hold the Bottle Holder (24) against the Handlebar Post (18) and secure it with the Bolt (13).
• Push the Drinking Bottle (25) into the Bottle Holder (24).
ASSEMBLY STEP
Recheck
all bolts, nuts and pedals are
tightened securely
before use the machine
w ww.ultega.net
7
US

ASSEMBLY STEP
Power supply – computer functions
Power supply –
Switching the computer on/o.
The computer of your Ergometer is supplied with a 6V 1 A (79) network adapter.
1. Insert the round jack of the network adapter in the socket at the rear of the Ergometer.
2. Insert the mains plug in a suitable 230 V~ / 50 Hz socket.
The computer will emit a brief signal tone and the display is activated.
The computer and the magnet brake of the Ergometer are now supplied with power, and the Ergometer
is ready for use.
If no display is visible on the computer, check all jacks and connections.
Switching the computer on/o
The computer will switch on automatically when any key of the computer is pressed or when the pedals
are turned. If any display seems faulty, check all cable connections.
The computer will switch o automatically if the pedals are not turned for about 4 minutes.
After exercising
After you have nished using the Ergometer always remove the mains plug from the socket.
w ww.ultega.net
8
US

COMPUTER FUNCTION
The keys
Enter
Sets the function values for TIME, DIST, CAL, PULSE
in the sleep mode
BODY FAT:
Measures body fat of the user
RESET
Returns to the main functions in STOP mode and
resets all pre-set function values to 0
ENCODER UP:
Selects the training mode and raises the function
values
START/STOP
Starts or stops the exercise session
ENCODER DOWN:
Selects the training mode and lowers the function
values
RECOVERY
Checks the recovery status of user’s heart rate
w ww.ultega.net
9
US

Operation
Switching on
On being switched on, the segment display lights up for two
seconds with an extended beep sound (Illustration 1)
and then displays the wheel diameter
(Illustration 2)
Setting calendar
Press ENTER/UP/DOWN to set the year/month/day and the time of
day (Illustration 3).
Press UP/DOWN to select the gure and then press ENTER to go to
the next setting. The screen will go into the standby mode.
(Illustration 4)
Setting user data
Set your personal user data under USER (U1-U9):
1. U1 ashes, press UP and DOWN to select User 1, 2 to 9.
2. Now enter your personal data such as AGE, WEIGHT, HEIGHT, SEX. Conrm your entries with ENTER.
Selecting the training program
In sleep mode the display MANUAL will ash (Illustration 4).
Press UP and DOWN to set the required training program:
MANUAL mode
In MANUAL mode you can press UP/DOWN to select the resistance
levels 1 to 16. The preset level is 1 (Illustration 5).
COMPUTER FUNCTION
w ww.ultega.net
10
US

Now press the UP and DOWN keys to select the resistance level at
which you wish to train, and conrm this with ENTER. After selec-
ting the required resistance level you can use UP/DOWN to set the
values for the functions TIME, DISTANCE, CALORIES and PULSE. Each
time conrm your selection with ENTER (Illustrations 6 - 9).
TIME
DISTANCE
CALORIES
Now press START to begin exercising. To select a dierent training
mode press the RESET key.
PULSE
MANUAL mode PROGRAM mode
In the PROGRAM mode you can select from 12 preset program
modes. Use the UP and DOWN keys to select the programs P01, P02,
P03 to P12. The selected program will be displayed on the screen for
two seconds (Illustration 10).
Then the corresponding program prole will appear on the display
(Illustration 11).
COMPUTER FUNCTION
w ww.ultega.net
11
US

After selection of the required training program the display LOAD 1
will ash. (Illustration 12).
Now use the UP and DOWN keys to select a level between 1 and 16. Conrm your choice with ENTER.
While you are exercising you can adjust the resistance level with the UP and DOWN keys.
Then press the START key to begin exercising.
USER mode
In the USER mode you can create your own program prole. To do this you can use 20 dierent sections.
Beginning with the 1st segment you can now set the required level using the UP and DOWN keys. Con-
rm your choice with ENTER to
progress to the next section. Repeat these steps until you have set all 20 sections.
Then press the START key to begin exercising.
H.R.C. (pulse-controlled training)
After you have selected the H.R.C. mode the AGE 25 display will light up. Set your age with UP and DOWN
keys and press ENTER. The
computer will automatically calculate the preset heart rate in accordance with your age.
The screen displays the heart rates 55%, 75%, 90% and TARGET. Use
UP/DOWN/ENTER to select the required heart rate for the exercise
session (Illustration 17).
COMPUTER FUNCTION
w ww.ultega.net
12
US

COMPUTER FUNCTION
WATT mode
In the WATT mode the preset watt value 120 will ash on the screen. Use UP/DOWN/ENTER to set a value
of between 10 and 350. Then press ENTER to begin exercising
Body Fat mode
Press the BODY FAT key in the STOP mode to begin the body fat measurement.
The selected user (U1-U9) ashes for two seconds. Start the measurement.
During the measurement you must keep both hands on the grips. For eight seconds the display will
show „--” „--” until the computer has conducted the measurement.
For 30 seconds the display will now show the BODY FAT symbol, BODY FAT in percent, BMR, BMI.
BMI (Body Mass Index) explanation
LOW <20
LOW/MEDIUM 20 - 24
MEDIUM 24.1 - 26.5
MEDIUM/HIGH >26.5
Body Fat
MALE
LOW (−) <13%
LOW/MEDIUM ( + ) 13% - 25.9%
MEDIUM (▲) 26% - 30%
MEDIUM/HIGH (♦) >30%
FEMALE
LOW (−) <23%
LOW/MEDIUM ( + ) 23% - 35.9%
MEDIUM (▲) 36% - 40%
MEDIUM/HIGH (♦) >40%
w ww.ultega.net
13
US

Other functions
TIME : orwards – No preset target. The time is counted in seconds from 00:00 to a maximum of
99:59.
Backwards – For a training session with preset time the time will be counted backwards from the
preset value to 00:00.
SPEED: Display of the current training speed from 0.0 to a maximum of 99.9 km.
RPM: Display of the current revolutions per minute.
DISTANCE: Forwards – No preset distance. The distance is counted in sections of 0.1 km from 0.00
to a maximum of 99.90.
Backwards – For a training session with preset distance the distance will be counted backwards
from the preset value to 0.00.
CALORIES: Forwards – No preset calories. The calories are counted in 1-calorie steps from 0 to a
maximum of 990.
Backwards – For a training session with preset calories the calories will be counted backwards
from the preset value to 0.
PULSE: Displays your current heart rate as soon as the pulse sensor is touched. If you keep both
hands on the grips, the computer will calculate your best heart rate.
WATT: Display of the current mechanical power generated in the training session.
RECOVERY:After exercising for a while, place your hands on the grips and press the RECOVERY
key. The function display will disappear, while the TIME display counts backwards from 00:60 to
00:00. The screen shows the recovery status of your heart rate with the values F1, F2 to F6, whereby F1
is the best value and F6 the poorest value. You can now train to improve the recovery status of your
heart frequency. (Press RECOVERY again to return to your main display.)
TEMPERATURE: In sleep mode the screen shows the current room temperature.
CALENDAR: In the sleep mode the screen shows the year/month/day.
CLOCK: In the sleep mode the screen shows the time of day.
COMPUTER FUNCTION
w ww.ultega.net
14
US

COMPUTER FUNCTION
Guidelines
The computer display switches o automatically if you interrupt the
exercise for four minutes or do not press any more keys.
Press any key to recall the display. The previous training data will
appear on the screen. If you begin exercising again, the previously
recorded data will be further calculated.
After exercise has been ended or no keys pressed for over four
minutes, the screen will switch o. Press ENTER for two seconds
for display of the room temperature, the time of day and the date
(Illustration 18).
If the display is incorrect, remove the jack and re-insert it.
General training guidelines
Congratulations on your purchase of the Ergometer – the rst step towards physical tness. The
Ergometer helps you to train your physical condition and thus to benet your health.
Goals
You can achieve various goals with the right kind of training:
• General tness
• Improving your stamina
• Greater sense of well-being
The success of your training depends to a great extent on the following points, which we would
recommend to you strongly:
• Regular and suciently long exercise
• Corresponding nutrition, and
• Monitoring the success of your training.
w ww.ultega.net
15
US

CARE AND MAINTAINANCE
TROUBLE SHOOTING
DISPLAY OF APPLIANCE
Old appliances may not be disposed of as
domestic waste!!
Should it no longer be possible to use the appliance or
the network adapter, then the consumer is legally obliged
to separate old appliances from domestic waste and to
return them to a collection point of his municipality or
urban district.
During the exercise session the computer no longer
counts units.
The pulse display does not function or is faulty.
The pedal resistance cannot be adjusted.
Computer displays malfunction.
Attention: Always remove plug from socket before
cleaning or maintenance!
Sweat, dust and dirt particles can change and damage the
surface of your Ergometer after just a few weeks. This is
why it’s important to clean the Ergometer regularly. Use
only mild, standard detergents for cleaning. Do not clean
the Ergometer with water but only with a moist cloth.
Attention: Never use aggressive detergents or
solvents. These will damage the plastic parts.
This ensures that the old appliances can be processed
appropriately and negative environmental eects are
avoided.
This is why electrical appliances are marked with the symbol
illustrated here.
Check that the jack of the network adapter is properly
inserted. Check that the power socket is working by plugging
in another appliance. Check the jack connections within the
Ergometer (see “Assembly” chapter).
The program may have been interrupted. Start it again with
the START/STOP key.
Place both hands simultaneously on the pulse sensors.
Press the START/STOP key and select a program. If necessary
adjust the pedal resistance with the UP/DOWN keys.
Remove the power plug from the socket. Wait a few seconds
and then re-insert it in the socket.
In order to maintain the high safety level, regularly check the
Ergometer and the network adapter for damage and wear.
These checks should be carried out at least once a month.
Defective parts must be replaced immediately. The
Ergometer must not be accessible to users while it is under
repair! Parts such as the grips and the pedals are particularly
subject to wear. Always ensure that securing bolts and nuts
have not become loose.
No display or no function.
w ww.ultega.net
16
US

In principle every physically healthy person, whether young or old, can commence tness
training as long as he has consulted a doctor beforehand.
If you have not engaged in sport for a long period, if you have cardiac, circulatory or
orthopedic problems, if you take medicaments or if you are pregnant, then you must consult a
doctor before beginning a training program.
Tell him/her what kind of exercise appliance you aim to use and get a physical examination to nd
out what kind of training program is best suited to your needs. It will be helpful if you take this
manual with you so that the doctor can plan an individual training program together with you. Be
aware that the Ergometer is an item of sports equipment and is not suitable for therapeutic
purposes.
Hazard to health through excessive exertion during exercise! Incorrect or excessive exercise can
endanger your health.
Physical exertion
Intensive tness training involves the entire body, not just the leg muscles. Your body, in particular
your cardiovascular system, needs time to adjust to the changes caused by the training.
This is why it is important to increase the level of exertion slowly and to give yourself appropriate
rest during and after the training.
So train at a level of performance that does not exhaust you.
Listen to your body, and stop exercising immediately if you feel unwell, are short of breath
or feel dizzy. You are training properly if you are still able to talk normally during exercise. Don’t forget
to adjust your Ergometer to your body: a saddle that is too low or too high will put undue stress on your
body.
Other important points before you exercise!
Bear the following points in mind to ensure successful and healthy exercise:
• Wear suitable clothing when exercising (e.g. a tracksuit). It’s important that the clothing is
• comfortable and breathable.
• When using the Ergometer always wear sports shoes with rm, non-slip soles.
• Don’t exercise shortly after a meal. Don’t eat any heavy meals about an hour before and
• after the training.
• Don’t exercise if you are already feeling tired and exhausted, or if you are feeling unwell.
WHO CAN WORK OUT?
w ww.ultega.net
17
US
/