Page is loading ...

Read all safety rules and instructions carefully before operating this tool.
Owner’s Manual
TOLL-FREE HELPLINE: 1-888-90WORKS
(888.909.6757)
24V LITHIUM-ION CORDLESS
8" POLE SAW
1400102

2
Contents .............................................................................................................................. 2
.......................................................................................................... 2
Safety information .............................................................................................................3-5
Symbols ............................................................................................................................ 6-7
Know your pole saw ............................................................................................................. 8
Assembly ........................................................................................................................ 9-10
Operation .......................................................................................................................11-18
Maintenance ................................................................................................................. 19-22
Environmentally safe battery disposal .............................................................................. 23
Troubleshooting .................................................................................................................24
Warranty ............................................................................................................................25
Exploded View .................................................................................................................. 26
Parts List.......................................................................................................................27-28
Notes ............................................................................................................................29-32
PRODUCT SPECIFICATIONS
24 V LITHIUM-ION 8" POLE SAW
Bar length ..................................................................................................... 8" (20.3 cm)
Chain pitch ................................................................................................. 3/8" (9.5 mm)
Chain type .......................................................................... 8" chain 91PJ033X (Oregon)
Guide bar type .................................................................. 8" bar 080SDEA318 (Oregon)
CONTENTS

3
SAFETY INFORMATION
IMPORTANT SAFETY INSTRUCTIONS
I M P O R T A N T
READ AND UNDERSTAND ALL INSTRUCTIONS. Failure to follow all instructions listed below
may result in electric shock, re, and/or serious personal injury.
• For safe operation, read and understand all instructions before using this product. Be familiar
with all controls and proper use of the machine. Follow all safety instructions. Failure to follow
all safety instructions listed below, can result in serious personal injury.
• Do not allow children or untrained individuals to use this unit.
• Thoroughly inspect the area where the equipment is to be used and remove all foreign
objects.
• Wear safety glasses or goggles that are marked as complying with ANSI Z87.1 standard as
well as head protection when operating this product.
• Dress properly. Wear heavy long pants, boots, and gloves. Do not wear loose tting clothing,
short pants, or go barefoot. Do not wear jewelry of any kind.
• Secure long hair above shoulder level to prevent entanglement in moving parts.
• Keep all bystanders, children, and pets at least 50' (15 m) away.
• Stay Alert — Watch what you are doing; use common sense. Do not operate this unit when
you are tired, ill, or under the inuence of alcohol, drugs, or medication.
• Do not operate in poor lighting.
• Keep rm footing and balance. Do not overreach. Overreaching can result in loss of balance
or exposure to hot surfaces.
• Keep all parts of your body away from any moving part.
• Inspect the unit before each use for loose fasteners, etc. Replace any damaged parts before
use.
• When not in use, product should be stored indoors in a dry, locked up place—out of the reach
of children.
• Use only original manufacturer’s replacement parts. Failure to do so may cause poor
performance, possible injury, and will void your warranty.
• Do not, under any circumstance, use any attachment or accessory on this product which
was not provided with the product or identied as appropriate for use with this product in the
operator’s manual.
• Avoid dangerous environments. Do not use the product in damp or wet locations. Do not use
in rain.
• Use the right appliance. Do not use the product for any job except that for which it is intended.
• Do not use on steps, a ladder, or unstable support. Stable footing on a solid surface enables
better control of the product in unexpected situations.
• Do not force the product. It will do the job better and with less likelihood of a risk of injury at
the rate for which it was designed.
DANGER! - Keep hands away from cutting area. Keep both hands on handles when power is on.

4
SAFETY INFORMATION
CAUTION! - Blade coasts after being turned off.
SPECIFIC SAFETY RULES
• Kickback is a dangerous reaction that can lead to serious injury. Kickback may occur when
the moving chain contacts an object at the upper portion of the tip of the guide bar or when
the wood closes in and pinches the chain in the cut. Contact at the upper portion of the tip of
the guide bar can cause the chain to dig into the object and stop the chain for an instant. The
result is a lightning-fast, reverse reaction which kicks the guide bar up and back toward the
operator. If the chain is pinched along the top of the guide bar, the guide bar can be driven
rapidly back toward the operator, which can cause loss of control and may result in serious
injury. Do not rely exclusively upon the safety devices built into the product. With a basic
understanding of kickback, you can reduce or eliminate the element of surprise. Sudden
surprise contributes to accidents.
• Use pole saw for cutting wood only. Do not use for cutting non-wood items.
• Make sure that the area in which you are cutting is free from obstructions. Do not let the nose
of the guide bar contact a log, branch, fence, or any other obstruction while you are operating
the unit. Have a planned retreat path.
• Do not grasp the exposed cutting blades or cutting edges when picking up or holding the
product.
• Cut only when visibility and light are adequate for you to see clearly.
• To protect yourself from electrocution, do not operate within 50' (15 m) of overhead electrical
lines.
• Before starting the motor, make sure the chain is not contacting any object. To protect yourself
from falling branches, do not stand directly under the branch or limb being cut. This unit
should not be held at an angle over 60° from ground level.
• Turn off the motor and make sure the cutting attachment has stopped before setting the unit
down.
• Follow the sharpening and maintenance instructions for the saw chain.
• Use only the replacement guide bars and low kickback chains specied for the unit.
• Do not operate the saw with one hand! Serious injury to the operator, helpers, bystanders, or
any combination of these persons may results from one hand operation. This saw is intended
for two-handed use.
• Use extreme caution when cutting small sized brush and saplings because slender material
may catch the saw chain and be whipped toward you or pull you off balance.
• When cutting a limb that is under tension, be alert for spring back so that you will not be struck
when tension in wood bers are released.
• To avoid accidental starting, never carry plugged in product with nger on switch. Be sure
switch is off when plugging in.
• Maintain product with care. Keep cutting edge sharp and clean for best performance and to
reduce the risk of injury. Follow instructions for lubricating and changing accessories. Inspect
cord periodically and, if damaged, have it repaired by an authorized service facility. Inspect
extension cords periodically and replace if damaged. Keep handles dry, clean, and free from
oil and grease.

5
SAFETY INFORMATION
• Check for damaged parts. Before further use of the product, a guard or other part that is
damaged should be carefully checked to determine that it will operate properly and perform
its intended function. Check for alignment of moving parts, binding of moving parts, breakage
of parts, mounting, and any other condition that may affect its operation. A guard or other
part that is damaged should be properly repaired or replaced by an authorized service centre
unless indicated elsewhere in this manual.
• Remove the battery from pole saw when not in use, before servicing, and when changing
accessories.
• Service on the product must be performed by qualified repair personnel only. Service or
maintenance performed by unqualied personnel could result in injury to the user or damage
to the product.
• Save these instructions. Refer to them frequently and use them to instruct others who may
use this product. If you loan someone this product, loan them these instructions also to
prevent misuse of the product and possible injury.
SAVE THESE INSTRUCTIONS

6
Some of the following symbols may be used on this product. Please study them and learn their
meaning. Proper interpretation of these symbols will allow you to operate the product better and safer.
SYMBOLS
n
o
6
SYMBOL NAME DESIGNATION/EXPLANATION
V Volts Voltage
A Amperes Current
Hz Hertz Frequency (cycles per second)
W Watts Power
hrs Hours Time
No Load Speed Rational speed, at no load
Class II Construction Double-insulated construction
/min Per Minute Revolutions, strokes, surface speed, orbits etc.,
per minute
Lithium-Ion Battery Recycling Designates that this tool is in compliance with
Lithium-Ion battery recycling program requirements
Safety Alert Symbol Precautions that involve your safety.
Read the Operator’s Manual To reduce the risk of injury, user must read and under-
-stand operator’s manual before using this product.
Eye and Head Protection Wear eye and head protection when operating this
equipment.
Gloves Wear non-slip, heavy-duty protective gloves when
handling the pole saw and the blade.
Safety Footwear Wear non-slip safety footwear when using this
equipment.
Kickback DANGER! Beware of kickback.
Risk of Electrocution DANGER! Risk of electrocution!
Electric Shock Failure to use in dry conditions and to observe safe
practices can result in electric shock.
No Hands Symbol Failure to keep your hands away from the blade will
result in serious personal injury.
Keep Bystanders Away Keep all bystanders at least 50' (15 m) away.

7
The following signal words and meanings are intended to explain the levels of risk associated
with this product.
SERVICE
Servicing requires extreme care and knowledge and should be performed only by a qualified
service technician. For service we suggest you return the product to your nearest AUTHORIZED
SERVICE CENTER for repair. When servicing, use only identical replacement parts.
W A R N I N G
To avoid serious personal injury, do not attempt to use this product until you have read this
Owner's Manual thoroughly and understand it completely. If you do not understand the warnings
and instructions in this Owner's Manual, do not use this product. Call the Toll-free Helpline (1-
888-909-6757) for assistance.
W A R N I N G
The operation of any power tool can result in foreign objects being thrown into your
eyes, which can result in severe eye damage. Before beginning power tool operation,
always wear safety goggles or safety glasses with side shields and, when needed, a
full face shield. We recommend Wide Vision Safety Mask for use over eyeglasses or
standard safety glasses with side shields. Always use eye protection which is marked
to comply with ANSI Z87.1.
SYMBOL SIGNAL MEANING
DANGER Indicates an imminently hazardous situation, which, if not
avoided, will result in death or serious injury.
WARNING Indicates a potentially hazardous situation, which, if not avoided,
could result in death or serious injury.
CAUTION Indicates a potentially hazardous situation, which, if not avoided,
may result in minor or moderate injury.
CAUTION (Without Safety Alert Symbol) Indicates a situation that may
result in property damage.
SYMBOLS
SAVE THESE INSTRUCTIONS

8
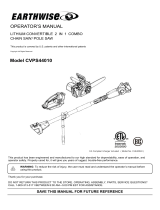
KNOW YOUR POLE SAW
Fig. 1
Oil Cap
Extension Pole
Scabbard
Read this operator's manual and safety rules before operating your pole saw. Compare the
illustration in Figure 1 to your lawn mower in order to familiarize yourself with the location of
various controls and adjustments. Save this manual for future reference.
Switch
Lock

9
UNPACKING
This product has been shipped completely assembled.
• Carefully remove the product and any accessories from the box. Make sure that all items
listed in the packing list are included.
• Inspect the product carefully to make sure no breakage or damage occurred during shipping.
• Do not discard the packing material until you have carefully inspected and satisfactorily
operated the product.
• If any parts are damaged or missing, please call 1-888-909-6757 for assistance.
PACKING LIST
• Pole saw
• Scabbard
• Owner's Manual
W A R N I N G
If any parts are damaged or missing, do not operate this product until the parts are replaced.
Failure to heed this warning could result in serious personal injury.
W A R N I N G
Do not attempt to modify this product or create accessories not recommended for use with this
product. Any such alteration or modication is misuse and could result in a hazardous condition
leading to possible serious personal injury.
W A R N I N G
Do not t on the battery until assembly is complete. Failure to comply could result in accidental
starting and possible serious personal injury.
ASSEMBLY INSTRUCTIONS

10
W A R N I N G
Do not allow familiarity with this product to make you careless. Remember that a careless
W A R N I N G
Always wear safety goggles or safety glasses with side shields when operating power tools. Failure
to do so could result in objects being thrown into your eyes, resulting in possible serious injury.
W A R N I N G
Do not use any attachments or accessories not recommended by the manufacturer of this product.
The use of attachments or accessories not recommended can result in serious personal injury.
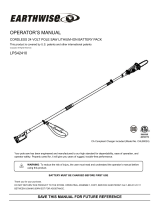
CONNECTING THE POLES (See Figure 2)
Before using the pole saw, assembly is required. When removed from the box, there are the
three poles as shown above.
• Remove packaging material from cord and discard.
• Insert the intermediate pole into the handle pole and slide together. The tubes are egg-shaped
and will only install one way.
• Lower the collar on the intermediate pole to the threaded base on the handle pole and rotate
clockwi
se to secure.
• Repeat this process to attach the intermediate pole to the powerhead pole.
W A R N I N G
Failure to lock powerhead pole as directed above could result in serious injury or death.
ASSEMBLY INSTRUCTIONS
Fig. 2
Handle Pole
Collar
Collar
Intermediate Pole
Powerhead Pole
Threaded Base
Threaded Base

11
OPERATING YOUR POLE SAW
W A R N I N G
Do not allow familiarity with this product to make you careless. Remember that a careless
fraction of a second is sufcient to inict serious injury.
W A R N I N G
Do not use any attachments or accessories not recommended by the manufacturer of this product.
The use of attachments or accessories not recommended can result in serious personal injury.
W A R N I N G
Always wear safety goggles or safety glasses with side shields when operating power tools. Failure
to do so could result in objects being thrown into your eyes, resulting in possible serious injury.
APPLICATIONS
You may use this product for the purposes listed below:
• Limbing
• Pruning

12
ADDING BAR AND CHAIN LUBRICANT (See Figure 3)
Use GREENWORKS Bar and Chain Lubricant. It is designed for chains and chain oilers, and is
formulated to perform over a wide temperature range with no dilution required.
NOTE: Pole saw comes from the factory with no bar and chain oil added. Level should also be checked after
• Remove oil cap.
• Carefully pour the bar and chain oil into the tank.
• Wipe off excess oil.
•
• Repeat as needed.
NOTE: Do not use dirty, used or otherwise contaminated oils. Damage may occur to the bar or chain.
NOTE: It is normal for oil to seep from the saw when not in use. To prevent seepage, empty the oil tank after
each use then run for one minute. When storing the unit for a long period of time (three months or longer) be
sure the chain is lightly lubricated; this will prevent rust on the chain and bar sprocket.
I M P O R T A N T
To preserve natural resources, please recycle or dispose of oil properly. Consult your local waste
authority for information regarding available recycling and/disposal options.
OPERATING YOUR POLE SAW
Fig. 3
Quick View
Oil Indicator
Oil Reser-
voir Cap
N
I
A
H
C
T
N
A
C
I
R
B
U
L

13
BATTERY PACK (See Figure 4)
I M P O R T A N T
The battery pack is not charged when it is purchased. Before using the pole saw for the rst
time, place the battery pack in the battery charger and charge it fully. Be sure to read all safety
precautions, and follow the instructions in the section entitled Charging Procedure. With regular
use, the battery will require shorter charging times. When storing the pole saw for a prolonged
period of time, remove the battery. When the pole saw is going to be used again, charge the
battery pack for at least a full charging period. This product has no memory effect.
REMOVING THE BATTERY PACK
• Press the latch button (1) on the battery pack down and hold.
• Grasp the pole saw (2) rmly, and pull the battery pack out of the handle.
Note: The battery pack ts into the handle snugly in order to prevent accidental dislodging. It may require a
strong pull to remove it.
OPERATING YOUR POLE SAW

14
INSTALLING THE BATTERY PACK
• Align the tongue (3) of the battery pack with the cavity.
•
• Push the battery pack into the handle until the latch locks into place.
• Do not use force when inserting the battery pack. It should slide into position and “click”.
W A R N I N G
• Replace the battery pack or the charger immediately if the battery case or charger cord is
damaged.
• Verify that the switch is in the OFF position before inserting or removing the battery pack.
• Verify that the battery pack is removed and the switch is in the OFF position before inspecting,
adjusting, or performing maintenance on any part of the pole saw.
• Read, understand, and follow the instructions contained in the section entitled Charging
Procedure.
I M P O R T A N T
This Lithium-ion battery pack is equipped with an internal circuit breaker which will automatically
shut off the power to the tool and then reset itself once cooled.
Follow these steps if an overload occurs while under heavy use:
1. Release the power switch and restart tool by depressing switch.
2. The battery may need to be removed for approximately 1 minute, allowed to cool and then
reinstalled for use.
Fig. 4
1
3
2
OPERATING YOUR POLE SAW

STARTING AND STOPPING (See Figure 5)
TO START THE MOTOR:
• Fit the battery pack into the pole saw.
• Press and hold the switch lock. This makes the switch trigger operational.
• Press and hold the switch trigger, release the switch lock and continue to squeeze the switch
trigger for continued operation.
TO STOP THE MOTOR:
• Release the switch trigger.
Fig. 5
15
Switch Lock
Switch Trigger
OPERATING YOUR POLE SAW

16
ADJUSTING TELESCOPING POLE (See Figure 6)
• Remove the battery pack from the pole saw.
• Rotate the collar counterclockwise to loosen.
• Push poles towards each other to shorten the pole or pull away from each other to lengthen
the pole.
NOTE: Extend the pole only to the length required to reach the limb being cut. Do not extend the handle
above waist height.
• When the desired length is achieved, rotate the collar clockwise to secure.
NOTE: Adjust hand placement on the shaft of the pole saw to keep proper balance. Do not attempt to use the
pole saw at a length which does not allow you to achieve proper footing and balance at all times.
ASSEMBLING THE POLES (See Figure 6)
• Remove the battery pack from the pole saw.
• Insert handle pole into intermediate pole or powerhead pole rmly.
• Turn the collar clockwise to lock the poles together.
NOTE: Assemble poles only to the length required to reach the limb being cut. Do not extend the handle
above waist height.
NOTE: Adjust hand placement on the shaft of the pole saw to keep proper balance. Do not attempt to use the
pole saw at a length which does not allow you to achieve proper footing and balance at all times.
Fig. 6
OPERATING YOUR POLE SAW
Collar

17
MAINTENANCE
W A R N I N G
When servicing, use only identical replacement parts. Use of any other parts may create a
hazard or cause product damage.
W A R N I N G
Always wear safety goggles or safety glasses with side shields during power tool operation or
when blowing dust. If operation is dusty, also wear a dust mask.
W A R N I N G
Before inspecting, cleaning or servicing the unit, stop the motor, wait for all moving parts to
stop, and remove the battery. Failure to follow these instructions can result in serious personal
injury or property damage.
GENERAL MAINTENANCE
Avoid using solvents when cleaning plastic parts. Most plastics are susceptible to damage from
various types of commercial solvents and may be damaged by their use. Use clean cloths to
remove dirt, dust, oil, grease, etc.
W A R N I N G
Do not at any time let brake uids, gasoline, petroleum-based products, penetrating oils, etc.,
come in contact with plastic parts. Chemicals can damage, weaken, or destroy plastic, which
may result in serious personal injury.
All pole saw service, other than the items listed in the instruction manual maintenance
instructions, should be performed by competent pole saw service personnel. (For example, if
improper tool is used to hold the ywheel in order to remove the clutch, structural damage to the
ywheel could occur and subsequently could cause the ywheel to burst).

18
MAINTENANCE
CHAIN TENSION
(See Figure 14-19)
W A R N I N G
To avoid possible serious injury, never touch or adjust the chain while the motor is running. The
saw chain is very sharp; always wear protective gloves when performing maintenance to the chain.
• Stop the motor and disconnect from power supply before setting the chain tension. Make
sure the guide bar nut is loose enough to nger tighten, turn the chain tensioning screw (see
gure 18) clockwise to tension the chain. Refer to Replacing the Bar and chain for additional
information.
NOTE: A cold chain is correctly tensioned when there is no slack on the underside of the guide bar, the chain
is snug, but it can be turned by hand without binding.
• Chain must be retensioned whenever the ats on the drive links hang out of the bar groove as
shown in Fig. 14.
• During normal operation, the temperature of the chain will increase. The drive links of a
correctly tensioned warm chain will hang approximately 1/16" (1.3 mm) out of the bar groove,
as shown in Fig. 15.
NOTE: New chain tends to stretch; check chain tension frequently and tension as required.
C A U T I O N
Chain tensioned while warm, may be too tight upon cooling. Check the “cold tension” before next
use.
Fig. 15
Fig. 14
FLATS
APPROX 1/16" (1.3 mm)

19
MAINTENANCE
REPLACING THE BAR AND CHAIN
(See Figure 16-19)
W A R N I N G
To avoid possible serious injury, stop the motor and remove the battery from the pole saw
before replacing the bar, chain, or performing any maintenance operation.
• Remove the lock bolt and drivecase cover.
• The bar contains a bar stud slot that fits over the bar stud. The bar also contains a chain
•
pin hole.
• Fit the chain over the sprocket and into the bar groove. The cutters on the top of the bar
should face toward the bar tip, in the direction of the chain rotation.
•
bar must be free to move for tension adjustment.
• Remove all slack from chain by turning the chain tensioning screw clockwise, assuring that
the chain seats into the bar groove during tensioning.
• Lift the tip of the bar up to check for sag. Release the tip of the bar, and turn the chain
tensioning screw 1/2 turn clockwise.
• Repeat this process until sag does not exist.
• Hold the tip of the bar up and tighten the lock bolt securely.
• Chain is co
rrectly
tensioned when there is no slack on the underside of the bar, the chain is
s
n
u
g
, b
u
t i
t c
an be turned by hand without binding.
NOTE: If chain is too tight, it will not rotate. Loosen the bar nut slightly and turn adjusting screw 1/4 turn coun-
terclockwise. Lift the tip of the bar up and retighten lock bolt.
Fig. 16
Fig. 17
Fig. 19
Fig. 18
Drivecase
Cover
Chain
Tensioning Pin
Bar Stud
Bar Stud Slot
Lock Bolt
Chain
Tensioning
Pin Hole
Sprocket
Lock Bolt
Chain Rotation
Sprocket
Chain
BAR
Chain Tensioning
Screw
Drivecase
Cover
Chain
Bar
Lock
Bolt

20
MAINTENANCE
CHAIN OILER
(See Figure 20)
W A R N I N G
To avoid possible serious injury, stop the motor and remove the battery from the pole saw
before replacing the bar, chain, or performing any maintenance operation.
• Use Premium Bar and Chain Lubricant. It is designed for chains and chain oilers and is
formulated to perform over a wide temperature range with no dilution required.
• Remove the cap and carefully pour approximately 2 oz (57 g) of bar and chain lubricant into
the bar lube re
servoir.
• Replace th
e cap and tighten securely.
•
NOTE: Do not use dirty, used, or otherwise contaminated lubricants. Damage may occur to the oil pump, bar,
or chain.
the foam.
Fig. 20
Remove
Cap
Bar Lube Reservoir
/