ICF-M780SL [GB/ES]
4-527-232-
13
(1)
ICF-M780SL
©2014 Sony Corporation Printed in China
FM/SW/MW/LW
PLL SYNTHESIZED RADIO
Operating Instructions GB
Manual de instrucciones ES
For customers in Europe
Register now for free updates at :
www.sony-europe.com/myproducts
4-527-232-13(1)
2
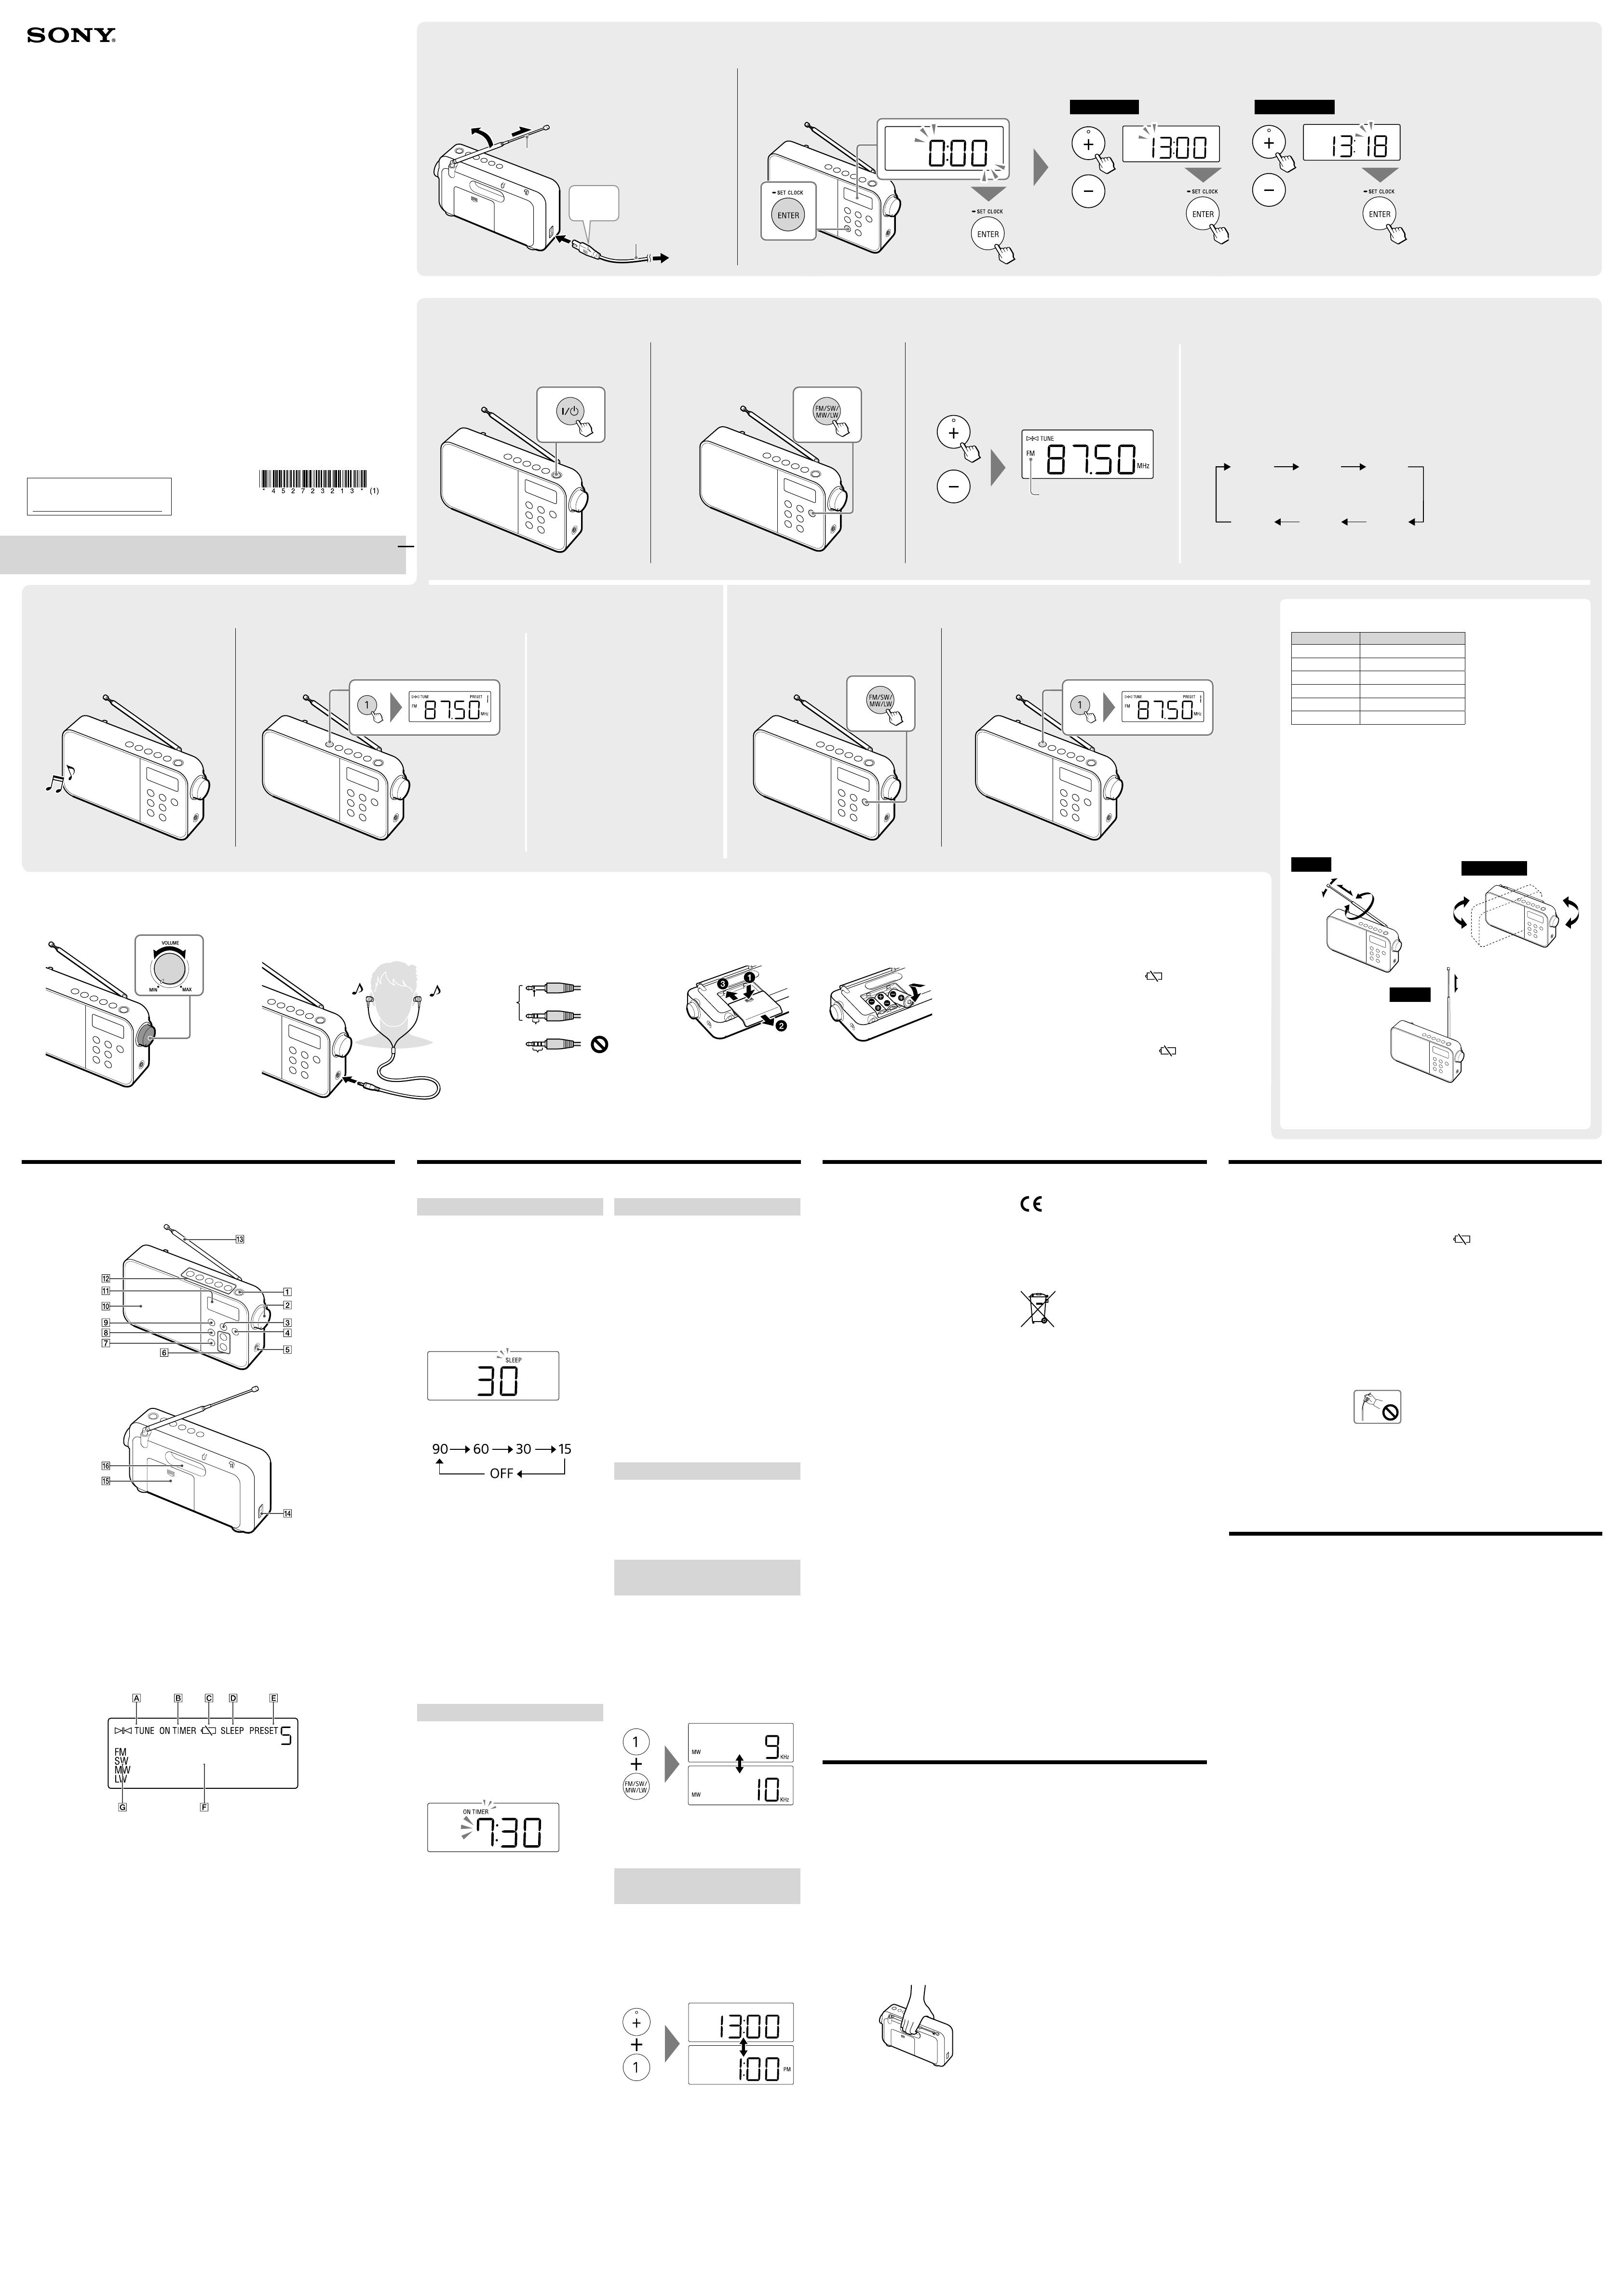
Set the clock.
1
Connect the radio to a wall outlet.
Getting Started
“0:00” will flash on the display when the batteries are installed or
the AC power cord is plugged in for the first time.
Press and hold
SET CLOCK
until the hour
indication
starts flashing.
Minute setting
Press + or to set the
minutes, and then press
ENTER.
Hour setting
Press + or to set the
hour, and then press
ENTER.
3
Tune to the station you want.
Listening to the Radio
1
Turn on the radio.
2
Select the band (FM, SW, MW or LW).
Repeatedly pressing the
button switches the
band.
1
Tune to the station you want.
Follow steps 1 to 3 in “Listening to the Radio”
above.
1
Select the band (FM, SW, MW or LW).
2
Press and hold the desired preset button (1 – 5) until
you hear a beep and the preset number appears on the
display.
2
Press the desired preset button (1 – 5).
To change the preset station
1 Tune to a new station.
2 Press and hold the preset button
you want to change.
The preset station on the selected
button will be replaced by the new one.
Presetting stations
Preset favourite stations to the 5 preset buttons. You can preset up to 5 stations each for
FM, SW, MW and LW bands.
Listening to a preset station
About the meter bands
Meter band Frequency range (kHz)
49 mb
5,800 6,250
41 mb
7,100 7,550
31 mb
9,300 10,000
25 mb
11,500 12,220
22 mb
13,500 13,900
19 mb
15,000 15,900
Note
Automatic tuning mode will only be available within the range of the current
meter band. When in outside of the range, the tuning mode changes to manual
tuning mode.
Improving radio reception
When radio receptions are poor, receptions will be improved by reorienting
or adjusting the length of the antenna (FM and SW), or reorienting the unit
itself (MW/LW).
Extend the
telescopic
antenna and
adjust the length
and the angle for
good reception.
For FM
For MW/LW
Reorient the unit itself to find
good reception. (A ferrite bar
antenna is built into the unit.)
Extend the telescopic
antenna vertically.
For SW
As the SW frequencies are
assigned to the meter
bands as shown in the
table, you can make a
quick search for a desired
frequency by changing the
corresponding meter band.
To adjust the volume To listen through headphones
Connect headphones that have a stereo or
monaural mini plug (not supplied).
You will hear monaural sound through the
headphones.
To use the radio on batteries
To (headphones)
Press down on the battery
compartment cover at
and slide it in the direction
of the arrow .
Insert the side of the
battery first.
Three LR14 (size C) batteries (not
supplied)
To close the cover, slide it in the direction of the arrow until it
clicks into place.
Guide to parts and controls
Unit
The serial number is
located on the
nameplate on the
bottom exterior of
the unit.
/ (power) button
VOLUME control*
SW BAND button
FM/SW/MW/LW button
(headphones) jack
+, buttons*
ENTER/SET CLOCK button (holding
down the button enters the clock
setting mode.)
ON TIMER/SET TIMER button (holding
down the button enters the timer
setting mode.)
SLEEP button
Speaker
Display
Preset buttons*
Telescopic antenna
AC IN jack
Battery compartment cover
Carrying handle
* The “MAX” position of VOLUME control, the
+button and the preset button numbered 3 has a
tactile dot. Use the tactile dot as a reference when
operating the radio.
Display
Lights up when a station is tuned in.
Lights up when the on timer is turned
on, or when the unit is in the on timer
setting mode.
Lights up or flashes when the battery
power is low. Replace all the batteries
with new ones when this indicator
starts flashing.
Lights up when the sleep timer is
turned on, or when the unit is in the
sleep timer setting mode.
Lights up when presetting the stations to
the preset buttons, or when selecting a
preset station.
Frequency/time/message display area
Indicates the currently selected band.
Convenient functions
Sleep Timer
The radio automatically turns off after a set time
has elapsed.
1 Press SLEEP.
The “SLEEP” indicator starts flashing and the
default setting (“90”) appears on the display.
If you press SLEEP while the radio is off, the
radio turns on automatically.
2 Press SLEEP repeatedly to select the
desired setting while the “SLEEP”
indicator is flashing.
Each time you press the button, the duration
(in minutes) changes on the display as follows:
OFF
90 60 30 15
3 Press ENTER.
The selected setting is confirmed and the
“SLEEP” indicator stops flashing.
Tips
• If you do not press ENTER within about 3 seconds,
the currently selected setting is confirmed
automatically.
• You can check the time left until the radio turns
off by pressing SLEEP again after setting the sleep
timer.
To cancel the sleep timer
You can cancel the sleep timer using either
method below:
• Set the sleep timer to “OFF.”
• Turn off the radio once, and then turn it on again.
To change the sleep timer setting
Press SLEEP repeatedly to select other settings.
On Timer
The radio automatically turns on at a preset time.
When using the on timer, make sure to tune to
the station you want to listen beforehand.
1 Press and hold ON TIMER.
The “ON TIMER” indicator and the hour
indication start flashing on the display.
2 Press + or to set the hour for the
radio to be turned on, and then press
ENTER.
The minute indication flashes on the display.
3 Press + or to set the minutes, and
then press ENTER.
The “ON TIMER” indicator stops flashing and
the on timer function is activated.
If the radio is turned on, press / and turn off
the radio.
Notes
• The on timer setting mode will be cancelled after
65 seconds if there is no operation.
• When the on timer function turns the radio on, the
sleep timer is automatically activated and the
radio goes off after 90 minutes. Until the radio will
go off, the display shows both the on timer and
sleep timer indicators.
To deactivate the on timer
Press ON TIMER (the “ON TIMER” indicator
disappears).
Repeatedly pressing the button allows you to
activate or deactivate the on timer.
Once you set and activate the on timer, the radio
turns on at the preset time everyday.
Scan Tuning
1
Press FM/SW/MW/LW to select the
band, then press and hold + or .
The unit starts scanning stations in the
frequency of the band.
2 Press ENTER to stop scan tuning when
the desired station is received.
When scan tuning begins, the unit
automatically starts scanning from the
previously received frequency and pauses for
3 seconds when a station is received, then the
scanning continues. Listen to the 3-second
radio previews and press ENTER when you
encounter the desired station.
Note
For the SW band, if scanning starts from a frequency
inside the range of a meter band, scanning is
performed only within the current meter band. If
scanning starts from a frequency outside the range
of a meter band and reaches the following meter
band, scanning will continue within that meter
band.
About Backlight
The backlight will turn off if no operation is
performed for 15 seconds to minimize power
consumption.
Tip
The backlight will stay on when performing scan
tuning.
To change the MW tuning
interval
1
Press / to turn off the radio.
2 Press and hold the preset button 1 and
FM/SW/MW/LW at the same time until
you hear a beep.
Each time you press and hold the buttons, the
MW tuning interval changes cyclically.
Changing the tuning interval erases all the MW
preset stations stored in the unit. Reset your
preset stations after changing the tuning
interval.
Note
The MW tuning interval can be changed only when
the radio is turned off. Be sure to turn off the radio
beforehand.
To change the clock display
mode
1
Press / to turn off the radio.
2 Press and hold + and the preset button
1 until the clock display mode is
changed.
Each time you press and hold the buttons, the
clock display mode changes from the 24-hour
system to the 12-hour system (or vice versa).
Note
The clock display mode can be changed only
when the radio is turned off. Be sure to turn off
the radio beforehand.
WARNING
As the main plug is used to disconnect the unit
from the mains, connect the unit to an easily
accessible AC outlet. Should you notice an
abnormality in the unit, disconnect the main plug
from the AC outlet immediately.
Do not install the appliance in a confined space,
such as a bookcase or built-in cabinet.
To reduce the risk of fire, do not cover the
ventilation of the apparatus with newspapers,
tablecloths, curtains, etc. And do not place lighted
candles on the apparatus.
To reduce the risk of fire or electric shock, do not
expose this apparatus to dripping or splashing, and
do not place objects filled with liquids, such as
vases, on the apparatus.
The unit is not disconnected from the AC power
source (mains) as long as it is connected to the wall
outlet, even if the unit itself has been turned off.
The nameplate and important information
concerning safety are located on the bottom
exterior.
Excessive sound pressure from earphones and
headphones can cause hearing loss.
Batteries or batteries installed apparatus shall not
be exposed to excessive heat such as sunshine, fire
or the like.
In case of battery leakage
If battery fluid has leaked, do not touch the fluid
with your bare hands.
Battery fluid may remain inside the unit. Consult
your nearest Sony dealer.
If battery fluid gets into your eyes, do not rub your
eyes, as blindness may occur. Quickly wash your
eyes with plenty of clean water and immediately
seek medical attention.
If battery fluid gets onto your body or clothing,
burns or injury may occur. Quickly wash off with
clean water, and seek medical attention if skin
inflammation or injuries occur.
Notice for customers: the following
information is only applicable to equipment
sold in countries applying EU directives
This product has been manufactured by or on
behalf of Sony Corporation, 1-7-1 Konan Minato-ku
Tokyo, 108-0075 Japan. Inquiries related to product
compliance based on European Union legislation
shall be addressed to the authorized representative,
Sony Belgium, bijkantoor van Sony Europe Limited,
Da Vincilaan 7-D1, 1935 Zaventem, Belgium. For any
service or guarantee matters, please refer to the
addresses provided in the separate service or
guarantee documents.
The validity of the CE marking is restricted to only
those countries where it is legally enforced, mainly
in the countries EEA (European Economic Area).
Disposal of waste batteries and electrical and
electronic equipment (applicable in the
European Union and other European countries
with separate collection systems)
This symbol on the product, the battery
or on the packaging indicates that the
product and the battery shall not be
treated as household waste. On certain
batteries this symbol might be used in
combination with a chemical symbol.
The chemical symbols for mercury (Hg) or lead (Pb)
are added if the battery contains more than
0.0005% mercury or 0.004% lead. By ensuring these
products and batteries are disposed of correctly, you
will help prevent potentially negative consequences
for the environment and human health which could
otherwise be caused by inappropriate waste
handling. The recycling of the materials will help to
conserve natural resources.
In case of products that for safety, performance or
data integrity reasons require a permanent
connection with an incorporated battery, this
battery should be replaced by qualified service staff
only. To ensure that the battery and the electrical
and electronic equipment will be treated properly,
hand over these products at end-of-life to the
applicable collection point for the recycling of
electrical and electronic equipment. For all other
batteries, please view the section on how to remove
the battery from the product safely. Hand the
battery over to the applicable collection point for
the recycling of waste batteries. For more detailed
information about recycling of this product or
battery, please contact your local Civic Office, your
household waste disposal service or the shop where
you purchased the product or battery.
The following frequency 1,606.5kHz 1,610kHz
range is not allocated to sound broadcasting in the
European Common Allocations table and cannot be
used in Europe.
Precautions
• Operate the unit only on the power sources
specified in “Specifications.” For battery operation,
use three LR14 (size C) alkaline batteries. For AC
operation, use the supplied AC power cord; do not
use any other cord.
• Unplug the unit from the wall outlet when it will
not be used for an extended period of time.
• When operating the unit on batteries, it is
recommended that you remove the AC power
cord from the wall outlet.
• Use the unit within a temperature range of 0°C to
40°C. If it is used in temperatures higher than this
range, the display may gradually turn black. If it is
used in temperatures lower than this range, the
display may change very slowly. (These
irregularities will disappear and there will be no
damage to the unit when the unit is used in the
recommended temperature range again.)
• When carrying the radio, grasp the handle at the
rear of the unit to prevent the radio from falling.
• Avoid exposure to temperature extremes, direct
sunlight, moisture, sand, dust or mechanical
shock. Never leave in a car parked in the sun.
• Should any solid object or liquid fall into the unit,
disconnect the AC power cord and remove the
batteries, and have the unit checked by a qualified
personnel before operating it any further.
• Since a strong magnet is used for the speakers,
keep personal credit cards using magnetic coding
or spring-wound watches away from the unit to
prevent possible damage from the magnetism.
• To clean the casing, use a soft dry cloth. Do not
use any type of solvent, such as alcohol or
benzine, which may damage the finish.
• Do not operate the unit with wet hands since
doing so may cause a short circuit.
• When carrying the unit, grasp the handle at the
rear of the unit to prevent the unit from dropping.
If you have any questions or problems concerning
your unit, please consult your nearest Sony
dealer.
Troubleshooting
Should any problems persist after you have
made the following checks, consult your
nearest Sony dealer.
Display is dim, or no indication is displayed.
• The radio is being used in extremely high or low
temperatures or in a place with excessive
moisture.
Very weak or interrupted sound, or
unsatisfactory reception.
• If you are in a building, listen near a window.
• Try improving radio receptions using the
following procedures.
FM: Extend the telescopic antenna and adjust
the length and the angle for best reception.
SW: Extend the telescopic antenna vertically.
MW/LW: An MW/LW antenna is built in the unit.
Reorient the unit itself for best reception.
When adjusting for FM or SW
reception, adjust the direction
of the antenna by holding it at
the bottom. The antenna can be
damaged if you move the
antenna with excessive force.
• Replace all the batteries with new ones if they
are exhausted.
There is noise in the speaker output.
• If a mobile phone is placed close to the radio, a
loud noise may be heard from the radio. Keep
the phone away from the radio.
Batteries become exhausted very quickly.
• Be sure to turn off the radio when not using it.
See “Battery life” under “Specifications” for
details about the estimated battery life.
• When “
” starts flashing, replace all the
batteries with new ones.
A desired station cannot be received when a
preset button is pressed.
• Make sure you have selected the desired band
(FM, SW, MW or LW) before you press the preset
button. One station for each band can be set to
each button.
• You may have held down the preset button to
which the station was preset, causing the station
to be replaced by a new one. Preset the desired
station again.
The message “Non” appears and the preset
button indicator (“PRESET” and the preset
number) lights up on the display when a
preset button is pressed.
• No station has been preset to the corresponding
button. Preset a station.
Specifications
Time display
12-hour system/24-hour system
Frequency range
FM
87.5 MHz 108 MHz (50 kHz step)
SW
5.8 MHz 15.9 MHz (5 kHz step)
MW
531 kHz 1,602 kHz (9 kHz step)
530 kHz 1,610 kHz (10 kHz step)
LW
153 kHz 279 kHz (9 kHz step)
Intermediate frequency
FM: 128 kHz
SW: 45 kHz
MW: 45 kHz
LW: 45 kHz
Speaker
Approx. 10 cm dia., 12 Ω, monaural
Audio power output
500 mW
Output
(headphones) jack (ø 3.5 mm mini jack)
Power requirements
230 V AC, 50 Hz (AC power supply)
4.5 V DC, three LR14 (size C) alkaline batteries
Battery life*
Approx. 100 hours (FM reception)
Approx. 100 hours (SW reception)
Approx. 100 hours (MW reception)
Approx. 100 hours (LW reception)
* When listening through the speaker on Sony
(LR14SG) alkaline batteries. (The actual battery life
may vary depending on the unit and operating
conditions.)
Dimensions
Approx. 253mm × 136.3mm × 61.2mm (W/H/D)
Mass
Approx. 860 g (excl. batteries)
Approx. 1,060 g (incl. batteries)
Supplied accessories
AC power cord (1)
Design and specifications are subject to change
without notice.
To change the meter band in the SW function
Press SW BAND repeatedly.
Each time you press the button, the meter band changes as
follows. Once changing the meter band, the unit receives the
lowest frequency in the selected meter band and starts tuning
from that frequency among the whole SW band.
Notes
• The clock setting mode will be cancelled
after 65 seconds if there is no operation.
• The clock setting will reset to the factory
default if you remove both the AC power
cord and batteries from the unit after
you set the clock.
49 mb
19 mb
41 mb
22 mb
31 mb
25 mb
Connect the AC power cord to the AC IN jack first, then
connect it to a wall outlet.
Currently selected band
Press + or to tune to
the desired station.
When you press and hold the button, the unit changes the
tuning mode to scan tuning mode. Scan tuning
automatically scans the stations in the frequency range of
the current band, receiving tuned signals for 3 seconds for
each station. For more details on scan tuning, see “Scan
Tuning” under “Convenient functions.”
Note
When connecting headphones to the radio, use
a headphones cable with a stereo (3-pole) or
monaural (2-pole) mini plug. Sound may not be
heard when using other types of plugs.
1 ring
2 rings
Other types of
plugs cannot be
used.
Compatible
plug types
3 or more rings
Monaural*
mini plug
Stereo mini
plug
* It is recommended that you use the monaural
headphones (ø 3.5 mm mini-plug) with this
radio. You can also use stereo headphones, but
the headphone output will be monaural.
Notes
• When the battery power drops to a certain level, the sound may
become weak or distorted, and the battery indicator (“
”) will start
flashing on the display. After that, when the batteries become fully
exhausted, the status of the indicator will change from “flashing” to
“lit-up,” and the power will go off. If this happens, replace all the
batteries with new ones.
• Be sure to turn off the radio and replace the batteries within 60
seconds. Otherwise, the settings such as for the clock, on timer and
preset stations will be initialized. Should this happen, perform the
necessary settings again. Note that the battery indicator (“
”) will
remain lit even after the batteries are replaced. The battery indicator
disappears when you turn on the radio after battery replacement.
• Remove the batteries from the unit if the unit is not to be used for an
extended period of time. When using the radio again, perform the
necessary settings, such as for the clock, on timer and preset stations.
Example: Presetting
FM 87.50 to preset
number 1.
Notes
• To prevent the preset from being
changed by mistake, do not hold the
preset button down.
• If no station has been preset to the
pressed button, “Non” appears and
the unit returns to the frequency
before the button was pushed.
Extend the telescopic
antenna when listening to
FM and SW stations.
Extending the antenna is
not necessary when
listening to MW/LW
stations.
Telescopic antenna
AC power cord (supplied)
To a wall outlet
To AC IN jack
Connect
securely.

