
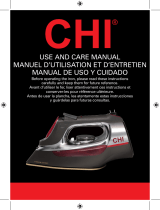
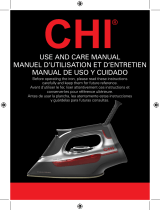
Travel Iron/Steamer
Fer à vapeur de voyage
Plancha de vapor para viaje
840195501
Le invitamos a leer cuidadosamente este
instructivo antes de usar su aparato.
READ BEFORE USE
À LIRE AVANT UTILISATION
LEA ANTES DE USAR
English ...................................................................................... 2
USA: 1-800-851-8900
Français .................................................................................. 13
Canada : 1-800-267-2826
Esp a ñ o l.................................................................................... 26
En México: 01-800-71-16-100
840195501 ENv02.qxd:840124300 ENv02.qxd 11/19/10 9:38 AM Page 1

This iron is not intended for regular use.
WARNING! Shock Hazard: This appliance has a polarized plug
(one wide blade) that reduces the risk of electric shock. The plug fits
only one way into a polarized outlet. Do not defeat the safety pur-
pose of the plug by modifying the plug in any way or by using an
adapter. If the plug does not fit, reverse the plug. If it still does not
fit, have an electrician replace the outlet.
OTHER CONSUMER SAFETY INFORMATION
Please Read Before First Use
• This appliance was initially set to operate at 120 volts. See
“To Change Voltage” section for conversion to 240 volts.
• During first use of travel iron/steamer, it may appear to smoke.
This will stop and does not indicate a defect or hazard.
• Many irons/steamers spit or sputter during the first few uses
with tap water. This happens as the steam chamber becomes
conditioned. This will stop after a few uses.
• Steam vents should be cleared before first use. Prepare travel
iron/steamer for steam ironing; then iron over an old cloth for a
few minutes while pressing the steam button.
NOTE: Power light remains ON when travel iron is plugged in, even
in OFF (O) setting.
IMPORTANT SAFEGUARDS
SAVE THESE INSTRUCTIONS!
2
3
12. If an extension cord is absolutely necessary, a cord with an
ampere rating equal to or greater than the maximum rating of
the iron shall be used. A cord rated for less amperage can result
in a risk of fire or electric shock due to overheating. Care shall
be taken to arrange the cord so that it cannot be pulled or be
tripped over.
When using a travel iron, basic precautions should always be
followed, including the following:
READ ALL INSTRUCTIONS BEFORE USING
1. Only use an iron for its intended use.
2. To avoid the risk of electric shock, do not immerse the iron in
water or other liquids.
3. Always turn the iron to OFF
(O) before plugging or unplugging
the iron from the electrical outlet. Never pull on the cord to
disconnect the iron from the electrical outlet; instead, grasp
the plug and pull on the plug to disconnect the iron.
4. Do not let the cord touch hot surfaces. Let the iron cool
completely before putting the iron away. Coil the cord loosely
around the iron when storing.
5. Always disconnect the iron from the electrical outlet before filling
the iron with water, emptying the water from the iron, and when
the iron is not in use.
6. Do not operate the iron with a damaged cord or in the event the
iron has been dropped or damaged or there are visible signs of
damage or it is leaking. To avoid the risk of electric shock, do not
disassemble the iron. Take it to a qualified serviceman for exami-
nation and repair. Incorrect assembly might result in a risk of
electric shock when the iron is used after reassembly.
7. The iron must be used and rested on a stable surface.
8. When placing the iron on its stand, ensure that the surface on
which the stand is placed is stable.
9. Close supervision is required for any appliance used by or near
children. Do not leave the iron unattended while the iron is con-
nected or on an ironing board.
10. Burns can occur from touching hot metal parts, hot water, or
steam. Use caution when you turn a steam iron upside down—
there might be hot water in the reservoir.
11. To avoid a circuit overload, do not operate an iron on the same
circuit with another high-wattage appliance.
840195501 ENv02.qxd:840124300 ENv02.qxd 11/19/10 9:38 AM Page 2

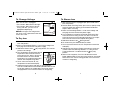
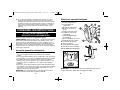
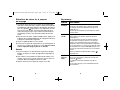
1. Power Light
2. Steam Switch
3. Steam Button
4. Water Tank Plug
5. Handle/Water Tank
6. Temperature Control Dial
7. Handle Release/Lock Button
8. Fabric Brush Attachment
9. Steam Brush Latch
10. Lint Pad
11. Steam Brush
12. Dual-Voltage Switch
13. Stainless Steel Soleplate
Storage Bag not shown.
4
Parts and Features
5
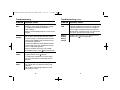
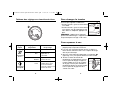
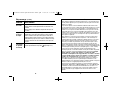
Fabric Setting Chart
Temperature
Setting
O
Synthetics •
Low
Silk, Wool ••
Medium
Cotton, Linen •••
High
Steam
Setting
Dry
Iron
Steam
Range
Ironing
Instructions
Off
Dry iron using spray
if necessary.
Iron silk on wrong side.
For cotton, iron while still
damp or use spray.
For linen, iron fabric on
wrong side.
NOTE: Power light remains ON when travel iron is plugged in,
even in OFF (O) setting.
840195501 ENv02.qxd:840124300 ENv02.qxd 11/19/10 9:38 AM Page 4

7
To Steam Iron
1. With travel iron/steamer unplugged, pull up the handle until it
locks into position.
2. Remove Water Tank Plug. Slowly pour 2 ounces (60 ml) of tap
water into water tank opening up to the MAX Fill Indicator.
Replace Water Tank Plug.
3. Make sure Dual-Voltage Switch is set to correct voltage and
then plug travel iron/steamer into power supply.
4. Turn Temperature Control Dial to desired temperature. With
travel iron/steamer resting on heel rest, allow 3 minutes for
travel iron/steamer to reach desired temperature. Do not pre-
heat travel iron/steamer with soleplate facing down.
5. Slide Steam Switch to the (Steam) position.
6. For steam burst, press Steam Button on handle.
7. To turn travel iron/steamer off, turn Temperature Control Dial
to O (OFF).
8. Unplug travel iron/steamer. Empty water from the travel iron/
steamer water tank following directions in “Caring for Your
Travel Iron/Steamer.” Set Steam Switch to (Dry Iron)
position.
9. Allow to cool completely. Press the Handle Release/Lock
Button (labeled PUSH on heel rest of iron) and push the handle
down until it locks into the storage position. Place travel iron/
steamer in storage bag.
6
To Dry Iron
1. With travel iron/steamer unplugged, pull up the handle until it
locks into position.
2. Make sure Dual-Voltage Switch is set to correct voltage and
then plug travel iron/steamer into power supply.
3. Slide Steam Switch to the (Dry Iron) position. This will also
prevent water leakage.
4. Turn Temperature Control Dial to desired
temperature. With travel iron/steamer
resting on heel rest, allow 3 minutes for
travel iron/steamer to reach desired
temperature. Do not preheat travel iron/
steamer with soleplate facing down.
5. To turn travel iron/steamer off, turn
Temperature Control Dial to O (OFF).
6. Unplug travel iron/steamer and allow to cool completely.
Press the Handle Release/Lock Button (labeled PUSH on heel
rest of iron) and push the handle down until it locks into the
storage position. Place travel iron/steamer in storage bag.
To Change Voltage
Make sure the unit is unplugged.
• For 120 volts: Slide switch to the right.
• For 240 volts: Slide switch to the left.
If using 240 volts, you must use an
appropriate adapter plug.
NOTICE: Damage to unit and garments
may occur if unit is operated at 240V with
switch set to 120V.
840195501 ENv02.qxd:840124300 ENv02.qxd 11/19/10 9:38 AM Page 6

9
To Remove Lint
1. Lint and hair may be removed from fabrics with the lint pad by
brushing the pad across fabric slowly from left to right.
2. To clean lint pad, brush on scrap fabric or towel from right to
left.
8
To Use Steam Brush
1. With travel iron/steamer unplugged, pull up the handle until it
locks into position.
2. Remove Water Tank Plug. Slowly pour 2 ounces (60 ml) of
tap water into the water tank opening up to the MAX Fill
Indicator. Replace Water Tank Plug.
3. Slide Brush Attachment over soleplate until the latch locks it
into place.
4. Make sure Dual-Voltage Switch is set to correct voltage and
then plug travel iron/steamer into power supply.
5. Turn Temperature Control Dial to desired temperature. With
travel iron/steamer resting on heel rest, allow 3 minutes for
travel iron/steamer to reach desired temperature. Do not
preheat travel iron/steamer with soleplate facing down.
6. Slide Steam Switch to the (Steam) position.
7. Clothing should be on a hanger. Pull fabric taut. Hold
steamer upright against fabric. Press Steam Button every
3 seconds for steam.
NOTE: The Steam Brush may be used as a lint remover.
If using on delicate fabric that may snag, remove Brush
Attachment by pulling straight up prior to heating travel
iron/steamer.
8. To turn travel iron/steamer off, turn Temperature Control Dial
to O (OFF).
9. Unplug travel iron/steamer. Empty water from the travel iron/
steamer reservoir following directions in “Caring for Your Travel
Iron/Steamer.” Set Steam Switch to (Dry Iron) position.
10. Allow to cool completely. Slide latch to unlock and remove
Steam Brush. Press the Handle Release/Lock Button
(labeled PUSH on heel rest of iron) and push the handle
down until it locks into the storage position. Place in
storage bag.
1. The Water Tank of your travel iron/steamer should be emptied
after each use. Turn Temperature Control Dial to O (OFF). Set
Steam Switch to (Dry Iron) position. Unplug the travel iron/
steamer and hold over a sink. Turn travel iron/steamer nose
down until water tank opening is parallel with sink. Water will
run out of water tank opening.
2. To store the travel iron/steamer after it has completely cooled,
press Handle Release/Lock Button and press down handle to
storage position.
3. Put Brush Attachment over the soleplate.
4. Place the travel iron/steamer in the storage bag and store
resting on its side. Do not store travel iron/steamer laying
flat on soleplate.
Soleplate
1. Never iron over zippers, pins, metal rivets, or snaps since
these may scratch the soleplate.
2. To clean occasional buildup on the soleplate, wipe with a
sudsy cloth. Do not use abrasive cleansers or metal scouring
pads.
3. Always store travel iron/steamer resting on its side.
Caring for Your Travel Iron/Steamer
840195501 ENv02.qxd:840124300 ENv02.qxd 11/19/10 9:38 AM Page 8

1110
Won’t
heat
PROBLEM
PROBABLE CAUSE
Water is
leaking
Won’t
steam
Leaves
spots
• Is travel iron/steamer plugged in and outlet
working? Check outlet by plugging in a lamp.
• Is Temperature Control Dial turned to a
fabric setting?
• Make sure Dual-Voltage Switch is set to correct
voltage.
• Do not overfill the water tank.
• Do not press Steam Button while dry ironing.
• If steam ironing, is Temperature Control Dial in
steam range and did travel iron/steamer have
enough time to preheat?
• Increase time between pushing Steam Button.
• If dry ironing, make sure Temperature Control
Dial is in DRY IRON position.
• Make sure Water Tank Plug is fully seated.
• Place Steam Switch in the (Dry Iron) position.
• Check water level.
• Is Steam Switch set to (Steam)?
• Is Temperature Control Dial in steam range?
• Has travel iron/steamer had enough time to
preheat?
• ALWAYS empty water tank after using. Water
left in water tank may discolor clothing and
soleplate.
• Do not press Steam Button while the travel
iron/steamer is cool.
Troubleshooting
PROBLEM
PROBABLE CAUSE
• If the travel iron/steamer cord should become
twisted, unplug travel iron/steamer and let cool.
Hold travel iron/steamer cord in the middle of
entire length. Let plug and travel iron/steamer
dangle freely until cord uncoils. This will extend
the life of your travel iron/steamer cord.
• Empty water when not in use and place Steam
Switch in the (Dry Iron) position.
Twisted
cord
Troubleshooting (cont.)
Water is
leaking
during
storage
840195501 ENv02.qxd:840124300 ENv02.qxd 11/19/10 9:38 AM Page 10

12
LIMITED WARRANTY
This warranty applies to products purchased in the U.S. and Canada. This is
the only express warranty for this product and is in lieu of any other warranty
or condition.
This product is warranted to be free from defects in material and
workmanship for a period of one (1) year from the date of original purchase.
During this period, your exclusive remedy is repair or replacement of this
product or any component found to be defective, at our option; however,
you are responsible for all costs associated with returning the product to us
and our returning a product or component under this warranty to you. If the
product or component is no longer available, we will replace with a similar
one of equal or greater value.
This warranty does not cover glass, filters, wear from normal use, use not
in conformity with the printed directions, or damage to the product resulting
from accident, alteration, abuse, or misuse. This warranty extends only to
the original consumer purchaser or gift recipient. Keep the original sales
receipt, as proof of purchase is required to make a warranty claim. This
warranty is void if the product is used for other than single-family household
use or subjected to any voltage and waveform other than as specified on
the rating label (e.g., 120V ~ 60 Hz).
We exclude all claims for special, incidental, and consequential damages
caused by breach of express or implied warranty. All liability is limited to the
amount of the purchase price. Every implied warranty, including any
statutory warranty or condition of merchantability or fitness for a
particular purpose, is disclaimed except to the extent prohibited by law,
in which case such warranty or condition is limited to the duration of
this written warranty. This warranty gives you specific legal rights. You may
have other legal rights that vary depending on where you live. Some states
or provinces do not allow limitations on implied warranties or special,
incidental, or consequential damages, so the foregoing limitations may not
apply to you.
To make a warranty claim, do not return this appliance to the store. Please
call 1.800.851.8900 in the U.S. or 1.800.267.2826 in Canada or visit
hamiltonbeach.com in the U.S. or hamiltonbeach.ca in Canada. For faster
service, locate the model, type, and series numbers on your appliance.
840195501 ENv02.qxd:840124300 ENv02.qxd 11/19/10 9:38 AM Page 12
Page is loading ...
Page is loading ...
Page is loading ...
Page is loading ...
Page is loading ...
Page is loading ...
Page is loading ...
Page is loading ...
Page is loading ...
Page is loading ...
Page is loading ...
Page is loading ...
Page is loading ...
Page is loading ...
Page is loading ...
-
 1
1
-
 2
2
-
 3
3
-
 4
4
-
 5
5
-
 6
6
-
 7
7
-
 8
8
-
 9
9
-
 10
10
-
 11
11
-
 12
12
-
 13
13
-
 14
14
-
 15
15
-
 16
16
-
 17
17
-
 18
18
-
 19
19
-
 20
20
-
 21
21
-
 22
22


Ask a question and I''ll find the answer in the document
Finding information in a document is now easier with AI
in other languages
- français: Hamilton Beach 10092 Manuel utilisateur
- español: Hamilton Beach 10092 Manual de usuario
Related papers
-
Hamilton Beach 14977Z User guide
-
Hamilton Beach QuickGlide 14353 User manual
-
-
-
-
-
-
Hamilton Beach 14290 User guide
-
Hamilton Beach 14280 Quick start guide
-
Hamilton Beach 14882 User guide
Other documents
-
Proctor Silex 17175 User guide
-
-
 CHI Steam 13106 User guide
-
-
 CHI Steam 13101 User manual
-
Proctor-Silex 17202 User manual
-
Proctor Silex 17291Y Owner's manual
-
-
-
Toastmaster WST5002ZE User manual

